Page is loading ...

Chapter
1
Planning for the
Installation of
Windows 7
TOPICS COVERED IN THIS CHAPTER
INCLUDE
Choosing a Windows 7 edition
Performing a local installation of Windows 7
Designing User State Migration
Considering virtualization
Planning and managing client licensing and activation
597095c01.indd 1 6/2/10 4:12:54 PM
COPYRIGHTED MATERIAL

One of the first steps you need to take when planning a migra-
tion to Windows 7 is choosing which edition of Windows 7 to
deploy. For an enterprise, your choice is limited to Windows 7
Professional, Windows 7 Enterprise, or Windows 7 Ultimate. To make the right choice,
you’ll need to know what features are available in each edition.
Once you identify the edition you’ll use, you need to come up with a migration plan.
Because many organizations will be upgrading existing Windows XP computers to
Windows 7, having a solid plan to migrate users’ data is very important. The User State
Migration Tool (USMT) can simplify this process for you with the use of
ScanState and
LoadState.
Although virtualization wasn’t common on end users’ desktops in the past, the new
Windows XP Mode available in Windows 7 is sure to change this for many users. It’s now
possible for end users to run applications on a Windows 7 system in a transparent virtual
instance of Windows XP.
Activation of Windows 7 can be done individually, with a Multiple Activation Key or
with a Key Management Service server. Whereas home users will always use individual
activation, you may need to use one of the other methods in larger or isolated enterprises.
Choosing a Windows 7 Edition
When planning a migration or tech refresh, a simple question to ask is what Windows 7
edition is needed. Windows 7 offers six editions, but you’ll quickly whittle down the choice
to just three for an enterprise because the first three are too basic for a work environment.
Microsoft lists this topic in some documentation as “Choosing a SKU
(Stock Keeping Unit).” An SKU is the number associated with the bar code
you see on just about any product these days.
These are the three basic editions that you won’t see in an enterprise:
Windows 7 Starter Some original equipment manufacturers (OEMs) preinstall this edi-
tion on specialized computers. It includes the fewest features, and it will not be available in
64-bit versions.
597095c01.indd 2 6/2/10 4:12:55 PM

Choosing a Windows 7 Edition
3
Windows 7 Home Basic This is available only in certain countries referred to as emerging
markets, and it includes very limited capabilities. It will not be available in the United States.
Windows 7 Home Premium Windows 7 Home Premium is designed for home users. It
includes the Windows Media Center, which can be used to record and play back TV shows
or other media. It can also easily integrate on a home network with other devices such as
Xbox gaming systems. Systems running this edition can’t join a domain.
If you’re a desktop support technician or desktop administrator working in an enter-
prise, you’ll focus on the following three editions used in work environments:
Windows 7 Professional Windows 7 Professional is intended for high-end home users and
small-business users. It can join a domain, support a remote desktop, and run applications
in a virtual environment using Windows XP Mode. It does lack some of the more advanced
features.
Windows 7 Enterprise T h e Windows 7 Enterprise edition is available only to organiza-
tions that have a Software Assurance contract with Microsoft and is purchased through a
volume license. Home users won’t have access to this, but businesses with as few as five PCs
can purchase Software Assurance.
Some key features included in this edition are BitLocker, AppLocker, and BranchCache.
Each of these will be explored in greater depth in later chapters. BitLocker (covered in
Chapter 11, “Managing Security in Windows 7”) can be used to protect data on both
internal and external drives, including USB flash drives. AppLocker (covered in Chapter 6,
“Configuring and Troubleshooting Application Issues”) can be used to prevent unauthor-
ized software from running. BranchCache (covered in Chapter 12, “Supporting Mobile
Windows 7 Users”) allows clients in remote locations to cache data used by others in the
same location.
Windows 7 Ultimate T h e Windows 7 Ultimate edition includes all of the features found
in the Enterprise edition, and home users using a single license can purchase it instead of
going through the Software Assurance program. Home users can upgrade to Windows 7
Ultimate from either Windows 7 Home Premium or Windows 7 Professional.
Windows 7 Ultimate doesn’t include any “ultimate extras” as Windows
Vista Ultimate did. These “extras” in Windows Vista were advertised to
entice some users to purchase Windows Vista Ultimate. Instead of get-
ting extras not available elsewhere, the reason to purchase Windows 7
Ultimate is to have the features found in the Enterprise edition, such as
BitLocker, AppLocker, and BranchCache.
Table 1.1 shows a comparison of many of the features included in Windows 7 Professional,
Windows 7 Enterprise, and Windows 7 Ultimate. Since there is very little difference between
Enterprise and Ultimate, they are shown in the same column. Some of the features that are
more relevant for desktop administrators working in an enterprise environment are covered
after the table.
597095c01.indd 3 6/2/10 4:12:55 PM

4
Chapter 1
Planning for the Installation of Windows 7
TABLE 1.1 Windows 7 versions and features
Feature Windows 7 Professional
Windows 7 Enterprise
and Ultimate
32-bit and 64-bit versions Yes Yes
AppLocker No Yes
Backup and Restore center Yes Yes
BitLocker Drive Encryption No Yes
BranchCache Distributed
Cache
No Yes
DirectAccess No Yes
Fast user switching Yes Yes
File and printer sharing
connections
20 20
Home Group Yes Yes
Subsystem for UNIX-based
applications
No Yes
Virtual hard disk booting No Yes
Volume licensing keys Yes Enterprise only
Windows Aero Yes Yes
Windows Media Center Yes Yes
Windows XP Mode Yes Yes
x86 vs. x64
Windows 7 comes in both 32-bit (x86) and 64-bit (x64) editions. Let me state the obvious—
you must have 64-bit hardware in order to install the 64-bit edition. It is also possible to
install the 32-bit edition on 64-bit hardware.
The biggest benefit of using a 64-bit edition over a 32-bit edition is RAM (random
access memory). With a 32-bit system, you’re limited to addressing and using no more than
4 GB of RAM. But even that is limited. Because of the way that RAM is addressed and
used in Windows operating systems, only about 3.3 GB of RAM is actually available when
4 GB is installed; the rest of the RAM is unused because of how address space is reserved.
597095c01.indd 4 6/2/10 4:12:55 PM

Choosing a Windows 7 Edition
5
However, Windows 7 Professional, Enterprise, and Ultimate all support as much as
192 GB of RAM on 64-bit systems. This gives you enough RAM to support multiple virtual
environments hosted on a single system and also to support even the most demanding
applications.
Years ago, many applications didn’t run effectively on 64-bit editions of Windows
because of various compatibility issues. However, the era of 64-bit systems has arrived.
Many programs have both 32-bit and 64-bit versions, and those that don’t have a separate
64-bit edition usually work on a 64-bit system without any problems.
AppLocker
AppLocker is a new feature in Windows 7 that can be used to control what software is
allowed to run on individual PCs using either Local Security Policy (nondomain computer)
or Group Policy in Active Directory. It can be used to restrict unauthorized software from
running on systems.
Although software restriction policies existed in previous versions of Windows, AppLocker
provides improvements that solve many of the problems with these software restriction poli-
cies. For example, a software restriction policy could be used to prevent an application from
running. However, when some applications were updated, the software restriction policy no
longer recognized the application and no longer restricted the application.
AppLocker uses a rule-based structure that an administrator can build to ensure that the
policy doesn’t need to be rewritten each time an application is updated. Group Policy and
AppLocker will be covered in greater depth in Chapter 10, “Managing Windows 7 with
Group Policy.”
BitLocker
BitLocker Drive Encryption allows you to protect entire drives by encrypting them. This
can be especially useful on disks in mobile computers when the data needs to be protected.
When BitLocker is implemented, the entire drive is encrypted. It can be configured to unlock
the drive automatically after the system verifies the drive is in the same computer or config-
ured so that users enter a passphrase to unlock access to the drive.
The BitLocker to Go feature is new to Windows 7. BitLocker to Go can be used to
encrypt and lock removable drives, including USB flash drives.
Both BitLocker and BitLocker to Go will be explored in greater depth in Chapter 11.
BranchCache
BranchCache is useful for clients in remote offices that access data over virtual private
network (VPN) links. When data is stored on a Windows Server 2008 R2 server at the
main office and BranchCache has been enabled, users in the remote office are able to store
a cached copy of the data on their local computers. This is similar to Offline Folders,
which has been available for many versions of Windows, but has a distinct difference. Data
cached on one Windows 7 computer can now be shared with other Windows 7 users.
597095c01.indd 5 6/2/10 4:12:55 PM

6
Chapter 1
Planning for the Installation of Windows 7
As an example, consider several users connected in a remote office over a very slow
56KB wide area network (WAN) link to the corporate office. Sally and Joe are users in the
remote office, and their computers are connected to each other using 100MB network inter-
face cards (NICs). Sally downloads an 8MB file from a Windows Server 2008 R2 server.
Later, Joe wants to view the file and tries to access it from the same Windows Server 2008
R2 server. BranchCache verifies that Joe has permission to access the file, recognizes that
the file is cached on Sally’s computer, and recognizes that Sally’s version is the most recent
version. BranchCache then redirects Joe’s computer to retrieve the file from Sally’s computer
instead of over the slow WAN link.
Users in remote offices can experience much greater speed when accessing commonly
used files over the WAN link. However, only Windows 7 computers can take advantage of
BranchCache. BranchCache will be explained in greater depth in Chapter 12.
Windows XP Mode
Windows XP Mode is a virtualization application that allows users to run a completely
separate instance of Windows XP within Windows 7. This can be especially useful for
applications that aren’t compatible with Windows 7 but will run in Windows XP.
Applications installed in Windows XP Mode will appear on the user’s Windows 7 Start
menu. While they appear to run on the Windows 7 desktop, they are actually running in
the virtual Windows XP Mode environment. Windows XP Mode is covered in more depth
later in this chapter, including how to install it.
Software Assurance
Windows 7 Enterprise is available only to businesses that have purchased the Software
Assurance program, so you may be interested in knowing a little about it. It’s a Microsoft
program offered to organizations that purchase licenses through a volume-licensing pro-
gram. Volume licensing allows a company to purchase licenses in bulk at a discount instead
of purchasing multiple individual copies.
Organizations that can purchase Software Assurance include businesses with as few as
five employees, government entities, schools, and campuses. It is actually purchased through
Microsoft partners, and the benefits are coordinated through Microsoft once they are acti-
vated. Benefits differ based on how many clients and licenses are purchased.
The benefits may include
Free upgrades to newer versions of the software during the licensing period
The option to spread payments over a longer period of time (as opposed to the initial
cost of purchasing all the licenses)
Training vouchers for Microsoft courses taught by Microsoft partners
Access to e-learning courses
24x7 telephone and web support
597095c01.indd 6 6/2/10 4:12:55 PM

Local Installation
7
Local Installation
It’s possible that you’ll need to install Windows 7 from the installation media at some
point. You’ll learn about Lite Touch Installation (LTI) and Zero Touch Installation (ZTI)
in Chapter 2, “Automating the Deployment of Windows 7,” but you may occasionally need
to do a “heavy touch” installation. No, there’s no acronym for heavy touch installation,
mostly because you don’t want to be doing it that often.
Installing one or two systems manually is no big deal, but if you have to install 5, 50, or
more, you’ll want to automate the process. For the most part, the installation of Windows
7 is straightforward with few surprises. The biggest challenge may come if you have to
change partitions on the hard disk or add additional disk drivers.
Exercise 1.1 will walk you through the steps needed to install Windows 7 from the
installation DVD.
EXERCISE 1.1
Installing Windows 7 from the Installation DVD
1. Place the Windows 7 installation DVD in the DVD drive and boot the system. After a
moment, the Install Windows screen will appear, as shown in the following graphic.
Although it looks like you have minimal choices here, you can press Shift+F10 to
access the command line from this menu. In the “Creating a Bootable VHD” exercise
later in this chapter, you’ll access the command line to create and configure a VHD file.
597095c01.indd 7 6/2/10 4:12:55 PM

8
Chapter 1
Planning for the Installation of Windows 7
2. Select the appropriate Language To Install, Time And Currency Format, and Keyboard
Or Input Method, and click Next.
3. Click Install Now.
4. Review the license terms, and select I Accept The License Terms. Click Next.
5. Select Custom (Advanced) to install a new copy of Windows. If an existing version
exists that can be upgraded to Windows 7, you can select Upgrade.
6. Select the partition where you want to install Windows.
Notice that you can create additional partitions from this screen. However, if you
start with anything other than a single precreated partition, Windows will create
a partition labeled System Reserved of about 100 MB, as shown in the following
graphic. This partition includes the Windows Recovery Environment (WinRE) and
ensures that all Windows features can work correctly. Also, once it’s created, you
can’t get rid of the partition without reinstalling the OS.
If you don’t want this partition added, you must format the entire drive as a single
partition before starting the installation. You can do so by accessing the command
prompt by pressing Alt+F10 at the Install Now page and using DiskPart. You can later
shrink the volume to create additional partitions.
Notice that you can also delete, extend, and format partitions from this page. You can
also load a driver from this page if your hard drive isn’t recognized. Beware though—
if you repartition the drive, you’ll lose access to data that would normally be stored
EXERCISE 1.1 (continued)
597095c01.indd 8 6/2/10 4:12:56 PM

Local Installation
9
in the Windows.old folder after the installation. Once you have selected the partition,
click Next.
7. The installation will take several minutes to complete, but it will be automated from
this point.
8. When the installation completes and reboots, you will be prompted to type a user
name, as shown in the following graphic. As you enter the user name, the computer
name will be created by appending the user name with -PC. You can accept this com-
puter name or type in a different computer name. Click Next once you’re satisfied
with the user name and computer name.
9. The Set A Password For Your Account page screen prompt will appear. This password
is for the account you created in the previous step. You need to type in a password, retype
the same password for confirmation, and type a password hint. Once you’ve entered
this information, click Next.
10. Enter the product key for your edition of Windows on the Type Your Windows Prod-
uct Key screen. The check box Automatically Activate Windows When I’m Online is
checked by default. Leave it checked and click Next.
11. You’ll be prompted to configure the computer for automatic updates. The Use
Recommended Settings selection will automate the download and installation of
updates, but you can choose Only Install Important Updates or set it to ask you later.
Select one of the choices.
EXERCISE 1.1 (continued)
597095c01.indd 9 6/2/10 4:12:56 PM

10
Chapter 1
Planning for the Installation of Windows 7
12. Choose your time zone on the time zone and clock screen. Make sure the time and
date are accurate, and click Next.
13. Select Work Network as the computer’s current location.
14. The Windows 7 desktop will appear. The installation is complete.
Designing User State Migration
The majority of Microsoft installed clients are Windows XP. Thus, if you’re considering
adding Windows 7, you probably have many Windows XP clients. Unfortunately, there isn’t
a direct upgrade path from Windows XP to Windows 7.
If you can do a direct upgrade, you won’t need to worry about migration.
An upgrade will retain all of the installed applications and all of the user’s
data. An upgrade is still considered a risky operation, and it’s possible that
things can go wrong, so you should always have a backup of the user’s
data in case the worst happens.
If you’ve looked at the upgrade paths from earlier versions of Windows to Windows 7,
you may have been a little surprised. There are very few upgrade choices. Some of the pos-
sible upgrade paths to versions likely to be used in the Enterprise are
Vista Business to Windows 7 Professional, Enterprise, and Ultimate
Vista Enterprise to Windows 7 Enterprise
Vista Ultimate to Windows 7 Ultimate
If you’re migrating other existing Windows clients, you probably won’t be able to do an
upgrade. This doesn’t have to be as painful as it sounds. The User State Migration Toolkit
has undergone significant changes and improvements and will make your job a lot easier.
USMT can be used in three types of migrations. Each one assumes that you have files
and settings from a Windows XP, Windows Vista, or Windows 7 installation that you want
to restore to a new installation of Windows 7.
In-place migration An in-place migration uses the same hardware for the old and new
installations of Windows. Hard drive partitions are not modified, and files and settings
from the previous installation are automatically retained in the
Windows.old folder.
EXERCISE 1.1 (continued)
597095c01.indd 10 6/2/10 4:12:56 PM

Designing User State Migration
11
Wipe-and-load migration A wipe-and-load migration uses the same hardware. However,
partitions on the hard drive holding the original operating system need to be modified,
which will prevent the
Windows.old folder from being created during the new installation.
Instead, you must use USMT before the installation to save the files and settings to a migra-
tion store from the previous installation. This migration store can then be restored to the
new installation of Windows 7.
Side-by-side migration A side-by-side migration uses two computers. You can use USMT
to save the files and settings to a migration store from the original computer before it’s
decommissioned. You can then use USMT to restore the migration store to Windows 7 on
the new computer.
In this section, you’ll learn where to get the USMT, how to install it, and how to use it in
each of the different types of migration.
User State Migration Toolkit
If you used the User State Migration Toolkit (USMT) from previous operating systems, you
may not have been overjoyed by the performance. I know I wasn’t. However, you’ll find
significant improvements in the USMT on Windows 7. In addition, the time required to
perform a migration has been substantially reduced.
The User State Migration Toolkit is a part of the Windows Automated Installation Kit
(AIK) for Windows 7. Older versions of the AIK exist, so you need to ensure you have the
version specifically designed for Windows 7.
You can use the USMT to migrate data from Windows XP, Windows Vista, or
Windows 7. It supports the following migration paths:
Windows XP to Windows Vista
Windows XP to Windows 7
Windows Vista to Windows 7
Windows 7 32-bit to Windows 7 64-bit
The Windows AIK is available as a free download from Microsoft’s download site
(
www.microsoft.com/downloads) by searching for “Windows Automated Installation Kit
(AIK) for Windows 7.” This download is an
.iso file, so you’ll need to burn it to a DVD.
Burning a CD or a DVD from an .iso file is built into Windows 7. Place the
disk in the drive and then use Windows Explorer to browse to the
.iso file.
Right-click the file and select Burn Disc Image. Windows 7 will do the rest.
Once you download the Windows AIK for Windows 7 and burn the image to a DVD,
insert the DVD into your computer’s drive. You can then follow the steps in Exercise 1.2 to
install the Windows AIK, which includes the USMT.
597095c01.indd 11 6/2/10 4:12:56 PM

12
Chapter 1
Planning for the Installation of Windows 7
EXERCISE 1.2
Installing Windows AIK Including the USMT
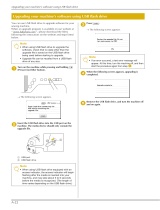
1. If prompted after inserting the DVD, select Run The StartCD.exe. If not prompted,
browse to the
StartCD.exe file using Windows Explorer and double-click it to start
Windows AIK. The installation screen appears, as shown in the following graphic.
2. Select the Windows AIK Setup link on the left.
3. On the Welcome screen, click Next.
4. Review the license agreement, select I Agree, and click Next.
5. Accept the default installation folder of C:\Program Files\Windows AIK and the
choice Install This For Everyone. Click Next.
6. On the Confirm Installation screen, click Next.
7. When the installation completes, click Close.
8. The Microsoft Windows AIK folder is available in the All Programs menu.
Once the Windows AIK is installed, you’ll have several program links on the Start menu
within the Microsoft Windows AIK Start menu folder. These include
Deployment Tools Command Prompt This launches a command prompt at the
C:\
Program Files\Windows AIK\Tools\PETools
folder, which gives you access to many of the
files used when creating a Windows Preinstallation Environment (Windows PE or WinPE).
597095c01.indd 12 6/2/10 4:12:56 PM

Designing User State Migration
13
Windows System Image Manager This is used to create an unattend.txt text file that can
be used to automate an installation and to open images.
Documentation This provides links to several help files including the Unattended
Windows Setup Reference, the Windows Automated Installation Kit, and the Windows PE
User’s Guide. Not all help files are available here. Notably for this chapter, the help file for
the USMT isn’t accessible here even though it was installed. The USMT help file is available
in the
C:\Program Files\Windows AIK\Docs\CHMs folder and is named WAIK.chm.
VAMT 1.2 The
VAMT 1.2 folder includes a help file for the Volume Activation
Management Tool (VAMT) and a link to launch the Volume Activation Management Tool.
You’ll use more of these tools later in this chapter and in Chapter 2. For now, the focus
is on the USMT tools
ScanState and LoadState.
Performing In-Place Migration
When you do the installation of Windows on a computer running Windows XP, Windows
Vista, or Windows 7, you can do a Custom (Advanced) installation. A message will appear
similar to Figure 1.1, informing you that you can access files from the previous installation
in a folder named
Windows.old.
FIGURE 1.1 Windows installation notification
Files from the previous installation will be gone if you do any advanced
repartitioning of the existing hard drive. The
Windows.old folder will be
created only if you use the partition as it exists when the install is started.
Now all you have to do is get the data out of the Windows.old folder and back to the
original location. You can spend hours cutting, pasting, and adjusting permissions, or you
can automate the process with the User State Migration Tool.
597095c01.indd 13 6/2/10 4:12:56 PM

14
Chapter 1
Planning for the Installation of Windows 7
Running ScanState and LoadState
Two important files that are added to your system with USMT are ScanState and LoadState.
You can use these two files from the command prompt or in batch files to automatically examine
your system and restore user accounts, files, and settings in a very short time.
ScanState ScanState will collect files and settings from a previous installation or from
the
Windows.old folder. It will store these files and settings in a migration store.
LoadState LoadState can read the files and settings from the migration store and restore
them to the current computer.
When you install the Windows AIK, it includes two folders for USMT: USMT\
x86\
and USMT\AMD64\. The x86 folder is for 32-bit systems, and the AMD64
folder is for 64-bit systems. While the
AMD64 folder implies it’s only for
AMD 64-bit processors, you also use files within this folder for 64-bit Intel
processors.
User profiles include a significant amount of data, including the desktop, document
folders, Registry settings, and much more. When you use USMT for an in-place migration,
it uses a hardlink migration store when the data is migrated from the
Windows.old folder.
This significantly reduces the time and space required to migrate all of this data. Instead of
actually copying the data from one place to another on the hard drive, it just changes the
links to where the data is located.
This is similar to what happens when you move a file from one location to another using
drag and drop in Windows Explorer. For example, imagine a project on which you are
working includes several files, so you decide to create a folder named
Project and drag and
drop all the files into that folder. The system doesn’t create a brand-new copy of these files
and then delete the originals. Instead, it just changes the file system links to these files so
that they are now “located” in the
Project folder.
Similarly, the hardlink migration feature in
ScanState and LoadState will change the
location of these files without having to copy all of the data. This can be significant if you’re
dealing with several GB of data.
It’s fairly easy to put the
ScanState and LoadState commands into a batch file that you
can use to automate the migration of files and settings for multiple computers in your net-
work. However, before automating
ScanState and LoadState, it’s good to know what the
commands are doing.
The
ScanState command is executed first. The following line shows how it may be exe-
cuted to retrieve the migration data from the
Windows.old folder. Note that even though it
shows on more than one line in this book, you should enter it as a single command without
any returns.
ScanState.exe c:\store /v:13 /o /c /hardlink /nocompress /efs:hardlink
/i:MigApp.xml /i:MigDocs.xml /offlineWinDir:c:\windows.old\windows
597095c01.indd 14 6/2/10 4:12:57 PM

Designing User State Migration
15
I realize it’s long, but the good news is that you don’t need to modify it at all. Just copy
it from the book, and it’ll work for many common migrations. The following bullets break
down the command:
ScanState
is the name of the command.
c:\store
is the location where the migration data will be stored.
/v:13
indicates the highest level of verbosity. It will provide a significant amount of
output to the log that can be viewed later. The lowest level is 0, which logs only errors
and warnings.
/o
causes it to overwrite an existing migration store (if one exists).
/c
tells ScanState to continue to run even if errors are encountered.
/hardlink
is used for in-place migrations to retrieve the data from the Windows.old
folder. It requires the use of the
/nocompress switch.
/nocompress
specifies that data is not compressed.
/efs:hardlink
specifies that encrypted file system (EFS) files will be moved using
hardlink migration. The
/hardlink switch must be used for this to succeed.
/
i:MigApp.xml specifies that the MigApp.xml file (which is included in the USMT folder)
will be used to identify application settings to migrate.
/i:MigDocs.xml
specifies that the MigDocs.xml file (which is included in the USMT
folder) will be used to identify document types to migrate.
/offlineWinDir:c:\windows.old\windows
is used to specify the location of the files
from the original installation.
After the
ScanState command is executed to capture the migration data, the LoadState
command is executed to restore the migration data to the current installation.
When performing in-place migrations, you can enter the
LoadState command with the
following switches. Just as the
ScanState command should be entered as a single line, the
following
LoadState command should be entered as a single line even though it spans more
than one line in this book.
LoadState.exe c:\store /v:13 /c /lac:P@ssw0rd /lae /i:MigApp.xml
/i:MigDocs.xml /sf /hardlink /nocompress
LoadState.exe
is the command.
c:\store
is the location of the migration store created by ScanState.
/v:13
indicates the highest level of verbosity. It will provide a significant amount of
output to the log that can be viewed later. The lowest level is 0, which logs only errors
and warnings.
/c
tells ScanState to continue to run even if errors are encountered.
597095c01.indd 15 6/2/10 4:12:57 PM

16
Chapter 1
Planning for the Installation of Windows 7
/lac:P@ssw0rd
specifies that local accounts should be created if they don’t already
exist. If the
/lac switch is not used, local accounts will not be migrated. The same
password will be used for all migrated accounts, and if a password is not specified,
the password will be empty. You should use caution if using the password in a batch
file because it will be stored in clear text, and anyone with access to the batch file can
read the password.
/lae
specifies that local accounts should be enabled. The /lac switch must be used to
migrate the accounts. When it is used, all migrated accounts will be enabled.
/
i:MigApp.xmlspecifies that the MigApp.xml file (which is included in the USMT folder)
will be used to identify application settings to migrate.
/i:MigDocs.xml
specifies that the MigDocs.xml file (which is included in the USMT
folder) will be used to identify document types to migrate.
/sf
restores shell folder redirection if a user had previously used folder redirection on
any of their user folders. For example, a user may have redirected the My Documents
folder to be stored on a server share or on a different partition.
/hardlink
is used for in-place migrations to retrieve the data from the Windows.old
folder. It requires the use of the
/nocompress switch.
/nocompress
specifies that data is not compressed.
More details on both the ScanState and LoadState commands, includ-
ing a full listing of all the switches, are included in the
USMT.chm help file
included with the Windows AIK. You can access this help file in the
C:\
Program Files\Windows AIK\Docs\CHMs\
folder.
Exercise 1.3 will lead you through the process of creating a batch file and running it to
migrate user data for in-place migrations. This assumes that the computer was running
Windows XP, Windows Vista, or Windows 7 and that a clean installation of Windows 7
was then performed on the system. Data from the previous installation is stored in the
Windows.old folder of the C: drive. Last, the Windows AIK for Windows 7 is also assumed
to have been installed on this system.
EXERCISE 1.3
Running USMT in a Batch File
1. Launch Windows Explorer, and browse to the C: drive. Create a folder called MyUSMT.
2. Right-click within the folder, and select New Text Document. Press Enter to open
the text document.
597095c01.indd 16 6/2/10 4:12:57 PM

Designing User State Migration
17
3. Type the following lines in the text document. Note that the ScanState and LoadState
commands span two lines in this book, but they should be entered as a single com-
mand in the document.
Cd “c:\Program Files\Windows AIK\Tools\USMT\x86”
rem
ScanState.exe c:\store /v:13 /o /c /hardlink /nocompress /efs:hardlink
/i:MigApp.xml /i:MigDocs.xml /offlineWinDir:c:\windows.old\windows
rem
LoadState.exe c:\store /v:13 /c /lac:P@ssw0rd /lae /i:MigApp.xml
/i:MigDocs.xml /sf /hardlink /nocompress
The first command changes the directory to the
...\USMT\x86 folder on the C:
drive. If you are running a 64-bit system, you can substitute this with
...\USMT\
amd64
instead. The rem lines are remark or comment lines I added to separate the
ScanState and LoadState commands for easier readability.
4. Select File Save As.
5. Type in usmt.bat and click Save. By adding the .bat extension, you tell Notepad to
save the file as a batch file (with a
.bat extension) that can be executed instead of a
text file (with a
.txt extension). Close the file.
6. Click Start Accessories, right-click the command prompt, and select Run As Admin-
istrator. If prompted by User Account Control, click Yes to continue.
7. Type in the following command to change the directory to the C:\MyUSMT directory
you created earlier:
Cd \MyUSMT
8.
Type in usmt and press Enter to run your batch file. This will take several minutes to
complete, and the output will appear on the screen. When you’ve finished, the migra-
tion is complete.
9. Using Windows Explorer, browse to the C:\Program Files\Windows AIK\Tools\
USMT\x86
folder (or the C:\Program Files\Windows AIK\Tools\USMT\amd64 if you
used that folder in your batch file. Locate and open the
loadstate.log file and the
scanstate.log file. With a verbosity level of 13 used in the commands, you’ll see
that a lot of data has been logged and can be reviewed to view the activity of both
commands.
EXERCISE 1.3 (continued)
597095c01.indd 17 6/2/10 4:12:57 PM

18
Chapter 1
Planning for the Installation of Windows 7
While the previous exercise had you create a batch file with the ScanState and
LoadState commands, it is possible just to execute the commands at the command prompt.
However, if you have created the batch file, you can create your own portable tool that can
be easily executed on any system to perform an in-place migration.
Creating a Portable USMT Batch File
If desired, you can make your batch file a little more portable. Instead of installing the
Windows AIK for Windows 7 on every computer that you are migrating, you can copy the
appropriate files to a USB flash drive or CD. These files consume only about 50 MB.
You can then bring your USB flash drive or CD to any computer that has had an in-place
migration, run the batch file, and the migration will be done in minutes.
For more on this process, check out the TechNet article “Building a USB
Drive to Store USMT 4.0 Files and Simple Commands.” You can read it
here:
http://technet.microsoft.com/library/dd940094.aspx.
You’ll still need to install the Windows AIK onto a Windows 7 computer. Once it’s
installed on any Windows 7 computer, you can use Windows Explorer to copy the
USMT
folder onto the portable media such as a USB flash drive.
Browse to the
C:\Program Files\Windows AIK\Tools\USMT folder.
Right-click the
USMT folder and select Copy.
Insert a USB flash drive.
Browse to the USB flash drive using Windows Explorer, right-click, and select Paste.
At this point, you’ll have the entire contents of the USMT folder on the flash drive. This
includes the
USMT folder used for 64-bit systems (\USMT\amd64\) and the folder used for
32-bit systems (
\USMT\x86).
Now you’ll need to create a batch file that can be used on any system. The batch file
used in the previous exercise can be used as a starting point, but it will need to be slightly
modified.
The USMT files need to be copied to the C: drive on the system that is being migrated,
so the first step in the batch file is to copy these files. This sounds simple enough, but
it’s impossible to tell what the letter of the USB drive will be when it’s plugged in on any
given system. That is, when you plug the USB into Sally’s computer, the USB disk may be
assigned the letter E:, but when you plug it into Joe’s computer, it might be assigned the
letter F:.
You can use the following
If exist statement in the batch file to check to see if the
USB flash drive is assigned the letter D:. It checks for the
USMT folder at the root of D:. If it
exists, it assumes this is the USB flash drive and copies the
USMT folder from the flash drive
to the Windows folder on the C: drive.
If exist D:\USMT\*.* XCopy /e /v /y C:\Windows\USMT\
597095c01.indd 18 6/2/10 4:12:57 PM

Designing User State Migration
19
The /e switch specifies that all directories should be copied—even empty ones. The /v
switch is used to verify the files, and the
/y switch is used to suppress prompting if any files
are overwritten.
Chapter 3 covers the XCopy command and other elements of the command
prompt in more depth.
Unfortunately, this works only if the USB flash drive is assigned the letter D:. It could be
assigned other letters such as E:, F:, and so on. You can add multiple lines to your batch file
to check for which letter is actually assigned to the USB flash drive. Simply copy and paste
the following line, changing only the letter of the drive:
If exist E:\USMT\*.* XCopy /e /v /y C:\Windows\USMT\
If exist F:\USMT\*.* XCopy /e /v /y C:\Windows\USMT\
Once you have added the extra lines, the rest of the batch file becomes a little easier.
You now know your USMT files exist in the
C:\Windows\USMT\x86 and the C:\Windows\
USMT\AMD64
folders. You simply change to the appropriate directory and run the ScanState
and
LoadState commands.
For example, if you were migrating data to a 32-bit installation of Windows 7, you’d use
the following batch file shown in Listing 1.1.
Listing 1.1: Batch file for 32-bit data migration
If exist D:\USMT\*.* XCopy /e /v /y C:\Windows\USMT\
If exist E:\USMT\*.* XCopy /e /v /y C:\Windows\USMT\
If exist F:\USMT\*.* XCopy /e /v /y C:\Windows\USMT\
If exist G:\USMT\*.* XCopy /e /v /y C:\Windows\USMT\
If exist H:\USMT\*.* XCopy /e /v /y C:\Windows\USMT\
If exist I:\USMT\*.* XCopy /e /v /y C:\Windows\USMT\
rem
Cd
“c:\Windows\USMT\x86”
ScanState.exe c:\store /v:13 /o /c /hardlink /nocompress /efs:hardlink
/i:MigApp.xml /i:MigDocs.xml /offlineWinDir:c:\windows.old\windows
LoadState.exe c:\store /v:13 /c /lac:P@ssw0rd /lae /i:MigApp.xml
/i:MigDocs.xml /sf /hardlink /nocompress
This batch file checks to see if the USB drive has been assigned letters D: through I:, but
if you want to check for all possible drive letters just copy an
If exist line, paste it, and
modify the letter in the new line. You can check for all drive letters up to Z: if desired.
You could save this file as
usmt32.bat.
However, if you needed to run the migration on a 64-bit system, you could replace
x86
with
amd64 in the change directory line and save the file as usmt64.bat.
Cd “c:\Windows\USMT\amd64”
597095c01.indd 19 6/2/10 4:12:57 PM

20
Chapter 1
Planning for the Installation of Windows 7
Wipe-and-Load Migration vs. Side-by-Side Migration
The majority of this section has covered an in-place migration. A common scenario is
where a Windows XP system has the hardware to support Windows 7. Windows 7 is
installed, and the user’s data and settings are then migrated from the
Windows.old folder.
However, there are some scenarios where the existing system needs to be wiped clean or
completely replaced. In these scenarios, you can still use the USMT commands to capture
the files and settings and then later restore them, but the process is a little different. The
two possible scenarios are a wipe-and-load migration or a side-by-side migration.
Wipe-and-load migration A wipe-and-load migration uses the same hardware but
removes all data on the partitions. A simple example would be a system that has multiple
partitions that aren’t needed in Windows 7, so the drive is reconfigured as a single parti-
tion. Repartitioning the disk will result in the loss of all the data, so before this is done
ScanState is run to capture all the files and settings. The ScanState data can be stored on
a server, as shown in Figure 1.2, stored on an external USB drive, or even stored on a USB
flash drive if the user doesn’t have much data. After Windows 7 is installed,
LoadState
is executed to restore these settings from the server (or the external USB or flash drive).
Figure 1.2 shows a wipe-and-load migration.
FIGURE 1.2 Wipe-and-load migration
Original
Computer
File
Server
Side-by-side migration In a side-by-side migration, a user has an older computer system
that will be replaced.
ScanState is run on the older system, and this older system is then
decommissioned. The
ScanState data can be stored on a server, as shown in Figure 1.2,
stored on an external USB drive, or stored on a USB flash drive if the user doesn’t have
much data. A newer system with Windows 7 is provided, and
LoadState is executed on it
to restore the files and settings. Figure 1.3 shows a side-by-side migration.
FIGURE 1.3 Side-by-side migration
Original
Computer
File
Server
New
Computer
597095c01.indd 20 6/2/10 4:12:58 PM
/