Page is loading ...

EXERCISE SYSTEM
For Maximum
Effectiveness and
Safety, Please Read
This Owner’s Manual
Before Using Your
Total Gym 1700 Club.
OWNER’S MANUAL

Congratulations on purchasing your new
Total Gym
®
1700 Club.
With this product in your home, you have everything you need to start
your own workout program, to tone and strengthen the important muscle
groups of your upper and lower body. This is vital for all of us, regardless
of age, sex, or fitness level, and regardless of whether your primary goal is
body sculpting, weight loss, health maintenance, or more energy for daily
activities.
Strength training not only tones and conditions the muscles we use
every day to stand, walk, lift, and turn; it can actually transform our body
composition. By reducing body fat and increasing the proportion of lean
muscle in our bodies, strength training can effectively turn up our
metabolic thermostat, so that we burn calories all the time, no matter
what we’re doing.
It’s easy-all you have to do is spend 15 to 20 minutes a day,
3 to 4 days per week on your Total Gym 1700 Club to start
realizing the benefits.
Be sure to read through this Owner’s Manual carefully.
It is the authoritative source of information about your
Total Gym 1700 Club.
If you have questions about your Total Gym 1700 Club,
please call Customer Service at 1-800-321-9236,
Monday through Friday, 9:00 AM to 5:00 PM, Eastern Time.
Table of Contents
Safety Instructions & Labels . . . . . . . . . . . . . . . . . . .4
Product Specifications . . . . . . . . . . . . . . . . . . . . . . .5
Set Up . . . . . . . . . . . . . . . . . . . . . . . . . . . . . . . . . . . .6-7
Accessories . . . . . . . . . . . . . . . . . . . . . . . . . . . . . . .8-11
Starting Out . . . . . . . . . . . . . . . . . . . . . . . . . . . . . . .12
Inspection, Maintenance & Storage . . . . . . . . . . . . . .13-14
— 3 —
Rev. 3/23/04

SAFETY INSTRUCTIONS AND LABELS- Please reference Product Specifications diagram on page 5
Before beginning this or any exercise program, consult a physician or health professional, who can assist you in planning a program
appropriate for your age and physical condition. This is especially important if you are over age 35 or have pre-existing health problems.
Do not overexert yourself. Stop exercising immediately and consult your doctor if you experience pain or tightness in your chest, irregular
heart beat, shortness of breath, or if you feel faint, nauseous, or dizzy.
This product is designed for home use only. It is not intended for commercial or institutional use. Use only as instructed. Do not stand on
the product.
The Total Gym 1700 Club is not intended for use by children. Keep this and all fitness equipment out of the reach of children.
Keep fingers, loose clothing, and hair away from moving parts.
Inspect your exerciser before each use to ensure proper operation. Do not use this equipment unless all moving parts, including cables
and pulleys are working properly. See page 13 for details on inspection, maintenance and storage.
The exerciser should be used with the mat enclosed or on carpeted surfaces only.
Use only the accessory items recommended by the manufacturer.
To avoid serious injury, care should be taken at all times when getting on and off this or any exercise equipment.
FAILURE TO READ AND FOLLOW THE SAFETY INSTRUCTIONS STATED IN THE OWNER’S
MANUAL AND VIDEO MAY RESULT IN POSSIBLE SERIOUS INJURY OR DEATH.
KEEP CHILDREN AWAY. MAXIMUM USER WEIGHT 275 LBS.
REPLACE LABEL IF DAMAGED, ILLEGIBLE OR REMOVED.
— 4 —
MAKE SURE ADJUSTMENT PIN IS LOCKED IN PLACE BEFORE BEGINNING EXERCISES.
BEFORE USING, INSERT SAFETY PIN IN FIRST HOLE BELOW HEIGHT BRACKET.
CRUSH HAZARD, KEEP HANDS CLEAR DURING FOLDING.
KEEP HAIR, FINGERS, LOOSE CLOTHING, PETS, AND CHILDREN AWAY FROM HINGES
AND OTHER MOVING PARTS TO AVOID SERIOUS INJURY. ALSO, BE SURE TO HAVE ALL
PINS LOCKED IN PLACE BEFORE GETTING ON YOUR TOTAL GYM®
TO AVOID SEVERE INJURY.
BE CAREFUL NOT TO BUMP HEAD WHEN LEG ATTACHMENT IS IN PLACE.
REMOVE WING ATTACHMENT FROM FRAME WHEN NOT REQUIRED
FOR THE SPECIFIC EXERCISE.
Warning Label 1.
Warning Label 2.
Warning Label 4.
(3 locations)
Caution Label
2.
Warning Label 5.
Caution Label 1.
Warning Label 6.
(4 locations)
WARNING
WARNING
WARNING
WARNING
CAUTION
WARNING
CAUTION
Warning Label 3.
PINCH POINT. KEEP HANDS AWAY FROM THE FENDER.
WARNING
Rev. 3/23/04

PRODUCT SPECIFICATIONS
— 5 —
Handles
Glideboard
Bottom Outer Rail
Top Inner Rail
Roller
Safety
Pin
Center Support Rail
Back Crossbar
Pilates Bar
Mat
Leg Pulley Accessory Kit
Dip Bars
Wing Accessory
Vertical Column
Cap
Arm Pulley/Cable Assembly
Rope
Pulley/
D-Ring
Assembly
Foam
Pad
1 Long Hitch Pin
For use with
leg pulley bracket.
2 Med
Hitch Pins
(Used with
Wing Accessory)
4 Short
Hitch Pins
(Used with Dip Bars/
Press Up Bars)
Clips
Foot
Harness
Weight
Clips
Bolt
Weight Bar
TOTAL GYM 1700 CLUB SPECS.
LENGTH: folded .................................51”
in use .................................94”
HEIGHT:
folded .................................10”
in use .................................44-1/2”
WIDTH: .....with out weight bar ..........16-1/2”
..........
with weight bar ..........24”
WEIGHT: ..........................................69 lbs.
MAX. USER WEIGHT: ..........................275 lbs.
MAX. ADDITIONAL FREE WEIGHTS: ....75 lbs.
Leg Pulley Bracket
For use with leg pulley
accessory only.
Allen
Wrenches
Stopper
Flip Chart Base
Foam
Pad
Grips
Includes two Videos
Roller
Cap
Cap
Safety Hitch
Pin
Spring Loaded Pin
(Located on Side of Rail)
Height
Adjustment
Tube
Height Adjustment
Quick Release Pin
Arm Pulley/Cable Hook
(Attaches to loop underneath glideboard)
Miscellaneous
Items shown below are also in Leg Pulley Accessory Kit
WARNING
LABEL 1
WARNING
LABEL 2
WARNING
LABEL 3
WARNING
LABEL 4
WARNING
LABEL 6
CAUTION
LABEL 2
WARNING
LABEL 5
CAUTION
LABEL 1
WARNING
LABEL 4
Flip Chart
Press Up Bars
PILATES
WORKOUT
TOTAL BODY
WORKOUT
Rev. 3/23/04

SET UP
Your product comes with:
• Safety Hitch Pin located at the bottom of the Vertical Column, which must be removed prior to unfolding.
• Height Adjustment Quick Release Pin located on back of Vertical Column for raising and lowering rails.
• One (1) Spring Loaded Pin locked into the base of the left rail by the height adjustment tube. Left side is determined
by standing behind the unit facing the Vertical Column.
IMPORTANT: To Prevent Injury – Be sure the spring-loaded pin is locked securely into place in the left
rail before using unit. This will prevent the height adjustment column from falling forward.
• Safety Pin - located on Lanyard/attached to Height Adjustment Tube.
• One Long Hitch Pin for Leg Pulley Bracket is located in the Miscellaneous Section of Accessory Kit as well as two
Medium Hitch Pins for the Wing Accessory, and 4 Short Hitch Pins for the Press Up Bars and Dip Bars.
IMPORTANT: Before using the Wing Accessory, Leg Pulley Accessory, Press Up Bars and Dip Bars, be
sure the Hitch Pins are securely inserted (see page 8, 9 & 11 of this manual for directions).
• One (1) Bolt and two (2) Weight Clips are located on the Weight Bar.
IMPORTANT: Before using the Weight Bar, be sure the Weight Clips are installed
(see page 10 of this manual for directions).
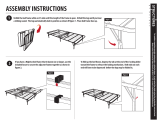
1. Pull the product out of the shipping box. Remove all packaging
materials, including tape and cardboard inserts, from your unit.
2. Lay product on the floor with glideboard side up. Make sure you have
plenty of space on both ends of the product. Slide the glideboard as far
as it will go towards the Front Crossbar before you begin lifting unit.
3. Lift the exerciser up by holding it at the top of the rails. Using your foot,
slowly spread the unit open at the bottom approximately 12 inches so
that it rests firmly on the Front and Back Crossbars not allowing it to go
too far.
4. Make sure the handles are out to the sides before
you begin to unfold your unit. Keep hands and
fingers away from pulley. Hold onto the top center
of glideboard and begin rolling rear rollers. Spread
the unit out until it is flat on the floor. Be careful to
do this
slowly.
Be sure to support the frame in the center to
avoid having the product drop suddenly onto
the floor or pinch fingers.
5. (a) Remove Safety Hitch Pin from bottom of Vertical Column. Next
remove plastic packing ties from the top and bottom of the Vertical
Column. Pull out the Spring Loaded Pin Knob located at the left rail
(NOTE - pin shown in picture is on right side) to release Spring
Loaded Pin. Continue to hold pin out while performing the next step.
— 6 —
3.
12”
5a
4.
Back
Crossbar
Front
Crossbar
Safety
Hitch Pin
Spring
Loaded
Pin
Lift Here
Hold Here While Lowering
To The Ground
Knob

(b) Take hold of the Vertical Column and pull it up until it is upright. Release
the Spring Loaded Pin. You should hear it lock back into place.
IMPORTANT: Be sure the Spring Loaded Pin is locked into place before
using your unit. You will know the pin is locked into place when you
can see the end protrude through the inside of the rail bracket.
6. Position one foot on Back Crossbar to keep the product from lifting
off the floor. With one hand on either the right or left rail and the
other hand holding the height adjustment Quick Release Pin out, slide
the rails along the Vertical Column to desired position and release pin.
Pin will pop into place - you will hear a snap. Then turn knob to the right to
tighten and secure. Last, insert straight Safety Pin (attached to the height
adjustment tube) into the hole on Vertical Column just below the height
adjustment bracket.
NOTE: Insert Safety Hitch Pin in the side hole located
at the bottom of the Vertical Column.
(This is the pin you removed in step 5a).
7. Assemble the Pilates Bar at the opposite end of the unit by
inserting it into the Front Crossbar as pictured to the right.
Make sure it is fully inserted.
8. If the Stopper at the bottom of the Vertical Column has not already
been installed, please do so now. Locate the Stopper which is
packed in Miscellaneous Accessories (See Product Specifications
on page 5 of this manual). Unscrew nut on the end of the Stopper
and remove. Insert the Stopper into the hole located in the center of
the Back Crossbar. (See Fig. 1) Screw the nut back onto the
Stopper and tighten with Allen Wrenches provided. (See Fig. 2)
IMPORTANT: Proper installation of the Stopper is necessary
for the Rollers to function easily when the unit is folded and
rolled into place for storage.
9. To add the Flip Chart, remove the cap from the Vertical Column
(keep it for storage). Insert the Flip Chart holder base into the
Vertical Column. Then secure the Flip Chart onto the Flip Chart Base.
— 7 —
6.
7.
Front Crossbar
5b
Height Adjustment
Quick Release Pin
Put Hitch Pin
Back Into Hole
Flip Chart
Vertical
Column
9.
Fig. 2
Fig. 1
8.
Flip Chart
Base
PILATES BAR ASSEMBLY
STOPPER ASSEMBLY

HOW TO ATTACH THE WING ACCESSORY
The Wing Accessory provided with your unit has been uniquely designed to serve several purposes. It can be
placed at the top or bottom of the exerciser and angled toward you or away from you depending upon what is
comfortable for you.
Two thick Foam Pads are provided with the Wing Accessory. They must be attached to the wing (if not already)
before exercising. To do this:
1. Simply wet each end of the straight Crossbar of the wing with some soapy water.
2. Then, attach Foam Pads on the Crossbar as shown
in Figure 1. Let dry before beginning to exercise
with the Wing Accessory.
Proper ways to use the Wing Accessory in accordance
with the exercises you wish to do:
PULL UPS AND CHIN UPS
1. Locate the holes at the top of the right and left rails.
2. With the wing angled toward the glideboard, line up the brackets on the
wing with the desired position holes on the rails.
3. Insert the 2 Medium Hitch Pins through the holes on the wing accessory
brackets and the hole on the rails, as shown in Figure 2.
4. You are now ready to perform Pull Up and Chin Up exercises
to work the arms, lats and back. See your Exercise Guide for
specific exercises.
LEG PULL; CRUNCHES AND SIT UPS
1. Locate the holes at the top of the right and left rails.
2. With the wing angled away from the glideboard, line up the
brackets on the wing with the desired position holes on the rails.
3. Insert the 2 Medium Hitch Pins through the holes on the Wing Accessory
brackets and the hole on the rails, as shown in Figure 3.
4. You are now ready to perform leg pulls, crunches and sit up
exercises to work the abdominals, waist and legs. See your Exercise
Guide for specific exercises.
SQUATS (Pilates bar can be used instead of Wing accessory)
1. Locate the holes at the bottom of the right and left rails near the front
crossbar.
2. With the wing angled away from the glideboard, line up the brackets
on the wing with the desired position holes on the rails.
3. Insert the 2 Medium Hitch Pins through the holes on the Wing Accessory
brackets and the hole on the rails, as shown in Figure 4.
4. You are now ready to perform the squats which works the thighs
and calves. See your Exercise Guide for specific exercises.
NOTE: When performing the squat exercises, be sure to position your hands on the side of the
glideboard, NOT along the bottom of the board in order to avoid pinched fingers.
Fig. 2
Fig. 1
— 8 —
Fig. 3
Fig. 4

FRONT PRESS (PRESS UP BARS CAN BE USED INSTEAD OF WING ACCESSORY)
1. Locate the holes at the bottom of the right and left rails near the front crossbar.
2. With the wing angled toward the glideboard, line up the brackets on the
wing with the desired position holes on the rails.
3. Insert the 2 Medium Hitch Pins through the holes on the Wing Accessory
brackets and the hole on the rails, as shown in Figure 5.
4. You are now ready to perform the Front Press which works the upper chest and
triceps. See your Exercise Guide for specific exercises.
HOW TO ATTACH THE PRESS UP BARS
1. Attach each Press Up Bar to the frame with the Short Hitch Pins included with your Total Gym 1700
Club.
Note: Hitch Pins are included in Miscellaneous Parts. Simply line up each bar with the holes at
the bottom or front of the frame.
2. Slide one Short Hitch Pin through the hole of one of the Press Up Bars and through the frame. Repeat
Steps 1 and 2 for attaching the other Press Up Bar.
Make sure to securely attach each Press Up Bar
to each side of the frame before using. See your Exercise Guide for specific exercise.
Note: Remove the Press Up Bars when you are not exercising with them.
HOW TO ATTACH THE DIP BARS
1. Attach each Dip Bar to the frame with the Short Hitch Pins included with your Total Gym 1700 Club.
Note: Hitch Pins are included in Miscellaneous Parts. Simply line up each bar with the holes in the
upper portion of the bottom frame.
2. Slide one Short Hitch Pin through the hole of one of the Dip Bars and through the frame. Repeat Steps
1 and 2 for attaching the other Dip Bar. Make sure to securely attach each Dip Bar to each side of
the frame before using. See your Exercise Guide for specific exercise.
Note: Remove the Dip Bars when you are not exercising with them.
Fig. 5
— 9 —
Press Up Bars
Press Up Bar Hole
1. and 2.
Dip Bar Hole
Dip Bars
Dip bars
2 Short Hitch Pins
1. and 2.
Dip Bars
Hitch Pin
Hitch Pin
Press Up Bars
Press Up Bars
2 Short Hitch Pins

— 10 —
HOW TO ATTACH THE WEIGHT BAR
NOTE: You need to provide your own free weights.
1. Following Step 6 on page 7, lock the rails in the highest position. (This will
make enough room below the rails for Step 3.)
2. Remove the Bolt and Spring Clips from the Weight Bar.
3. Center the Weight Bar with the glideboard so there are equal lengths
extending on each side. Under the glideboard, line up the holes on
Bracket and Weight Bar. Then attach them together with the Bolt
removed in Step 2. Lower rails before beginning exercise.
4. Add your free weights to the bar. The maximum amount of free weight
added to the Weight Bar must not exceed 75 lbs. The maximum user
weight plus Weight Bar weight must not exceed 350 lbs. Add weights
equally and evenly to both sides of the Weight Bar when stacking weights.
5. Install a Weight Clip on each side of the bar to prevent the weights from
slipping off the bar.
NOTE: Remove weight bar from glideboard when not in use.
NOTE: Do not use Weight Bar with Leg Pulley exercises or Pilates Video.
You can use free weights with most exercises found in your
Exercise Guide.
Front Crossbar
Weight Bar
Weight Bar Hole
Front Crossbar
Weight Bar
(Equal lengths extending)
TO AVOID SERIOUS INJURY OR PRODUCT DAMAGE, DO NOT ALLOW THE PRODUCT
TO TIP OVER WHEN USING THE WEIGHT BAR.
• THE WEIGHT BAR IS TO BE USED ONLY IN THE HOLES IN THE GLIDEBOARD, AS SHOWN IN STEP 3 BELOW.
• MAXIMUM WEIGHT BAR WEIGHT IS NOT TO EXCEED 75 LBS.
• MAXIMUM USER WEIGHT PLUS ADDITIONAL WEIGHT MUST NOT EXCEED 350 LBS.
• ADD WEIGHT EQUALLY AND EVENLY TO BOTH SIDES OF THE WEIGHT BAR WHEN STACKING WEIGHTS.
• WEIGHT CLIPS MUST BE INSTALLED WHEN WEIGHT BAR IS IN USE.
• ALWAYS REMOVE WEIGHT BAR FROM GLIDEBOARD WHEN NOT IN USE.
WARNING
Steps 4 & 5
Step 3
continued
Step 3
looking at bottom
of glideboard
Insert screw into
bracket and hole
in weight bar,
then tighten.
Weight Bar
Bracket
Weight
Clip

HOW TO ATTACH THE LEG PULLEY ACCESSORY KIT
1. Connect the Leg Pulley Bracket to the top of the Vertical Column by
aligning Bracket with the hole at the top of the column. (Be sure
bracket is right side up.) Insert Long Hitch Pin through the hole to
secure Bracket onto the Vertical Column.
2. Detach the Cable Assembly from the loop on the underside of the
glideboard and attach one of the Clips from the Leg Pulley Assembly.
3. Place D-Ring on Pulley first. Then connect the D-Ring to the
Bracket as shown.
NOTE: If rope appears to be twisted, take D-Ring off and turn
Pulley around.
4. Attach the Foot Harness to one of your feet by placing your foot in
the Harness so the sewn-in-ring is on the bottom of your foot.
Pull tightly on the belt so the Harness is secure.
5. (a) Position yourself on the glideboard correctly for the specific
exercise you want to perform.
(b) While lying down on the glideboard, connect the Clip on
the end of the rope to an O-Ring on the Harness attached
to your foot. Depending on the exercise you are performing,
connect the Clip to the proper O-Ring. Be sure to always
stabilize the glideboard when clipping the Harness on or off.
Also, use caution when getting on or off the glideboard. You
are now ready to exercise using the Leg Pulley Accessory.
See your
Exercise Guide for specific exercises that utilize the
Leg Pulley Accessory.
NOTE: Remove Leg Pulley Bracket when you are not exercising with it.
(c) To disconnect the Harness, unclip the rope from the O-Ring on
the Harness. Be sure to stabilize glideboard when disconnecting Foot Harness.
NOTE: Do not use Weight Bar with Leg Pulley exercises or Pilates Video.
— 11 —
Foot Harness
Harness
Buckle
Clip
O-Ring (loose)
O-Ring (sewn in)
O-Ring (loose)
5.
6b.
Leg Pulley Accessory Kit
Rope
Pulley/D-Ring
Assembly
Clip
Long
Hitch
Pin
Clip
Harness
Leg Pulley Bracket
For use with leg pulley
accessory only.
1.
4.
Bracket
Bracket
D-Ring
Long Hitch Pin
Pulley
Pulley

STARTING OUT
Wear athletic shoes and comfortable light clothing when exercising on the Total Gym 1700 Club.
Do not exercise barefoot. Check your exerciser before using to ensure that all the parts are in place
and working properly (see page 13 for details on inspection, maintenance and storage).
Adult supervision is required at all times.
NOTE: The Rails and Glideboard can be raised to any desired level on the Height Adjustment
Column depending upon your degree of fitness. Please note, however, that the Rails
cannot be raised to the highest position on the Height Adjustment Column when the
Leg Pulley Bracket is attached to the column.
Be sure you have plenty of free space around the exerciser so that performing on the
Total Gym 1700 Club, as well as getting on and off, is convenient and safe.
Each time you raise or lower the Adjustment Column, be sure you hold it to keep it from
dropping to the floor.
Begin using the product at a low incline. As your fitness level progresses, increase the incline to
increase the intensity and improve your muscle strength. Don’t be in a hurry to exercise at a high
intensity level; start out easily and build gradually. The Total Gym 1700 Club is as easy as 1-2-3
to use, so read on.
1. Important Things to Remember When Using the Total Gym 1700 Club
• Always have control of the glideboard before getting on and off the exerciser.
• Keep your feet on the floor when getting on and off the exerciser. Only remove
them from the floor for the duration of the exercise.
• If you are using the handles, hold onto them as you get on and off the glideboard.
2. Exercising with the Handles Only
Grasp the handles which are attached to the cable and slide the glideboard to a position
in which you can comfortably sit or lay down when performing the desired exercise (see
the Exercise Guide). Be sure to keep your feet on the floor until you are in the correct
position for the specific exercise. Then, if the exercise calls for your feet to be off the floor,
place your feet as specified in the instructions.
3. Exercising with the Wing Accessory, the Press Up Bars and the Dip Bars
Slide the glideboard to a position in which you can comfortably sit or lay down on when
performing the desired exercise (see the
Exercise Guide). Keep your feet on the ground
until you are in the correct position and feel comfortable. Then, place your feet in the
proper position and begin to exercise.
4. Using Resistance
To add resistance, you can put weights (up to 75 lbs.) on the weight bar. However, the
maximum user weight plus the weights on the weight bar cannot exceed 350 lbs. Place
equal amounts of weight on each side. Do not use the weight bar with leg pulley exercises
or pilates video.
When starting your exercise program, begin with the basic exercises in the
Exercise Guide included
with your Total Gym 1700 Club to familiarize yourself with the movements. Use the lowest incline level
to start with-you can work up to a higher incline level in the weeks and months to come. Once you
have become efficient using your Total Gym 1700 Club without weights, you may begin to add weights
to your workout program. See page 10 for proper setup.
For the specific Total Gym 1700 Club exercises and programs, study and follow the
instructions in the
Exercise Guide included with your product.
— 12 —

— 13 —
INSPECTION, MAINTENANCE & STORAGE
INSPECT YOUR TOTAL GYM 1700 CLUB PRIOR TO EACH USE
Before using your Total Gym 1700 Club for your workout session, be sure to make the
following inspection:
• Make sure the equipment is fully opened and sitting on a solid, level surface with
plenty of clearance on all sides. Unit should be used on the mat supplied or on
carpeted surfaces only.
• Make sure all the Hitch Pins are securely in place and locked into position.
• Check that the Pulley is attached securely to the loop on the top underside of
the glideboard.
• Check that the Cables are traveling correctly in the groove of each pulley.
• Make sure the Cable is securely fastened to each Hand Grip.
• Check that the Pilates Bar, Wing Accessory or other accessories are installed
correctly when in use.
• Make sure the Glideboard is gliding smoothly along the frame.
• Make sure the Weight Clips are installed when using Weight Bar.
ROUTINE MAINTENANCE
•Wipe down your Total Gym 1700 Club on a regular basis using a clean cloth and alcohol or
alcohol-based products like Windex
®
or 409
®
. Do not leave towels or workout clothing
laying or hanging on the equipment.
• Periodically check the following parts for signs of fraying or other wear: the cable,
pulleys, wheels, glideboard, accessories and frame. If the cable, pulleys, frame or wheels
need replaced - do not use your unit, wait until the part is replaced.
If any other part than the ones listed above needs to be replaced, do not use that part until
it is replaced.
• Never use a lubricant such as WD-40
®
or ArmorAll
®
to lubricate or clean the unit. Use only
3-in-1
®
oil or machine oil to lubricate the axles of the wheel or pulley, not the roller surface.
TO STORE YOUR TOTAL GYM 1700 CLUB
Follow these easy steps to store your exerciser properly:
1. First, remove all accessories and attachments including the Flip Chart accessory and
replace the cap on the top of the Vertical Column.
2. Remove Safety Hitch Pin and Safety Pin from Vertical Column.
3. Be sure the Cable Pulley is attached to the underside of the glideboard for folding.
4. Position one hand on either side of rail to hold it up before releasing the Height Adjustment
Quick Release Pin. Pull pin out and slowly lower the rails to the ground until they rest on
the back crossbar.
Continued on next page

5. a. Release Spring Loaded Pin (on left side rail) as shown.
b. Fold Vertical Column down towards the center of the unit.
c. Then insert Safety Hitch Pin at bottom of vertical column.
6. Slide the Glideboard towards the bottom of unit shown in Figure 6.
7. With caution, to avoid pinched fingers or hands, grab the top of the
Glideboard and slowly pull the unit up allowing the rollers to bring the
back of the unit towards the center. Keep approximately 12” apart.
8. Continue to fold the exerciser together until it is completely folded
and roll the exerciser into a closet for storage. To store under a bed,
simply lower the exerciser to the floor and roll under the bed.
Do not store unit in upright position when folded.
TO REMOVE THE GLIDEBOARD
You can also remove the Glideboard if you need to fit the exerciser under a narrow
space (between 6” and 8”).
IMPORTANT: The Glideboard weighs approximately 15 lbs. Use caution when
lifting it off of the exerciser. Lifting incorrectly may result in user injury.
1. With exerciser laying flat on the floor, disconnect the pulley from
the hook on the underside of the glideboard.
2. Next, tilt up the glideboard and slide it off the frame
of the exerciser. When the bench is completely off
the exerciser, set it aside.
3. Next, pull the Spring Loaded Pin to release the Rail
and fold the exerciser together as shown above in
Figure 7. & 8. Be sure you release the Spring Loaded Pin
before folding.
— 14 —
2.
6.
12”
Back
Crossbar
Front
Crossbar
Insert
Safety
Hitch Pin
Spring
Loaded
Pin
5b.
Fold
Vertical
Column
down
5a.
5c.
7. & 8.
CRUSH HAZARD, KEEP HANDS CLEAR DURING FOLDING.
WARNING
Lift Here

Fitness Quest warrants this product to be free from all
defects in material and workmanship when used
according to the manufacturer’s instructions.
See Limited Warranty Card for details.
If you have any comments or questions contact our
Customer Service Department, toll free at 1-800-321-9236,
Monday through Friday, 9:00 am to 5:00 pm, Eastern Time.
Please record the following information and keep for reference.
Serial #: ___________________
Date Of Purchase: ___________
Save your sales receipt.
(You may wish to staple it into this manual.)
Dedication to Quality
©2004 Fitness Quest® Inc. All rights reserved. Made in China & Thailand.
©2004 Total Gym Fitness, LLC. All rights reserved. Total Gym
®
is a registered trademark.
U.S. Patents #D 405,132, #5,967,955; ROC Patent #ND-060792; PRC Patent #ZL 97 2 28552.0.
No part of this booklet may be reproduced or utilized in any form, by any means, electronic,
mechanical or otherwise, without the express written consent of the copyright holder.
Rev. 3/24/04
/