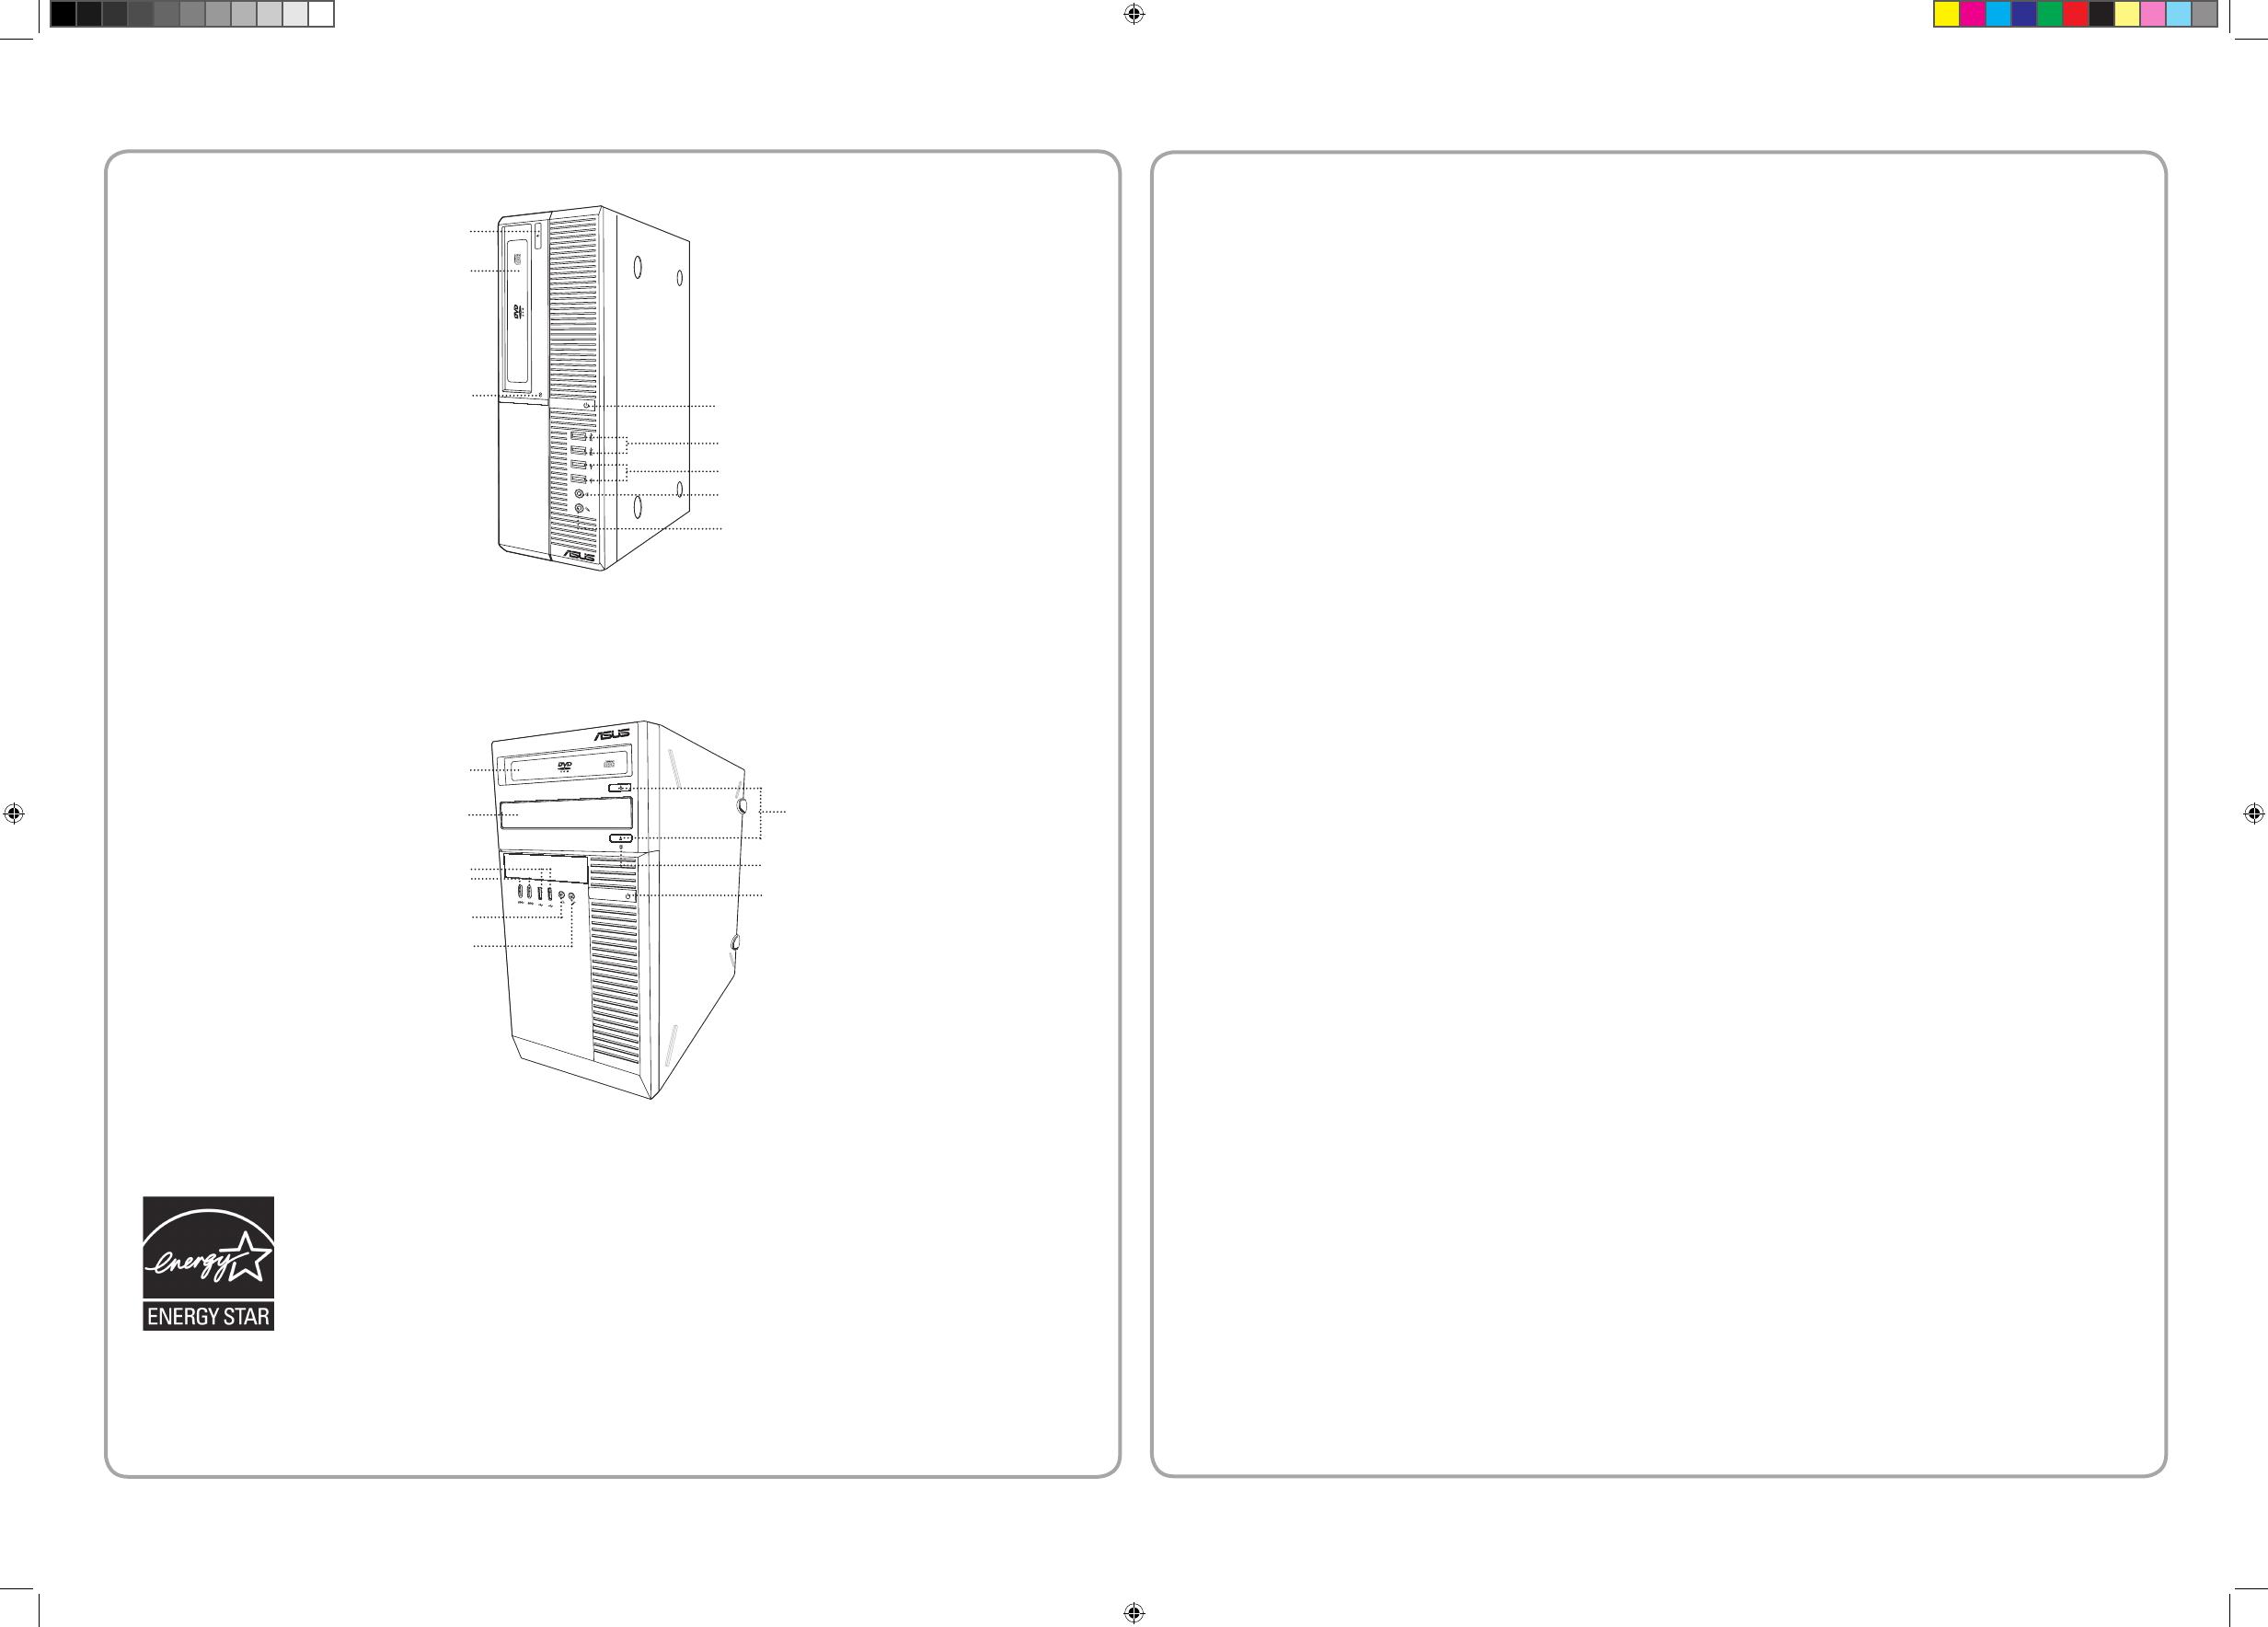
Asus BM6875 User manual

Type
User manual

This manual is also suitable for

Asus BM6875: A Versatile Desktop PC for Home and Office

With its sleek design and multiple ports, the Asus BM6875 desktop PC offers a seamless computing experience for everyday needs. Connect various devices with ease using its USB 2.0 and USB 3.0 ports, ensuring fast data transfer speeds for peripherals like external storage drives and printers. Enjoy clear audio output through the dedicated headphone and microphone ports, making it perfect for online communication and multimedia entertainment.

• Connectdevices.
• Geräteanschließen.
• Connectezles
périphériques.
• Conectelosdispositivos.
• Apparatenaansluiten.
• A. Selectthesysteminputvoltage.
Ifthevoltagesupplyinyourareais100-127V,setthevoltageselectorto115V.Ifthe
voltagesupplyinyourareais200-240V,setthevoltageselectorto230V.
B. Connectoneendofthepowercordtothepowerconnectorand
theotherendtoawallpoweroutlet.
• A. WählenSiedieSystemeingangsspannung.
 FallsdieStromversorgunginIhrerRegion100-127Vbeträgt,stellenSiedenSpan-
nungswählerauf115Vein.FallsdieStromversorgunginIhrerRegion200-240V
beträgt,stellenSiedenSpannungswählerauf230Vein.
B. VerbindenSieeinEndedesStromkabelsmitdemStromanschluss
desComputersunddasandereEndemitderSteckdose.
• A. Sélectionnezlatensiond’entrée.
Silatensiondevotrerégionestcompriseentre100et127V,réglezl’interrupteur
sur115V.Silatensiondevotrerégionestcompriseentre200et240V,réglez
l’interrupteursur230V.
B. Connectezuneextrémitéducordond’alimentationauconnec-
teurd’alimentationduchâssisetl’autreextrémitéàuneprise
électrique.
• A. Seleccioneelvoltajedeentradadelsistema.
Sielvoltajedesuregiónesde100-127V,establezcaelselectordevoltajeen115V.Si
elvoltajedesuregiónesde200-240V,establezcaelselectordevoltajeen230V.
B. Conecteunextremodelcabledealimentaciónalconectorde
alimentación,yelotroextremoalatomadecorriente.
• A. Selecteerdespanningvoordesysteeminvoer.
Alsdespanninginuwgebied100-127Vis,steltudespanningsselectorinop115V.
Alsdespanninginuwgebied200-240Vis,steltudespanningsselectorinop230V.
B. Sluitéénuiteindevandestroomkabelaandevoedingsconnector
enhetandereuiteindeaaneencontactdoos.
WARNING
/ AVERTISSEMENT / ADVERTENCIA / WAARSCHUWING/ AVISO
:
• Settingthevoltageselectorwrongmayseriouslydamageyoursystem.
• FalscheEinstellungenamSpannungswählerkannIhrSystemdauerhaftbes-
chädigen.
• Unmauvaispositionnementdusélecteurdetensionpeutsérieusement
endommagervotresystème.
• Elsistemapodríasufrirgravesdañossielselectordevoltajesecolocaenla
posiciónincorrecta.
• Alsudespanningsselectieverkeerdinstelt,kanditernstigeschadeaanuw
systeemveroorzaken.
• Pressthepowerbuttontoturnonthe
system.
• DrückenSiedieEinschalttaste,umdas
Systemzustarten.
• Appuyezsurleboutondemiseenroute
pourallumerl’ordinateur.
• Presioneelbotóndealimentaciónpara
encenderelsistema.
• Drukopdeaan/uit-knopomhetsysteem
inte
WARNING
/ AVERTISSEMENT / ADVERTENCIA / WAARSCHUWING / AVISO
:
• UseBM6875,BM6675/MD750,andBP6375/SD750inenvironmentswithanambienttemperaturebetween5˚C
and40˚C.
Openingsonthechassisareforventilation.DONOTblockorcovertheseopenings.
• VerwendenSieBM6875,BM6675/MD750,BP6375/SD750inOrtenmiteinerUmgebungstemperaturzwischen5˚C
und40˚C.
ÖnungenamGehäusedienenderBelüftung.DieseÖnungendürfenNICHTblockiertoderabgedecktwerden.
• UtilisezleBM6875,BM6675/MD750,BP6375/SD750dansunenvironnementdontlatempératureambianteest
compriseentre5˚Cet40˚C.
NEPASbloquerlesbouchesd’aérationduchâssis.Veillezàgarantiruneventilationoptimalepourceproduit.
• UtilicesuBM6875,BM6675/MD750,BP6375/SD750enentornosconunatemperaturaambienteentre5˚Cy40˚C.
Lasaberturasdelacarcasasonpartedelsistemadeventilacióndelproducto.NObloqueenitapeestasaberturas.
• GebruikBM6875,BM6675/MD750,BP6375/SD750inomgevingenmeteenomgevingstemperatuurtussen5˚Cen
40˚C.
Deopeningenaanhetchassiszijnvoorventilatie.DezeopeningenmogenNIETwordengeblokkeerdofafgedekt.
• Illustrationsareforreferenceonly.Actualproductspecicationsmayvary.
• DieAbbildungenwerdennurzuReferenzzweckenbereitgestellt.TatsächlichenProduktspezikationenkönnenvariieren.
• Lesillustrationsnesontdonnéesqu’àtitreindicatif.Lesspécicationsnalesduproduitpeuventvarier.
• Lasilustracionesquecontieneestedocumentodebenemplearseexclusivamenteconnesdereferencia.Lasespecicacionesrealesdelproductopodríanvariar.
• Deafbeeldingenzijnuitsluitendbedoeldalsreferentie.Deeigenlijkeproductspecicatieskunnenverschillen.
5.25inchopticaldiskdrivebay/5.25-ZollSchächtefüroptische
Laufwerke/Baies5.25poucespourlecteursoptiques/Bahíaspara
unidadesópticasde5,25pulgadas/Optischestationlades5,25inch
PowerLED/Strom-LED/Voyantd’alimentation/LEDde
alimentación/Voedings-LED
USB2.0port/USB2.0-Anschlüsse/PortsUSB2.0/PuertosUSB2.0/
USB2.0-poorten
Headphoneport/Kopfhöreranschluss/Prisecasque/Puerto
paraauriculares/Koptelefoonpoort
Microphoneport/Mikrofonanschluss/Portmicro/Puertopara
micrófono/Microfoonpoort
Resetbutton/Reset-Taste/Boutonderedémarrage/
BotónRestablecer/Reset-knop
HDDLED/LEDfürFestplattenlaufwerke/Voyantd’activitépour
disque(s)dur(s)/LEDdeunidaddediscoduro/HDD-LED
3.5inchdrivebay/3.5-ZollLaufwerksschächte/Baies
3.5pouces/Bahíasparaunidadesde3,5pulgadas/
Stationlades3,5inch
Powerbutton/Einschalttaste/Boutondemiseenroute/
Botóndealimentación/Aan-uit-knop
USB3.0port/USB3.0-Anschlüsse/PortsUSB3.0/PuertosUSB3.0/
USB3.0-poorten
ASUS Desktop PC Installation Guide
1
2
3
BP6375/SD750
BM6675/MD750
OUT
BM6875
OUT
BM6875
BP6375/SD750
BM6675/MD750
• ObtainadetailedUserManualfromyourWindows®desktoportheASUSsupportsiteathttp://support.asus.com.
• EinausführlichesBenutzerhandbuchndenSieinIhremWindows®-DesktopoderaufderASUSSupport-Webseiteunterhttp://support.asus.com.
• Voustrouverezlemanueld’utilisationdétaillésurleBureauWindows®devotreordinateurdebureauousurlesitedesupportd’ASUSsurhttp://support.asus.com.
• ObtengaunmanualdeusuariodetalladodesuescritoriodeWindows®odelsitiodesoportedeASUS(http://support.asus.com).
• VerkrijgeengedetailleerdegebruikershandleidingvanuwWindows®desktopofvandeASUS-ondersteuningssiteophttp://support.asus.com.
BM6675/MD750
BP6375/SD750
BM6675/MD750
BM6875
U9271a / Revised Edition V2 / April 2014
U9271a_BM6875_BM6675_BP6375_QSG_V2.indd 1 4/17/2014 11:08:47 AM
Microphoneport/Mikrofonanschluss/Portmicro/Puerto
paramicrófono/Microfoonpoort
Powerbutton/Einschalttaste/Boutondemiseen
route/Botóndealimentación/Aan-uit-knop
HDD LED/ LED für Festplattenlaufwerke /Voyant d’activité pour disque(s)
dur(s) / LED de unidad de disco duro / HDD-LED
USB2.0port/USB2.0-Anschlüsse/PortsUSB2.0/Puertos
USB2.0/USB2.0-poorten
HDD LED/ LED für Festplattenlaufwerke /Voyant d’activité pour disque(s)
dur(s) / LED de unidad de disco duro / HDD-LED
5.25inchopticaldiskdrivebay
/ 5.25-Zoll Schächte für optische
Laufwerke/ Baies 5.25 pouces pour lecteurs optiques / Bahíasparauni-
dadesópticasde5,25pulgadas / Optischestationlades5,25inch
Headphoneport/Kopfhöreranschluss/Prisecasque/
Puertoparaauriculares/Koptelefoonpoort
Safety information
• Beforeusingthisproduct,ensurethatallcablesarecorrectlyconnected.Ifyoudetectanycabledamage,contactyourretailer
immediately.
• Usethisproductonlywiththecorrectvoltageasinstructedbythemanufacturer.
• Toavoidshortcircuitsandfaultycontacts,keepscrapsofpaper,screws,andthreadsawayfromconnectors,slots,sockets,and
circuits.
• Beforeaddingorremovingdevicestoorfromthesystem,ensuretounplugitfromthepowersource.
• Thesystemcoversareelaboratelydesignedtoprotectusersfromscratches,butstillbecarefulwiththosesharptipsandedges.Put
onapairofglovesbeforeremovingorreplacingthesystemcovers.
• Ifyouencountertechnicalproblemswiththisproduct,e.g.thepowersupplyisbroken,contactaqualiedservicetechnicianor
yourretailer.DONOTservicethisproductyourself.
Sicherheitsinformationen
• VorInbetriebnahmedesProduktsmüssenalleKabelrichtigangeschlossensein.BemerkenSieeineBeschädigung,kontaktierenSie
sofortIhrenHändler.
• BetreibenSiedasProduktnurmitrichtigerSpannung,wievomHerstellerangewiesen.
• UmKurzschlüsseundWackelkontaktezuvermeiden,haltenSiePapierschnipsel,SchraubenundFädenfernvonAnschlüssen,Steck-
plätzen,SockelnundStromkreisen.
• BeimAnschließenoderTrennenvonGerätenandasodervomSystemmussdasStromkabeldesSystemsherausgezogenwerden.
• ObwohldasSystemgehäusesorgfältigentwickeltwurde,umBenutzervorKratzernzuschützen,achtenSieaufscharfeSpitzen
oderKanten.BevorSiedieSystemabdeckung/dasGehäuseentfernenoderersetzen,könnenSiesichmiteinPaarHandschuhen
schützen.
• FallstechnischeProblemebeimProduktauftretenwiez.B.defektesStromkabel,wendenSiesichandenqualiziertenKundendi-
enstoderIhreVerkaufsstelle.ReparierenSiedasProduktNICHTselbst.
Informations relatives à la sécurité
• Avantd’utiliserleproduit,vériezquetouslescâblessontbienbranchésetquelescâblesd’alimentationnesontpasendom-
magés.Sivousrelevezlemoindredommage,contactezvotrerevendeurimmédiatement.
• Veillezàutiliserlatensiond’entréeappropriéeàvotrerégionetcommeindiquéparlefabricant.
• Pouréviterlescourt-circuits,gardezlesclips,lesvisetlesagrafesloindesconnecteurs,desslots,dessocketsetdelacircuiterie.
• Avantd’ajouterouenleverdescomposants,vériezquelescâblesd’alimentationsontdébranchés
• Malgrélefaitqueleboîtierdevotreordinateuraiétéconçudesorteàvousprotégercontreleséraures,prenezgardedenepas
vousblesseraveclesextrémitéspointuesduboîtier.Enlezunepairedegantsavantderetireroureplacerlespanneauxduboîtier.
• Sivousrencontrezunproblèmetechniqueavecceproduit(ex:unitéd’alimentationendommagée),contactezuntechnicienquali-
éouvotrerevendeur.NeréparezPASceproduitvous-même.
Información de seguridad
• Antesdeusaresteproducto,asegúresedequetodosloscablesestáncorrectamenteconectados.Sidetectaalgúncabledañado,
póngaseencontactoconsudistribuidorinmediatamente.
• Utiliceesteproductosolamenteconelvoltajecorrectosegúnloindicaelfabricante.
• Paraevitarcortocircuitosycontactosdefectuosos,mantengalosrestosdepapel,lostornillosyobjetossimilaresalejadosdelos
conectores,lasranuras,losterminalesylacircuitería.
• Antesdeagregardispositivosalsistemaoquitarlosdeéste,asegúresededesenchufarlodelatomadecorriente.
• Aunquelastapasdelsistemaestándiseñadasaldetalleparaevitararañazosalosusuarios,tengacuidadoconlaspuntasylosbor-
desalados.Póngaseunoguantesantesdequitarovolveracolocarlastapasdelsistema.
• Sitieneproblemastécnicosconelproducto,porejemplosilafuentealimentaciónestárota,póngaseencontactoconunprofe-
sionaldeserviciotécnicooconsudistribuidor.NOintenterepararelproductoporsímismo.
Veiligheidsinformatie
• Zorgdatallekabelsgoedzijnaangeslotenvoordatuditproductgebruikt.Neemonmiddellijkcontactopmetuwhandelaaralsu
enigekabelschade
detecteert.
• Gebruikditproductalleenmetdejuistespanning,zoalsdoordefabrikantwordtvoorgeschreven.
• Omkortsluitingenfoutecontactentevermijden,dientupapiersnippers,schroevenendradenuitdebuurtvanconnectors,sleu-
ven,bussenencircuitsweghouden.
• Voordatuaanofvanhetsysteemapparatentoevoegtofverwijdert,dientutezorgendathetvandevoedingsbronisverwijderd.
• Desysteempanelenzijnopzettelijkeontworpenomgebruikerstegenschrammentebeschermen.Umoetechterweluitkijkenvoor
dezescherpepuntenenranden.Doehandschoenenaanvoordatudesysteempanelenverwijdertofterugplaatst.
• Alsumetditproducttechnischeproblemenondervindt,bijv.devoedingsbroniskapot,dientucontactoptenemenmeteen
bevoegdeservicemonteurofuwhandelaar.DitproductNIETzelfonderhouden.
15060-08V3K100
opticaldiskdriveejectbutton/Auswurftastefüroptisches
Laufwerk/Boutond’éjectiondulecteuroptique/Botónde
expulsióndelaunidaddediscoóptico/Knopomoptische
schijfstationuittewerpen
opticaldiskdrivebay(empty)/Schachtfüroptisches
Laufwerk(leer)/Baiepourlecteurdedisqueoptique(vide)
/Bahíadeunidaddediscoóptico(vacía)/Sleufvanoptisch
schijfstation(leeg)
opticaldiskdriveejectbutton/Auswurftastefüroptisches
Laufwerk/Boutond’éjectiondulecteuroptique/Botónde
expulsióndelaunidaddediscoóptico/Knopomoptische
schijfstationuittewerpen
USB3.0port/USB3.0-Anschlüsse/PortsUSB3.0/Puertos
USB3.0/USB3.0-poorten
Powerbutton/Einschalttaste/Boutondemiseenroute/
Botóndealimentación/Aan-uit-knop
USB3.0port/USB3.0-Anschlüsse/PortsUSB3.0/PuertosUSB3.0/
USB3.0-poorten
USB2.0port/USB2.0-Anschlüsse/PortsUSB2.0/PuertosUSB2.0/
USB2.0-poorten
Headphoneport/Kopfhöreranschluss/Prisecasque/Puerto
paraauriculares/Koptelefoonpoort
Microphoneport/Mikrofonanschluss/Portmicro/Puertopara
micrófono/Microfoonpoort
5.25inchopticaldiskdrivebay
/ 5.25-Zoll Schächte für optische
Laufwerke/ Baies 5.25 pouces pour lecteurs optiques / Bahíasparauni-
dadesópticasde5,25pulgadas / Optischestationlades5,25inch
ENERGYSTARisajointprogramoftheU.S.EnvironmentalProtectionAgencyandtheU.S.DepartmentofEnergyhelping
usallsavemoneyandprotecttheenvironmentthroughenergyecientproductsandpractices.
AllASUSproductswiththeENERGYSTARlogocomplywiththeENERGYSTARstandard,andthepowermanagement
featureisenabledbydefault.Themonitorandcomputerareautomaticallysettosleepafter10and30minutesofuser
inactivity.Towakeyourcomputer,clickthemouseorpressanykeyonthekeyboard.
Pleasevisithttp://www.energy.gov/powermanagementfordetailinformationonpowermanagementanditsbenetstothe
environment.Inaddition,pleasevisithttp://www.energystar.govfordetailinformationontheENERGYSTARjointprogram.
*Note:EnergyStarisNOTsupportedonFreedosandLinux-basedproducts.
BP6375/SD750
BM6875
U9271a_BM6875_BM6675_BP6375_QSG_V2.indd 2 4/17/2014 11:08:48 AM
  • Page 1 1
  • Page 2 2

Asus BM6875 User manual

Type
User manual
This manual is also suitable for

Asus BM6875: A Versatile Desktop PC for Home and Office

With its sleek design and multiple ports, the Asus BM6875 desktop PC offers a seamless computing experience for everyday needs. Connect various devices with ease using its USB 2.0 and USB 3.0 ports, ensuring fast data transfer speeds for peripherals like external storage drives and printers. Enjoy clear audio output through the dedicated headphone and microphone ports, making it perfect for online communication and multimedia entertainment.

Ask a question and I''ll find the answer in the document

Finding information in a document is now easier with AI