Trendnet TV-IP322WI Quick Installation Guide

Type
Quick Installation Guide
3
2
Add: How to manually add a camera or NVR on the app. Use this to manually add a remote device, for local devices you can use the Scan feature.
IPView-App
IPView_App
Host: Similar to the name assignment, devices from a local or
remote location requires separate entries. For local connections
(at home) enter the IP address of the device (camera or NVR),
usually you can find this information on your router's DHCP client
list or table. It is recommended to assign the device with a static
IP address, to avoid any changes the router may encounter. For
remote connection (away from home) enter the assigned WAN IP
address of your router. If you are using DDNS on your router, you
can simply enter your DDNS account information you have set
on your router.
Name: Enter the assigned name of your device (camera or NVR).
To view devices from a local (at home) or remote (away from
home) location requires separate entries. Consider assigning a
name based on the location of your device. For instance, to view
your patio camera from a remote location like when you are at
work assign a name like “Remote Patio Cam”. You can assign
“Patio Cam” as a different entry to view the same camera while
you are
at home.
Port: Enter the HTTP port assigned on your device (camera or
NVR). This is the same port you have assigned a virtual server or
port forwarding rule on your router's firewall settings.
Login: Enter the username of your device (camera or NVR), in
most cases the username is “admin”
Passwork: Enter the login password assigned to your device
(camera or NVR). Click save.
1
8
6
5
7
4
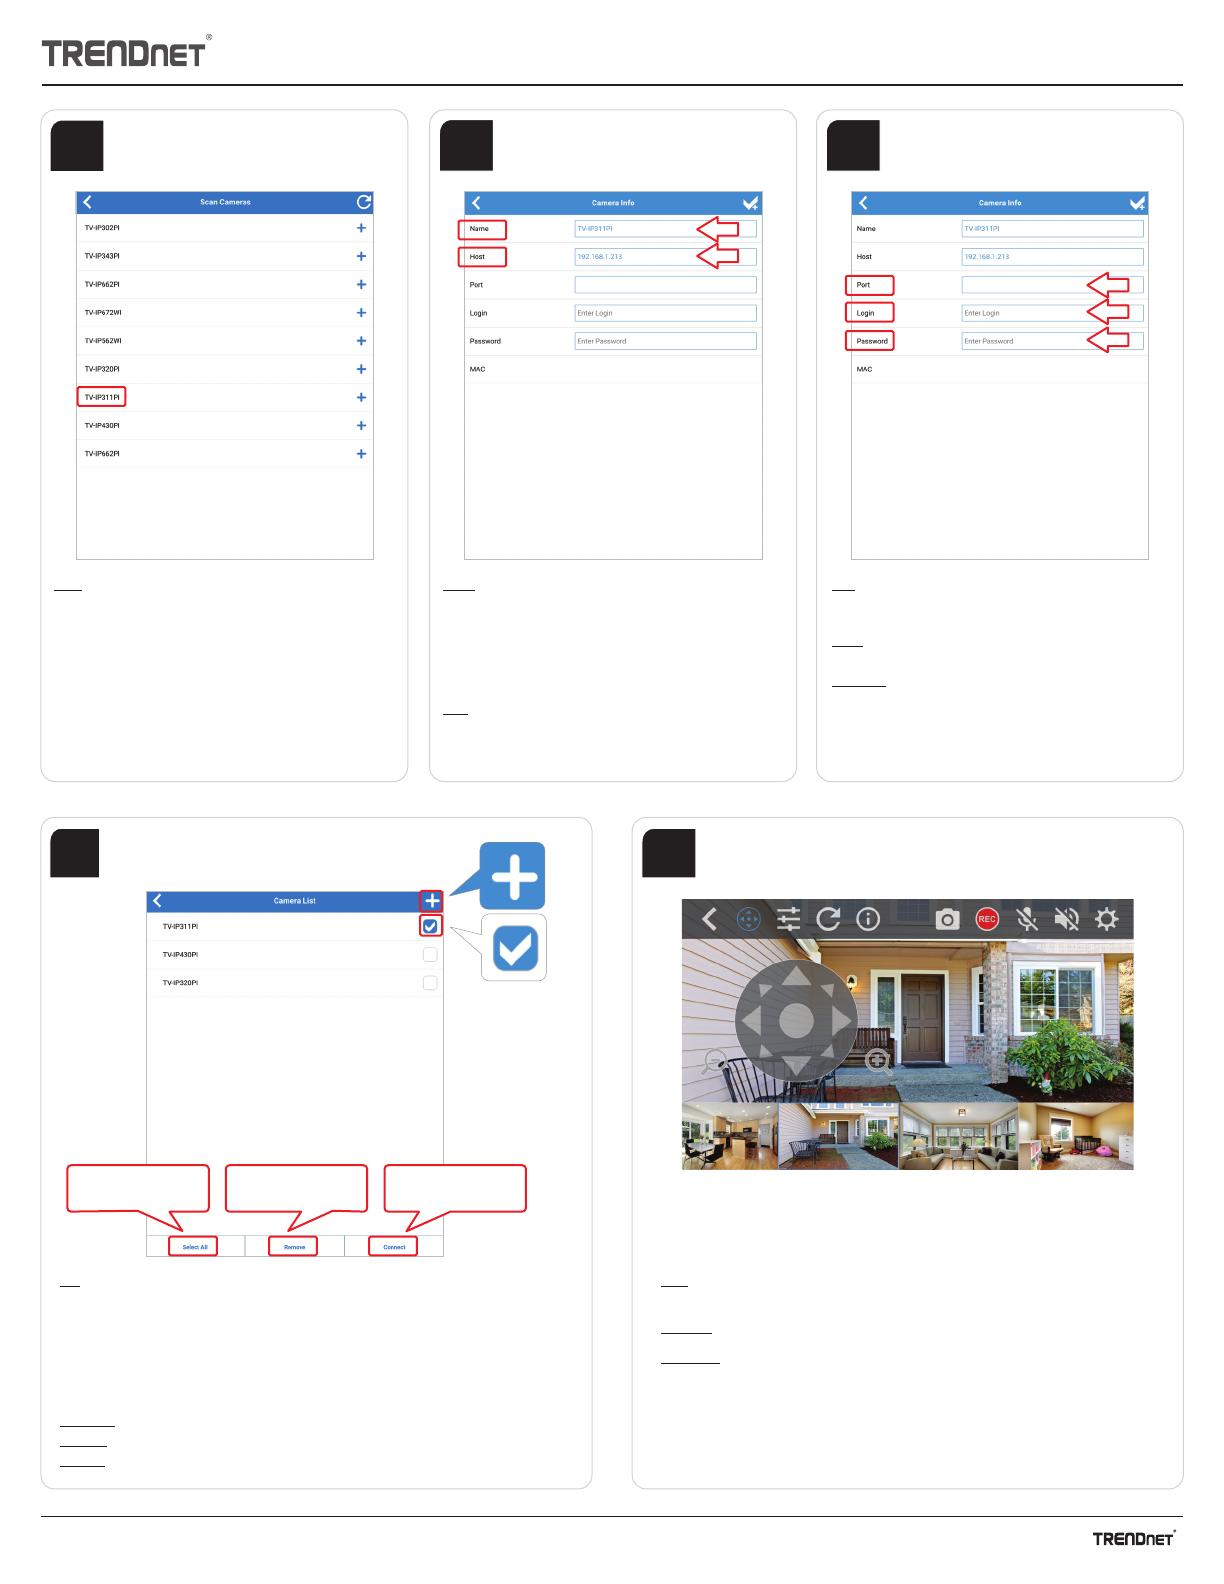
Scan: Scan connected devices on your network.
Refresh button: Click to refresh the list of connected devices. If
your device does not appear please check your device is properly
connected and that your tablet or mobile device is also connected
to the same network. If your device still does not appear, you can
manually add the device using the “Add” feature.
Click + to add the device (camera or NVR).
IPView-App
List: Lists of all entries you have saved on the app.
Click + to manually add an device.
Click the box to select the device to view.
Press and release on the entry to view the selected entry's information. This is helpful to use when
you want to make any changes to the entry.
Entries with > sign indicated there are several devices also connected to it. This is available when
you have a NVR entry and allows you to select certain cameras to view. If you would like to view
all cameras connected to the NVR click the check box.
Select All: Select this option to select all entries
Remove: Click this option to remove/delete selected devices
Connect: Click this option to connect selected devices
IPView_App
Name: Assign a name of your device (camera or NVR). Please
note that devices from a local or remote location requires
separate entries. The scan feature can only view devices
connected at the same network as your table or mobile devices
is currently connected to. Since your scanned device is on your
local connection (at home) consider assigning a name based on
the location of your device. For instance, “Patio Cam” or “Front
door”.
Host: Once the app scans your device (camera or NVR) the Host
should automatically populate with the assigned IP address of
your device. You do not have to enter the IP address of your
device.
Port: Once the app scans your device (camera or NVR) the Port
should automatically populate with the assigned port of your
device. You do not have to enter the IP address of your device.
Login: Enter the username of your device (camera or NVR), in
most cases the username is “admin”
Password: Enter the login password assigned to your device
(camera or NVR).
Click save
Remove
Connect
View: Quickly view all devices you have selected on the List section. To edit the list of cameras
to view, click on list option.
Live view: This section display the current live view of the selected camera
Thumbnail: This section shows thumbnail images of your listed cameras. Select the thumbnail of
the camera to view the current live view. If you have several cameras, swipe left and scroll
through all cameras.
Select All
10
IPView_App
Control:
IPView-App
Setting
Multiview: Available on upgrade version, allows you to view several camera's live view at once.
9
Speaker: Available for cameras with microphone features, select this option to hear the selected live
view camera
Mic: Available for cameras with 2-way audio features, select this option to speak on the selected live
view camera hear
Snapshot: Click this option to take a snap shot image of the selected live view camera. Accounts with
upgraded versions, you will be allowed to save the snapshot image directly on yo ur mobile
Record: Click this option to start recording on the selected live view camera, click this option again to
stop the recording. Accounts with upgraded versions, you will be allowed to save the snapshot image
directly on your mobile device/tablet or to your dropbox account.
PTZ control: Available for cameras PTZ features, select this option to pan, tilt or zoom your camera.
Preset: Available for cameras with preset features, select this option and select your assigned preset
position assigned to the camera.
Refresh: Click this option to refresh the app. Click this option to view the selected live view camera's
information.
Info: Camera information.
12
IPView_App
Settings
11
Auto scan: Select this scan time duration of the apps live view and thumbnail section.
Aspect ratio: Select to change the live view sections aspect ratio from original aspect ratio or fit to screen Dropbox account: Available on upgrade version, enter your dropbox account information to save
snapshot images or video recordings.
IPView-App
13
14
TRENDnet
20675 Manhattan Place
Torrance, CA 90501
USA
Product Warranty Registration
Please take a moment to register your
product online. Go to TRENDnet’s website at:
www.trendnet.com/register
Technical Support
If you have any questions regarding the product
installation, please contact our Technical Support.
Toll free US/Canada: 1-866-845-3673
Regional phone numbers available
at www.trendnet.com/support
Waste electrical an electronic products must not be disposed of
with household waste. Please recycle where facilities exist.
Check with your Local Authority or Retailer for recycling advice.
Copyright © 2016. All Rights Reserved. TRENDnet.
Certifications
This device complies with Part 15 of the FCC Rules. Operation is subject to the
following two conditions:
(1) This device may not cause harmful interference.
(2) This device must accept any interference received. Including interference that
may cause undesired operation.
Applies to PoE Products Only: This product is to be connected only to PoE
networks without routing to the outside plant.
Note
The Manufacturer is not responsible for any radio or TV interference caused by
unauthorized modifications to this equipment. Such modifications could void the
user’s authority to operate the equipment.
Advertencia
En todos nuestros equipos se mencionan claramente las caracteristicas del
adaptador de alimentacón necesario para su funcionamiento. El uso de un
adaptador distinto al mencionado puede producir daños fisicos y/o daños al
equipo conectado. El adaptador de alimentación debe operar con voltaje y
frecuencia de la energia electrica domiciliaria exitente en el pais o zona de
instalación.
IPView_App
IPView-App
  • Page 1 1
  • Page 2 2
  • Page 3 3
  • Page 4 4
  • Page 5 5

Trendnet TV-IP322WI Quick Installation Guide

Type
Quick Installation Guide

Ask a question and I''ll find the answer in the document

Finding information in a document is now easier with AI