Page is loading ...

FP-90
Gasless Welding System (FCAW)
Instruction Manual
FORM NO. 0056-1839 EFFECTIVE: July 2001
Safety and Operating
Instructions
For Your Safety . . .
PLEASE READ
CAREFULLY!


Table of Contents
page
Introduction . . . . . . . . . . . . . . . . . . . . . . . . . . . . . . . . . . . . . . . . . . . . . . . . . . . . . . . . . . . . . . . . . . . . . . . . . . .1
Safety Profile . . . . . . . . . . . . . . . . . . . . . . . . . . . . . . . . . . . . . . . . . . . . . . . . . . . . . . . . . . . . . . . . . . . . . . . . . .1
Safety Information . . . . . . . . . . . . . . . . . . . . . . . . . . . . . . . . . . . . . . . . . . . . . . . . . . . . . . . . . . . . . . . . . . . . . .1
Safety Symbols . . . . . . . . . . . . . . . . . . . . . . . . . . . . . . . . . . . . . . . . . . . . . . . . . . . . . . . . . . . . . . . . . . . . . . . .1
General Welding Safety Instructions . . . . . . . . . . . . . . . . . . . . . . . . . . . . . . . . . . . . . . . . . . . . . . . . . . . . . . . .3
Location . . . . . . . . . . . . . . . . . . . . . . . . . . . . . . . . . . . . . . . . . . . . . . . . . . . . . . . . . . . . . . . . . . . . . . . . . . .3
Personal Protection . . . . . . . . . . . . . . . . . . . . . . . . . . . . . . . . . . . . . . . . . . . . . . . . . . . . . . . . . . . . . . . . . .3
Safety Instructions . . . . . . . . . . . . . . . . . . . . . . . . . . . . . . . . . . . . . . . . . . . . . . . . . . . . . . . . . . . . . . . . . . .3
Fire Prevention . . . . . . . . . . . . . . . . . . . . . . . . . . . . . . . . . . . . . . . . . . . . . . . . . . . . . . . . . . . . . . . . . . . . . .4
Ventilation . . . . . . . . . . . . . . . . . . . . . . . . . . . . . . . . . . . . . . . . . . . . . . . . . . . . . . . . . . . . . . . . . . . . . . . . .4
Electromagnetic Compatibility . . . . . . . . . . . . . . . . . . . . . . . . . . . . . . . . . . . . . . . . . . . . . . . . . . . . . . . . . .4
Health Hazards . . . . . . . . . . . . . . . . . . . . . . . . . . . . . . . . . . . . . . . . . . . . . . . . . . . . . . . . . . . . . . . . . . . . . .4
Welder Specifications . . . . . . . . . . . . . . . . . . . . . . . . . . . . . . . . . . . . . . . . . . . . . . . . . . . . . . . . . . . . . . . . . . .5
Welder Operating Characteristics . . . . . . . . . . . . . . . . . . . . . . . . . . . . . . . . . . . . . . . . . . . . . . . . . . . . . . . . . . .5
Internal Thermal Overload Protection . . . . . . . . . . . . . . . . . . . . . . . . . . . . . . . . . . . . . . . . . . . . . . . . . . . . . . .5
Specifications for FP-90 Gasless Welding System (1444-0302) . . . . . . . . . . . . . . . . . . . . . . . . . . . . . . . . . . . .5
Assembling the Welder . . . . . . . . . . . . . . . . . . . . . . . . . . . . . . . . . . . . . . . . . . . . . . . . . . . . . . . . . . . . . . . . . .6
Welder Installation . . . . . . . . . . . . . . . . . . . . . . . . . . . . . . . . . . . . . . . . . . . . . . . . . . . . . . . . . . . . . . . . . . . . . .6
Power Source Connection . . . . . . . . . . . . . . . . . . . . . . . . . . . . . . . . . . . . . . . . . . . . . . . . . . . . . . . . . . . . .6
Power Requirements . . . . . . . . . . . . . . . . . . . . . . . . . . . . . . . . . . . . . . . . . . . . . . . . . . . . . . . . . . . . . . .6
Connection to Power Source . . . . . . . . . . . . . . . . . . . . . . . . . . . . . . . . . . . . . . . . . . . . . . . . . . . . . . . . .6
Extension Cords . . . . . . . . . . . . . . . . . . . . . . . . . . . . . . . . . . . . . . . . . . . . . . . . . . . . . . . . . . . . . . . . . .6
Installation of the Welding Wire . . . . . . . . . . . . . . . . . . . . . . . . . . . . . . . . . . . . . . . . . . . . . . . . . . . . . . . . . . . .7
Welding Torch . . . . . . . . . . . . . . . . . . . . . . . . . . . . . . . . . . . . . . . . . . . . . . . . . . . . . . . . . . . . . . . . . . . . . . . . .8
Gasless Welding . . . . . . . . . . . . . . . . . . . . . . . . . . . . . . . . . . . . . . . . . . . . . . . . . . . . . . . . . . . . . . . . . . . . . . . .8
Advantages of Gasless Welding . . . . . . . . . . . . . . . . . . . . . . . . . . . . . . . . . . . . . . . . . . . . . . . . . . . . . . . . .8
Preparation for Welding . . . . . . . . . . . . . . . . . . . . . . . . . . . . . . . . . . . . . . . . . . . . . . . . . . . . . . . . . . . . . . . . . .9
Welding Procedures . . . . . . . . . . . . . . . . . . . . . . . . . . . . . . . . . . . . . . . . . . . . . . . . . . . . . . . . . . . . . . . . . . . . .9
Replacement of the Wire Spool . . . . . . . . . . . . . . . . . . . . . . . . . . . . . . . . . . . . . . . . . . . . . . . . . . . . . . . . . . . .9
Welding Tips . . . . . . . . . . . . . . . . . . . . . . . . . . . . . . . . . . . . . . . . . . . . . . . . . . . . . . . . . . . . . . . . . . . . . . . . .10
General Operating Tips . . . . . . . . . . . . . . . . . . . . . . . . . . . . . . . . . . . . . . . . . . . . . . . . . . . . . . . . . . . . . . . . .10
Adjustment of the Power Source . . . . . . . . . . . . . . . . . . . . . . . . . . . . . . . . . . . . . . . . . . . . . . . . . . . . . . . . . .10
Selecting Wire . . . . . . . . . . . . . . . . . . . . . . . . . . . . . . . . . . . . . . . . . . . . . . . . . . . . . . . . . . . . . . . . . . . . . . . .11
Wire Diameter . . . . . . . . . . . . . . . . . . . . . . . . . . . . . . . . . . . . . . . . . . . . . . . . . . . . . . . . . . . . . . . . . . . . .11
Wire Spool Size . . . . . . . . . . . . . . . . . . . . . . . . . . . . . . . . . . . . . . . . . . . . . . . . . . . . . . . . . . . . . . . . . . . .11
Selecting Welding Current Polarity . . . . . . . . . . . . . . . . . . . . . . . . . . . . . . . . . . . . . . . . . . . . . . . . . . . . . . . .12
Preparing the Work Area . . . . . . . . . . . . . . . . . . . . . . . . . . . . . . . . . . . . . . . . . . . . . . . . . . . . . . . . . . . . . . . .12
Setting up the Workpiece . . . . . . . . . . . . . . . . . . . . . . . . . . . . . . . . . . . . . . . . . . . . . . . . . . . . . . . . . . . . . . . .12
Preparing the Joint . . . . . . . . . . . . . . . . . . . . . . . . . . . . . . . . . . . . . . . . . . . . . . . . . . . . . . . . . . . . . . . . . .12
Workpiece Clamp Connection . . . . . . . . . . . . . . . . . . . . . . . . . . . . . . . . . . . . . . . . . . . . . . . . . . . . . . . . .14
Tuning in the Wire Speed . . . . . . . . . . . . . . . . . . . . . . . . . . . . . . . . . . . . . . . . . . . . . . . . . . . . . . . . . . . .14
Learning to Weld . . . . . . . . . . . . . . . . . . . . . . . . . . . . . . . . . . . . . . . . . . . . . . . . . . . . . . . . . . . . . . . . . . . . . .15
Holding the Gun . . . . . . . . . . . . . . . . . . . . . . . . . . . . . . . . . . . . . . . . . . . . . . . . . . . . . . . . . . . . . . . . . . . .15
Position the Gun to the Workpiece . . . . . . . . . . . . . . . . . . . . . . . . . . . . . . . . . . . . . . . . . . . . . . . . . . .15
Distance from the Workpiece . . . . . . . . . . . . . . . . . . . . . . . . . . . . . . . . . . . . . . . . . . . . . . . . . . . . . . .15
Laying a Bead . . . . . . . . . . . . . . . . . . . . . . . . . . . . . . . . . . . . . . . . . . . . . . . . . . . . . . . . . . . . . . . . . . . . .16
Moving the Gun . . . . . . . . . . . . . . . . . . . . . . . . . . . . . . . . . . . . . . . . . . . . . . . . . . . . . . . . . . . . . . . . . . . .16

page
Types of Weld Beads . . . . . . . . . . . . . . . . . . . . . . . . . . . . . . . . . . . . . . . . . . . . . . . . . . . . . . . . . . . . . . . .16
Welding Positions . . . . . . . . . . . . . . . . . . . . . . . . . . . . . . . . . . . . . . . . . . . . . . . . . . . . . . . . . . . . . . . . . . .17
Multiple Pass Welding . . . . . . . . . . . . . . . . . . . . . . . . . . . . . . . . . . . . . . . . . . . . . . . . . . . . . . . . . . . . . . .18
Special Welding Methods . . . . . . . . . . . . . . . . . . . . . . . . . . . . . . . . . . . . . . . . . . . . . . . . . . . . . . . . . . . . . . . .18
Spot Welding . . . . . . . . . . . . . . . . . . . . . . . . . . . . . . . . . . . . . . . . . . . . . . . . . . . . . . . . . . . . . . . . . . . . . .18
Spot Welding Instructions . . . . . . . . . . . . . . . . . . . . . . . . . . . . . . . . . . . . . . . . . . . . . . . . . . . . . . . . . . . . .19
Additional Safety Information . . . . . . . . . . . . . . . . . . . . . . . . . . . . . . . . . . . . . . . . . . . . . . . . . . . . . . . . . . . .20
Troubleshooting Information . . . . . . . . . . . . . . . . . . . . . . . . . . . . . . . . . . . . . . . . . . . . . . . . . . . . . . . . . . . . .21
Firepower FO-150 MIG-Gun Parts Listing . . . . . . . . . . . . . . . . . . . . . . . . . . . . . . . . . . . . . . . . . . . . . . . . . . .22
General Operating Tips . . . . . . . . . . . . . . . . . . . . . . . . . . . . . . . . . . . . . . . . . . . . . . . . . . . . . . . . . . . . . .22
Troubleshooting Guide for Firepower FP-150 MIG Gun . . . . . . . . . . . . . . . . . . . . . . . . . . . . . . . . . . . . . . . .22
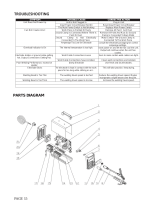
FP-90 Parts List . . . . . . . . . . . . . . . . . . . . . . . . . . . . . . . . . . . . . . . . . . . . . . . . . . . . . . . . . . . . . . . . . . . . . . .24
Firepower Limited Warranty . . . . . . . . . . . . . . . . . . . . . . . . . . . . . . . . . . . . . . . . . . . . . . . . . . . . . . . . . . . . .27
Table of Illustrations
page
Figure 1: Handle Installation . . . . . . . . . . . . . . . . . . . . . . . . . . . . . . . . . . . . . . . . . . . . . . . . . . . . . . . . . . . . . .6
Figure 2: Wire Installation . . . . . . . . . . . . . . . . . . . . . . . . . . . . . . . . . . . . . . . . . . . . . . . . . . . . . . . . . . . . . . . .7
Figure 3: Polarity Preparation . . . . . . . . . . . . . . . . . . . . . . . . . . . . . . . . . . . . . . . . . . . . . . . . . . . . . . . . . . . . .9
Figure 4: Power Source . . . . . . . . . . . . . . . . . . . . . . . . . . . . . . . . . . . . . . . . . . . . . . . . . . . . . . . . . . . . . . . . .10
Figure 5: Work Area . . . . . . . . . . . . . . . . . . . . . . . . . . . . . . . . . . . . . . . . . . . . . . . . . . . . . . . . . . . . . . . . . . . .12
Figure 6: Workpiece Preparation . . . . . . . . . . . . . . . . . . . . . . . . . . . . . . . . . . . . . . . . . . . . . . . . . . . . . . . . . .13
Figure 7: Types of Weld Joints . . . . . . . . . . . . . . . . . . . . . . . . . . . . . . . . . . . . . . . . . . . . . . . . . . . . . . . . . . . .13
Figure 8: Gun Position, Angle A . . . . . . . . . . . . . . . . . . . . . . . . . . . . . . . . . . . . . . . . . . . . . . . . . . . . . . . . . .15
Figure 9: Gun Position, Angle B . . . . . . . . . . . . . . . . . . . . . . . . . . . . . . . . . . . . . . . . . . . . . . . . . . . . . . . . . .15
Figure 10: Gun Travel Direction . . . . . . . . . . . . . . . . . . . . . . . . . . . . . . . . . . . . . . . . . . . . . . . . . . . . . . . . . .16
Figure 11: Stringer Weld Bead . . . . . . . . . . . . . . . . . . . . . . . . . . . . . . . . . . . . . . . . . . . . . . . . . . . . . . . . . . . .17
Figure 12: Weave Weld Bead . . . . . . . . . . . . . . . . . . . . . . . . . . . . . . . . . . . . . . . . . . . . . . . . . . . . . . . . . . . . .17
Figure 13: Flat Position Weld . . . . . . . . . . . . . . . . . . . . . . . . . . . . . . . . . . . . . . . . . . . . . . . . . . . . . . . . . . . . .17
Figure 14: Horizontal Position Weld . . . . . . . . . . . . . . . . . . . . . . . . . . . . . . . . . . . . . . . . . . . . . . . . . . . . . . .17
Figure 15: Vertical Position Weld . . . . . . . . . . . . . . . . . . . . . . . . . . . . . . . . . . . . . . . . . . . . . . . . . . . . . . . . . .17
Figure 16: Overhead Position Weld . . . . . . . . . . . . . . . . . . . . . . . . . . . . . . . . . . . . . . . . . . . . . . . . . . . . . . . .17
Figure 17: Triple Pass V Butt Joint . . . . . . . . . . . . . . . . . . . . . . . . . . . . . . . . . . . . . . . . . . . . . . . . . . . . . . . . .18
Figure 18: Triple Pass Lap and T Weld Joints . . . . . . . . . . . . . . . . . . . . . . . . . . . . . . . . . . . . . . . . . . . . . . . . .18
Figure 19: Spot Weld Methods . . . . . . . . . . . . . . . . . . . . . . . . . . . . . . . . . . . . . . . . . . . . . . . . . . . . . . . . . . . .18
Figure 20: FP-150 MIG Gun Assembly . . . . . . . . . . . . . . . . . . . . . . . . . . . . . . . . . . . . . . . . . . . . . . . . . . . . .22
Figure 21: FP-90 Parts Breakdown . . . . . . . . . . . . . . . . . . . . . . . . . . . . . . . . . . . . . . . . . . . . . . . . . . . . . . . . .23
Figure 22: FP-90 Wiring Diagram . . . . . . . . . . . . . . . . . . . . . . . . . . . . . . . . . . . . . . . . . . . . . . . . . . . . . . . . .25

INTRODUCTION
This User’s Guide provides specific information about your Firepower Welding System. This guide provides
pertinent information needed to safely and effectively use your Firepower Welding System. The information in
this manual applies to specific Firepower Welding System models. It gives instructions on set-up, installation
and actual use of your Firepower Welding System.
SAFETY PROFILE
Tradesmen respect the tools and equipment with which they work. They are also aware that tools and equip-
ment are dangerous if used improperly or abused.
Read this guide prior to using your welding system. It enables you to do a better and safer job. You will also
learn the machine’s application, limitations and the specific potential hazards related to welding.
SAFETY INFORMATION
The following safety information is provided to you as a guideline. Use it to operate your new Firepower
Welding System under the safest possible conditions. Any equipment that uses electrical power is potentially
dangerous to use when the safety or safe handling instructions are not known and/or are not followed. This
safety information gives you the necessary information for safe use and operation.
Items in this manual that significantly affect safety are identified with the following headings. Please read and
understand this manual. Pay special attention to items identified with these headings.
- Means there is a possibility of injury or death to yourself or others if the proper
safety precautions are not followed.
- Means there is the possibility of damage to the Firepower Welding System or
other property.
- Indicates points of interest for more efficient and convenient installation or opera-
tion. It may be used before or after a procedure to highlight or better explain the step.
READ ALL SAFETY AND WARNING INSTRUCTIONS CAREFULLY before attempting to install, oper-
ate or service this welding unit. Your failure to comply with the instructions could result in personal injury
and/or property damage.
RETAIN THESE INSTRUCTIONS FOR YOUR FUTURE REFERENCE.
SAFETY SYMBOLS
Please familiarize yourself with the warning symbols listed on the following pages. These symbols identify
important safety messages in this manual. When you see one of these symbols, be alert to the possibility of
personal injury and carefully read the message that follows.
Indicates that the possibility of electric shock hazard exists during the operation of the step(s) that
follow.
Indicates that the possibility of fire hazard exists during the operation of the step(s) that follow.

Indicates that the helmet must be worn during the step(s) that follow to protect against eye damage
and burns due to flash hazard.
Indicates that the possibility of toxic gas hazard existed during operation of the step(s) that follow.
Indicates that the possibility of being burned by hot slag exists during operation of the step(s) that
follow.
Indicates that the eye protection should be worn to protect against flying debris in the following
step(s).
Indicates that the possibility of injury or death exist due to improper handling and maintenance of
compressed gas cylinders or regulators.
ELECTRIC SHOCK CAN KILL! Reduce the risk of death or serious injury from shock. Read,
understand and follow the following safety instructions. Additionally, make certain that anyone else
who uses this welding equipment, or who is a bystander in the welding area, understands and fol-
lows these safety instructions as well.
FIRE OR EXPLOSION CAN CAUSE DEATH, INJURY AND PROPERTY DAMAGE! Reduce
the risk of death, injury or property damage from fire or explosion. Read, understand and follow
the following safety instructions. Additionally, make certain that anyone else who uses this welding
equipment, or who is a bystander in the welding area, understands and follows these safety instruc-
tions as well. Remember, welding by nature produces sparks, hot spatter, molten metal drops, hot
slag and hot metal parts that can start fires, burn skin and damage eyes.
ARC RAYS CAN INJURE EYES AND BURN SKIN! Reduce the risk of injury from arc rays.
Read, understand and follow the following safety instructions. Additionally, make certain that any-
one else who uses this welding equipment, or who is a bystander in the welding area, understands
and follows these safety instructions as well.
FUMES, GASSES AND VAPORS CAN CAUSE DISCOMFORT, ILLNESS AND DEATH!
Reduce the risk of discomfort, illness or death. Read, understand and follow the following safety
instructions. Additionally, make certain that anyone else who uses this welding equipment, or who
is a bystander in the welding area, understands and follows these safety instructions as well.
2

IMPROPER HANDLING AND MAINTENANCE OF COMPRESSED GAS CYLINDERS AND
REGULATORS CAN RESULT IN SERIOUS INJURY OR DEATH! Reduce the risk of injury or
death from compressed gasses and equipment hazards. Read, understand and follow the following
safety instructions. Additionally, make certain that anyone else who uses this welding equipment, or
who is a bystander in the welding area, understands and follows these safety instructions as well.
GENERAL WELDING SAFETY INSTRUCTIONS
LOCATION
Welding processes of any kind can be dangerous not only to the operator but to
any person situated near the equipment, if safety and operating rules are not strictly
observed.
PERSONAL PROTECTION
1. Wear closed, non-flammable protective clothing, without pockets or turned up trousers.
2. Wear a non-flammable welding helmet to shield the neck, face and sides of the head. Keep the protective
lens clean Replace the protective lens if broken or cracked. Position a transparent glass between the lens and
the welding area. Weld in a closed area that does not open into other working areas.
3. NEVER look at the arc without proper protection to the eyes.
4. Thoroughly clean metal of rust or paint to avoid producing harmful fumes. Parts degreased with a solvent
must dry before welding.
5. NEVER weld on metals or coated metals containing zinc, mercury, chromium, graphite, lead, cadmium or
beryllium unless the operator and the people standing in the same area use an air-supplied respirator.
SAFETY INSTRUCTIONS
For your safety, BEFORE connecting the power source to the line, follow these instructions:
1. Insert an adequate two-pole switch, equipped with time-delay fuses, before the main outlet.
2. Make the single-phase connection with a two-pole plug compatible with the above mentioned socket.
3. The two wires of the two-pole input cable are used for the connection with the single-phase line. The yel-
low/green wire is for the compulsory connection to the ground.
4. When working in a confined space, keep the power source outside the welding area and fix the ground cable
to the workpiece. NEVER work in a damp or wet area.
5. DO NOT use damaged input or welding cables.
6. NEVER operate the power source without its panels in place. This could cause serious injury to the operator
and could damage the equipment.
FIRE PREVENTION
Welding operations use fire or combustion as a basic tool.
1. The work area MUST have a fireproof floor.
2. Work benches or tables used during welding operations MUST have fireproof tops. DO NOT weld on
wooden work benches.
3. Use heat-resistant shields or other approved material to protect nearby walls or unprotected flooring from
sparks and hot metal.
4. Keep an approved fire extinguisher of the proper size and type in the work area. Inspect it regularly to
ensure that it is in proper working order. Know how to use the fire extinguisher.
3

5. Remove all combustible materials from the work site. If you can not remove them, protect them with fire-
proof covers.
NEVER perform welding operations on a container that has held toxic, com-
bustible or flammable liquids or vapors. NEVER perform welding operations in an area con-
taining combustible vapors, flammable liquids or explosive dust.
VENTILATION
Ventilate welding work areas adequately. Maintain sufficient air flow to prevent
accumulation of explosive or toxic concentrations of gases. Welding operations using cer-
tain combinations of metals, coatings and gases generate toxic fumes. Use respiratory
protection equipment in these circumstances. BEFORE welding, read and understand the
Material Safety Data Sheet for the welding alloy.
ELECTROMAGNETIC COMPATIBILITY
BEFORE installing a welding power source, inspect the surrounding area checking the following points:
1. Make sure there are no other power supply cables, control lines, telephone cables or other devices close to
the power source.
2. Make sure that telephones, televisions, computers or other control systems are not in the working area.
3. People with pace-makers or hearing aides should keep far from the power source. In particular cases, special
protection measures may be required.
Reduce interference by following these suggestions:
1. If there is interference in the power source line, mount an E.M.T. filter between the power supply and the
power source.
2. Shorten the output cables of the power source, keep them together and connected to ground.
3. Securely fasten the panels of the power source in place after performing maintenance.
HEALTH HAZARDS
The welding process can be hazardous to your health. Therefore, follow these precautions:
1. ALWAYS wear protective clothing without pockets and cuffs. Wear a helmet, gloves and shoes with an
insulating sole.
2. ALWAYS use a welding mask or helmet with the properly tinted protective glass in the shade adequate to
the welding operation being performed and to the current intensity.
3. Make certain that bystanders in the welding area are also following these precautions.
4. ALWAYS keep the welding mask glass clean. Replace it if it is cracked or chipped.
5. NEVER weld in a damp area or come in contact with a moist or wet surface when welding.
6. If the welding area lacks proper ventilation, use fume extractors.
7. Clean the welding pieces from solvents or alogenous grease which develop toxic gases when exposed to
heat.
WELDER SPECIFICATIONS
Your new Firepower Flux Core (FCAW) Wire Welding System is designed for maintenance and sheet metal
fabrication. The unit consists of a single-phase power transformer power source, arc stabilizer, rectifier and
heavy-duty wire feed system.
This welding power source is also capable of welding with either 0.030 inch (0.8 mm) or 0.035 inch (0.9 mm)
4

flux cored welding wire FCAW process. The use of shielding gas is not required for this welding process.
Please refer to the instructions provided in this manual for proper machine setup.
The use of larger diameter wire makes welding difficult. The results cannot be guaranteed. The manufacturer
DOES NOT recommend using larger diameter welding wire with this unit.
WELDER OPERATING CHARACTERISTICS
The duty rating defines how long the user can weld and how long the welder must rest and cool down. Duty
Cycle ratings are expressed as a percentage of a ten-minute period. It represents the maximum welding time
allowed at the specified amperage setting. The remaining balance of a ten-minute period is required for cooling
off the unit.
Firepower 120 volt Welding Systems have duty cycle ratings based on 15 amp and 20 amp input currents.
Please refer to the data plate located on the front of the unit for the specific rating that applies to your unit.
INTERNAL THERMAL OVERLOAD PROTECTION
DO NOT constantly exceed the duty cycle or damage could result to your welder.
If you do exceed the duty cycle of your welder, the internal thermal overload protection shuts
off all welder functions. If this happens, DO NOT SHUT OFF THE WELDER. Leave the
welder turned on and the fan running. After the welder is properly cooled, the thermal protec-
tor automatically resets and your welder will function properly.
If you find that your welder does not weld for a 1-5 minute time period without stopping, reduce the wire
speed slightly. Welding with the wire speed set too high not only causes poor visible welds but also increases
amperage draw and shortens the duty cycle.
SPECIFICATIONS FOR FP-90 GASLESS WELDING SYSTEM (1444-0302)
Type . . . . . . . . . . . . . . . . . . . . . . . . . . . . . . . . . . . . . . . . . . . . . . . . . . . . . . . . . .90 Amp DC Wire Feed Welder
Input Voltage . . . . . . . . . . . . . . . . . . . . . . . . . . . . . . . . . . . . . . . . . . . . . . . . . . . . . . . . . . . . . . .115 Volt/60 Hz
Rated Output . . . . . . . . . . . . . . . . . . . . . . . . . . . . . . . . . . . . . . . . . . . . . . . . . . . .80 Amps @ 15% Duty Cycle
Agency Approval . . . . . . . . . . . . . . . . . . . . . . . . . . . . . . . . . . . . . . . .CSA Rated 60 Amps @ 20% Duty Cycle
Maximum Output . . . . . . . . . . . . . . . . . . . . . . . . . . . . . . . . . . . . . . . . . . . . . . . . . . . . . . . . . . . .90 Amps Peak
Output Power Settings . . . . . . . . . . . . . . . . . . . . . . . . . . . . . . . . . . . . . . . . . . . . .High/Low Amperage Settings
Wire Speed Adjustment . . . . . . . . . . . . . . . . . . . . . . . . . . . . . . . . . .Infinite Speed Controlled by Potentiometer
Power Cord . . . . . . . . . . . . . . . . . . . . . . . . . . . . . . . . . . . . . . . . . . . . . . . . . . . . . . .4 foot 15 Amp Power Plug
MIG Gun . . . . . . . . . . . . . . . . . . . . . . . . . . . . . . . . . . . . . . . . . . . . . . . . . . . . .6 foot FIREPOWER
®
Wire Gun
Ground Cable and Clamp . . . . . . . . . . . . . . . . . . . . . . . . . . . . . .5 foot Ground Cable/150 Amp Ground Clamp
MIG Gun Connection . . . . . . . . . . . . . . . . . . . . . . . . . . . . . . . . . . . . . . . . . . . . . . . . . . . . . . .Fixed Connection
Spool Capacity . . . . . . . . . . . . . . . . . . . . . . . . . . . . . . . . . . . . . . . . . . . . . . . . . . . . . . . . . . . . . . . . . . . . . . .2 lb
Accessories . . . . . . . . . . . . . . . . . . . . . . . . . . . . . . . . . . . . . . . . . . . . . . . . . . . . . . . . . . . . . . . . . . . . . . .Nozzle
Contact Tip
1 lb. .035” Spool Flux MIG Wire
Instruction Manual
The FP-90’s MIG gun torch is a “live” contact torch and is ALWAYS
in the power on position. Wear eye protection at all times when handling this
torch.
5

6
The MIG gun on this unit is a “live” torch which is in the constant “ON” position.
Touching the torch to a grounded surface will produce and arc which could cause injury.
Please USE CAUTION when handling this unit.
ASSEMBLING THE WELDER
The following steps describe the assembly, installation, maintenance and operations of your new welder.
Avoid contacts with wires or parts. DO NOT work with the side panels
partially opened or removed completely from the power source.
The FP-90’s MIG gun torch is a “live” contact gun and is ALWAYS IN
THE POWER-ON POSITION. Wear Eye protection at all times when handling this
MIG gun.
Be sure that the welder’s elec-
trical power supply cord is not connected while performing this procedure.
Tools Required: Allen Wrench (metric)
1. Unpack the welder.
2. Assemble and install the plastic handle as shown in Figure 1.
3. Install MIG wire per instructions noted in section
“Installation of Welding Wire.”
4. Place the power source in a well ventilated area. DO NOT
obstruct the air intake and output vents. A reduced air flow
can cause a reduced duty cycle and damage internal compo-
nents.
5. Insure at least 6 feet of open space on the each side of the welder.
Connect the power supply cable to the correct receptacle, single-phase 120V (protected by slow blow fuses).
This equipment MUST be connected to ground.
WELDER INSTALLATION
POWER SOURCE CONNECTION
Power Requirements
This welder is designed to operate on a properly grounded 120 volt, 60 HZ, single-phase alternating current (AC)
power source fused with a 20 amp time-delayed fuse or circuit breaker. A qualified electrician should verify the ACTU-
AL VOLTAGE at the receptacle into which the welder will be plugged and confirm that the receptacle is properly
grounded. The use of the proper circuit size can eliminate the nuisance of circuit breaker tripping when welding.
DO NOT OPERATE THIS WELDER if the ACTUAL power source voltage is less than 110 Volts AC or
greater than 132 Volts AC. Contact a qualified electrician if this problem exists. Improper performance and/or
damage to the welder will result if operated on inadequate or excessive power.
Figure 1: Handle Installation

Connection to Power Source
High voltage danger from power source! Consult a qualified electri-
cian for proper installation of receptacle at the power source.
This welder must be grounded while in use to protect the operator from electrical shock. If you are not sure if your
outlet is properly grounded, have it checked by a qualified electrician. DO NOT cut off the grounding prong or alter
the plug in any way. DO NOT use any adapters between the welder’s power cord and the power source receptacle.
Make sure the POWER switch is OFF. Connect the welder’s power cord to a
properly grounded 120 VAC, 60 Hz, single-phase, 20 amp power source. DO NOT operate
this welder if the source voltage is less than 110 Volts AC or greater than 132 Volts AC.
Contact a qualified electrician if this problem exists. Improper performance and/or damage to
the welder will result if operated on inadequate or excessive power.
Extension Cords
For optimum welder performance, an extension cord should not be used unless absolutely necessary. If neces-
sary, care must be taken in selecting an extension cord appropriate for use with your specific welder.
Select a properly grounded extension cord that will mate directly with the ac power source receptacle and the
welder power cord without the use of adapters. Make certain that the extension is properly wired and in good
electrical condition (minimum gauge size 10/3 AWG, maximum 25 ft. length).
INSTALLATION OF THE WELDING WIRE
The power source is supplied with a spool of .035” Spool Flux MIG Wire. Install the wire into the feeding sys-
tem by following the instructions below and referring to Figure 2. MIG (GMAW) welding applications require
argon shielding gas.
7
Figure 2: Wire Installation

Remove the contact tip and gun nozzle from the welding torch before starting this
procedure.
1. Loosen the nut of the spool holder (brake drum). Remove the spring and the external ring.
2. Remove the plastic protection from the spool. Place it on the spool holder again. Mount the external ring,
the spring and the plastic lock nut again. These parts form the braking system for the wire spool. Tighten nut
until slightly snug. Excessive pressure strains the wire feeding motor. Too little pressure does not allow the
immediate stop of the wire spool at the end of the welding.
3. Loosen and lower the plastic knob. Release the upper roll of the feeder. Extract any wire remaining in the
torch liner from an earlier roll of wire.
4. When the wire is disconnected, grasp it with pliers so that it cannot exit from the spool. If necessary,
straighten it before inserting it in the wire input guide. Insert the wire on the lower roll and in the torch liner.
Keep the torch straight. When feeding a new wire through the liner, make sure the
wire is cut cleanly (no burrs or angles) and that at least 2” from the end is straight (no curves).
Failure to follow these instructions could cause damage to the liner.
5. Lower the upper roll and the knob. Tighten slightly. If tightened too much, the wire gets locked and could
cause motor damage. If not tightened enough, the rolls will not feed the wire.
6. Connect the power supply cable to the 120 V, 60 Hz line. Turn on the switch. Press the torch switch. The
wire fed by the wire feeding motor at variable speed must slide through the liner. When it exits from the
torch neck, release the torch switch. Turn off the machine. Mount the contact tip and the nozzle.
The drive rollers, when moving, may crush the fingers. Periodically, check the drive
rollers. Replace them when they are worn and compromise the regular feeding of the wire.
The FP-90’s welding torch is a “live” contact torch and is ALWAYS
in the power on position. Wear eye protection at all times when handling this
torch.
WELDING TORCH
The welding torch is installed in the welder at the factory. We recommend you periodically check the contact
tips and the nozzle. These parts must be clean and not worn. Replace the torch liner when the wire does not
run smoothly.
The FP-90’s welding torch is a “live” contact torch and is ALWAYS
in the power on position. Wear eye protection at all times when handling this
torch.
GASLESS WELDING (FCAW)
In gasless welding the torch is connected to the negative pole and the ground cable to the positive pole.
Gasless welding requires a special wire called “flux cored wire.” Flux-cored wire simplifies the use of these
machines compared to the machines with standard wire which requires a separate source of shielding gas.
ADVANTAGES OF GASLESS WELDING
1. There is no need for gas cylinders.
2. Welding outdoors is easier because there are fewer chances that wind blows away the shielding gas.
8

3. Welding time is about 50% less compared to the normal electrode welding.
4. The learning time for the operator is very short.
5. Minimum waste of welding material.
6. Most important, this process allows to complete the welding more quickly and efficiently..
7. Less heat, less distortion.
8. Possible to weld thin materials.
PREPARATION FOR WELDING
1. Connect the welding machine to the 120V,
60 Hz line.
2. Connect the ground cable to the workpiece
(see Figure 3). Make sure that the contact
is good.
3. Make sure that the wire-feeding roll is cor-
rectly positioned (groove matching the
wire diameter). Note that each roll has two
grooves. One is marked “.035”/0.9 mm”
and the other is marked “.030”/0.8 mm.”
WELDING PROCEDURES
1. Your welding power source has two positions for the regulation of the current in the various conditions. The
choice of the position for the welding is determined by the thickness of the material to weld.
2. The thickness of the material determines the wire speed.
REPLACEMENT OF THE WIRE SPOOL
The welding power source is supplied with a mini wire spool of of flux cored 0.035” diameter wire. When the
wire spool is finished it can be replaced with a wire spool of 2 lbs.
9
Figure 3: Polarity Preparation
Table 1:Approximate Settings for Welding

The wire is pushed by a roll which is moved by a series of mechanisms. The roll has two grooves, one marked
by 0.035” (0.9 mm) and the other marked by 0.030” (0.8 mm). It is very important to use the correct groove as
explained in “Preparation for Welding” on page 9. Otherwise, the wire will not feed smoothly or it will be
crushed. Make sure that the torch tip matches with the wire diameter. Your welding power source is supplied
with a welding torch, complete with tip, for the wire included with the power source.
Follow the procedure described in “Installation of the Welding Wire” on page 7 for the replacement of the wire
spool.
WELDING TIPS
1. Keep the torch handle with a 45º angle with respect to the workpiece. Maintain the nozzle about 1/4” (6
mm) from the surface.
2. Move the torch handle with prudence and steadiness.
3. Keep the wire and its cover clean. DO NOT use rusted wire.
4. Avoid sharp bends and kinks on the welding hose.
5. If possible, clean the wire liner with compressed air when replacing the wire spool.
6. Periodically, remove the dust using low pressure (3-4 bar/20-30 PSI) from the inside of the power source, to
assure adequate heat dissipation from power source during operation.
GENERAL OPERATING TIPS
Contact tips and nozzles should be cleaned frequently. Spatter buildup may cause bridging between nozzle and
tip. This could cause electrical shorting between the nozzle and the workpiece.
Regularly, inspect the conductor tube, handle, cable hose and other parts of the welding torch for abrasions,
cuts or undue wear. Replace or repair any parts found deficient.
ADJUSTMENT OF THE POWER SOURCE
Set the voltage. Use the correct “stick out.” The wire “stick out” is the distance between the contact tip and the
workpiece. The wire “stick out” (sometimes improperly called the arc length) should remain in the 0.2”-0.4”
(5mm-10mm) range to obtain the best welding (and sound) performance.
1. Position the voltage switch in the desired position (see Table 1). Select the lower position for thin material
and the higher setting for thicker material.
2. Adjust the wire speed. Start using a trial metal sheet thoroughly cleaned of layers of rust or paint. Connect
the ground cable to the workpiece. Adjust the wire speed at the high setting. Press the torch switch.
The FP-90’s welding torch is a “live” con-
tact torch and is ALWAYS IN THE POWER ON
POSITION. Wear eye protection at all times when
handling this torch.
Press the torch switch firmly to feed the wire.
Start welding and decrease the wire speed gradually.
Continue to decrease the wire speed and listen to the
sound. The sound changes from a crackling noise to a regular and strong buzzing (similar to
the sound of frying bacon). This buzzing sound indicates the correct wire speed for the work-
piece being welded. When the current regulation is changed, reset the wire speed. ALWAYS
10
Figure 4: Power Source

start from a higher wire speed. This operation prevents damage to the contact tip during
welding. During welding, keep the torch at a 45º angle from the workpiece.
SELECTING WIRE
WIRE DIAMETER SELECTION
Using a wire that is too small in diameter causes excessive weld spatter and weld heat. Wire that is too large
causes wire stubbing. Stubbing occurs when the molten metal bridge between the electrode and weld pool can-
not be broken and the electrode stubs into the pool and the pool freezes. Wire that is too large at low amper-
ages can cause an uneven arc. In either case the weld is ruined. Use Table 2 below to identify the recommend-
ed wire diameter to use for the metal being welded. These recommendations are for typical applications only.
WIRE SPOOL SIZE SELECTION
This welder accepts a 2-lb. spool. Welding wire oxidizes over time.
1. STEEL WIRE - is usually coated with copper to prevent rusting and to strengthen the transmission of the
welding current from the contact tip to the wire. We recommend that copper-coated steel welding wire be
purchased in spool sizes that will be used in 6 months are less. The copper coating begins oxidizing in the
early stages of aging. As time passes, the oxidation gets heavier. Check the wire for copper oxidation by
unspooling about 2 feet of wire. Pinch the wire between the thumb and forefinger. Pull the thumb and fore-
finger down the length of the wire. Look at the line created by the copper oxidation on the thumb and fore-
finger. A fresh spool leaves a light gray line. A well-oxidized spool leaves a darker line. Heavy copper oxi-
dation causes arc flutter and possibly wire drive slippage. If steel wire continues to oxidize, the steel wire
under the copper coating will rust and cause even worse arc flutter and drive problems.
2. SELF-SHIELDING, FLUX-CORE, STEEL WIRE - spools should be selected based on the same guide-
lines as for copper-coated steel wire.
3. ALUMINUM WIRE - has a greater storage problem than steel. It oxidizes much faster and the oxidation is
much heavier. The early stages of oxidation are virtually invisible. As time passes, a white powder develops
that causes extreme arc flutter, wire drive problems, contamination build-up in the liner, wire burn-back into
the contact tip and a poor weld. Use up a spool of aluminum wire within three months.
4. STAINLESS STEEL WIRE - oxidizes a slow rate. Its oxidation is light. Handling and storing stainless
steel wire is less critical than for aluminum and steel wires.
5. SILICON-BRONZE WIRE - spools use the same guidelines as for copper-coated steel wire.
The above recommended spool storage times are rules-of-thumb. Storage times are impacted by the time in
distribution prior to retail sale, warehouse conditions, time of year and packaging.
Although these factors are out of your control, you can slow down the oxidation process by the following:
Store the wire in a dry place when not in use;
Store the wire in sealed plastic bag;
Leave unopened in the manufacturer's package until ready to use.
If a spool of wire looks heavily oxidized, unspool a few turns of wire. Determine if
the wire further down the spool is usable. If a spool has developed heavy oxidation, discard
the spool of wire.
11
Table 2: Wire Diameter Amperage Ranges (Typical)

SELECTING WELDING CURRENT POLARITY
Using gas-shielded steel welding wire requires direct current (dc) reverse polarity. Self-shielding flux cored
wires use direct current straight polarity. Depending on the type of wire you are using, the polarity may have
to be converted.
Some welders DO NOT have the capability of changing the polarity.
Direct current reverse polarity is sometimes referred to as DCEP (Direct Current Electrode Positive). Direct
current straight polarity is sometimes referred to as DCEN (Direct Current Electrode Negative).
PREPARING THE WORK AREA
Preparation is an important factor in making a satisfactory weld. Study the process and equipment. Practice
welding before attempting to weld the finished product. We recommend an organized, safe, convenient, com-
fortable, well-lighted work area for the operator. The work area should contain no flammable items. Both a
fire extinguisher and a bucket of sand should be available.
Proper preparation for welding requires the following:
1. Prepare an organized, well-lighted work area (see Figure 5).
2. Provide protection for the eyes and skin of the operator and any by-standers.
3. Set up the workpiece. Make the workpiece clamp connection.
SETTING UP THE WORKPIECE
PREPARING THE JOINT
For effective welding, the surfaces to be joined MUST be free of dirt, rust, scale, oil or paint. Welding on met-
als not properly cleaned causes a brittle and porous weld.
Aluminum welding requires more detailed preparation than steel welding.
1. A clean weld joint area is a must in obtaining a quality aluminum weld. Remove dirt and oxidation with a
stainless steel bristled wire brush. Remove any oil or grease with a good chemical aluminum cleanser.
12
Figure 5: Work Area

2. Aluminum is often anodized to prevent oxidation. However, an anodized surface will NOT conduct electric-
ity. Therefore, to weld anodized aluminum, you MUST sand or grind the anodized coating from the weld
joint area and from the site where the workpiece clamp will be connected.
Determine whether or not the aluminum you intend to weld is
anodized. Touch the two probes of an electrical continuity tester or
ohmmeter to the aluminum in question. Set the probes an inch or two
apart. If there is no indication of electrical continuity, the aluminum
is anodized.
If the base metal pieces to be joined are thick or heavy, it may be
necessary to bevel the edges (with a metal grinder) at the point of
contact as shown in Figure 6. The angle of the bevel should be
approximately 60º.
ALWAYS wear safety goggles to help prevent eye injuries when grind-
ing metal. Also, inspect the grinder and verify that it is in good working condition.
See the chart, Types of Weld Joints, in Figure 7, for detailed instructions for preparing the weld joint.
During welding, the workpieces become hot and expand. The expansion may cause the pieces to shift posi-
tions. If possible, clamp the workpieces into the position they are to occupy when the welding is completed.
13
Figure 6: Workpiece Preparation
Figure 7: Types of Weld Joints

WORKPIECE CLAMP CONNECTION
Connect the workpiece clamp directly to the work piece as close to the weld as possible. If it is impractical to
connect the workpiece clamp directly to the workpiece, connect it to the metal that is securely attached to the
workpiece, but not electrically insulated from it. Also, make sure the attached metal piece is of about the same
or greater thickness as the workpiece.
There is risk of electronic component damage if the workpiece clamp is connect-
ed to an automobile or other equipment with on-board computer systems, solid state electron-
ic controls, solid state sound systems, etc. DO NOT weld until disconnecting the cable from
the battery that is attached to chassis ground. Failure to do so may result in electronic com-
ponent damage.
TUNING IN THE WIRE SPEED
Tuning the wire speed is one of the most important parts of welder operation. Selecting the best wire speed
setting is much the same as tuning in a radio station. It must be done BEFORE starting each welding job or
whenever changing the heat setting, wire diameter or wire type. Tune the wire speed according to the follow-
ing steps.
1. Set up and ground a scrap piece of the same type of metal that you will be welding. It should be equal to or
greater than the thickness of the actual workpiece. It should be free of paint, oil, rust, etc.
2. Select a heat or voltage setting.
3. Hold the gun in one hand allowing the nozzle to rest on the edge of the workpiece farthest away from you
and at an angle similar to that which will be used when actually welding.
ARC RAYS CAN INJURE EYES AND BURN SKIN! Reduce the risk of injury
from arc rays. NEVER strike a welding arc until you and all bystanders in the welding
area have a welding helmet or shield in place and are wearing the recommended protec-
tive clothing. DO NOT continue unless you read, understand and intend to follow the
entire SAFETY SUMMARY provided at the front of this manual.
4. With your free hand, turn the wire speed control to maximum. Continue to hold onto the adjustment knob.
5. Lower your welding helmet. Pull the trigger on the gun to start an arc.
6. Drag the gun toward you while turning down the wire speed control.
7. LISTEN! As you decrease the wire speed, the sound that the arc makes changes from a sputtering sound to
a smooth, high-pitched buzzing sound. It sputters again if you decrease the wire speed too far.
8. Continue decreasing the wire speed until the arc noise passes the high-pitched buzzing (preferred sound)
and begins sputtering again.
9. Turn the wire speed control back, in the opposite direction, until you come back to the high-pitched arc
noise.
The wire speed is now tuned in. REMEMBER! Repeat this tune-in procedure whenever you select a new heat
setting, a different wire diameter or a different type of wire.
Self-shielding flux-core wire has a very wide preferred sounding range. The range
can span as much as 60 degrees on the wire speed control. It is important to know that the
heat of the arc and the penetration into the base metal increases as the wire speed increases
within the preferred sounding range for a given heat setting. Therefore, use the wire speed
control to slightly increase or decrease heat and penetration by selecting higher or lower wire
speed settings WITHIN the preferred sounding range for a given heat setting.
14

LEARNING TO WELD
Whether you have welded before or not, it is important that you become familiar with your new welder, its
controls and the results achieved at different settings. We strongly recommend that you practice with your new
welder on scrap metal. Try different heat settings, base metal thicknesses and welding positions for each type
and size of wire that you will use. By practicing, you will gain a feel for how changes in these welding vari-
ables affect the weld.
If you have not MIG welded before, you need to develop welding skills and techniques as well.
The self-taught welder learns through a process of trial and error. The best way to teach yourself how to weld
is with short periods of practice at regular intervals. Practice welding on scrap metal that can be discarded. DO
NOT attempt to make any repairs on valuable equipment until your practice welds are of good appearance and
free of slag or gas inclusions. What you fail to learn through practice will be learned through mistakes and re-
welds later on.
HOLDING THE GUN
Hold the welding gun in the way that feels most comfortable to you. While practicing with your new welder,
try holding the gun in different positions until you find the one that works best for you.
Position the Gun to the Workpiece
There are two angles of the gun nozzle in relation to the workpiece to consider when welding.
1. Angle A (Figure 8) can be varied. In most cases, the optimum angle is 60 degrees, the point at which the
gun handle is parallel to the workpiece. Increasing angle A increases penetration. Decreasing angle A
decreases penetration.
2. Angle B (Figure 9) can be varied for two reasons: to improve the ability to see the arc in relation to the
weld puddle and to direct the force of the arc.
The force of the welding arc follows a straight line out of the end of the nozzle. If angle B is changed, so is
the direction of the arc force and the point at which penetration is concentrated.
On a butt weld joint, the only reason to vary angle B from perpendicular (straight up) to the workpiece is to
improve visibility of the weld puddle. In this case, angle B can be varied anywhere from 0º to 45º. A 30º angle
works best.
On a fillet weld joint, the nozzle is generally positioned so as to split the angle between the horizontal and ver-
tical members of the weld joint. In most cases, a fillet weld is 45º.
Distance from the Workpiece
The end of the welding gun is designed with the contact tip recessed from the end of the nozzle and the nozzle
electrically insulated from the rest of the gun. This permits the operator to rest the nozzle on the workpiece
and drag it along while welding. This is helpful to beginning welders to steady the gun and allows the welder
to concentrate on welding technique. If the nozzle is held off the workpiece, keep a constant distance between
the nozzle and the workpiece and DO NOT exceed ⁄" or the arc may begin sputtering, signaling a loss in weld-
ing performance.
15
Figure 8: Gun Position, Angle A
Figure 9: Gun Position, Angle B

LAYING A BEAD
EXPOSURE TO WELDING ARC IS EXTREMELY HARMFUL TO THE
EYES AND SKIN! Prolonged exposure to the welding arc can cause blindness and
burns. Never strike an arc or begin welding until you are adequately protected.
Wear flameproof welding gloves, a heavy long-sleeved shirt, cuffless trousers,
high-topped shoes and a welding helmet.
ELECTRIC SHOCK CAN KILL! To prevent electric shock, DO NOT
perform any welding while standing, kneeling or lying directly on the grounded
work.
MOVING THE GUN
Gun travel refers to the movement of the gun along the weld joint. It is broken into two elements: direction
and speed. A solid weld bead requires that the welding gun move steadily and at the correct speed along the
weld joint. Moving the gun too fast, too slow or erratically prevents proper fusion or creates a lumpy uneven
bead.
1. Travel Direction is the direction the gun moves
along the weld joint in relation to the weld
puddle. The gun is either pushed (see Figure10)
into the weld puddle or pulled away from the
weld puddle.
For most welding jobs you pull the gun along the
weld joint to take advantage of the greater weld
puddle visibility. However, there are a few appli-
cations where pushing the gun provides some
advantages:
a. Vertical welding starts at the top of a weld joint. Pull the gun down toward the bottom. However, if pud-
dle control becomes difficult (such as the puddle running downward), start the vertical weld at the bottom
of the weld joint. Push the gun up toward the top to overcome this problem.
b. Aluminum welding uses either direction of gun travel. However, pushing leaves a weld that is cleaner in
appearance. Pulling the gun leaves a sooty weld. The finished weld is always being blasted by the arc and
the impurities coming out of the weld puddle. This problem affects the weld appearance only. Clean the
weld with a stainless steel bristled wire brush.
2. Travel speed is the rate at which the gun is pushed or pulled along the weld joint. For a fixed heat setting,
the faster the travel speed, the lower the penetration, the lower and narrower the finished weld bead.
Likewise, the slower the travel speed, the deeper the penetration, the higher and wider the finished weld
bead.
TYPES OF WELD BEADS
The following paragraphs discuss the most commonly used arc welding beads.
Once the gun is in position with the wire lined up on the weld joint, lower your helmet, pull the trigger and the
arc starts. In a second or two, you notice a weld puddle form and the base of the bead beginning to build. Now
move the gun. If you are just learning to weld, move the gun in a straight line and at a steady speed along the
weld joint. Try to achieve a weld with the desired penetration and fairly flat and consistent in width.
As you become more familiar with your new welder and better at laying some beads, you can try different
welding techniques to improve and add to your welding skills.
16
Figure 10: Gun Travel Direction
/