Page is loading ...

00-99-000985/1009
READ ENTIRE MANUAL BEFORE
USING THIS PRODUCT
USER’S GUIDE
GUIDE DE L-UTILISATEUR
ARC WELDER
SOUDEUR D’ARC
LIRE ENTIÈREMENT LE GUIDE AVANT
D’UTILISER CE PRODUIT

• 1 •
GENERAL SAFETY PRECAUTIONS 1.
The following safety information is provided as a guideline to help you
operate your new welder under the safest possible conditions. Any
equipment that uses electrical power can be potentially dangerous to use
when safety or safe handling instructions are not known or not followed.
The following safety information is provided to give you the information
necessary for safe use and operation.
When a WARNING precedes a procedure step, it is an indication that the
step contains a procedure that might be injurious to a person if proper
safety precautions are not heeded. When a procedure step is preceded
by a CAUTION, it is an indication that the step contains a procedure that
might damage the equipment being used. A NOTE may be used before or
after a procedure step to highlight or explain something in that step.
READ ALL SAFETY INSTRUCTIONS CAREFULLY before attempting
to install, operate, or service this welder. Failure to comply with these
instructions could result in personal injury and/or property damage.
Published standards on safety are available. They are listed in
ADDITIONAL SAFETY INFORMATION at the end of this SAFETY
SUMMARY. The National Electrical Code, Occupational Safety and Health
Act regulations, local industrial codes and local inspection requirements
also provide a basis for equipment installation, use, and service.
SHOCK HAZARDS 1.1
WARNING: Electric shock can kill! To reduce the risk of death
or serious injury from shock, read, understand, and follow the
following safety instructions. In addition, make certain that anyone
else who uses this welding equipment, or who is a bystander in the
welding area understands and follows these safety instructions as
well.
IMPORTANT! TO REDUCE THE RISK OF DEATH, INJURY, OR
PROPERTY DAMAGE, DO NOT ATTEMPT OPERATION of this welding
equipment until you have read and understand the following safety
summary.
Do not, in any manner, come into physical contact with any part of the •
welding current circuit. The welding current circuit includes: A. the work
piece or any conductive material in contact with it, B. the ground clamp,
C. the electrode or welding rod, D. any metal parts on the electrode
holder.
Do not weld in a damp area or come in contact with a moist or wet •
surface.
Do not attempt to weld if any part of clothing or body is wet. •
Do not allow the welding equipment to come in contact with water or •
moisture.
Do not drag welding cables, wire feed gun, or welder power cord through •
or allow them to come into contact with water or moisture.

• 2 •
Do not touch welder, attempt to turn welder on or off if any part of the •
body or clothing is moist or if you are in physical contact with water or
moisture.
Do not attempt to plug the welder into the power source if any part of •
body or clothing is moist, or if you are in physical contact with water or
moisture.
Do not connect welder ground clamp to or weld on electrical conduit. •
Do not alter power cord or power cord plug in any way. •
Do not attempt to plug the welder into the power source if the ground •
prong on power cord plug is bent over, broken off, or missing.
Do not allow the welder to be connected to the power source or attempt •
to weld if the welder, welding cables, welding site, or welder power cord
are exposed to any form of atmospheric precipitation, or salt water spray.
Do not carry coiled welding cables around shoulders, or any other part of •
the body, when they are plugged into the welder.
Do not modify any wiring, ground connections, switches, or fuses in this •
welding equipment.
Wear welding gloves to help insulate hands from welding circuit. •
Keep all liquid containers far enough away from the welder and work area •
so that if spilled, the liquid can not possibly come in contact with any part
of the welder or electrical welding circuit.
Replace any cracked or damaged parts that are insulated or act as •
insulators such as welding cables, power cord, or electrode holder
IMMEDIATELY.
EMF INFORMATION 1.2
WARNING: Weldingcurrentwillcauseelectromagneticeldsasitows
through welding cables and internal wiring. There has been and continues
tobesomeconcernandresearchaboutsuchelds.Untilthenal
conclusions of the research are reached, you may wish to minimize your
exposuretoelectromagneticeldswhenweldingorcutting.
Toreducemagneticeldsintheworkplace:
Keep cables close together by twisting or taping them. •
Arrange cables to one side and away from you. •
Do not coil or drape cables around your body. •
Keep welding power source and cables as far away from you as practical. •
Connect work clamp to work piece as close to the weld as possible. •
About Pacemakers: Pacemaker wearers consult your doctor prior to
using any welding equipment. If cleared by your doctor, then following the
above procedures is recommended.

• 3 •
FLASH HAZARDS 1.3
WARNING: ARC RAYS CAN INJURE EYES AND BURN SKIN! To
reduce risk of injury from arc rays, read, understand, and follow the
following safety instructions. In addition, make certain that anyone
else that uses this welding equipment, or is a bystander in the
welding area, understands and follows these safety instructions as
well.
Do not look at an electric arc without proper protection. A welding arc is •
extremely bright and intense and, with inadequate or no eye protection,
theretinacanbeburned,leavingapermanentdarkspotintheeldof
vision.Ashieldorhelmetwithanumber10-shadelterlens(minimum)
must be used.
Donotstrikeaweldingarcuntilallbystandersandyou(thewelder)have•
welding shields and/or helmets in place.
Do not wear a cracked or broken helmet and replace any cracked or •
brokenlterlensesIMMEDIATELY.
Do not allow the uninsulated portion of the wire feed gun to touch the •
groundclamporgroundedworktopreventanarcashfrombeing
created on contact.
Providebystanderswithshieldsorhelmetsttedwithanumber10-shade•
lterlens.
Wear protective clothing. The intense light of the welding arc can burn the •
skin in much the same way as the sun, even through lightweight clothing.
Wear dark clothing of heavy material. The shirt worn should be long
sleeved and the collar kept buttoned to protect chest and neck.
ProtectagainstREFLECTEDARCRAYS.Arcrayscanbereectedoff•
shiny surfaces such as a glossy painted surface, aluminum, stainless
steel,andglass.Itispossibleforyoureyestobeinjuredbyreectedarc
rays even when wearing a protective helmet or shield. If welding with a
reectivesurfacebehindyou,arcrayscanbounceoffthesurface,then
offthelterlensontheinsideofyourhelmetorshield,thenintoyour
eyes.Ifareectivebackgroundexistsinyourweldingarea,eitherremove
itorcoveritwithsomethingnonammableandnon-reective.Reected
arc rays can also cause skin burn in addition to eye injury.
FIRE HAZARDS 1.4
WARNING: FIRE OR EXPLOSION CAN CAUSE DEATH, INJURY,
AND PROPERTY DAMAGE! To reduce risk of death, injury,
orpropertydamagefromreorexplosion,read,understand,
and follow the following safety instructions. In addition, make
certain that anyone else that uses this welding equipment, or is
a bystander in the welding area, understands and follows these
safety instructions as well. REMEMBER! Arc welding by nature
produces sparks, hot spatter, molten metal drops, hot slag, and hot
metalpartsthatcanstartres,burnskin,anddamageeyes.

• 4 •
Do not wear gloves or other clothing that contain oil, grease, or other •
ammablesubstances.
Donotwearammablehairpreparations.•
Do not weld in an area until it is checked and cleared of combustible •
and/orammablematerials.BEAWAREthatsparksandslagcany
35 feet and can pass through small cracks and openings. If work and
combustibles cannot be separated by a minimum of 35 feet, protect
againstignitionwithsuitable,snug-tting,reresistant,coversorshields.
Do not weld on walls until checking for and removing combustibles •
touching the other side of the walls.
Do not weld, cut, or perform other such work on used barrels, drums, •
tanks,orothercontainersthathadcontainedaammableortoxic
substance.Thetechniquesforremovingammablesubstancesand
vapors, to make a used container safe for welding or cutting, are quite
complex and require special education and training.
Do not strike an arc on a compressed gas or air cylinder or other •
pressure vessel. Doing so will create a brittle area that can result in
a violent rupture immediately or at a later time as a result of rough
handling.
Donotweldorcutinanareawheretheairmaycontainammabledust•
(suchasgraindust),gas,orliquidvapors(suchasgasoline).
Do not handle hot metal, such as the workpiece or electrode stubs, with •
bare hands.
Wearleathergloves,heavylongsleeveshirt,cufesstrousers,high-•
topped shoes, helmet, and cap. As necessary, use additional protective
clothingsuchasleatherjacketorsleeves,reresistantleggings,or
apron. Hot sparks or metal can lodge in rolled up sleeves, trouser cuffs,
or pockets. Sleeves and collars should be kept buttoned and pockets
eliminated from the shirtfront.
Havere-extinguishingequipmenthandyforimmediateuse!Aportable•
chemicalreextinguisher,typeABC,isrecommended.
Wear earplugs when welding overhead to prevent spatter or slag from •
falling into ear.
Makesureweldingareahasagood,solid,safeoor,preferablyconcrete•
ormasonry,nottiled,carpeted,ormadeofanyotherammablematerial.
Protectammablewalls,ceilings,andoorswithheatresistantcoversor•
shields.
Check welding area to make sure it is free of sparks, glowing metal or •
slag,andamesbeforeleavingtheweldingarea.

• 5 •
FUME HAZARDS 1.5
WARNING: FUMES, GASES, AND VAPORS CAN CAUSE
DISCOMFORT, ILLNESS, AND DEATH! To reduce risk of
discomfort, illness, or death, read, understand, and follow the
following safety instructions. In addition, make certain that anyone
else that uses this welding equipment or is a bystander in the
welding area, understands and follows these safety instructions as
well.
Do not weld in an area until it is checked for adequate ventilation as •
described in ANSI standard #Z49.1. If ventilation is not adequate to
exchange all fumes and gasses generated during the welding process
withfreshair,donotweldunlessyou(thewelder)andallbystandersare
wearing air-supplied respirators.
Do not heat metals coated with, or that contain, materials that produce •
toxicfumes(suchasgalvanizedsteel),unlessthecoatingisremoved.
Make certain the area is well ventilated, and the operator and all
bystanders are wearing air-supplied respirators.
Do not weld, cut, or heat lead, zinc, cadmium, mercury, beryllium, or •
similar metals without seeking professional advice and inspection of
the ventilation of the welding area. These metals produce EXTREMELY
TOXIC fumes that can cause discomfort, illness, and death.
Do not weld or cut in areas that are near chlorinated solvents. •
Vapors from chlorinated hydrocarbons, such as trichloroethylene and
perchloroethylene, can be decomposed by the heat of an electric arc or
its ultraviolet radiation. These actions can cause PHOSGENE, a HIGHLY
TOXIC gas to form, along with other lung and eye-irritating gases. Do not
weld or cut where these solvent vapors can be drawn into the work area
or where the ultraviolet radiation can penetrate to areas containing even
very small amounts of these vapors.
Donotweldinaconnedareaunlessitisbeingventilatedandthe•
operator(andanyoneelseinthearea)iswearinganair-supplied
respirator.
Stop welding immediately if you develop momentary eye, nose, or •
throat irritation as this indicates inadequate ventilation. Stop work and
take necessary steps to improve ventilation in the welding area. Do not
resume welding if physical discomfort persists.
ADDITIONAL SAFETY INFORMATION 1.6
For additional information concerning welding safety, refer to the following
standards and comply with them as applicable.
ANSI Standard Z49.1 — SAFETY IN WELDING AND CUTTING — •
obtainable from the American Welding Society, 550 NW Le Jeune Road,
Miami,FL33126Telephone(800)443-9353,Fax(305)443-7559-www.
amweld.org or www.aws.org

• 6 •
ANSIStandardZ87.1—SAFEPRACTICEFOROCCUPATIONAND•
EDUCATIONAL EYE AND FACE PROTECTION — obtainable from the
American National Standards Institute, 11 West 42nd St., New York, NY
10036Telephone(212)642-4900,Fax(212)398-0023-www.ansi.org
NFPA Standard 51B — CUTTING AND WELDING PROCESS — •
obtainable from the National Fire Protection Association, 1 Batterymarch
Park,P.O.Box9101,Quincy,MA02269-9101Telephone(617)770-3000,
Fax(617)770-0700-www.nfpa.org
OSHA Standard 29 CFR, Part 1910, Subpart Q., WELDING, CUTTING •
ANDBRAZING—obtainablefromyourstateOSHAofceorU.S.Dept.
ofLaborOSHA,OfceofPublicAffairs,RoomN3647,200Constitution
Ave. NW Washhington, DC 20210 - www.osha.gov
CSAStandardW117.2—CodeforSAFETYINWELDINGAND•
CUTTING.—obtainablefromCanadianStandardsAssociation,178
Rexdale Blvd. Etobicoke, Ontario M9W 1R3 - www.csa.ca
American Welding Society Standard A6.0. WELDING AND CUTTING •
CONTAINERS WHICH HAVE HELD COMBUSTIBLES. — obtainable
from the American Welding Society, 550 NW Le Jeune Road, Miami, FL
33126Telephone(800)443-9353,Fax(305)443-7559-www.amweld.org
or www.aws.org
INTRODUCTION 2.
DESCRIPTION 2.1
Your new welder is designed for general repair, maintenance, and metal
fabrication. The welder consists of a single-phase power transformer, and
control switch. This welder is capable of welding with 1/16”, 5/64”, and
3/32” general purpose mild steel electrodes.
Now you can weld 18-gauge steel sheet metal up to 1/8” with a single
pass. Welds thicker metal with beveling and multiple passes.
WELDER PERFORMANCE 2.2
Your welder has been designed to weld on steel from approximately
18 gauge up to 1/8” thick. Thinner and thicker material can be welded
depending on the experience and technique of the welder and the type of
welding rod being used.

•7•
SPECIFICATIONS 2.3
Input Voltage 120 volt 60 Hz. Single Phase
Input Amps @ Rated Output 20 AAC
Input Plug Style 120 volt 15 amp
Power Cord Length 6-ft.
Rated Output Amps 70AAC
Max Output Amps 80 AAC
Rated Output Volts 27VAC
Rated Duty Cycle 10%
Max Open Circuit Voltage 40 VAC
Agency Listing cULus
Output Settings 2
POWER REQUIREMENTS 2.4
WARNING: THIS WELDING MACHINE MUST BE CONNECTED
TO A POWER SOURCE IN ACCORDANCE WITH APPLICABLE
ELECTRICAL CODES.
This welder intermittently draws more than 15 amps of current. We
recommend that you either install a 20 amp circuit or do not run anything
else on the same circuit as the welder or you may trip the breaker
supplying the AC power. If you modify the power cord in any way, other
than attaching the proper input plug, you will void the manufacturer’s
warranty.Itisrecommendedthataqualiedelectricianverifytheactual
voltageatthereceptacleintowhichthewelderwillbepluggedandconrm
that the receptacle is properly fused and grounded. The use of the proper
circuit size can eliminate nuisance circuit breaker tripping while welding.
DO NOT OPERATE THIS WELDER if the actual power source voltage is
lessthan100voltsACorgreaterthan125voltsAC.Contactaqualied
electrician if this problem exists. Improper performance, damage to the
welder, property damage and/or personal injury can result if operated on
inadequate or excessive power.
WARNING: ELECTRIC SHOCK CAN KILL! FIRE CAN KILL,
INJURE, AND CAUSE PROPERTY DAMAGE!
Toreducetheriskofelectricshockandre,connectonlyto •
properly grounded and fused outlets.
Never alter the AC power cord provided on the welder. Never •
alter an extension cord or extension cord plugs.

• 8 •
EXTENSION CORD USE 2.5
For optimum welder performance, an extension cord should not be used
unless absolutely necessary. If necessary, care must be taken in selecting
anextensioncordappropriateforusewithyourspecicwelder.
Select a properly grounded extension cord that will mate the AC power
cord of the welder with the AC power source receptacle directly, without
the use of adapters. Make sure the extension cord is properly wired and in
good electrical condition.
For an extension cord not exceeding 25 feet in length, choose the same
AWG wire size as that of the power cord on the welder. Extension cord
lengths longer than 25 feet will require heavier wire gauges to compensate
for voltage losses.
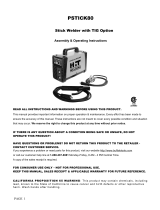
INSTALLING THE ELECTRODE HOLDER 2.6
Attach the electrode holder to the electrode cable according to the
following steps.
Removethehandle(3)fromtheelectrodeholder(1)byremovingthe1.
screwholdingthehandle(notshown)andslidingthehandleoff.
Removethescrew(6)fromtheelectrodeholder(1).2.
Pushthecable(4)throughthehandle(3).3.
Insertthescrew(6)throughtheholeintheelectrodeholder,then4.
throughthecablelug(5)andthreadintotheRectangularMountingNut
(2).
Slidethehandlebackontotheelectrodeholderbody(whenitis5.
alignedproperlyitwillslideoneasily).Pressthetwopartstogetherand
reinsert the screw to hold the handle in place.

• 9 •
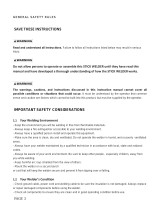
INSTALLING THE GROUND CLAMP 2.7
Attach the ground clamp to the ground cable according to the following
steps.
Remove the rubber grip from 1.
ground clamp.
Push the cable through the 2.
grip as illustrated.
Attach cable lug to the ground 3.
clamp with lockwasher and
screw.
Slide grip back up over ground 4.
clamp.
OPERATION 3.
GETTING TO KNOW YOUR NEW WELDER 3.1
Whether or not you have welded before, it is important that you become
familiar with your welder, its controls, and the results achieved at different
settings. We strongly recommend that you practice with your new welder
on scrap metal, trying a variety of heat settings, base metal thicknesses,
and welding positions for each type and size of wire that you will be
using. By doing this you will gain a feel for how changes in these welding
variables affect the weld.
If you have not welded before, you will need to develop welding skills and
techniques as well. The self-taught welder learns through a process of trial
and error. The best way to teach yourself how to weld is with short periods
of practice at regular intervals.
Do not attempt to weld on any valuable equipment until you have made
practice welds on scrap metal that can be discarded. The scrap metal
should be of the same type and thickness as that of the item to be welded.
Onlyafteryouaresatisedthatyourpracticeweldsareofgoodstrength
and appearance, should you attempt your actual
welding job.
CONTROLS & THEIR FUNCTIONS 3.2
AMPERAGE CONTROL
Two settings can be selected. The lower setting for
thinner material and smaller welding electrodes,
the higher setting for thicker materials and larger
welding electrodes.

• 10 •
ON-OFF – THERMAL INDICATOR
To turn the power on to the welder, push the main switch to ON. Your
welder has a lighted main switch. This light will come on if the welder has
overheated. The light indicates that a thermostat has shut off the power
within the welder. Once the welder has cooled, the thermostat will turn the
welder back on and the light will go out. Over heating is usually caused by
exceeding the welder duty cycle.
DUTY CYCLE
The duty cycle rating of a welder is a measure of how long the welder
can weld and how long it must be rested and cool. It is expressed as
apercentageoftenminutes(theindustryrecognizedcycletime)and
represents the maximum welding time allowed, with the balance of the ten
minute cycle required for cooling.
INTERNAL THERMAL PROTECTION
If you exceed the duty cycle of your welder, an internal thermal protector
will open and shut off all welder functions. If this ever happens to you,
do not shut off the welder! Leave it turned on. After cooling a while, the
thermal protector will automatically reset and the welder will function
again. However, you should wait at least 10 minutes after the thermal
protector opens before resuming welding, even if the protector resets
itselfsooner,oryoumayexperiencelessthanspecieddutycycle
performance.
CAUTION! DO NOT CONSTANTLY EXCEED THE DUTY CYCLE OR
DAMAGE TO THIS WELDER WILL RESULT!
CONNECT WELDER GROUND
Attach the ground clamp to the work piece making sure that the work
piece is cleaned of dirt, oil, rust, scale, oxidation, and paint at the point
of connection. It is best to connect the ground clamp directly to the work
piece and as close to the weld as possible. If it is impractical to connect
the ground clamp directly to the work piece, connect it to metal that is
securely attached to the work piece, but not electrically insulated from it.
Also, make sure this other metal is of similar or greater thickness than that
of the work piece.
CAUTION! RISK OF ELECTRONIC COMPONENT DAMAGE!
If the ground clamp is being connected to an automobile or other
equipment with on-board computer systems, solid state electronic
controls, solid state sound systems, etc., do not weld until disconnecting
the cable from the battery that is attached to chassis ground. Failure to do
so may result in electronic component damage!

• 11 •
GENERAL WELDING INFORMATION 4.
PREPARATIONS FOR WELDING 4.1
An important factor in making a satisfactory weld is preparation.
This includes studying the process and equipment and then practice
weldingbeforeattemptingtoweldnishedproduct.Anorganized,safe,
convenient, comfortable, well lighted work area should be available to the
operator.Theworkareashouldspecicallybefreeofallammableswith
bothareextinguisherandbucketofsandavailable.
To properly prepare for welding, it is necessary to:
Prepare an organized, well lighted work area 1.
Provide protection for the eyes and skin of the operator and 2.
bystanders.
Set up the work piece and make the ground clamp connection. 3.
Select the electrode. 4.
Turn the power switch on. 5.
SETTING UP THE WORK PIECE 4.2
Welding Positions
Arc welding can be performed in any of the four basic positions: Flat,
Horizontal, Vertical and Overhead. Flat welding is generally easier,
faster, and allows for better penetration. Overhead welding is the most
difcult.The(rod)selectionswillbeaffectedbythepositions.Verticaland
overhead welding are usually only attempted when using a welder with dc
welding capabilities.
If possible, the work piece should be positioned so that the bead will run
onaatsurface.
Preparing The Joint
For effective welding, the surfaces to be joined must be free of dirt, rust,
scale, oil or paint. Welding on metals not properly cleaned will cause a
brittle and porous weld.
If the base metal pieces to be joined are thick or heavy, it may be
necessary to bevel the edges, with a metal grinder, at the point of contact,
as shown below. The angle of the bevel should be approximately 60
degrees. If utilizing a grinder, be sure to follow all manufacturer warnings
and procedures.
See the chart below for detailed instructions for preparing the weld joint.

• 12 •
During the welding, the work pieces will become hot and will tend to
expand. The expansion may cause the pieces to shift from the regular
position. If possible, the work pieces should be clamped into the position
they are to occupy when the welding is completed.
Selecting The Proper Electrode 4.3
The welding electrode is a rod, or wire, of electrically conductive metal,
coatedwithalayerofux.
Whenwelding,electricalcurrentowsbetweentheelectrode(rod)andthe
grounded metal work piece. The intense heat of the arc between the rod
andthegroundedmetalmeltsthewireandtheux.
The rod wire joins with the base metal in the work piece to form the weld
bead.Theburninguxformsagasshieldaroundthearcandhelpsto
controltheowofthefusingmetalsthatformtheweldbead.
The type and thickness of the metal and the position of the work
piece determines the electrode type and the amount of heat needed
in the welding process. Heavier and thicker metals require more heat
(amperage).
There is no hard and fast rule that determines the exact rod or heat setting
required for every situation. To check the rod requirements for particular
applications, refer to the rod guide on your welder, and then experiment on
some scrap metal.

• 13 •
Low vs High Voltage Welding Electrodes
Make certain you have the best electrode for the welding job you intend
to do. Electrode manufacturers make most of the standard welding
electrodes in two basic types. One type has been designed to run on
welders with high Open Circuit Voltage. The other type electrode is
designed to run on welders with Low Open Circuit Voltage. Most of your
welding will probably be done with low open circuit voltage AC rods such
asE-6013orE-7014generalpurposerods.Userodsof1/16,5/64,or
3/32inchdiameter(thethickertherod,themoreexperienceyouneed.)
Highopencircuitvoltagerodssuchas6011,7018,etc.willnotworkwith
mostlowpowerwelders(100ampsandsmaller).
Electrode manufacturers have adopted a uniform marking code for
weldingelectrodes.Eachelectrodeismarkedwithaprexletterandfour
numbers.Eachofthenumbershasaparticularsignicance.Forexample:
a commonly used general purpose electrode is marked E-6013. The E
signiestheelectrodeisforelectricarcapplications.
Thersttwodigitsinthenumberindicatetheminimumtensilestrength,
of the deposited metal, in thousands of pounds per square inch. In this
instance, 60 indicates the melting rod will have a minimum tensile strength
of 60,000 p.s.i. The third number indicates the welding position for which
the rod is intended. A number 1 indicates for use in any position. Number
2representsanelectroderestrictedtoweldinginhorizontalandat
positions.Number3representsanelectrodeintendedforuseintheat
position only. The fourth digit shows some special characteristics of the
electrode such as weld quality, type of current, or amount of penetration.
For all practical purposes, fourth position marking will not affect the rod
you would normally purchase.
Striking The Arc 4.4
To strike an arc, bring the tip of the rod in contact with the work surface
andthenquicklyraiseituntilthereisabout1/8inch(3.2mm)gapbetween
the rod and the work, as can be seen below.
Theeasiestwaytostrikeanarcistoscratchthetipoftherod(fora
shortdistance)ontheworksurface(asyouwouldstrikeamatch),then
quicklyliftittherequired1/8inch(3.2mm).Itisimportantthatthegap
be maintained during the welding process and that it be neither too wide
or too narrow. If the gap becomes too narrow, the electrode will freeze or
stick to the work piece.

• 14 •
Striking a proper arc and maintaining the gap between the electrode and
the base metal takes practice. A beginner may expect to extinguish any
number of arcs and freeze more than a few electrodes before acquiring
the necessary skill.
Knowing when the arc is just right is a matter of experience. A crisp,
cracking sound, accompanies a good arc. The sound is similar to that
made by eggs frying. To lay a weld bead, only 2 movements are required;
downward and in the direction the weld is to be laid. Always watch the
weldpuddletokeeptheslagfromowinginfrontofittopreventcausing
inclusions and gas pockets.
GENERAL MAINTENANCE 5.
Except for external cleaning and occasionally retightening screws, there is 5.1
no periodic maintenance recommended for your welder.
Servicing does not require opening unit, as there are no user-serviceable 5.2
parts.
REPLACEMENT PARTS LIST 6.
Part Number Description
3599000200 HANDLE
0699000218 ELECTRODE HOLDER
2299000549 GROUND CLAMP
4999000103 *WELDING HELMET
4999000104 *WELDING GLOVES
4999000105 *WELDING BRUSH
*Optional on some models
LIMITED WARRANTY7.
SCHUMACHER ELECTRIC CORPORATION, 801 BUSINESS CENTER
DRIVE, MOUNT PROSPECT, IL 60056-2179, MAKES THIS LIMITED
WARRANTY TO THE ORIGINAL RETAIL PURCHASER OF THIS
PRODUCT. THIS LIMITED WARRANTY IS NOT TRANSFERABLE OR
ASSIGNABLE.
SchumacherElectricCorporation(the“Manufacturer”)warrantsthe
welder’stransformerfor5years,theentirewelder(excludingaccessories
packedwiththewelderandtheweldingcables,gunortorch)for2years
and the welder’s welding cables and welding gun or torch for 1 year from
the date of purchase at retail against defective material or workmanship
that may occur under normal use and care. If your unit is not free from
defective material or workmanship, Manufacturers obligation under
this warranty is solely to repair or replace your product, with a new or
reconditioned unit, at the option of the Manufacturer. It is the obligation

• 15 •
of the purchaser to forward the unit, along with mailing charges prepaid
to the Manufacturer or its authorized representatives in order for repair or
replacement to occur.
Manufacturer does not provide any warranty for any accessories used
with this product that are not manufactured by Schumacher Electric
Corporation and approved for use with this product. This Limited Warranty
is void
if the product is misused, subjected to careless handling, repaired, or
modiedbyanyoneotherthanManufacturerorifthisunitisresoldthrough
an unauthorized retailer.
Manufacturer makes no other warranties, including, but not limited to,
express, implied or statutory warranties, including without limitation,
anyimpliedwarrantyofmerchantabilityorimpliedwarrantyoftness
for a particular purpose. Further, Manufacturer shall not be liable for
any incidental, special or consequential damage claims incurred by
purchasers, users or others associated with this product, including, but not
limitedto,lostprots,revenues,anticipatedsales,businessopportunities,
goodwill, business interruption and any other injury or damage. Any and
all such warranties, other than the limited warranty included herein, are
hereby expressly disclaimed and excluded. Some states do not allow the
exclusion or limitation of incidental or consequential damages or length
of implied warranty, so the above limitations or exclusions may not apply
toyou.Thiswarrantygivesyouspeciclegalrightsanditispossibleyou
may have other rights which vary from this warranty.
THIS LIMITED WARRANTY IS THE ONLY EXPRESS LIMITED
WARRANTY AND THE MANUFACTURER NEITHER ASSUMES
OR AUTHORIZES ANYONE TO ASSUME OR MAKE ANY OTHER
OBLIGATION TOWARDS THE PRODUCT OTHER THAN THIS
WARRANTY.
Schumacher Electric Corporation Customer Service
1-800-621-5485
Monday – Friday 7:00 a.m. to 5:00 p.m. CST
Schumacher and the Schumacher Logo are registered trademarks of
Schumacher Electric Corporation
/