Page is loading ...

Oracle
®
Server X7-2L Service Manual
Part No: E72474-02
October 2017


Oracle Server X7-2L Service Manual
Part No: E72474-02
Copyright © 2017, Oracle and/or its affiliates. All rights reserved.
This software and related documentation are provided under a license agreement containing restrictions on use and disclosure and are protected by intellectual property laws. Except
as expressly permitted in your license agreement or allowed by law, you may not use, copy, reproduce, translate, broadcast, modify, license, transmit, distribute, exhibit, perform,
publish, or display any part, in any form, or by any means. Reverse engineering, disassembly, or decompilation of this software, unless required by law for interoperability, is
prohibited.
The information contained herein is subject to change without notice and is not warranted to be error-free. If you find any errors, please report them to us in writing.
If this is software or related documentation that is delivered to the U.S. Government or anyone licensing it on behalf of the U.S. Government, then the following notice is applicable:
U.S. GOVERNMENT END USERS: Oracle programs, including any operating system, integrated software, any programs installed on the hardware, and/or documentation,
delivered to U.S. Government end users are "commercial computer software" pursuant to the applicable Federal Acquisition Regulation and agency-specific supplemental
regulations. As such, use, duplication, disclosure, modification, and adaptation of the programs, including any operating system, integrated software, any programs installed on the
hardware, and/or documentation, shall be subject to license terms and license restrictions applicable to the programs. No other rights are granted to the U.S. Government.
This software or hardware is developed for general use in a variety of information management applications. It is not developed or intended for use in any inherently dangerous
applications, including applications that may create a risk of personal injury. If you use this software or hardware in dangerous applications, then you shall be responsible to take all
appropriate fail-safe, backup, redundancy, and other measures to ensure its safe use. Oracle Corporation and its affiliates disclaim any liability for any damages caused by use of this
software or hardware in dangerous applications.
Oracle and Java are registered trademarks of Oracle and/or its affiliates. Other names may be trademarks of their respective owners.
Intel and Intel Xeon are trademarks or registered trademarks of Intel Corporation. All SPARC trademarks are used under license and are trademarks or registered trademarks of
SPARC International, Inc. AMD, Opteron, the AMD logo, and the AMD Opteron logo are trademarks or registered trademarks of Advanced Micro Devices. UNIX is a registered
trademark of The Open Group.
This software or hardware and documentation may provide access to or information about content, products, and services from third parties. Oracle Corporation and its affiliates are
not responsible for and expressly disclaim all warranties of any kind with respect to third-party content, products, and services unless otherwise set forth in an applicable agreement
between you and Oracle. Oracle Corporation and its affiliates will not be responsible for any loss, costs, or damages incurred due to your access to or use of third-party content,
products, or services, except as set forth in an applicable agreement between you and Oracle.
Access to Oracle Support
Oracle customers that have purchased support have access to electronic support through My Oracle Support. For information, visit http://www.oracle.com/pls/topic/lookup?
ctx=acc&id=info or visit http://www.oracle.com/pls/topic/lookup?ctx=acc&id=trs if you are hearing impaired.

Référence: E72474-02
Copyright © 2017, Oracle et/ou ses affiliés. Tous droits réservés.
Ce logiciel et la documentation qui l'accompagne sont protégés par les lois sur la propriété intellectuelle. Ils sont concédés sous licence et soumis à des restrictions d'utilisation et
de divulgation. Sauf stipulation expresse de votre contrat de licence ou de la loi, vous ne pouvez pas copier, reproduire, traduire, diffuser, modifier, accorder de licence, transmettre,
distribuer, exposer, exécuter, publier ou afficher le logiciel, même partiellement, sous quelque forme et par quelque procédé que ce soit. Par ailleurs, il est interdit de procéder à toute
ingénierie inverse du logiciel, de le désassembler ou de le décompiler, excepté à des fins d'interopérabilité avec des logiciels tiers ou tel que prescrit par la loi.
Les informations fournies dans ce document sont susceptibles de modification sans préavis. Par ailleurs, Oracle Corporation ne garantit pas qu'elles soient exemptes d'erreurs et vous
invite, le cas échéant, à lui en faire part par écrit.
Si ce logiciel, ou la documentation qui l'accompagne, est livré sous licence au Gouvernement des Etats-Unis, ou à quiconque qui aurait souscrit la licence de ce logiciel pour le
compte du Gouvernement des Etats-Unis, la notice suivante s'applique :
U.S. GOVERNMENT END USERS: Oracle programs, including any operating system, integrated software, any programs installed on the hardware, and/or documentation,
delivered to U.S. Government end users are "commercial computer software" pursuant to the applicable Federal Acquisition Regulation and agency-specific supplemental
regulations. As such, use, duplication, disclosure, modification, and adaptation of the programs, including any operating system, integrated software, any programs installed on the
hardware, and/or documentation, shall be subject to license terms and license restrictions applicable to the programs. No other rights are granted to the U.S. Government.
Ce logiciel ou matériel a été développé pour un usage général dans le cadre d'applications de gestion des informations. Ce logiciel ou matériel n'est pas conçu ni n'est destiné à être
utilisé dans des applications à risque, notamment dans des applications pouvant causer un risque de dommages corporels. Si vous utilisez ce logiciel ou ce matériel dans le cadre
d'applications dangereuses, il est de votre responsabilité de prendre toutes les mesures de secours, de sauvegarde, de redondance et autres mesures nécessaires à son utilisation dans
des conditions optimales de sécurité. Oracle Corporation et ses affiliés déclinent toute responsabilité quant aux dommages causés par l'utilisation de ce logiciel ou matériel pour des
applications dangereuses.
Oracle et Java sont des marques déposées d'Oracle Corporation et/ou de ses affiliés. Tout autre nom mentionné peut correspondre à des marques appartenant à d'autres propriétaires
qu'Oracle.
Intel et Intel Xeon sont des marques ou des marques déposées d'Intel Corporation. Toutes les marques SPARC sont utilisées sous licence et sont des marques ou des marques
déposées de SPARC International, Inc. AMD, Opteron, le logo AMD et le logo AMD Opteron sont des marques ou des marques déposées d'Advanced Micro Devices. UNIX est une
marque déposée de The Open Group.
Ce logiciel ou matériel et la documentation qui l'accompagne peuvent fournir des informations ou des liens donnant accès à des contenus, des produits et des services émanant de
tiers. Oracle Corporation et ses affiliés déclinent toute responsabilité ou garantie expresse quant aux contenus, produits ou services émanant de tiers, sauf mention contraire stipulée
dans un contrat entre vous et Oracle. En aucun cas, Oracle Corporation et ses affiliés ne sauraient être tenus pour responsables des pertes subies, des coûts occasionnés ou des
dommages causés par l'accès à des contenus, produits ou services tiers, ou à leur utilisation, sauf mention contraire stipulée dans un contrat entre vous et Oracle.
Accès aux services de support Oracle
Les clients Oracle qui ont souscrit un contrat de support ont accès au support électronique via My Oracle Support. Pour plus d'informations, visitez le site http://www.oracle.com/
pls/topic/lookup?ctx=acc&id=info ou le site http://www.oracle.com/pls/topic/lookup?ctx=acc&id=trs si vous êtes malentendant.

Contents
Using This Documentation ................................................................................ 13
Product Documentation Library ....................................................................... 13
Feedback ...................................................................................................... 13
About the Oracle Server X7-2L ......................................................................... 15
Product Description ....................................................................................... 15
About Controls and Connectors ....................................................................... 16
Front Panel Components ......................................................................... 17
Back Panel Components and Cable Connections ......................................... 18
About System Components ............................................................................. 19
Illustrated Parts Breakdown ..................................................................... 20
Customer-Replaceable Units .................................................................... 21
Field-Replaceable Units .......................................................................... 22
Troubleshooting and Diagnostics ..................................................................... 23
Troubleshooting Server Component Hardware Faults ........................................... 23
Troubleshooting Server Hardware Faults ................................................... 23
Troubleshooting and Diagnostic Information .............................................. 27
Troubleshooting Using the Server Front and Back Panel Status Indicators ........ 28
Troubleshooting System Cooling Issues ..................................................... 33
Troubleshooting Power Issues .................................................................. 35
Managing Server Hardware Faults Through the Oracle ILOM Fault
Management Shell ................................................................................. 36
Troubleshooting With Diagnostic Tools ............................................................. 37
Diagnostic Tools ................................................................................... 37
Diagnostic Tool Documentation ............................................................... 38
Attaching Devices to the Server ....................................................................... 39
▼ Attach Devices to the Server .............................................................. 39
5

Contents
Back Panel Connector Locations .............................................................. 40
Configuring Serial Port Sharing ............................................................... 41
Server Operating System Names for the NVMe Storage Drives ...................... 43
Ethernet Device Naming ......................................................................... 43
Back Panel Pinhole Switches ................................................................... 44
Getting Help ................................................................................................. 45
Contacting Support ................................................................................ 46
Locating the Chassis Serial Number ......................................................... 46
Auto Service Requests ................................................................................... 47
Preparing for Service ........................................................................................ 49
Safety Precautions ......................................................................................... 49
Safety Symbols ............................................................................................. 50
Electrostatic Discharge Safety .......................................................................... 50
FRU Key Identity Properties (KIP) Automated Update ......................................... 51
Required Tools .............................................................................................. 52
Preparing the Server for Component Replacement ............................................... 52
Powering Down the Server ..................................................................... 53
▼ Disconnect Cables From the Server ..................................................... 59
▼ Extend the Server to the Maintenance Position ...................................... 60
▼ Remove the Server From the Rack ...................................................... 61
▼ Take Antistatic Measures ................................................................... 62
▼ Remove the Server Top Cover ............................................................ 63
Servicing Storage Drives (CRU) ........................................................................ 67
Storage Drives Hot-Plug Conditions ................................................................. 67
Storage Drive Failure and RAID ...................................................................... 68
Storage Drive Locations and Numbering ........................................................... 68
Removing and Replacing a Storage Drive .......................................................... 69
▼ Remove a Storage Drive .................................................................... 70
▼ Install a Storage Drive ...................................................................... 72
Removing and Replacing an NVMe Storage Drive Using Oracle Solaris .................. 74
▼ Unmount an NVMe Storage Drive ...................................................... 74
▼ Remove an NVMe Storage Drive ........................................................ 75
▼ Verify Removal of an NVMe Storage Drive .......................................... 75
▼ Install an NVMe Storage Drive .......................................................... 75
▼ Power On an NVMe Storage Drive and Attach a Device Driver ................ 76
6 Oracle Server X7-2L Service Manual • October 2017

Contents
Removing and Replacing an NVMe Storage Drive Using Oracle Linux ................... 77
▼ Unmount an NVMe Storage Drive ...................................................... 77
▼ Remove an NVMe Storage Drive ........................................................ 79
▼ Verify Removal of an NVMe Storage Drive .......................................... 79
▼ Install an NVMe Storage Drive .......................................................... 80
▼ Power On an NVMe Storage Drive and Attach a Device Driver ................ 80
▼ Verify Operation of an NVMe Storage Drive ......................................... 81
Removing and Replacing an NVMe Storage Drive Using Microsoft Windows
Server .......................................................................................................... 81
▼ Remove an NVMe Storage Drive ........................................................ 81
▼ Install an NVMe Storage Drive .......................................................... 82
Servicing Fan Modules (CRU) ........................................................................... 85
▼ Remove a Fan Module .............................................................................. 85
▼ Install a Fan Module ................................................................................. 87
▼ Remove the Fan Tray ............................................................................... 89
▼ Install the Fan Tray .................................................................................. 90
Servicing Power Supplies (CRU) ...................................................................... 93
Power Supply Overview ................................................................................. 93
▼ Remove a Power Supply ........................................................................... 94
▼ Install a Power Supply .............................................................................. 96
Servicing the Internal M.2 Flash SSDs (CRU) ................................................... 99
▼ Remove a Flash Riser Board ...................................................................... 99
▼ Install a Flash Riser Board ....................................................................... 101
▼ Identify and Remove a Faulty M.2 Flash SSD ............................................. 103
▼ Install an M.2 Flash SSD ......................................................................... 105
Servicing an Internal USB Flash Drive (CRU) .................................................. 107
▼ Remove an Internal USB Flash Drive ........................................................ 107
▼ Install an Internal USB Flash Drive ........................................................... 108
Servicing the Air Baffle (CRU) ......................................................................... 111
▼ Remove the Air Baffle ............................................................................ 111
▼ Install the Air Baffle ............................................................................... 113
7

Contents
Servicing the DIMMs (CRU) ............................................................................. 117
DIMM and Processor Physical Layout ............................................................. 118
DIMM Population Scenarios .......................................................................... 119
DIMM Population Rules ............................................................................... 119
Populating DIMMs for Optimal System Performance ......................................... 120
Populating DIMMs in Single-Processor Systems for Optimal System
Performance ................................................................................................ 120
Populating DIMMs in Dual-Processor Systems for Optimal System Performance ..... 122
DIMM Operating Speeds .............................................................................. 123
DIMM Rank Classification Labels .................................................................. 123
Inconsistencies Between DIMM Fault Indicators and the BIOS Isolation of Faulty
DIMMs ...................................................................................................... 124
Using the Server Fault Remind Button ............................................................ 124
▼ Identify and Remove a Faulty DIMM ........................................................ 125
▼ Install a DIMM ...................................................................................... 127
Servicing PCIe Cards (CRU) ............................................................................ 131
PCIe Slot Locations ..................................................................................... 132
▼ Remove a PCIe Card .............................................................................. 133
▼ Install a PCIe Card ................................................................................. 135
Servicing the Battery (CRU) ............................................................................ 139
▼ Remove the Battery ................................................................................ 139
▼ Install the Battery ................................................................................... 141
Servicing Processors (FRU) ............................................................................ 143
▼ Identify and Remove a Faulty Processor ..................................................... 144
▼ Install a Processor .................................................................................. 150
Servicing the Disk Backplane (FRU) ............................................................... 157
▼ Remove the Disk Backplane ..................................................................... 157
▼ Install the Disk Backplane ....................................................................... 161
Servicing the Front LED Indicator Module (FRU) ............................................ 165
▼ Remove the Front LED Indicator Module ................................................... 165
▼ Install the Front LED Indicator Module ...................................................... 168
8 Oracle Server X7-2L Service Manual • October 2017

Contents
Servicing the Temperature Sensor (FRU) ........................................................ 173
▼ Remove the Temperature Sensor ............................................................... 173
▼ Install the Temperature Sensor .................................................................. 176
Servicing the Internal HBA Card and HBA Super Capacitor (FRU) .................. 179
▼ Remove the Internal HBA Card and HBA Super Capacitor ............................. 180
▼ Install the Internal HBA Card and HBA Super Capacitor ............................... 183
Servicing SAS Cables (FRU) ........................................................................... 187
▼ Remove SAS Storage Drive Cables ........................................................... 187
▼ Install SAS Storage Drive Cables .............................................................. 190
Servicing NVMe Cables (FRU) ......................................................................... 193
▼ Remove NVMe Cables ............................................................................ 193
▼ Install NVMe Cables ............................................................................... 196
Servicing the Motherboard Assembly (FRU) ................................................... 199
▼ Remove the Motherboard Assembly ........................................................... 199
▼ Install the Motherboard Assembly ............................................................. 206
Returning the Server to Operation .................................................................. 211
Server Filler Panel Requirements .................................................................... 211
▼ Remove and Install Filler Panels ............................................................... 212
▼ Install the Server Top Cover ..................................................................... 212
▼ Remove Antistatic Measures ..................................................................... 213
▼ Reinstall the Server Into the Rack ............................................................. 214
▼ Return the Server to the Normal Rack Position ............................................ 214
▼ Reconnect Power and Data Cables ............................................................. 216
▼ Power On the Server ............................................................................... 216
Identifying the Server Ports ............................................................................ 219
Gigabit Ethernet Port .................................................................................... 219
Network Management Port ............................................................................ 220
Serial Management Port ................................................................................ 221
USB Ports .................................................................................................. 223
9

Contents
Setting Up BIOS Configuration Parameters .................................................... 225
Manage the BIOS Configuration .................................................................... 225
Accessing the BIOS Setup Utility ................................................................... 225
BIOS Setup Utility Menus .................................................................... 226
BIOS Key Mappings ............................................................................ 226
▼ Access BIOS Setup Utility Menus ..................................................... 227
▼ Navigate BIOS Setup Utility Menus .................................................. 228
Using UEFI BIOS ....................................................................................... 229
Configuration Utilities for Add-In Cards .................................................. 230
Configure and Manage BIOS Using Oracle ILOM ..................................... 230
UEFI Secure Boot ............................................................................... 230
Trusted Execution Technology ............................................................... 231
Common BIOS Setup Utility Tasks ................................................................. 231
▼ Verify BIOS Factory Default Settings ................................................. 232
▼ Select a Temporary Boot Device ....................................................... 232
▼ Configure TPM Support .................................................................. 234
▼ Configure UEFI Driver Settings ........................................................ 236
▼ Configure I/O Resource Allocation .................................................... 239
▼ Configure UEFI Secure Boot ............................................................ 242
▼ Configure Trusted Execution Technology ............................................ 251
▼ Exit BIOS Setup Utility ................................................................... 253
BIOS Setup Utility Menu Options .................................................................... 255
BIOS Main Menu Selections ......................................................................... 255
BIOS Advanced Menu Selections ................................................................... 260
BIOS Advanced Menu iSCSI Configuration Options .................................. 261
BIOS Advanced Menu Gigabit Network Connection Options ....................... 263
BIOS Advanced Menu Driver Health Options ........................................... 264
BIOS Advanced Menu Serial Port Console Redirection Options ................... 264
BIOS Advanced Menu Network Stack Options ......................................... 266
BIOS Advanced Menu NVMe Configuration Options ................................. 266
BIOS Advanced Menu Primary Video Selection Option .............................. 267
BIOS Advanced Menu Trusted Computing 2.0 Options .............................. 267
BIOS Advanced Menu PCH SATA Configuration Options .......................... 268
BIOS Advanced Menu Processor Configuration Options ............................. 270
BIOS Advanced Menu Memory Configuration Options .............................. 271
BIOS Advanced Menu CPU Power Management Configuration Options ........ 272
10 Oracle Server X7-2L Service Manual • October 2017

Contents
BIOS Advanced Menu USB Ports Options ............................................... 272
BIOS Advanced Menu Error Injection Settings Option ............................... 273
BIOS Advanced Menu Disk Freeze Lock Settings Option ........................... 273
BIOS IO Menu Selections ............................................................................. 274
BIOS IO Menu PCI Subsystem Settings Options ....................................... 275
BIOS IO Menu IO Virtualization Options ................................................ 275
BIOS IO Menu IOAT Configuration Options ............................................ 276
BIOS IO Menu Internal Devices Options ................................................. 276
BIOS IO Menu Add-in Cards Options ..................................................... 277
BIOS IO Menu PCIE Hardware Slot Configuration Options ........................ 277
BIOS Boot Menu Selections .......................................................................... 278
BIOS Exit Menu Selections ........................................................................... 279
Monitoring Components and Identifying SNMP Messages .............................. 281
Monitoring Component Health and Faults Using Oracle ILOM ............................ 281
Monitoring System Components ..................................................................... 282
System Chassis Components .................................................................. 283
Cooling Unit Components ..................................................................... 285
Disk Backplane Components ................................................................. 285
Memory Device Components ................................................................. 287
Power Unit Components ....................................................................... 287
Processor Components .......................................................................... 288
System Motherboard Components ........................................................... 289
System Firmware Components ............................................................... 291
Hard Disk Drive Components ................................................................ 291
Identifying SNMP Trap Messages .................................................................. 292
Environmental Events ................................................................................... 293
Hard Disk Drive Events ................................................................................ 294
Power Events .............................................................................................. 295
Fan Events ................................................................................................. 299
Memory Events ........................................................................................... 301
Entity Presence Events ................................................................................. 302
Index ................................................................................................................ 303
11

12 Oracle Server X7-2L Service Manual • October 2017

Using This Documentation
■
Overview – Describes how to troubleshoot and maintain the Oracle Server X7-2L.
■
Audience – Technicians, system administrators, authorized service providers, and trained
hardware service personnel who have been instructed on the hazards within the equipment
and are qualified to remove and replace hardware.
■
Required knowledge – Advanced experience troubleshooting and replacing hardware.
Product Documentation Library
Documentation and resources for this product and related products are available at http://www.
oracle.com/goto/x7-2l/docs.
Feedback
Provide feedback about this documentation at http://www.oracle.com/goto/docfeedback.
Using This Documentation 13

14 Oracle Server X7-2L Service Manual • October 2017

About the Oracle Server X7-2L
These sections describe the controls, connectors, LEDs, system components, and replaceable
components of the server:
■
“Product Description” on page 15
■
“About Controls and Connectors” on page 16
■
“About System Components” on page 19
Note - Always update the server with the latest firmware, drivers, and other hardware-related
software by downloading the latest software release package when you first receive the server,
and for every new software release. For information about the software release packages and
how to download the software, refer to “Getting Firmware and Software” in Oracle Servers
X7-2 and X7-2L Installation Guide.
Product Description
The Oracle Server X7-2L is an enterprise-class, two rack unit (2U) server. It supports the
following components:
■
Up to two Intel processors. Processors with the following capabilities are supported:
■
Intel Xeon 8168, 24-core, 2.7 GHz, 205W processors
■
Intel Xeon 8160, 24-core, 2.1 GHz, 150W processors
■
Intel Xeon 6140, 18-core, 2.3 GHz, 140W processors
■
Intel Xeon 6128, 6-core, 3.4 GHz, 115W processors
■
Intel Xeon 4114, 10-core, 2.0-2.2 GHz, 85W processors
■
Up to 12 DDR4 DIMMs per processor for a maximum of 24 RDIMMs (16GB and 32GB)
and LRDIMMs (64GB) with speeds up to 2667 MT/sec are supported in dual-processor
systems.
■
Eleven PCIe Gen3 slots in the dual-processor systems. PCIe slots 1 through 6 are
nonfunctional in single-processor systems.
■
Storage drive configurations can comprise both hard disk drives (HDDs) or solid state disk
drives (SSDs). Configurations include:
About the Oracle Server X7-2L 15

About Controls and Connectors
■
Up to twelve 3.5-inch hot-pluggable SAS3 HDDs/SSDs, or up to twelve 2.5-inch NVM-
Express (NVMe) SSDs
■
Two hot-pluggable internal SATA M.2 flash SSDs
■
Two hot-pluggable, redundant 1200W power supplies.
■
An on-board Oracle Integrated Lights Out Manager (Oracle ILOM) service processor (SP)
based on the ASPEED Pilot 4 chip.
About Controls and Connectors
The following sections describe the controls, indicators, connectors, and drives located on the
front and back panels.
■
“Front Panel Components” on page 17
■
“Back Panel Components and Cable Connections” on page 18
Related Information
■
“About System Components” on page 19
■
“Illustrated Parts Breakdown” on page 20
■
“Troubleshooting Using the Server Front and Back Panel Status Indicators” on page 28
16 Oracle Server X7-2L Service Manual • October 2017

About Controls and Connectors
Front Panel Components
Call Out Description
1 Product Serial Number (PSN) label and Radio Frequency Identification (RFID) tag
2 Locate Button/LED: white
3 Fault-Service Action Required LED: amber
4 System OK LED: green
5 On/Standby button
6 Fault-Service Required LED: Top: Fan Module (amber)
7 Fault-Service Required LED: Rear: Power Supply (amber)
8 Fault-Service Required LED: Overtemp Icon: System Over Temperature Warning (amber)
9 SP OK LED: green
10 DO NOT SERVICE LED: white
11 Storage drive 0 HDD/SSD/NVMe
12 Storage drive 1 HDD/SSD/NVMe
13 Storage drive 2 HDD/SSD/NVMe
About the Oracle Server X7-2L 17

About Controls and Connectors
Call Out Description
14 Storage drive 3 HDD/SSD/NVMe
15 Storage drive 4 HDD/SSD/NVMe
16 Storage drive 5 HDD/SSD/NVMe
17 Storage drive 6 HDD/SSD/NVMe
18 Storage drive 7 HDD/SSD/NVMe
19 Storage drive 8 HDD/SSD/NVMe
20 Storage drive 9 HDD/SSD/NVMe
21 Storage drive 10 HDD/SSD/NVMe
22 Storage drive 11 HDD/SSD/NVMe
Related Information
■
“Troubleshooting Using the Server Front and Back Panel Status Indicators” on page 28
Back Panel Components and Cable Connections
Call Out Description
1 Power supply (PS 1)
2 Power Supply (PS) 1 status indicators: Fault-Service Required LED: amber; AC OK LED:
green
3 Power supply (PS 0)
4 Power Supply (PS) 0 status indicators: Fault-Service Required LED: amber; AC OK LED:
green
18 Oracle Server X7-2L Service Manual • October 2017

About System Components
Call Out Description
5 PCIe slot 1 (Nonfunctional in single-processor systems)
6 PCIe slot 2 (Nonfunctional in single-processor systems)
7 PCIe slot 3 (Nonfunctional in single-processor systems)
8 PCIe slot 4 (Nonfunctional in single-processor systems)
9 PCIe slot 5 (Nonfunctional in single-processor systems)
10 PCIe slot 6
11 Serial management (SER MGT) RJ-45 serial port
12 Oracle Integrated Lights Out Manager (ILOM) service processor (SP) network management
(NET MGT) RJ-45 10/100/1000BASE-T port
13 Network (NET) 100/1000BASE-T RJ-45 Gigabit Ethernet (GbE) port: NET 0
14 USB 3.0 connector
15 System status LEDs: Locate Button/LED: white; Fault-Service Required: amber; System
OK: green
16 PCIe slot 7
17 PCIe slot 8
18 PCIe slot 9
19 PCIe slot 10
20 PCIe slot 11
Note - For more information on back panel components and connections, see “Back Panel
Connector Locations” on page 40. See also “Back Panel Pinhole Switches” on page 44.
Related Information
■
“Troubleshooting Using the Server Front and Back Panel Status Indicators” on page 28
■
“Disconnect Cables From the Server” on page 59
■
“Reconnect Power and Data Cables” on page 216
■
“Identifying the Server Ports” on page 219
About System Components
These sections describe the components of the server:
■
“Illustrated Parts Breakdown” on page 20
■
“Customer-Replaceable Units” on page 21
■
“Field-Replaceable Units” on page 22
About the Oracle Server X7-2L 19

About System Components
Illustrated Parts Breakdown
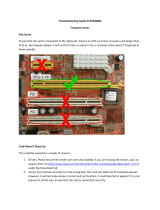
The following figure identifies the major components of the server.
Figure
Legend
Description
1 Twelve storage drives
2 Disk backplane
3 System chassis
4 Front LED indicator module and temperature sensor
5 Fan modules
6 Fan tray
7 Motherboard assembly
8 Processors and heatsinks (Single-processor systems contain only a single processor in socket P0; socket P1
contains a cover to protect processor socket pins.)
9 Internal M.2 flash SSDs
10 Top cover
20 Oracle Server X7-2L Service Manual • October 2017
/