Initial settings
Basic operation
Thank you for buying the "Xperia
TM
Z Ultra" (simply called the "product" from
here on).
In this guide, settings and precautions for using the product are described.
Setting Guide
Opening Notification panel
If any notification icons are displayed on
the left side of the status bar, slide down the
status bar to open the Notification panel. You
can check details of notification icons or start
corresponding applications.
Open the Notification panel to enable/disable
functions with the Quick settings tool.
For detailed descriptions of operations, refer to the "Instruction Manual"
(Japanese) application installed on the product or "
(Full Instruction Manual)" (Japanese) available on the au homepage.
P
Power key
Power ON
Press and holdPfor over a second.
Screen Lock
PressPwhile the screen displayed, then the
backlight turns off and screen lock is activated
(avoiding the keys or touch screen from false
operations).
Unlocking Screen Lock
The lock screen appears when turning the
power on or the backlight on by pressingP.
Swipe (flick) the screen up or down to cancel
the screen lock.
Application key
Tap to display the applications screen.
Touch panel operations
Long-touch
Keep touching an item
with your finger.
Drag
Keep touching an item
or icon, trace it to the
desired direction to
move.
Pinch
Touch the screen with
two fingers and widen
(pinch-out) or narrow
(pinch-in) the fingers'
distance.
Character entry
Use software keyboard to enter characters.
The software keyboard appears when you tap the entry field for registering
a contact, composing a mail, etc.
Software keyboard
To input Japanese, use "Xperia™ Japanese keyboard" switching five input
types of "Phonepad", "QWERTY keyboard", "Japanese syllabary", "Kana
handwriting", "Kanji handwriting".
Tap "
" to switch the character mode "Hiragana/Kanji"
"Alphanumeric" (except Kanji handwriting input).
Long-touch or Flick up "
" (tap "
" for Kanji handwriting input) to
switch software keyboard or check/change Xperia™ Japanese keyboard
settings.
1
Setting Wi-Fi
®
network manually
1
Select Wi-Fi
®
network
[Other network…]
Flick input screen
Flick left
Flick up
Tap
Flick right
Flick down
Flick input
Touch a key in the phonepad to display input candidates for flick input as
follows. Flick in the direction of a desired character to enter.
Input a password
(security key) [Connect]
2
Connect Wi-Fi
®
network
[Done] [ ]
3
Slide
While your finger is
gently touching the
screen, trace it to the
desired direction to move
over.
Displaying menu
There are two types for displaying the screen menu; tapping " " and long-
touching an input field or item.
Company names and product names referred to in this manual are trademarks or
registered trademarks of respective companies.
The TM, ® marks may be omitted in this manual.
Screen illustrations shown in this manual may look different from the actual screens.
In some cases, upper or lower part of a screen may be omitted.
Connect Wi-Fi
®
network
[Done] [ ]
3
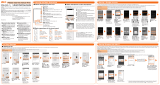
STEP 4: Accounts & sync <Setting Google account>
If you set up a Google account, you can use Google applications such as "Gmail", "Google Play", "Hangouts" or "Google+".
And, Gmail's mail address "(user name) @gmail.com" is automatically created from the user name set with a Google account.
To create an account, you are required to register "First" name, "Last" name and "Security question and Answer". In "Recovery email address", set a different
mail address used for contact from Google in case you forget your password etc. If you have no another mail, remain as blank.
1
[Google]
* If you have Google account,
tap "Existing".
[New]
2 3
Enter "First" name,
"Last" name
[ ]
4 5 6
8 9
[Not now]
10
7
Select a question in
case you forget the
password Enter an
answer [ ]
Add Wi-Fi
®
network manually.
Check network SSID, authentication type, etc. in advance.
If security is set, you need to enter a security key.
Enter a user name
[ ]
Confirm contents
[ ] Enter
displayed texts [ ]
Confirm the
back up
setting [
]
Set network SSID and
security [Save]
2
* If you select "Join Google+",
follow the onscreen instructions.
When you turn on the product for the first time, swipe (flick) the screen
up or down to unlock screen lock and follow the onscreen instructions
to set the language, functions, services, etc.
STEP 2: Setting Wi-Fi
®
connection
Use home wireless LAN (Wi-Fi
®
) or public wireless LAN to connect
Internet service.
Wi-Fi
®
setting method as follows. Operate in a place where signal of
Wi-Fi
®
network can be received.
Tap "Search for networks" to detect available Wi-Fi
®
networks and
display the list.
Wi-Fi
®
network with is open network.
Wi-Fi
®
network with
is protected by security. To connect, enter
password (security key).
To detect Wi-Fi
®
network manually or make Wi-Fi
®
advanced settings,
after the initial setting is complete, tap [ ] [Settings] [Wi-Fi]
[ ] [Scan]/[Advanced].
Select "English (United States)" and tap "Done".
Alternatively, after the initial setting is complete, from the Home
screen, tap [
] [ (Settings)] [ (Language &
input)] [ (Language)] to set the language.
STEP START: Setting language
When "Welcome" appears, tap " ".
STEP 1: Starting basic settings
STEP 5: Completion of setup
When the setup completion screen appears, tap "Finish".
Alternatively, after the initial setting is complete, from the Home screen, tap [
] [Settings] [Setup guide], you can set each function and service.
* After step 4, checking registration of username starts. If the entered user name is unavailable, an entry
screen for prompting another user name appears.
* In step 9, "Terms & Conditions" screen may appear first. In some cases, "Terms & Conditions" screen may
not appear.
You can use the product even if you do not set up a Google account.
STEP 4: Accounts & sync
Tap "Facebook"/"Twitter"/"Exchange ActiveSync" and follow onscreen instruction to set up an
account and synchronize.
Tap " " of Automatic Synchronization to activate so that you can synchronize with
contacts, calendar, etc. of Gmail or online service.
To set online service, make sure that data communication is enabled. Check that
/
appears on the status bar or the product is connected to a Wi-Fi
®
network.
When you finish setting Accounts and Synchronization, tap " ".
au Easy Setting
Set au convenient functions or services.
1
[Next]
Using Wi-Fi
®
network selection settings
Select from detected Wi-Fi
®
network to set.
To select a protected Wi-Fi
®
network, you need to enter a security key.
Setting au ID
By setting au ID, you can use various services provided by au such as au (au Smart Pass) or "au Kantan Kessai", which allows you to purchase
applications from Google Play.
* au ID which is already used by another user cannot be set.
Alternatively, after the initial setting is complete, from the Home screen, tap [ ] [ (Customer support)] [au Easy Setting], you can set au service.
[au ID
(Set/save
au ID)]
3 4
* Default value is
four-digit security
code written at
subscription.
Enter a security
password [OK]
Set password [
(Agree Terms of
Use and register)]
5
*
If you already have au ID, set
from [au ID
(Register your au ID)].
*
If some data can be taken over in the step 7, select
data [Agree, and next] to take over.
*
If you select service in the step 8, you can back up
contacts or photos etc. to au Cloud.
*
If you select service in the step 9, information
based on the location data is displayed in the
widget and receive the latest music information.
*
If you select service in the step 10, you can set
support service in case of loss, theft or malfunction
of the product.
2
[Registration] [OK]
Status bar
Current status and
notification icons
are displayed.
Confirm contents
[Accept]
* If you select "Decline",
confirm contents
[Done].
SFO/KDDI/Setting guide
Tap/Double-tap
Tap: Gently touch
a screen and then
immediately release your
finger.
Double tap: Tap the
same position twice.
Flick (swipe)
Operate the screen
by quickly moving
(flicking) your finger
up, down, right, or left.
WPS is a function enabling simple wireless LAN (Wi-Fi
®
) connection for advanced
security settings. You can use the WPS function of the product to connect to the
Wi-Fi
®
network through a WPS compatible wireless LAN (Wi-Fi
®
) device as an
access point. Make the WPS compatible device settings as required.
Tap [
] [Automatic setup (WPS)] and follow the onscreen instructions.
Using auto-setting (WPS)
Sony Entertainment Network provides you with online services such
as online music store "Music Unlimited" or online video store "Video
Unlimited", and you can use these services with a single account.
Tap "Get started" to create and save a user account when using Sony
Entertainment Network.
STEP 3: Setting Sony Entertainment Network
Phonepad
QWERTY keyboard
*1 You can enter the next
character over the entered
character.
*2 You can enter kanji and
katakana without switching
input mode.
Kana handwriting
*1
Japanese syllabary
keyboard
6
[OK] [
(Go to setting screen)]
Enter necessary
information Tap [
(Done)]
[ (Set)]
[ (Exit)]
Enter a security
password [ ]
Kanji handwriting
*2
Introduction
Basic operation
Describes the basic operations.
Initial settings
Make initial settings when you turn
the power on for the first time.
E-mail setting
Make initial settings for @ezweb.
ne.jp etc.
Making a call
Describes how to make a call.
Receiving a call
Describes how to receive a call.
Importing contacts
Import contacts from microSD
memory card etc.
Exporting contacts
Export contacts to microSD memory
card etc.
Sending or receiving contacts
via infrared
Send or receive contacts via infrared
communication.
Backing up to microSD
memory card
Use a file management application to
back up data.
Saving battery power
Save battery power using widget.
Display (Touch panel)
Operate directly touching with your finger.
r
Recently used applications
Tap to display a list of recently used
applications by a thumbnail or small apps. Tap
[Close all] at the top right of the screen to end
all applications and delete all list items in the
thumbnail.
y
Home key
Tap to display the Home screen.
x
Back key
Tap to return to the previous screen.
12
[Finish]
8
Confirm contents
Select a service
to use [Agree,
and next]
9 10
7
[Next]
11
Check the contents
[Activate]
Confirm contents
Select a service
to use [Agree,
and next]
Confirm contents
Select a service
to use [Agree,
and next]
* Appears only when "3LM
(loss and theft measures )"
is marked in the step 10.