
Homeowners Guide
Drop-in Bath Whirlpool With Heater
M product numbers are for Mexico (i.e. K-12345M)
Los números de productos seguidos de M corresponden a México
(Ej. K-12345M)
Français, page “Français-1”
Español, página “Español-1”
K-1158
1043843-5-B

Important Information
INSTRUCTIONS PERTAINING TO A RISK OF FIRE,
ELECTRICAL SHOCK, OR INJURY TO PERSONS
READ AND FOLLOW ALL INSTRUCTIONS
SAVE THESE INSTRUCTIONS
WARNING: When using electrical products, basic precautions should always be followed,
including the following:
DANGER: Risk of personal injury. To reduce the risk of injury, do not permit children to use this
unit unless they are closely supervised at all times.
WARNING: Risk of personal injury. To avoid injury, exercise care when entering or exiting the
whirlpool.
WARNING: Risk of electric shock. Do not permit electric appliances (such as a hair dryer, lamp,
telephone, radio, or television) within 5’ (1.5 m) of this whirlpool.
WARNING: Risk of hyperthermia. People using medications and/or having an adverse medical
history should consult a physician before using a whirlpool equipped with a heater.
An equipment grounding terminal is provided in the field wiring compartment. To reduce the risk of electric
shock, this terminal must be connected to the grounding means provided in the electric supply panel with a
conductor equivalent in size to the circuit conductors supplying this whirlpool.
A pressure wire connector is provided on the exterior of the pump or control within this unit to permit
connection of a bonding conductor between this unit and all other exposed metal in the vicinity, as needed to
comply with local requirements.
Use this whirlpool only for its intended purpose as described in this manual. Do not use attachments not
recommended by the manufacturer.
Never drop or insert any object into any opening.
Do not operate this unit without the guard (cover) over the suction fitting.
The whirlpool must be connected only to a supply circuit that is protected by a Ground-Fault
Circuit-Interrupter (GFCI) or Earth-Leakage Circuit-Breaker (ELCB). Such a GFCI or ELCB should be
provided by the installer and should be tested on a routine basis. To test the GFCI or ELCB, press the test
button. The GFCI or ELCB should interrupt power. Press the reset button. Power should be restored. If the
GFCI or ELCB fails to operate in this manner, the GFCI or ELCB is defective. If the GFCI or ELCB interrupts
power to the bath without the test button being pressed, a ground current is flowing, indicating the
possibility of an electric shock. Do not use this whirlpool bath. Disconnect the whirlpool and have the
problem corrected by a qualified service representative before using.
WARNING: The use of alcohol, drugs, or medication can greatly increase the risk of fatal
hyperthermia. Prolonged immersion in hot water may induce hyperthermia. Hyperthermia occurs
when the internal temperature of the body reaches a level several degrees above the normal body
temperature of 98.6° F (37° C). The symptoms of hyperthermia include an increase in the internal
temperature of the body, dizziness, lethargy, drowsiness, and fainting. The effects of hyperthermia
include: (a) failure to perceive heat, (b) failure to recognize the need to exit the bath, (c) unawareness
of impending hazard, (d) fetal damage in pregnant women, (e) physical inability to exit the bath, and
(f) unconsciousness resulting in the danger of drowning.
IMPORTANT! Flush your whirlpool system twice a month or more depending upon usage, as described
in Care and Cleaning Instructions in this manual.
Do not allow the water temperature in the whirlpool to exceed 104° F (40° C).
1043843-5-B 2 Kohler Co.

Important Information (cont.)
Keep small objects such as bath toys and bathing accessories out of the whirlpool while the unit is running.
Repeated use of personal care products containing oils can damage plastic whirlpool components. Do not use
heavy, vegetable-based shampoos or bath oils.
Whirlpool hydro-massage action can cause even a small amount of bubble bath, bath soap, shampoo, or bath
oil to foam excessively. For this reason, please don’t use these products during whirlpool operation.
Table of Contents
Important Information .............................................................. 2
Thank You For Choosing Kohler Company .............................................. 3
Your Kohler Whirlpool ............................................................. 3
User Keypad And Whirlpool Modes/Features ............................................ 4
Optional Remote Control ........................................................... 4
Operating Your Whirlpool ........................................................... 4
Cleaning Your Acrylic Whirlpool ...................................................... 5
Clean Your Keypad and Remote Control ................................................ 5
Flushing Your Whirlpool System ...................................................... 5
One-Year Limited Warranty - USA and Canada ........................................... 5
One-Year Warranty - For Mexico ..................................................... 6
Troubleshooting Procedures ......................................................... 7
Service Parts ................................................................... 10
Thank You For Choosing Kohler Company
Thank you for choosing the Bold Look of Kohler. Kohler craftsmanship offers you a rare combination of
proven performance and graceful sophistication that will satisfy you for years to come. The dependability
and beauty of your Kohler product will surpass your highest expectations. We’re very proud of our products
here at Kohler and we know you will be too.
Please take a few minutes to study this Homeowners Guide. Pay special attention to the care and cleaning
instructions.
All information in this manual is based upon the latest product information available at the time of
publication. At Kohler, we constantly strive to improve the quality of our products. We reserve the right to
make changes in product characteristics, packaging or availability at any time without notice.
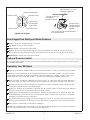
Your Kohler Whirlpool
Your new whirlpool is designed to stimulate, invigorate, and energize your body with comforting
hydro-massage therapy. The whirlpool consists of the following components:
Bath - acts as a reservoir for water, and provides a location for the hydro-massage action.
User Keypad - located within easy reach, the keypad allows you to turn the whirlpool and heater
on and off and regulate the water flow through the jets.
Pump Motor - provides quiet, variable speed power to circulate the water and create the soothing
hydro-massage action.
Adjustable Jets - positioned to optimize their hydro-massage effect, the jets allow you to adjust the
air and water flow and control the flow direction as you desire.
Heater - designed to automatically help maintain the temperature of the water up to 104° F (40° C)
to enhance your hydro-massage experience. The heater turns on automatically when the whirlpool
is operating, and turns off when the pump motor is turned off. The heater may be turned off,
through the keypad, at any time while the pump is operating.
Kohler Co. 3 1043843-5-B

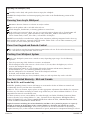
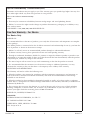
User Keypad And Whirlpool Modes/Features
Power - Turns the whirlpool pump on and off.
Up Arrow - Increases the water flow.
Down Arrow - Decreases the water flow.
Heater - The heater automatically engages when the whirlpool is turned on. You may turn the
heater off by pressing the heater button. Press the button a second time to turn the heater back on.
Indicator Bar - Shows the water flow volume.
Optional Remote Control
If you purchased a remote control, please refer to the Homeowners Guide packed with your remote control
for detailed information.
Operating Your Whirlpool
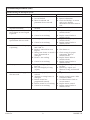
Turn the jet trim fully counterclockwise. Position the jet nozzles so they face down toward the basin.
NOTE: The water temperature in the whirlpool should never exceed 104° F (40° C). A built-in heater
automatically maintains the water temperature when the whirlpool is running, as long as the water
temperature does not exceed 104° F (40° C). The heater will disengage at higher temperatures.
Close the drain, and fill the whirlpool to a level at least 2″ (5.1 cm) above the top of the highest jet.
Use your hand to test the water temperature for comfort and safety, then carefully enter the bath.
Press Power to turn on the whirlpool. The whirlpool will start at medium volume. The heater will
also turn on and the heater icon will illuminate.
Increase or decrease the water flow by pressing the up or down arrows on the keypad. An indicator
bar in the center of the keypad shows the water flow volume.
Adjust the jets for optimum air/water mixture. Turn the jet trim clockwise to reduce the flow, and
counterclockwise to increase the flow. Position the jet nozzles to direct the water flow as desired to
maximize your hydro-massage experience.
The heater automatically engages when the whirlpool is turned on. You may turn the heater off by
pressing the heater button on the keypad. Press the button a second time to turn the heater back on.
Press Power a second time to turn off the whirlpool.
NOTE: Your whirlpool will automatically stop after approximately 20 minutes of continuous operation.
You can restart the whirlpool, if you desire, by pressing Power.
Indicator Bar -
Shows water
flow volume
Power On/Off
Heater On/Off
Heater Indicator Light
Increases Flow
Decreases Flow
Lighted User Keypad
Fill with water 2" (5.1 cm)
above the highest jet.
Turn the jet trim ring
clockwise to
decrease the flow.
Position the jet
nozzles to direct
the water flow as
desired.
Turn the jet trim ring counterclockwise
to increase the flow.
1043843-5-B 4 Kohler Co.

Operating Your Whirlpool (cont.)
Carefully exit the bath, and open the drain to empty the whirlpool.
NOTE: If the whirlpool does not function properly, please refer to the Troubleshooting section of this
manual.
Cleaning Your Acrylic Whirlpool
Do not use abrasive cleansers or solvents on acrylic surfaces.
Wipe out the product with a soft cloth after each use.
Avoid detergents, disinfectants, or cleaning products in aerosol cans.
If the surface gets excessively dirty you can use a general purpose cleaner such as: Formula 409
®
All
Purpose Cleaner, Gel Gloss
®
(Bath and Shower only), Scrub Free
®
Mildew Stain Remover, Mr.
Clean
®
Lemon Fresh, Cinch
®
, Glass Plus
®
, or Fantastik
®
All Purpose.
NOTE: To restore dull or scratched units: Apply white automotive polishing compound with a clean rag.
Rub scratches and dull areas vigorously. Wipe off residue. Follow with a coat of white automotive paste
wax. Do not wax areas where you walk or stand.
Clean Your Keypad and Remote Control
Use a soft cloth to wipe the keypad and remote control after each use. If the surface becomes dirty,
use a non-abrasive soap and warm water to clean.
Flushing Your Whirlpool System
Flush your whirlpool system twice a month or more, depending upon usage. Use the following
sequence:
•
Turn the jet trim rings fully clockwise to remove air induction.
•
Fill the whirlpool with warm water to a level at least 2″ (5.1 cm) above the highest jets, or leave
water in the whirlpool after using.
•
Add 2 tablespoons (30 ml) of a low-foaming dishwasher detergent and 20 ounces (590 ml) of
household bleach (5% - 6% sodium hypochlorite) to the water.
•
Run the whirlpool for 5 to 10 minutes. Turn off the whirlpool and drain.
•
If desired, rinse the bath surfaces with water.
•
Rinse the surfaces of the jets, faucet, handrails, drain, etc. and wipe them dry with a soft cloth.
One-Year Limited Warranty - USA and Canada
For the U.S.A. and Canada Only
KOHLER
®
plumbing fixtures, faucets and fittings are warranted to be free of defects in material and
workmanship for one year from date of installation.
Kohler Co. will, at its election, repair, replace or make appropriate adjustment where Kohler Co. inspection
discloses any such defects occurring in normal usage within one year after installation. Kohler Co. is not
responsible for removal or installation costs.
To obtain warranty service, contact Kohler Co. either through your Dealer, Plumbing Contractor, Home
Center or E-tailer, or by writing Kohler Co., Attn.: Customer Service Department, 444 Highland Drive,
Kohler, WI 53044, USA, or by calling 1-800-4-KOHLER from within the USA, 1-800-964-5590 from within
Canada and 001-877-680-1310 from within Mexico.
Implied warranties including that of merchantability and fitness for a particular purpose are expressly
limited in duration to the duration of this warranty, Kohler Co. disclaims any liability for special,
incidental or consequential damages. Some states/provinces do not allow limitations on how long an
implied warranty lasts, or the exclusion or limitation of special, incidental or consequential damages so these
Kohler Co. 5 1043843-5-B

One-Year Limited Warranty - USA and Canada (cont.)
limitations and exclusions may not apply to you. This warranty gives you specific legal rights. You may also
have other rights which vary from state/province to state/province.
This is our exclusive written warranty.
Notes:
1. There may be variation in color fidelity between catalog images and actual plumbing fixtures.
2. Kohler Co. reserves the right to make changes in product characteristics, packaging or availability at any
time with out notice.
COPYRIGHT © 1999, 2000, 2001, 2002 BY KOHLER CO.
One-Year Warranty - For Mexico
For Mexico Only
KOHLER CO.
It is recommended that at the time of purchase, you verify that all accessories and components are complete
in this package.
This Kohler product is warranted to be free of defects in material and workmanship for one (1) year from the
date of purchase as shown on the invoice or receipt.
1. Kohler Co. will only service its commercialized products through its authorized distributors.
2. To obtain warranty service, please present the invoice and corresponding warranty.
3. Through its authorized distributors, Kohler Co. promises to repair the defective product or provide a new
replacement or an equivalent model (in those cases that the model has been discontinued) when the product
is beyond repair, without any charge to the consumer.
4. The time of repair will not exceed six (6) weeks commencing on the date the product is received.
5. It is recommended that the consumer save the invoice or receipt as additional protection, as it may
substitute the warranty in the case that there is a discrepancy in the validity of the warranty.
EXCEPTIONS AND RESTRICTIONS
The Warranty will not be valid in the following cases:
1. When the product is not operated in accordance with the instructions concerning use and operation set
forth in the owner’s manual or installation instructions, and when the recommendations and warnings
included are not observed.
2. When the product has been modified or dismantled partially or totally; or has been used in a negligent
fashion and as a consequence has suffered damages attributable to the consumer, individual, or hardware not
authorized by Kohler Co.
3. This warranty does not cover the damages as a result of disaster such as fire or acts of God, including
flooding, earthquake, or electric storms, etc. To obtain a list of distributors in your area where you can
exercise your rights under this warranty, please call 001-877-680-1310.
KOHLER CO., KOHLER, WI 53044 U.S.A.
IMPORTER:
INTERNACIONAL DE CERÁMICA, S.A. DE C.V.
AV. CARLOS PACHECO NO. 7200
CHIHUAHUA, CHIH., MEXICO C.P. 31060
TEL: 52 (14) 29-11-11
1043843-5-B 6 Kohler Co.

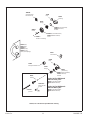
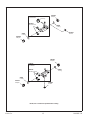
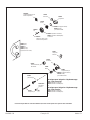
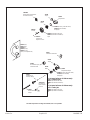
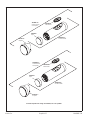
1. Troubleshooting Procedures
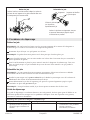
Remove the Jets
NOTE: A special tool is provided with the jets that will allow you to remove them from the whirlpool.
This tool is also supplied with each trim kit.
Position the jet ball nozzle so it is pointing upward.
NOTE: The nozzle must remain pointed up or the tool will slip off.
Insert the removal tool, hooked end up, into the opening of the jet and hook the inside top of the
nozzle.
Grasp the tool firmly and place your thumb against the whirlpool wall. Pull steadily on the tool
until the jet assembly pulls free of the hole. Be careful not to lose the O-ring.
Reinstall the Jets
NOTE: The jet O-ring must be correctly positioned, must be lubricated, and must be in good condition to
permit easy rotation and proper operation of the jet.
Install the O-ring onto the first shoulder of the jet. Lubricate the O-ring with silicone lubricant to
prevent noisy operation of the jet.
Carefully insert the jet into the housing, and lightly push and rotate the jet until it snaps into
position. Do not force the jet.
NOTE: When installed correctly, the jet should turn smoothly both clockwise and counterclockwise.
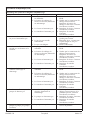
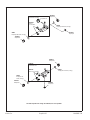
Troubleshooting Guide
This troubleshooting guide is for general aid only. A Kohler Authorized Service Representative or qualified
electrician should correct any electrical problems. For warranty service, contact your dealer or wholesale
distributor.
Troubleshooting the Whirlpool System
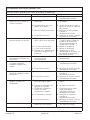
Symptoms Probable Causes Recommended Action
1. User keypad does not
illuminate when power button
is pressed or outer ring is
rotated.
A. No power to control. A. Check wiring and connect
power. If problem persists,
refer to installer/dealer.
Remove the Jets
Insert the tool hook as shown and pull the jet out of the
housing. The jet should be facing up when this is done.
Housing
Reinstall the Jets
Insert the jet into the housing, and lightly
push and rotate until it snaps in position
Slide the O-ring
onto the first
shoulder of the jet
Inspect and
lubricate the O-ring
Kohler Co. 7 1043843-5-B

Troubleshooting Procedures (cont.)
Troubleshooting the Whirlpool System
Symptoms Probable Causes Recommended Action
B. GFCI or ELCB circuit breaker
is tripped.
B. Reset GFCI or ELCB.
C. Wiring harness from user
keypad to control is loose,
disconnected or damaged.
C. Check wiring for proper
connections. Replace wiring
harness if necessary. Refer to
installer/dealer.
D. Keypad is not working. D. Replace user keypad. Refer to
installer/dealer.
E. Control is not working. E. Replace control. Refer to
installer/dealer.
2. Motor starts, but all jets are not
functioning.
A. Jet is closed. A. Rotate jet trim ring
counterclockwise to open.
B. Jet not installed correctly. B. Reinstall jet; check for O-ring
damage.
C. Jets are blocked. C. Remove obstruction.
3. User keypad is illuminated but
does not respond to buttons or
ring.
A. Control program is locked. A. Reset GFCI or ELCB.
B. Wiring harness from user
keypad to control is loose,
disconnected or damaged.
B. Check wiring for proper
connections. Replace wiring
harness if necessary. Refer to
installer/dealer.
C. Keypad is not working. C. Replace user keypad. Refer to
installer/dealer.
D. Control is not working. D. Replace control. Refer to
installer/dealer.
4. User keypad indicator bar
keeps scanning at power-up.
A. Control program is locked. A. Reset GFCI or ELCB.
B. Wiring harness from user
keypad to control is loose,
disconnected or damaged.
B. Check wiring for proper
connections. Replace wiring
harness if necessary. Refer to
installer/dealer.
C. Keypad is not working. C. Replace user keypad. Refer to
installer/dealer.
D. Control is not working. D. Replace control. Refer to
installer/dealer.
5. User keypad is illuminated, but
pump won’t start.
A. Power cord from pump to
control is loose, disconnected
or damaged.
A. Check wiring for proper
connections. If problem
persists, refer to
installer/dealer.
B. Pump is not working. B. Replace pump. Refer to
installer/dealer.
C. Control is not working. C. Replace control. Refer to
installer/dealer.
6. Motor runs but pump won’t
prime (cavitates).
A. Pump is shimmed too high. A. Lower pump/control to
subfloor level.
B. Small air leak at pump inlet. B. Securely tighten nut(s) on
intake side of pump.
C. Motor/pump is not working. C. Replace motor/pump. Refer to
installer/dealer.
D. Controller is not working. D. Replace control. Refer to
installer/dealer.
7. Pump stops before 18 minutes. A. GFCI or ELCB tripped. A. Identify source of fault, and
correct. Reset GFCI or ELCB.
1043843-5-B 8 Kohler Co.

Troubleshooting Procedures (cont.)
Troubleshooting the Whirlpool System
Symptoms Probable Causes Recommended Action
B. Suction is blocked. B. Remove obstruction.
C. Jets are blocked. C. Remove obstruction.
D. Motor overheated and
protection device activated.
D. Check for blockage at suction
and/or jets. Remove
obstruction and allow motor to
cool.
8. Pump does not automatically
stop after 22 minutes.
A. 20-minute timer inadvertently
disabled.
A. See Service Manual.
9. Pump won’t turn off when the
power button on user keypad
is pressed.
A. Keypad is not working. A. Replace user keypad. Refer to
installer/dealer.
B. Control is not working. B. Replace control. Refer to
installer/dealer.
10. Pump operates but variable
speed feature does not work.
A. Motor/pump is not working. A. Replace motor/pump. Refer to
installer/dealer.
B. Control is not working. B. Replace control. Refer to
installer/dealer.
11. Bath water cools while pump
is operating.
A. Water temperature is above
104° F (40° C).
A. Allow bath water to cool.
B. Heater is turned off on user
keypad.
B. Turn heater on.
C. Wiring from heater to control is
loose, disconnected or
damaged.
C. Check wiring for proper
connections. Refer to
installer/dealer.
D. Heater is not working. D. Replace heater. Refer to
installer/dealer.
E. Control is not working. E. Replace control. Refer to
installer/dealer.
12. Noisy operation. A. Pump banding straps have not
been cut.
A. Cut pump banding straps with
tin snips.
B. Dry or dislodged jet O-ring
(squeal).
B. Remove jet, replace and
lubricate O-ring, and reinstall
jet.
13. Remote control (if equipped)
does not work.
A. Batteries improperly installed
or dead.
A. Replace batteries.
B. Antenna on wiring harness is
damaged.
B. Replace wiring harness. Refer
to installer/dealer.
C. Remote control not
programmed correctly.
C. See Homeowners Guide or
service manual.
D. Remote control is not working. D. Replace remote control.
E. Control is not working. E. Replace control. Refer to
installer/dealer.
Kohler Co. 9 1043843-5-B

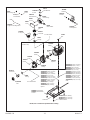
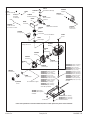
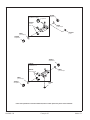
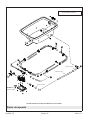
Service Parts
**Finish/color code must be specified when ordering.
*Note: All tubing 1" unless otherwise noted.
1-1/2" Tubing
1-1/2" Tubing
1-1/2" Tubing
1015008
Wire Harness
1043843-5-B 10 Kohler Co.

34353
O-Ring
67429
Flange
65885 (Acrylic and FRP)
67668 (Cast Iron)
Gasket
67889
Jet Housing
91967
Check Valve
88532** (Colored Finishes)
88531** (Metal Finishes)
Jet
30739
Jet Tool
1045715-P
67665
Plug
88530** (Colored Finishes)
88529** (Metal Finishes)
Jet
93685
Housing
96708
Flange
96895** (Colored Finishes)
65061** (Metal Finishes)
Cover
65886 (Acrylic and FRP)
60050 (Cast Iron)
Gasket
65054**
Screw
65226**
Suction Cover Plug
73518
Plug
94469
Flange Removal Tool
1003065
**Finish/color code must be specified when ordering.
Silicone Lube
Packet
Single Jet For Whirlpools
With 6 or More Jets
Single Jet For Whirlpools
With 5 or Less Jets
Suction Flange
Removal Tool
93836 (1/2")
93837 (3/4")
93838 (1")
93839 (1-1/4")
94853 (1-1/2")
Tube (w/Couplings)
Kohler Co. 11 1043843-5-B

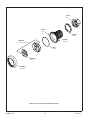
1016953
1.5 HP Pump
1016954
Motor
1010548
Volute
1010673
Seal
1010677
Screw
1010675
O-Ring
1013755
Impeller
1010676
Cover
94821
O-Ring
61845-K
Copper Grounding Wire
1019719
Connector
1005363
Nut
1019447-A [1/4" (6 mm)]
1019447-B [1/2" (1.3 cm)]
1019447-C [3/4" (1.9 cm)]
Isolation Mount
1018964
Bracket
1019433
Carriage Bolt
1001794
Locknut
90153
Nut
1019446-A [1-3/4" (4.4 cm)]
1019446-B [2-3/4" (7 cm)]
1019446-C [3" (7.6 cm)]
1019446-D [2-1/2" (6.4 cm)]
1019446-E [2" (5.1 cm)]
1019446-F [2-1/4" (5.7 cm)]
1019446-G [3-1/4" (8.3 cm)]
1019446-H [3-1/2" (8.9 cm)]
1019446-J [3-3/4" (9.5 cm)]
1019446-K [4" (10.2 cm)]
1019446-L [1-1/2" (3.8 cm)]
1019446-M[1-1/4" (3.2 cm)]
Stud
1019444-A [3/4" (1.9 cm)]
1019444-B [1-3/4" (4.4 cm)]
1019444-C [2" (5.1 cm)]
1019444-D [1-1/2" (3.8 cm)]
1019444-E [1" (2.5 cm)]
1019444-F [1-1/4" (3.2 cm)]
1019444-G [2-1/4" (5.7 cm)]
1019444-H [2-1/2" (6.4 cm)]
1019444-J [2-3/4" (7 cm)]
1019444-K [3" (7.6 cm)]
1019444-L [1/2" (1.3 cm)]
1019444-M[1/4" (6 mm)]
Spacer
**Finish/color code must be specified when ordering.
1018660 (One Outlet)
1018662 (Two Outlets)
Control
Outlet
1034673
Connector
To Tee Heater
60320
Screw
93892-A
Electrical Box
67065
Ground Lug
61776
Lock Washer
1033678
Screw
93003
Strain Relief
94821
O-Ring
1005363
Nut
93893
Cover
60320
Screw
67065
Ground Lug
61776
Lock Washer
1010029
Pump Tee
To In-line Heater
1043843-5-B 12 Kohler Co.

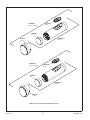
1018710
Tee Heater
94821
O-Ring
94821
O-Ring
1012977
Adapter
1012916
Nut with Screws
1011679
Gasket
1012977
Adapter
1011679
Gasket
**Finish/color code must be specified when ordering.
94821
O-Ring
1012653
Adapter
1012653
Adapter
1012916
Nut w/Screws
1022408
In-line Heater
94821
O-Ring
1032545
Housing
Kohler Co. 13 1043843-5-B

1013460
Housing
59588
Screw
94110
O-Ring
1013459-A
Decal
1013469**
Trim Ring
1020679-A
Cover/Circuit Board
**Finish/color code must be specified when ordering.
1020677
Gasket
65157
Nut
1043843-5-B 14 Kohler Co.

1023091**
Cap
1013471**
Stand
1013464-A
Decal
1013464-B
Decal
1022253-B**
Remote
1022253-A**
Remote
1013822-A**
Remote w/Stand
1013822-B**
Remote w/Stand
1023091**
Cap
1013471**
Stand
**Finish/color code must be specified when ordering.
Kohler Co. 15 1043843-5-B

Guide du propriétaire
Baignoire à hydromassage encastrée avec chauffeau
Renseignements importants
CONSIGNES RELATIVES AUX RISQUES
D’INCENDIE, D’ÉLECTROCUTION OU DE
BLESSURES CORPORELLES
LIRE ET SUIVRE TOUTES LES INSTRUCTIONS
CONSERVER CES INSTRUCTIONS
AVERTISSEMENT : Lors de l’utilisation des produits électriques, des précautions de base devraient
toujours être observées, incluant ce qui suit:
DANGER : Risque de blessure corporelle. Afin de réduire les risques de blessures, ne pas permettre
aux enfants d’utiliser cet appareil sans surveillance.
AVERTISSEMENT : Risque de blessures corporelles. Pour éviter les blessures corporelles, entrer et
sortir avec précaution de la baignoire à hydromassage.
AVERTISSEMENT : Risque d’électrocution. Ne pas raccorder d’appareils électriques (tels que
sèche-cheveux, lampe, téléphone, radio ou télévisions) dans les 5’ (1,5 m) de cette baignoire à
hydromassage.
AVERTISSEMENT : Risque d’hyperthermie. Les personnes sous médicaments ou qui sont en
observation médicale doivent consulter leur médecin avant d’utiliser des baignoires à hydromassage
équipées de chauffeau.
Une borne de mise à la terre est incluse dans le boîtier du câblage. Afin de réduire les risques
d’électrocution, ce terminal doit être raccordé à la borne de mise à la terre du panneau du service électrique,
avec un câble ayant le même calibre que celui du circuit de contrôle qui alimente cet équipement.
Un connecteur à pression par câble est prévu à l’extérieur de la pompe ou de la commande de cet appareil
afin de permettre la connexion entre l’appareil et toutes autres surfaces de métal avoisinantes, tel que requis
par les normes locales.
Utiliser cette baignoire à hydromassage uniquement pour un usage tel que décrit dans ce manuel. Ne pas
utiliser des fixations non recommandées par le fabricant.
Ne jamais faire tomber ou insérer d’objet quelconque dans les ouvertures.
Ne pas utiliser cet appareil sans ses protecteurs (couvercles) sur ses raccords d’aspiration.
La baignoire à hydromassage doit être uniquement raccordée à un Disjoncteur Différentiel (GFCI) ou un
Disjoncteur de Mise à la Terre (ELCB). De tels disjoncteurs GFCI ou ELCB devraient être fournis par
l’installateur et vérifiés régulièrement. Appuyer sur le bouton de test pour tester les disjoncteurs GFCI ou
ELCB. Les disjoncteurs GFCI ou ELCB de mise à la terre devraient couper l’alimentation. Appuyer sur le
bouton de ré-initialisation. L’alimentation devrait être restituée. Si les disjoncteurs GFCI or ELCB ne
fonctionnent pas de cette façon, l’un ou l’autre est défectueux. Si les disjoncteurs GFCI ou ELCB stoppent
l’alimentation électrique à la baignoire sans que le bouton test ne soit utilisé, il y a donc un court-circuit
indiquant la possibilité de choc électrique. Ne pas utiliser pas cette baignoire à hydromassage. Débrancher la
baignoire à hydromassage et la faire réviser par un technicien qualifié avant son utilisation.
Kohler Co. Français-1 1043843-5-B

Renseignements importants (cont.)
AVERTISSEMENT : La consommation d’alcool, de drogues ou de médicaments peuvent augmenter
considérablement le risque fatal d’hyperthermie. Une immersion prolongée dans l’eau chaude peut
provoquer l’hyperthermie. L’hyperthermie a lieu lorsque la température corporelle interne atteint
plusieurs degrés au dessus de la température normale de 98.6° F (37° C). Les symptômes
d’hyperthermie comprennent la hausse de la température corporelle, l’étourdissement, la léthargie, la
somnolence et l’évanouissement. Les effets de l’hyperthermie comprennent: (a) défaut de percevoir la
chaleur, (b) défaut de s’apercevoir du besoin de sortir de la baignoire, (c) incapacité de reconnaître le
danger, (d) dommages au foetus dans le cas des femmes enceintes, (e) incapacité physique de sortir de
la baignoire et (f) inconscience et danger conséquent de noyade.
IMPORTANT ! Rincer le système d’hydromassage deux fois par mois ou plus souvent, selon l’usage, tel
que décrit dans la rubrique Entretien et nettoyage dans ce manuel.
Ne pas laisser la température de la baignoire à hydromassage excéder 104° F (40° C).
Ne pas laisser de petits objets tels que des jouets ou accessoires pour le bain dans la baignoire à
hydromassage lorsqu’elle est en marche.
L’utilisation répétée de produits d’hygiène et de beauté contenant des huiles peut endommager les
revêtements en plastique des composants de la baignoire à hydromassage. Ne pas utiliser de shampoings ou
d’huiles de bains à bases végétales.
L’action de la baignoire à hydromassage peut considérablement faire mousser une quantité de produit
moussant, même très petite, de savon, de shampoing ou d’huile pour le bain. Pour cette raison, nous vous
conseillons de ne pas utiliser ces produits dans votre baignoire à hydromassage.
Sommaire
Renseignements importants ......................................................... 1
Merci d’avoir choisi la compagnie Kohler ............................................... 2
Votre baignoire à hydromassage Kohler ................................................ 3
Clavier de l’utilisateur et modes/fonctions de la baignoire à hydromassage ...................... 4
Télécommande optionnelle .......................................................... 4
Opérer votre baignoire à hydromassage ................................................ 4
Nettoyage de la baignoire à hydromassage en acrylique .................................... 5
Nettoyer le clavier et la télécommande ................................................. 5
Purger le système de baignoire d’hydromassage .......................................... 5
Garantie limitée d’un an - É.U. et Canada ............................................... 5
Garantie d’un an - Pour le Mexique ................................................... 6
Procédures de dépannage .......................................................... 8
Pièces de rechange .............................................................. 12
Merci d’avoir choisi la compagnie Kohler
Merci d’avoir choisi la ligne the Bold Look of Kohler. Le travail soigné des artisans de Kohler vous fera
apprécier une rare combinaison de performances prouvées et une sophistication gracieuse, qui vous
satisferont pour les années à venir. La fiabilité et la beauté de votre produit Kohler surpasseront vos plus
grandes espérances. Chez Kohler, nous sommes fiers du rendement de nos produits et nous savons que vous
le serez aussi.
Veuillez prendre s’il vous plaît quelques minutes pour consulter ce guide du propriétaire. Prêter une
attention toute particulière aux instructions d’entretien et de nettoyage.
Toute l’information dans ce manuel est basée sur la dernière disponible au moment de la publication. Chez
Kohler, nous veillons constamment à améliorer la qualité de nos produits. Nous nous réservons le droit
d’apporter des modifications aux caractéristiques, emballages et disponibilités des produits à tout moment, et
ce sans préavis.
Kohler Co. Français-2 1043843-5-B

Votre baignoire à hydromassage Kohler
Votre nouvelle baignoire à hydromassage est concue pour relaxer, stimuler, revigorer et tonifier votre corps.
La baignoire à hydromassage consiste en les éléments suivants:
Baignoire - agit comme un réservoir d’eau, et fournit un espace pour l’action d’hydromassage.
Clavier de l’utilisateur - localisé à portée de main, le clavier permet d’arrêter ou de démarrer le
système d’hydromassage et le chauffeau ainsi que de régulariser le débit d’eau dans les jets.
Moteur de pompe - silencieux et à vitesse variable, pour faire circuler l’eau et créer l’action
d’hydromassage.
Jets réglables - positionnés de manière stratégique pour optimiser l’effet d’hydromassage, ils
permettent d’ajuster le débit d’air et d’eau, ainsi que de contrôler la direction du jet selon le désir.
Chauffeau - conçu pour aider à maintenir automatiquement la température de l’eau jusqu’à 104ºF
(40ºC) et pour améliorer votre expérience d’hydromassage. Le chauffeau s’active automatiquement
lorsque la baignoire à hydromassage est en service, et s’éteint lorsque le moteur de la pompe est
arrêté. Le chauffeau peut être arrêté par le clavier de commande et à tout moment quand la pompe
est en fonction.
1043843-5-B Français-3 Kohler Co.

Clavier de l’utilisateur et modes/fonctions de la baignoire à hydromassage
Alimentation - Met les pompes de la baignoire à hydromassage en marche et arrêt.
Flèche haut - Augmente le débit d’eau.
Flèche bas - Réduit le débit d’eau.
Chauffeau - Le chauffeau s’active automatiquement lorsque la baignoire à hydromassage est mise en
service. Vous pouvez arrêter le chauffeau en appuyant sur son bouton. Appuyer une deuxième fois
sur le bouton pour redémarrer le chauffeau.
Barre indicatrice - Indique le volume du débit d’eau.
Télécommande optionnelle
Si vous avez acheté une télécommande, veuillez consulter le guide du propriétaire emballé avec la
télécommande pour une information détaillée.
Opérer votre baignoire à hydromassage
Tourner complètement la bague du jet vers la gauche. Orienter les jets vers le fond du bassin.
REMARQUE : La température de la baignoire à hydromassage ne doit pas excéder 104°F (40° C). Un
chauffeau encastré maintient automatiquement la température d’eau quand la baignoire à hydromassage
est en marche, et tant que la température d’eau ne dépasse pas 104°F (40° C). Le chauffeau s’arrêtera aux
températures plus hautes.
Fermer le drain, et remplir la baignoire à hydromassage à un niveau d’au moins 2″ (5,1 cm)
au-dessus du jet le plus élevé. Tester la température de l’eau avec votre main, puis entrer dans la
baignoire doucement.
Appuyer sur le bouton de marche pour démarrer la baignoire à hydromassage La baignoire à
hydromassage commencera à opérer à débit moyen. Le chauffeau démarrera et son voyant
l’umineux s’allumera.
Augmenter ou diminuer le débit de l’eau en pressant sur les flèches du clavier. Une barre
d’indication située au centre du clavier indique le volume du débit d’eau.
Ajuster les jets pour un mélange optimal de l’eau et de l’air. Tourner la bague du jet vers la droite
pour réduire le débit, ou vers la gauche l’augmenter. Orienter les jets pour diriger le débit d’eau
vers la direction désirée pour optimiser l’action d’hydromassage.
Le chauffeau s’active automatiquement lorsque la baignoire à hydromassage est mise en service.
Vous pouvez arrêtez le chauffeau en appuyant sur le bouton du clavier. Appuyer une deuxième fois
sur le bouton pour redémarrer le chauffeau.
Barre d'indication -
Indique le volume
du débit d'eau
Marche/arrêt
Augmente le débit
Réduit le débit
Clavier de l'utilisateur illuminé
Chauffeau
marche/arrêt
Voyant lumineux
du chauffeau
Remplir d'eau de 2" (5,1 cm)
au-dessus du jet le plus élevé.
Tourner la bague du jet vers la gauche
pour augmenter le débit d'eau.
Tourner la bague
du jet vers la
droite pour
diminuer le débit.
Orienter les jets
pour diriger le
débit d'eau en
position désirée.
Kohler Co. Français-4 1043843-5-B

Opérer votre baignoire à hydromassage (cont.)
Appuyer une deuxième fois pour arrêter la baignoire à hydromassage.
REMARQUE : Votre baignoire à hydromassage s’arrêtera automatiquement après environ 20 minutes de
fonctionnement. Vous pouvez redémarrer la baignoire à hydromassage, si désiré, en appuyant sur le
bouton de mise en marche.
Sortir doucement de la baignoire à hydromassage, et ouvrir le drain pour la vider.
REMARQUE : Si la baignoire à hydromassage ne fonctionne pas de façon appropriée, se reporter au
tableau de dépannage.
Nettoyage de la baignoire à hydromassage en acrylique
Ne pas utiliser de nettoyants abrasifs ou de solvants sur les surfaces acryliques.
Essuyer le produit avec un chiffon doux après chaque usage.
Eviter les détergents, les désinfectants ou les produits de nettoyage en aérosols.
Si la surface devient excessivement sale, vous pouvez utiliser un nettoyant d’usage général tel que:
Formule 409
®
Nettoyant tout usage
®
(Baignoire et Douche uniquement), Gel Brillance
®
, Sans
frotter
®
Nettoyant pour moisissure, Mr. Propre
®
, Citron Frais, Cinch
®
, Verre Plus
®
, ou Fantastik
®
Tout Usage.
REMARQUE : Pour réparer les unités abîmées ou détériorées: Appliquer un produit à polir blanc pour
automobile avec un chiffon propre. Polir vigoureusement les rayures et les détériorations. Essuyer les
résidus. Passer ensuite une couche de produit à polir blanc pour voiture. Ne pas polir les surfaces sur
lesquelles vous vous tenez debout ou vous marchez.
Nettoyer le clavier et la télécommande
Utiliser un chiffon doux pour essuyer votre clavier et votre télécommande après chaque usage. Si la
surface devient sale, utiliser un savon doux non-abrasif et de l’eau tiède pour le nettoyage.
Purger le système de baignoire d’hydromassage
Purger le système d’hydromassage deux fois par mois ou plus, selon la fréquence d’utilisation.
Suivre la séquence suivante:
•
Tourner les bagues de garniture du jet complètement vers la droite pour supprimer l’injection de
l’air.
•
Remplir la baignoire à hydromassage avec de l’eau chaude à un niveau d’au moins 2″ (5,1 cm)
au-dessus des jets les plus élevés, ou laisser l’eau dans la baignoire à hydromassage après l’usage.
•
Ajouter à l’eau 2 cuillères à soupe (30 ml) d’un détergent pour lave-vaisselle peu moussant et 20
onces (590 ml) d’eau de javel (5% - 6% d’hypochlorite de sodium).
•
Faire fonctionner la baignoire à hydromassage pendant5à10minutes. Arrêter la baignoire à
hydromassage et purger.
•
Si désiré, rincer les surfaces de la baignoire avec de l’eau.
•
Rincer les surfaces des jets, le robinet, les barres d’appuis, le drain, etc. et sécher avec un chiffon
doux.
Garantie limitée d’un an - É.U. et Canada
Pour les É.U. et le Canada uniquement
Les robinets, appareils sanitaires et accessoires Kohler
®
sont garantis contre tout défaut matériel et de
fabrication pour un an à partir de la date d’installation.
Kohler Co. jugera à sa discrétion, de la réparation, du remplacement ou du réglage approprié et ceci après
1043843-5-B Français-5 Kohler Co.
Page is loading ...
Page is loading ...
Page is loading ...
Page is loading ...
Page is loading ...
Page is loading ...
Page is loading ...
Page is loading ...
Page is loading ...
Page is loading ...
Page is loading ...
Page is loading ...
Page is loading ...
Page is loading ...
Page is loading ...
Page is loading ...
Page is loading ...
Page is loading ...
Page is loading ...
Page is loading ...
Page is loading ...
Page is loading ...
Page is loading ...
Page is loading ...
Page is loading ...
Page is loading ...
Page is loading ...
Page is loading ...
Page is loading ...
Page is loading ...
Page is loading ...
Page is loading ...
-
 1
1
-
 2
2
-
 3
3
-
 4
4
-
 5
5
-
 6
6
-
 7
7
-
 8
8
-
 9
9
-
 10
10
-
 11
11
-
 12
12
-
 13
13
-
 14
14
-
 15
15
-
 16
16
-
 17
17
-
 18
18
-
 19
19
-
 20
20
-
 21
21
-
 22
22
-
 23
23
-
 24
24
-
 25
25
-
 26
26
-
 27
27
-
 28
28
-
 29
29
-
 30
30
-
 31
31
-
 32
32
-
 33
33
-
 34
34
-
 35
35
-
 36
36
-
 37
37
-
 38
38
-
 39
39
-
 40
40
-
 41
41
-
 42
42
-
 43
43
-
 44
44
-
 45
45
-
 46
46
-
 47
47
-
 48
48
-
 49
49
-
 50
50
-
 51
51
-
 52
52


Kohler K-1158 User manual
- Type
- User manual
- This manual is also suitable for
Ask a question and I''ll find the answer in the document
Finding information in a document is now easier with AI
in other languages
- français: Kohler K-1158 Manuel utilisateur
- español: Kohler K-1158 Manual de usuario
- português: Kohler K-1158 Manual do usuário
Related papers
-
Kohler K-1111 User manual
-
-
-
-
-
-
-
-
-
Other documents
-
 OVE Decors 15BTW-GBW54R-00 Operating instructions
-
 OVE Eloise Right-Sided Door 60x30 Installation guide
-
 ARTELLI P20 Installation guide
-
MAAX 100073-000-001 Melodie Installation guide
-
Sterling 77301100-0 Installation guide
-
Electrolux EWE451PX-DWX5 User manual
-
Truper PREM-1 Owner's manual
-
MAAX 102761-000-001 Living 6636 Installation guide
-
Wren Phantom Whirlpool 1800 Installation, Use And Maintenance Manual
-
Whirlpool KR-32 Owner's manual


