Page is loading ...

Futuro Futuro
Futuro Futuro
RANGE HOOD
INSTALLATION MANUAL
QUEST BLACK / QUEST WHITE
36” & 48” VERSIONS
www.FuturoFuturo.com
36” or 48”
24”
18”
6”

E
D
20,4”
A
16” - 18”
B
C
Step 1:
Recommended distance from cooktop to range hood: 16” - 18”.
Mounting bracket is 20.4” above the bottom of the range hood.
Note: mounting bracket screws must be attached to joists, 2x4’s, or
3/4” plywood. Do not attach the range hood to sheetrock alone.
OPTIONAL - Step 4:
If using a chimney cover, attach the cover mounting bracket to wall,
then attach the cover section(s).
Step 3:
Duct requirements: 6” round, rigid type. Do NOT use flexible
ducting. Note: duct may be routed into the wall (as shown), or
vertically.
Rear Exhaust Option: if desired, duct may also be routed through
the rear of the unit - see next page of this manual.
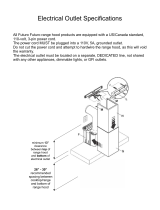
Electrical Outlet:
The location of the electrical outlet (US standard 110V, 3-pin)
depends on specific installation parameters and local building
codes. Outlet may be placed above the top edge of hood body, or
inside the hood body (requires cutting a hole in rear wall).
QUEST - BASIC INSTALLATION
Step 2:
Make sure the hood is level, as well as plumb against the wall.
Adjust the position by turning the adjustable screws built into the
mounting hooks.

QUEST - REAR EXHAUST
Step 2: remove blower, then remove the knock-out plate
on rear wall of range hood. Rotate the blower 90 degrees
and insert into the hole left by the knock-out plate.
Step 3: secure the blower with the 4 screws removed in
Step 2, and reconnect the plug. Connect the range hood to
110V AC power supply and test its operation prior to
continuing installation.
The Quest range hood is equipped with a reversible
blower mount that allows the user a choice of vertical or
horizontal ducting (rear exhaust). A removable knock-out
plate is provided on rear of unit.
Step 1: disconnect 1 plug (on bottom of blower), then
remove 4 screws holding the blower.
/