IDEC SA1E-PP1-2M User manual

Type
User manual
SA1E Miniature Photoelectric Switches
(Built-in Amlifier)
Through-beam
Polarized retro-reflective
Diffuse-reflective
Background suppression (BGS)
Small-beam reflective
Coaxial polarized retro-reflective
User-friendly,
higih-performance
photoelectric switches
Through-beam Polarized retro-reective Diffuse-reective Background suppression
(BGS)
Upgraded SA1E
Various accessories
9 types of slits for through-beam model
4 types of mounting brackets
8 types of reectors for coaxial polarized retro-reective model
Air blower mounting block
SA1ESA1E
Ignores the background and detects the objects only. Smaller beam
makes it possible to detect small objects and narrow gaps between the
objects. The upgraded model is also less affected by the object colors.
Background Suppression
(BGS)
Coaxial Polarized Retro-reective (Transparent Object Sensing)
Long Distance Detection
Several SA1E models are protected from incorrect wiring:
Through-beam
Polarized retro-reective
Diffuse-reective
Background Suppression (BGS)
• Small-beam Reflective
The improved sensing ability detects objects of different
colors such as black and white more accurately.
Output reverse-polarity protection circuit
Detects objects of different colors
Main Circuit
Load
+V
OUT
OV
12 to 24V DC
100mA max.
Because the SA1E-X co-axial
polarized retroreective model
does not have blind zone,
where the reected light
misses the light receiving
element, like the SA1E-P
polarized retro-reective type,
the SA1E-X can be used in
applications where objects
pass near the sensor.
Diffuse-reective Background Suppression (BGS)
Background Suppression (BGS)
Through-beam
Polarized retro-reective
Protected!
When using a reector (IAC-R5/-R8)
20m
5m
Object
Optical AxisSensing Point
(machine axis)
Large beam
size
Conventional
Conventional
ON
Object
Smaller beam
size
Detects the object
closer to the optical
axis
Upgrade Model
Upgrade Model
Upgrade Model
ON
+
Unaffected by
object shapes.
Background Suppression (BGS)
Slits for through-beam model Mounting brackets
Mail sorting
ONON ON
OFF
ONOFF ON
ON
Background Suppression (BGS)
Coaxial Polarized Retro-reective
Application Examples
Transparent lm edge detection
Multi-story parking lot
Through-beam
Mirror-like objects
Polarized Retro-reective
Automatic faucet
Diffuse-reective
PCB line
Miniature Photoelectric Switches
(Built-in Amplier)
SA1E-P SA1E-XSA1E-P
Reector
Blind
Zone
Blind
Zone
Light
receiving
element
Light
receiving
element
Light
source
element
Reector
Light receiving
element
Light source
element
The reected light
is NOT received by the
light receiving element!
The reected light
is received by the
light receiving
element.
Coaxial Polarized Retro-reectivePolarized Retro-reective (non-coaxial)
Reector
No blind zone!
SA1E-X
Reector
Light source
element
Light source
element
sourcesource
Light receiving
element
half-mirrorhalf-mirror
The reected light
is received by the
light receiving
element.
The reected light
is received by the
light receiving
element.
Aplication Example
Coaxial optical structure and narrow beam ensure
stable detection; unaffected by narrowing, inclination
or shaking of a bottle.
2
Upgraded SA1E
Various accessories
9 types of slits for through-beam model
4 types of mounting brackets
8 types of reectors for coaxial polarized retro-reective model
Air blower mounting block
SA1ESA1E
Ignores the background and detects the objects only. Smaller beam
makes it possible to detect small objects and narrow gaps between the
objects. The upgraded model is also less affected by the object colors.
Background Suppression
(BGS)
Coaxial Polarized Retro-reective (Transparent Object Sensing)
Long Distance Detection
Several SA1E models are protected from incorrect wiring:
Through-beam
Polarized retro-reective
Diffuse-reective
Background Suppression (BGS)
• Small-beam Reflective
The improved sensing ability detects objects of different
colors such as black and white more accurately.
Output reverse-polarity protection circuit
Detects objects of different colors
Main Circuit
Load
+V
OUT
OV
12 to 24V DC
100mA max.
Because the SA1E-X co-axial
polarized retroreective model
does not have blind zone,
where the reected light
misses the light receiving
element, like the SA1E-P
polarized retro-reective type,
the SA1E-X can be used in
applications where objects
pass near the sensor.
Diffuse-reective Background Suppression (BGS)
Background Suppression (BGS)
Through-beam
Polarized retro-reective
Protected!
When using a reector (IAC-R5/-R8)
20m
5m
Object
Optical AxisSensing Point
(machine axis)
Large beam
size
Conventional
Conventional
ON
Object
Smaller beam
size
Detects the object
closer to the optical
axis
Upgrade Model
Upgrade Model
Upgrade Model
ON
+
Unaffected by
object shapes.
Background Suppression (BGS)
Slits for through-beam model Mounting brackets
Mail sorting
ONON ON
OFF
ONOFF ON
ON
Background Suppression (BGS)
Coaxial Polarized Retro-reective
Application Examples
Transparent lm edge detection
Multi-story parking lot
Through-beam
Mirror-like objects
Polarized Retro-reective
Automatic faucet
Diffuse-reective
PCB line
Miniature Photoelectric Switches
(Built-in Amplier)
SA1E-P SA1E-XSA1E-P
Reector
Blind
Zone
Blind
Zone
Light
receiving
element
Light
receiving
element
Light
source
element
Reector
Light receiving
element
Light source
element
The reected light
is NOT received by the
light receiving element!
The reected light
is received by the
light receiving
element.
Coaxial Polarized Retro-reectivePolarized Retro-reective (non-coaxial)
Reector
No blind zone!
SA1E-X
Reector
Light source
element
Light source
element
sourcesource
Light receiving
element
half-mirrorhalf-mirror
The reected light
is received by the
light receiving
element.
The reected light
is received by the
light receiving
element.
Aplication Example
Coaxial optical structure and narrow beam ensure
stable detection; unaffected by narrowing, inclination
or shaking of a bottle.
3
4
SA1E Miniature Photoelectric Switches (Built-in Amplifier)
Sensing Method Sensing Range Connection
Cable
Length
Operation
Mode
Part No.
NPN Output PNP Output
Through-beam
Infrared LED
w/Sensitivity Adjustment
20m
See the characteristics on page 15.
Cable
1m
Light ON SA1E-TN1 SA1E-TP1
Dark ON SA1E-TN2 SA1E-TP2
2m
Light ON SA1E-TN1-2M SA1E-TP1-2M
Dark ON SA1E-TN2-2M SA1E-TP2-2M
5m
Light ON SA1E-TN1-5M SA1E-TP1-5M
Dark ON SA1E-TN2-5M SA1E-TP2-5M
M8 Connector
Light ON SA1E-TN1C SA1E-TP1C
Dark ON SA1E-TN2C SA1E-TP2C
Polarized Retro-reective
Red LED
w/Sensitivity Adjustment
5.0m (50mm)
When using IAC-R5/R8
2.0m (150mm)
When using IAC-RS2
3.0m (50mm)
When using IAC-R6
1.3m (150mm)
When using IAC-RS1
1.6m (100mm)
When using IAC-R7
See the characteristics on page 16.
Cable
1m
Light ON SA1E-PN1 SA1E-PP1
Dark ON SA1E-PN2 SA1E-PP2
2m
Light ON SA1E-PN1-2M SA1E-PP1-2M
Dark ON SA1E-PN2-2M SA1E-PP2-2M
5m
Light ON SA1E-PN1-5M SA1E-PP1-5M
Dark ON SA1E-PN2-5M SA1E-PP2-5M
M8 Connector
Light ON SA1E-PN1C SA1E-PP1C
Dark ON SA1E-PN2C SA1E-PP2C
Diffuse-reective
Infrared LED
w/Sensitivity Adjustment
700 mm
See the characteristics on page 16.
Cable
1m
Light ON SA1E-DN1 SA1E-DP1
Dark ON SA1E-DN2 SA1E-DP2
2m
Light ON SA1E-DN1-2M SA1E-DP1-2M
Dark ON SA1E-DN2-2M SA1E-DP2-2M
5m
Light ON SA1E-DN1-5M SA1E-DP1-5M
Dark ON SA1E-DN2-5M SA1E-DP2-5M
M8 Connector
Light ON SA1E-DN1C SA1E-DP1C
Dark ON SA1E-DN2C SA1E-DP2C
Note: Maintain at least
the distance shown in
the ( ) between the SA1E
photoelectric switch and
reector. Reectors are
not sup plied and must be
ordered separately.
Simple, compact design for world-wide usage.
•Six sensing methods
•Cable model (three cable lengths) and M8 connector models are available.
•NPN output, PNP output, light ON, dark ON can be selected.
•Sensing range doubled with SA1E-T through-beam and SA1E-P polarized retro-
reective models.
•Highly stable with excellent resistance against vibration and shock resistance.
•Coaxial polarized retro-reective model (SA1E-X) ensures stable detection, unaf-
fected by construction, inclination or shaking of the object, and a high-speed
response and small beam ensure reliable counting of target objects moving at high
speed.
•Air blower mounting block for installing an air blower to clean the lens sur face.
Ideal to maintain a clean lens surface and sensor performance.
•Nine types of slits for through-beam models available.
•CE marked, UL listed.
Connector Model
Cable Model
Package Quantity: 1
CUS
LISTED
SA1E Miniature Photoelectric Switches (Built-in Amplifier)
5
Package Quantity: 1
Sensing Method Sensing Range Connection
Cable
Length
Operation
Mode
Part No.
NPN Output PNP Output
Background Suppression
Red LED
w/Sensing Range Adjustment
Cable
1m
Light ON SA1E-BN1 SA1E-BP1
Dark ON SA1E-BN2 SA1E-BP2
2m
Light ON SA1E-BN1-2M SA1E-BP1-2M
Dark ON SA1E-BN2-2M SA1E-BP2-2M
5m
Light ON SA1E-BN1-5M SA1E-BP1-5M
Dark ON SA1E-BN2-5M SA1E-BP2-5M
M8 Connector
Light ON SA1E-BN1C SA1E-BP1C
Dark ON SA1E-BN2C SA1E-BP2C
Small-beam Reective
Red LED
w/Sensitivity Adjustment
Cable
1m
Light ON SA1E-NN1 SA1E-NP1
Dark ON SA1E-NN2 SA1E-NP2
2m
Light ON SA1E-NN1-2M SA1E-NP1-2M
Dark ON SA1E-NN2-2M SA1E-NP2-2M
5m
Light ON SA1E-NN1-5M SA1E-NP1-5M
Dark ON SA1E-NN2-5M SA1E-NP2-5M
M8 Connector
Light ON SA1E-NN1C SA1E-NP1C
Dark ON SA1E-NN2C SA1E-NP2C
Coaxial Polarized Retro-reective
Red LED
With Sensitivity Adjustment
Note: Reector is not supplied and
must be ordered separately.
2.0m
(when using IAC-R9)
1.0m
[
100 mm
]
(when using IAC-R10)
1.0m
[
100 mm
]
(when using IAC-R11)
Cable
1
Light ON SA1E-XN1 SA1E-XP1
Dark ON SA1E-XN2 SA1E-XP2
2
Light ON SA1E-XN1-2M SA1E-XP1-2M
Dark ON SA1E-XN2-2M SA1E-XP2-2M
5
Light ON SA1E-XN1-5M SA1E-XP1-5M
Dark ON SA1E-XN2-5M SA1E-XP2-5M
M8 Connector
Light ON SA1E-XN1C SA1E-XP1C
Dark ON SA1E-XN2C SA1E-XP2C
20 to 200 mm
See the characteristics on page 16.
40 to 200 mm
Adjustable Sensing Range
50 to 150 mm
See the characteristics on page 16.
See the characteristics on page 17.
SA1E Miniature Photoelectric Switches (Built-in Amplifier)
6
Slits (for through-beam)
Item Slit Size Part No. Ordering No.
Package
Quantity
Vertical Slit
0.5 mm × 18 mm SA9Z-S06 SA9Z-S06PN02
2
1.0 mm × 18 mm SA9Z-S07 SA9Z-S07PN02
2.0 mm × 18 mm SA9Z-S08 SA9Z-S08PN02
Horizontal Slit
0.5 mm × 6.5 mm SA9Z-S09 SA9Z-S09PN02
1.0 mm × 6.5 mm SA9Z-S10 SA9Z-S10PN02
2.0 mm × 6.5 mm SA9Z-S11 SA9Z-S11PN02
Round Slit
ø0.5 mm SA9Z-S12 SA9Z-S12PN02
ø1.0 mm SA9Z-S13 SA9Z-S13PN02
ø2.0 mm SA9Z-S14 SA9Z-S14PN02
Reflectors (for polarized retro-reflective)
Item Part No.
Package
Quantity
Reector
Standard IAC-R5
1
Small IAC-R6
Large IAC-R8
Narrow (rear/side mounting) IAC-R7M
Narrow (rear mounting) IAC-R7B
Narrow (side mounting) IAC-R7S
Tape Type (40 × 35 mm) IAC-RS1
Tape Type (80 × 70 mm) IAC-RS2
Reector
Mounting Bracket
For IAC-R5 IAC-L2
For IAC-R6 IAC-L3
For IAC-R8 IAC-L5
•See page 13 for dimensions.
•The IAC-L2 is not supplied with mounting screws and nuts. Use commercially
available M4 screws and nuts for mounting the IAC-R5 reector.
•The IAC-L3 is supplied with two mounting screws (M3 × 8 mm sems screws).
•The IAC-L5 is supplied with two mounting screws (M4 × 10 mm sems
screws).
•The IAC-R7M and IAC-R7S are supplied with two M3 × 8 mm self-tapping
screws, two at washers, and two spring washers.
•The IAC-R7B is supplied with an M3 × 8 mm self-tapping screw, a at washer,
and a spring washer.
Sensor Mounting Brackets
Item Part No.
Package
Quantity
Main Unit Mounting
Brackets
Vertical Mounting SA9Z-K01
1
Horizontal Mounting SA9Z-K02
Cover type SA9Z-K03
Back Mounting SA9Z-K04
•Two mounting screws (M3 × 12 mm sems screws) are supplied with the
SA9Z-K01 and SA9Z-K02.
•Two mounting screws (M3 × 14 mm sems screws) are supplied with the
SA9Z-K03.
•The through-beam model requires two mounting brackets, one each for the
projec tor and the receiver.
•The SA9Z-K02 cannot be used for the connector models.
•Contact IDEC about mounting brackets for the connector.
Connector Cable (for M8 connector model)
Number of
Core Wires
Style & Length Part No.
Package
Quantity
4
Straight, 2m SA9Z-CM8K-4S2
1
Right angle, 2m SA9Z-CM8K-4L2
Straight, 5m SA9Z-CM8K-4S5
Right angle, 5m SA9Z-CM8K-4L5
Reflectors (used only for coaxial polarized retro-reflective)
Item Part No.
Package
Quantity
Reector
Standard IAC-R9
1
Small IAC-R10
Ultra-small IAC-R11
Reector Mounting Bracket For IAC-R9 IAC-L3
Air Blower Mounting Block
Item Part No. Package Quantity
Air Blower Mounting Block SA9Z–A02 1
•Two mounting screws (M3 × 20 mm sems screws), one M5 × 6 mm screw for
plugging the air supply port, and one gasket (0.5 mm thick) are supplied.
•The air tube tting and mounting bracket are not supplied and must be
ordered separately (recommended mounting bracket: SA9Z-K01).
•Material: Anodized aluminum surface
Sensitivity Control Screwdriver
Item Part No. Package Quantity
Sensitivity Control Screwdriver
SA9Z-AD01 1
Accessories (optional)
SA1E Miniature Photoelectric Switches (Built-in Amplifier)
7
Specifications
Sensing Method Through-beam Polarized Retro-reective
Part No.
SA1E-T SA1E-P
Power Voltage 12 to 24V DC (Operating range: 10 to 30V DC) equipped with reverse-polarity protection
Current Draw
Projector: 15 mA
Receiver: 20 mA
30mA
Sensing Range 20m
5.0m (IAC-R5/R8)
3.0m (IAC-R6)
2.0m (IAC-RS2)
1.3m (IAC-RS1)
1.6m (IAC-R7) (Note 1)
Adjustable Sensing Range
Detectable Object Opaque Opaque/mirror-like objects
Hysteresis
Response Time 1 ms maximum
Sensitivity Adjustment
Adjustable using a potentiometer (approx. 240°)
Through-beam and polarized retro-reective models are also available without sensitivity adjustment.
Sensing Range Adjustment
Light Source Element Infrared LED Red LED
Operation Mode Light ON/Dark ON
Control Output
NPN open collector or PNP open collector (30V DC, 100 mA maximum, short-circuit protection)
Voltage drop:
2V max. (30V DC, 100 mA max)
1.2V max. (30V DC, 10 mA max)
With output reverse connection protection control circuit
LED Indicators
Operation LED: Yellow
Stable LED: Green
Power LED: Green (Through-beam model projector)
Interference Prevention Two units can be mounted in close proximity.
Degree of Protection IP67 (IEC 60529)
Extraneous Light Immunity Sunlight: 10,000 lx maximum, Incandescent lamp: 5,000 lux maximum (at receiver)
Operating Temperature –25 to +55°C (no freezing)
Operating Humidity 35 to 85% RH (no condensation)
Storage Temperature –40 to +70°C (no freezing)
Insulation Resistance Between live part and mounting bracket: 20 MΩ maximum (500V DC megger)
Dielectric Strength Between live part and mounting bracket: 1000V AC, 50/60 Hz, 1 minute
Vibration Resistance Damage limits: 10 to 500 Hz, 90 m/s
2
, 1 cycle 5 mins, in each of 3 axes
Shock Resistance Damage limits: 1000 m/s
2
, 6 shocks in each of 3 axes
Material
Case PC/PBT
Lens PMMA
Indicator Model PC
Weight
(approx.)
Cable
Model
Projector: 30g , Receiver: 30g (Note 2) 30g (Note 2)
Connector Model Projector: 10g, Receiver: 10g 10g
Connection
Method
Cable
Model
ø3.5 mm, 2-core, 0.2 mm
2
cable ø3.5 mm, 3-core, 0.2 mm
2
cable
Connector Model
M8 connector (4-pin)
Note 1: Maintain at least the distance shown below between the SA1E photoelectric switch and reector.
IAC-R5/R6/R8: 50 mm
IAC-R7: 100 mm
IAC-RS1/RS2: 150 mm
The detection distance cannot be guaranteed if the reector is deformed or the tape type reector is applied on uneven surface.
Note 2: Cable length: 1m (50g when the cable length is 2m. 110g when the cable length is 5m.)
SA1E Miniature Photoelectric Switches (Built-in Amplifier)
8
Specifications
Sensing Method Diffuse-reective Background Suppression (BGS) Small-beam Reective
Coaxial Polarized Retro-reective
(Transparent Object Sensing)
Part No.
SA1E-D SA1E-B SA1E-N SA1E-X
Power Voltage 12 to 24V DC (Operating range: 10 to 30V DC), equipped with reverse-polarity protection
Current Draw 30 mA 20 mA
Sensing Range
700 mm
(using 200 × 200 mm white mat
paper)
20 mm to preset
(using 200 × 200 mm white mat
paper)
50 to 150 mm
(using 100 × 100 mm white mat
paper)
2 m
(using IAC-R9)
Adjustable Sensing Range 40 to 200 mm
Detectable Object Opaque/Transparent Opaque Opaque/Transparent
Opaque, transparent and mirror-
like objects
Hysteresis 20% maximum 10% maximum 20% maximum
Response Time 1 ms maximum 500 μs maximum
Sensitivity Adjustment
Adjustable using a potentiometer
(approx. 240°)
Adjustable using a potentiometer (approx. 240°)
Sensing Range Adjustment 6-turn control knob
Light Source Element Infrared LED Red LED
Operation Mode Light ON/Dark ON
Control Output
NPN open collector or PNP open collector (30V DC, 100 mA maximum with short circuit protection circuit)
Voltage drop:
2V max. (30V DC, 100 mA)
1.2V max. (30V DC, 100 mA)
Output reverse-polarity
protection circuit
Voltage drop:
2V max. (30V DC, 100 mA)
Output reverse-polarity
protection circuit
Voltage drop:
2V max. (30V DC, 100 mA)
1.2V max. (30V DC, 100 mA)
Output reverse-polarity
protection circuit
Voltage drop: 2V max.
(30V DC, 100mA)
LED Indicators
Operation LED: Yellow
Stable LED: Green
Operation LED: Yellow
Stable LED: Green
Operation LED: Yellow
Interference Prevention Two units can be mounted in close proximity.
Degree of Protection IP67 (IEC 60529)
Extraneous Light Immunity Sunlight: 10,000 lux maximum, Incandescent lamp: 5,000 lux maximum (at receiver)
Operating Temperature –25 to +55°C (no freezing)
Operating Humidity 35 to 85% RH (no condensation)
Storage Temperature –40 to +70°C (no freezing)
Insulation Resistance Between live part and mounting bracket: 20 MΩ maximum (500V DC megger)
Dielectric Strength Between live part and mounting bracket: 1000V AC, 50/60 Hz, 1 minute
Vibration Resistance Damage limits: 10 to 500 Hz, 1 cycle 5 mins in each of 3 axes
Damage limits: 10 to 55 Hz, double amplitude 1.5mm,
20 cycles in each of 3 axes
Shock Resistance Damage limits: 1000 m/s
2
, 6 shocks in each of 3 axes Damage limits: 500 m/s
2
, 10 shocks in each of 3 axes
Material
Housing PC/PBT PBT PC/PBT
Lens PMMA
Indicator cover PC
Weight
(approx.)
Cable Model 30g (Note 1) 35g (Note 2) 30g (Note 1) 35g (Note 2)
Connector
Model
10g 25g 10g 20g
Connection
Method
Cable Model ø3.5 mm, 3-core, 0.2 mm
2
cable
Connector
Model
M8 connector (4-pin)
Note 1: Cable length: 1m (50g when the cable length is 2m. 110g when the cable length is 5m.)
Note 2: Cable length: 1m (55g when the cable length is 2m. 120g when the cable length is 5m.)
SA1E Miniature Photoelectric Switches (Built-in Amplifier)
9
+V
OUT
0V
Brown (1)
Black (4)
Load
12V to
24V DC
Blue (3)
Main Circuit
+V
Brown (1)
Load
Black (4)
OUT
12V to
24V DC
0V
Blue (3)
Main Circuit
+V
Brown (1)
Black (4)
Load
OUT
12V to
24V DC
0V
Blue (3)
Main Circuit
+V
Brown (1)
Load
Black (4)
OUT
12V to
24V DC
0V
Blue (3)
Main Circuit
PNP OutputNPN Output
Through-beam Projector
+V
Brown (1)
12V to
24V DC
0V
Blue (3)
Main Circuit
+V
Brown (1)
12V to
24V DC
0V
Blue (3)
Main Circuit
Connector Pin Assignment
(OUT)
(NC)
(0V)
(+V)
Connector Pin Assignment
(OUT)
(NC)
(0V)
(+V)
Connector Pin Assignment
(OUT)
(NC)
(0V)
(+V)
Connector Pin Assignment
(OUT)
(NC)
(0V)
(+V)
(NC)
(NC)
(0V)
(+V)
Connector Pin Assignment
(NC)
(NC)
(0V)
(+V)
Connector Pin Assignment
Coaxial polarized retro-reective (Transparent Object Sensing)
Slit and Sensing Range
A slit, which changes the beam size of through-beam sensors, can easily be attached to the sensing side of the through-beam projector and receiver. Three different
slit widths are available.
Slit
w/Sensitivity Adjustment
Sensing Range (m)
Minimum Detectable Object Width
(mm) (Note 1)
Attached on:
Part No.
Slit Width: A
Receiver
Receiver/
Projector
Receiver
Receiver/
Projector
SA9Z-S06 0.5 mm 2.5 1.0 0.5 0.5
SA9Z-S07 1.0 mm 3.5 1.5 1.0 1.0
SA9Z-S08 2.0 mm 6.0 3.5 2.0 2.0
SA9Z-S09 0.5 mm 2.0 0.7 0.5 0.5
SA9Z-S10 1.0 mm 3.0 1.5 1.0 1.0
SA9Z-S11 2.0 mm 5.5 3.0 2.0 2.0
SA9Z-S12 0.5 mm 0.8 0.08 0.5 0.5
SA9Z-S13 1.0 mm 1.5 0.3 1.0 1.0
SA9Z-S14 2.0 mm 2.5 1.2 2.0 2.0
Note 1: At 1mm from receiver surface.
•Theslitcanbeinstalledontothefronteasily(seethegureatright).
Slit
(stainless steel)
The slit can be pressed to
snap onto the front easily.
Horizontal slits and round slits have
an orientation. Make sure that the TOP
marking comes on top of the sensor
(LED side).
Output Circuit & Wiring Diagram
Through-beam
Polarized reective
Diffuse-reective
Background suppression (BGS)
Small-beam reective
SA1E Miniature Photoelectric Switches (Built-in Amplifier)
10
17.1
19.8
7.8
Projector/
Receiver
10.8
31.5
ø3.5
19.5
25.4
3.4
7.2 9.9
7.8
19.8
1.2
8.2
11.7
3.2
Operation LED (yellow)
2-M3
Stable LED (green) (*1)
Sensitivity Control
Projector
Receiver
17.2
4.5
ø5.2
14.5
11.0
2.9
10.8
0.9
31.5
25.4
2-M3
Projector/
Receiver
(coaxial)
19.5
3.4
ø3.5
Dimensions
Cable Model
Through-beam
Coaxial polarized retro-reflective
(Transparent Object Sensing)
Polarized retro-reflective
Diffuse-reflective
Background Suppression (BGS)
Small-beam reflective
*1: Stable LED is not installet on background suppression (BGS) model.
Dimensions
All dimensions in mm.
SA1E Miniature Photoelectric Switches (Built-in Amplifier)
11
Dimensions
Connector Model
Through-beam
Coaxial polarized retro-reflective
(Transparent Object Sensing)
Polarized retro-reflective
Diffuse-reflective
Background Suppression (BGS)
Small-beam reflective
10.8
31.5
4.5
6.3
19.5
25.4
3.4
7.2
9.9
7.8
19.8
1.2
8.2
11.7
3.2
2-M3
17.1
7.8
19.8
Projector/
Receiver
Operation LED
(yellow)
Stable LED (green) (*1)
Sensitivity Control
Projector
Receiver
M8×1
17.2
4.5
0.931.5
25.4
10.8
2.9
11.0
14.5
M8
4.5
6.3 (*2)
2-M3
19.5
3.4
ø5.2
Projector/
Receiver
(coaxial)
*2: The connector length is 18 mm when a right-angle connector cable
(SA9Z-CM8K-4L) is attached.
*1: Stable LED is not installet on background suppression (BGS) model.
(with right angle connector)
Dimensions
All dimensions in mm.
SA1E Miniature Photoelectric Switches (Built-in Amplifier)
12
46
2.5
18
R9.5
25
3.2
13
3.2
25
6
ø55
ø39
19
29
7
20º
40º
5.5
5.5
ø25
6.2
19
14º
4
2-R25
10.8
13
7.2
17.1
12.3
25.4
3.2
9.3
31.5
(5.3)
1.2
15.0
0.6 19.5
29.0
ø39.0
ø55.0
(18)
(55)
46
2.5
18
R9.5
25
3.2
13
3.2
25
6
ø55
ø39
19
29
7
20º
40º
5.5
5.5
ø25
6.2
19
14º
4
2-R25
10.8
13
7.2
17.1
12.3
25.4
3.2
9.3
31.5
(5.3)
1.2
15.0
0.6 19.5
29.0
ø39.0
ø55.0
(18)
(55)
12.3
17.1
25.4
42.5
7.2
9.9
25.0
(*1)
(*2)
9.3 31.5 1.2
13.7
0.5 19.5
13.46.0
24.8
21.5
10.8
(3.2)
1.2
42.5
21.5
7
13.7
14
3.4
3.4
14.0
3.2
12.3 25.4
8.0
9.0 3.04.5
12.3
17.1
25.4
42.5
7.2
9.9
25.0
(*1)
(*2)
9.3 31.5 1.2
13.7
0.5 19.5
13.46.0
24.8
21.5
10.8
(3.2)
Mounting Brackets
Vertical Mounting
SA9Z-K01
Horizontal Mounting
SA9Z-K02
Cover Model
SA9Z-K03
Back Mounting
SA9Z-K04
With Mounting Bracket
10.8
24.8
13.4
28.4
19.5
1.6
15.3
25.4
21.5
12.7
1.2
14.6
8.4
34.8
55.0
10.6
14º
4.5
12.0 5.0
4.5
ø
3.4
6.0
17.6
15.3 25.4
12.3 31.5 1.2
12.7
21.5
1.0 19.5
1.2
8.0
14.6
(3.2)
10.6
34.8
55.0
7.2
17.1
28.0
(*1)
(*2)
15.3
25.4
21.5
12.7
1.2
14.6
8.4
34.8
55.0
10.6
14º
4.5
12.0 5.0
4.5
ø
3.4
6.0
17.6
15.3 25.4
12.3 31.5 1.2
12.7
21.5
1.0 19.5
1.2
8.0
14.6
(3.2)
10.6
34.8
55.0
7.2
17.1
28.0
(*1)
(*2)
Material: stainless steel
14
8
3.4
30
25
5
7
t=1.2
32
77
24
25.4
3.2
Material: Stainless Steel
*1: Center of optical axis (through-beam)
*2: Center of optical axis (polarized retro-reective,
diffuse reective, and small-beam reective models
*1: Center of optical axis (through-beam)
*2: Center of optical axis (polarized retro-reective,
diffuse reective, and small-beam reective models
All dimensions in mm.
Accessory Dimensions
SA1E Miniature Photoelectric Switches (Built-in Amplifier)
13
Reectors
3.3
(Effective reecting area: 30 × 31)
2-ø3.6
8.3
35.3
34.3
42.3
8
25
4
(21)
35
40
Thickness = 0.5 mm
61
(Effective reecting area: 47 × 47)
2-ø4.5
30
40
30.4
51.2
51.2
8
IAC-R5 IAC-R6
2-M3 tapping
screw hole
(ø2.6 mm,
depth 8.6 mm)
Positioning Projection
(ø3.0 mm, height 1.0 mm)
11.5
2-7.3
3.0
12.4
25.4
12.4
33.3
M3 tapping screw hole
(ø2.6 mm, depth 7.7 mm)
12.4
2-7.3
Positioning Projection
(ø3.0 mm, height 1.0 mm)
M3 tapping screw hole
(ø2.6 mm, depth 7.7 mm)
11.5
12.4
33.3
2-M3 tapping
screw hole
(ø2.6 mm,
depth 8.6 mm)
25.4
12.4
2-7.3
3.0
12.4
33.3
All dimensions in mm.
IAC-RS1IAC-R8
70
80
Thickness = 0.5 mm
(Effective reecting area: 47.2 × 47.2)
2-ø4.3
51
72
60
3
9
•Effective reecting area: 8.6 × 29.5
•The mounting plate for reector must be 0.8 to 2.5 mm in thickness.
IAC-R7M (rear/side mounting) IAC-R7B (rear mounting) IAC-R7S (side mounting)
IAC-RS2
6.1
3.5
4.4
61.6
51
5
51.6
40
20
2-R2.2
2-R2.2
(Reecting surface 47×47.6)
3.1
6.1
19.4
60
50
2-ø4.4 2-ø7
(Reecting surface 38.5×16)
2
3.2
26
32
20.2
2-ø3.8
(Reecting surface 18×18.2)
IAC-R9 IAC-R10 IAC-R11
Accessory Dimensions
SA1E Miniature Photoelectric Switches (Built-in Amplifier)
14
Reector Mounting Brackets
28.1
18.9
27.2
ø4.7
ø10
Black White
Blue Brown
Cable length:
2 or 5m
IAC-L2 (for IAC-R5)
IAC-L3 (for IAC-R6)
IAC-L5 (for IAC-R8)
Connector Cable (connector on one end)
Straight
(SA9Z-CM8K-4S)
Right-angle
(SA9Z-CM8K-4L)
Cable length:
2 or 5m
33.7
ø4.7
ø10
Black White
Blue Brown
•Dielectric strength when installed on the SA1E: 1000V AC (between live part and
mounting bracket, except between live part and tightening ring)
Air Blower Mounting Block
SA9Z-A02
5.8
14.0
8.0
37.0
25.4
25.0
6.9
M5
P0.8
M5
P0.8
42.5
14.0
6.5
31.5
8.0
3.4
10.9
(3.8)
2.03.5 19.5
Plugging screws
for air supply port
(M5), Gasket
(used on one
side only)
Air supply port
Air Blower
Mounting Block
SA1E-****
(3.2)
Recommended mounting
bracket (SA9Z-K01)
2-ø3.2
(Material: Anodized aluminum surface)
With Mounting Bracket
•The SA9Z-A02 air blower mounting block is supplied
with two mounting screws (M3 × 20 mm sems
screws), one screw for plugging the air supply port
(M5 × 6 mm), and one gasket for plugging the air
supply port.
•An air tube tting (M5) can be installed to either the
top or side. Tighten the tting to a torque of 0.5 N·m
maxi mum.
•The air tube tting and mounting bracket are
not supplied and must be ordered separately
(recommended mounting bracket: SA9Z-K01).
All dimensions in mm.
Vertical Slit Horizontal Slit Round Slit
SA9Z-S06
SA9Z-S07
SA9Z-S08
SA9Z-S09
SA9Z-S10
SA9Z-S11
SA9Z-S12
SA9Z-S13
SA9Z-S14
18
8.2
32.1
A
6.1
0.3
A
8.2
32.1
6.1
0.3
4.4
6.5
øA
4.4
8.2
32.1
6.1
0.3
Material: Stainless Steel
Note: For slit width A, see page 9.
Material: SPCC (zinc chromate plating, black)
42
5.5
19
6
28
37
74
113
2
2-ø3.4
4-ø4.4
30
58
70
60
44
20
1.6
25
1610
8
6
Material: SPCC (zinc plating)
8-M3 × 0.5 holes
25
4.5
11
10
35
(3)
40
4.5
10
Material: SPCC (zinc plating)
26
12
35
(28)
(3)
20
(2)
61
16
15
18
7
40
50
11
8-M3 × 0.7 holes
Accessory Dimensions
SA1E Miniature Photoelectric Switches (Built-in Amplifier)
15
Characteristics (Typical)
1-1. Through-beam SA1E-T
Excess Gain (Without slit) Lateral Displacement (Without slit) Angle (Without slit)
Excess Gain (With vertical slit) Excess Gain (With horizontal slit) Excess Gain (With round slit)
Lateral Displacement (With 0.5-mm vertical slit) Lateral Displacement (With 1.0-mm vertical slit) Lateral Displacement (With 2.0-mm vertical slit)
Lateral Displacement (With 0.5-mm horizontal slit) Lateral Displacement (With 1.0-mm horizontal slit) Lateral Displacement (With 2.0-mm horizontal slit)
Lateral Displacement (With ø0.5-mm round slit) Lateral Displacement (With ø1.0-mm round slit) Lateral Displacement (With ø2.0-mm round slit)
10
1
100
0510 15 20 25 30
Sensing Distance (m)
Excess Gain
Operation
Level
Sensing Distance X (m)
Lateral Displacement Y (mm)
0
-800
-400
400
200
-200
-600
600
800
0510 15 20 25 30
X
Y
-90
-60
-30
0
30
60
90
0510 15 20
X
Sensing Distance X (m)
Receiver Angle θ (°)
Excess Gain
Sensing Distance (m)
1
10
100
01234567 1098
2.0 mm
slits on
both sides
1.0 mm
slits on
both sides
0.5 mm
slits on
both sides
Operation
Level
Sensing Distance (m)
Excess Gain
1
10
100
01234567 1098
1.0 mm
slits on
both sides
2.0 mm
slits on
both sides
0.5 mm
slits on
both sides
Operation
Level
Excess Gain
1
10
100
0 1.0 2.0 5.03.0 4.0
ø0.5mm
slits on
both sides
ø1.0mm
slits on
both sides
ø2.0mm
slits on
both sides
Sensing Distance (m)
Operation
Level
Sensing Distance X (m)
Lateral Displacement Y (mm)
-250
-200
-150
-100
-50
50
100
150
200
250
012345 76
0
Y
X
Slits on
both sides
One slit on
receiver
Sensing Distance X (m)
Lateral Displacement Y (mm)
-300
-200
-100
0
100
200
300
0246 108
Y
X
One slit on
receiver
Slits on
both sides
Lateral Displacement Y (mm)
0
-400
-300
-200
-100
100
200
300
400
0246810 12
Y
X
Slits on
both sides
One slit on
receiver
Sensing Distance X (m)
Lateral Displacement Y (mm)
Sensing Distance X (m)
-250
-150
-200
-100
-50
0
50
150
200
100
250
01234 765
Y
X
One slit on
receiver
Slits on
both sides
Lateral Displacement Y (mm)
Sensing Distance X (m)
-250
-200
-150
-100
-50
0
50
100
150
200
250
012345610987
Y
X
One slit on
receiver
Slits on
both sides
Lateral Displacement Y (mm)
-400
-300
-200
-100
0
100
200
300
400
024681210
Y
X
Slits on
both sides
One slit on
receiver
Sensing Distance X (m)
Lateral Displacement Y (mm)
Sensing Distance X (m)
-50
-40
-30
-20
-10
0
10
20
30
40
50
0 0.4 0.8 1.2 2.01.6
Y
X
One slit on
receiver
Slits on
both sides
Lateral Displacement Y (mm)
Sensing Distance X (m)
-100
-80
-60
-40
-20
0
20
40
60
100
80
0 0.5 1.0 1.5 2.0 2.5 3.0 3.5 4.0
Y
X
One slit on
receiver
Slits on
both sides
Lateral Displacement Y (mm)
Sensing Distance X (m)
0
-160
-80
-120
-40
80
40
120
160
0123456
Y
X
One slit on
receiver
Slits on
both sides
SA1E Miniature Photoelectric Switches (Built-in Amplifier)
16
Characteristics (Typical)
2. Polarized Retro-reective SA1E-P
Excess Gain Lateral Displacement Angle (when using IAC-R5/-R8)
3. Diffuse-Reective SA1E-D
Excess Gain Lateral Displacement Angle (when using IAC-R5/-R8)
4. Background Suppression SA1E-B
Lateral Displacement (Preset 100 mm) Lateral Displacement (Preset 200 mm) Light Beam Diameter
Sensing Distance vs. Hysteresis Control Knob vs. Sensing Distance Color Matte Paper and Other Materials
5. Small-beam Reective SA1E-N
Excess Gain Lateral Displacement Object Size vs Sensing Distance
Sensing Distance (m)
Excess Gain
Operation
Level
IAC-R5/8
IAC-R6IAC-RS2
IAC-R7
IAC-RS1
100
10
1
0 123 58746
Sensing Distance X (m)
Lateral Displacement Y (mm)
80
120
40
0
-40
-80
-120
1234 85670
IAC-RS1
IAC-RS2
IAC-R7
IAC-R6
IAC-R5/8
X
Y
Sensing Distance X (m)
Reector Angle θ (°)
012356784
-80
-60
-40
-20
20
40
80
60
0
IAC-RS1
IAC-RS2
IAC-R5/8
IAC-R7
IAC-R6
X
θ
Sensing Distance (m)
Excess Gain
Operation
Level
1
10
100
0 300 600 900 1200 1500
Sensing Distance X (m)
Lateral Displacement Y (mm)
-100
-80
-60
-40
-20
0
20
40
60
80
100
0 200 400 600 800 12001000 1400
Object:
200 × 200 mm
white mat paper
X
Y
Side Length A (mm)
Sensing Distance X (mm)
0
200
400
600
800
1000
1200
1400
04080 120 160 200
X
A
Object:
A mm
white mat paper
-10
-6
-8
-2
-4
0
2
4
6
8
10
04020 60 80 100
X
Y
White
Paper
Black
Paper
Object: 200 × 200 mm
mat paper
Distance setting:
using white paper
Sensing Distance X (mm)
Lateral Displacement Y (mm)
-10
-4
-6
-8
-2
0
2
4
6
8
10
04080 120 160 200
X
Y
Object: 200 × 200 mm
mat paper
Distance setting:
using white paper
Black
Paper
White
Paper
Sensing Distance X (mm)
Lateral Displacement Y (mm)
Sensing Distance (mm)
Light Beam Diameter (mm)
0
2
4
6
8
10
12
14
16
18
050 100 150 200 250
Gray
Paper
6.0
1.0
0.0
2.0
3.0
4.0
5.0
050 100 150 200 250
Black
Paper
White
Paper
Hysteresis (%)
Sensing Distance (mm)
100
0
200
300
400
500
600
700
800
900
1000
6012345
White
Paper
Gray
Paper
Black
Paper
Sensing Distance (mm)
Control Knob (turns)
Comparison of sensing distance when set to
detect white mat paper (200 x 200 mm) at 100 mm
Comparison of sensing distance when set to
detect white mat paper (200 x 200 mm) at 200 mm
200
160
80
120
40
0
200
160
80
120
40
0
Black
Cardboard
Aluminum
Stainless Steel
Brass
Veneer Board
White
Red
Green
Blue
Gray
Black
Cardboard
Aluminum
Stainless Steel
Brass
Veneer Board
White
Red
Green
Blue
Gray
Distance (mm) Distance (mm)
1
10
100
050 100 150 200 300250
Sensing Distance (mm)
Excess Gain
Operation
Level
-15
-10
-5
0
5
10
15
050 100 150 200 300250
XX
Y
Object: 100 × 100 mm
white mat paper
Sensing Distance X (mm)
Lateral Displacement Y (mm)
XX
A
0
50
100
150
200
250
300
020406080 100
Object:
A mm
white mat paper
Side Length A (mm)
Sensing Distance X (mm)
SA1E Miniature Photoelectric Switches (Built-in Amplifier)
17
6. Coaxial Polarized Retro-reective SA1E-X
Excess Gain
Excess Gain
100.0
10.0
1.0
IAC-R10
0 0.5 1 1.5 2 2.5 3 3.5 4
IAC-R9
IAC-R11
Sensing Distance X (mm)
Lateral Displacement
Laterl Displacement Y(mm)
30
20
10
0
-10
-20
-30
0 0.5 1 1.5 2 2.5 3 3.5 4
IAC-R11
X
Y
IAC-R9
IAC-R10
Distance (mm)
Angle
Reector Angle θ (° )
40
30
20
10
0
-10
-20
-30
-40
0 0.5 1 1.5 2 2.5 3 3.5 4
X
IAC-R10
IAC-R11
IAC-R9
Sensing Distance X (mm)
Light Beam Diameter
40
35
30
25
20
15
10
5
0
0 0.2 0.4 0.6 0.8 1 1.2 1.4 1.6 1.8
2
Distance (m)
Light Beam Diameter (mm)
SA1E Miniature Photoelectric Switches (Built-in Amplifier)
18
1. Indicator and Output Operation
(except for background suppression model)
•The operation LED turns on (yellow) when the control output is on.
Operation LED (yellow)
Stable LED (green)
Sensitivity Contr
ol
•The stable LED turns on (green) either at stable incident or stable interrup-
tion. Make sure to use the photoelectric switch after the stable operation
is ensured.
•In the light ON operation, the output turns on when the receiving light inten-
sity level is 1.0 or over as shown on the right.
•In the dark-ON operation, the output turns on when the receiving light in-
tensity level is 1.0 or less as shown on the right.
Receiving Light Intensity
Level
Light Receiving
Status
Stable
LED
(green)
Operation LED (yellow)/Control
Output
Light ON Dark ON
Operation
Level
1.2 and
over
Stable Incident ON
ON OFF
1.0
Unstable
Incident
OFF
Unstable
Interruption
OFF ON
0.8 and
below
Stable
Interruption
ON
2. Optical Axis Alignment (Light ON)
Through-beam
Fasten the receiver temporarily. Place the projector to face the receiver. Move
the projector up, down, right and left to nd the range where the operation
LED turns on. Fasten the projector in the middle of the range. Next, move the
receiver up, down, right and left in the same manner and fasten in the middle
of the range where the operation LED turns on. Make sure that stable LED
turns on at stable incident and stable interruption.
Polarized retro-reective
Install the reector perpendicularly to the optical axis. Move the SA1E
photoelectric switch up, down, right and left to nd the range where the
operation LED turns on. Fasten the switch in the middle of the range. Polarized
retro-reective model can be installed also by nding the position where the
reection of projected red light is most intense, while observing the reection
on the reector from behind the switch. Make sure that stable LED turns on
at stable incident and stable interruption.
Diffuse-reective/Small-beam reective
Place the SA1E photoelectric switch where the switch can detect the object.
Move the switch up, down, right and left to nd the range where the operation
LED tuns on. Fasten the switch in the middle of the range. Make sure that
stable LED turns on at stable incident and stable interruption. Because the
light source element of small-beam reective model is a red LED, visual
inspection is possible as well.
3. Sensitivity Adjustment
Referring to the table at right, adjust the sensitivity of the SA1E photoelectric
switch when necessary, in such cases as the through-beam model is used
to detect small or translucent objects or the reective model is affected
by background. The table explains the status of operation LED when the
operation mode is set to light ON.
•After adjusting the sensitivity, make sure that stable LED turns on at stable
incident and stable interruption. For detecting objects too small to turn on
the stable LED, use an optional slit.
•Sensitivity is set to the maximum (+) at the factory before shipment. When
adjusting the sensitivity, use the screwdriver supplied with the SA1E pho-
toelectric switch to turn the control as shown below, to a torque of 0.05
N·m maximum.
Step
Photoelectric
Switch Status
Sensitivity Control Adjusting Procedure
1
Receiving light
•Through-beam,
polarized reective: No
object detected
•Diffuse reective,
small-beam reec tive:
Object detected
Turn the control counter-clockwise to
the mini mum (–). Then turn clock wise
(toward +) until the operation LED
turns on (turns off with dark ON type)
(point A).
2
Light is interrupted
•Through-beam,
polarized reective:
Object detected
•Diffuse reective,
small-beam reec tive:
No object detected
B
A
At interruption status, turn the control
clock wise (toward +) from point A, until
the operation LED turns on (turns off
with dark ON type) (point B).
If the operation LED does not turn
on (turn off with dark ON type) even
though the control has reached the
maxi mum (+), set the maximum
position (+) as point B.
3
C
B
A
Set the middle point between point A
and B as point C.
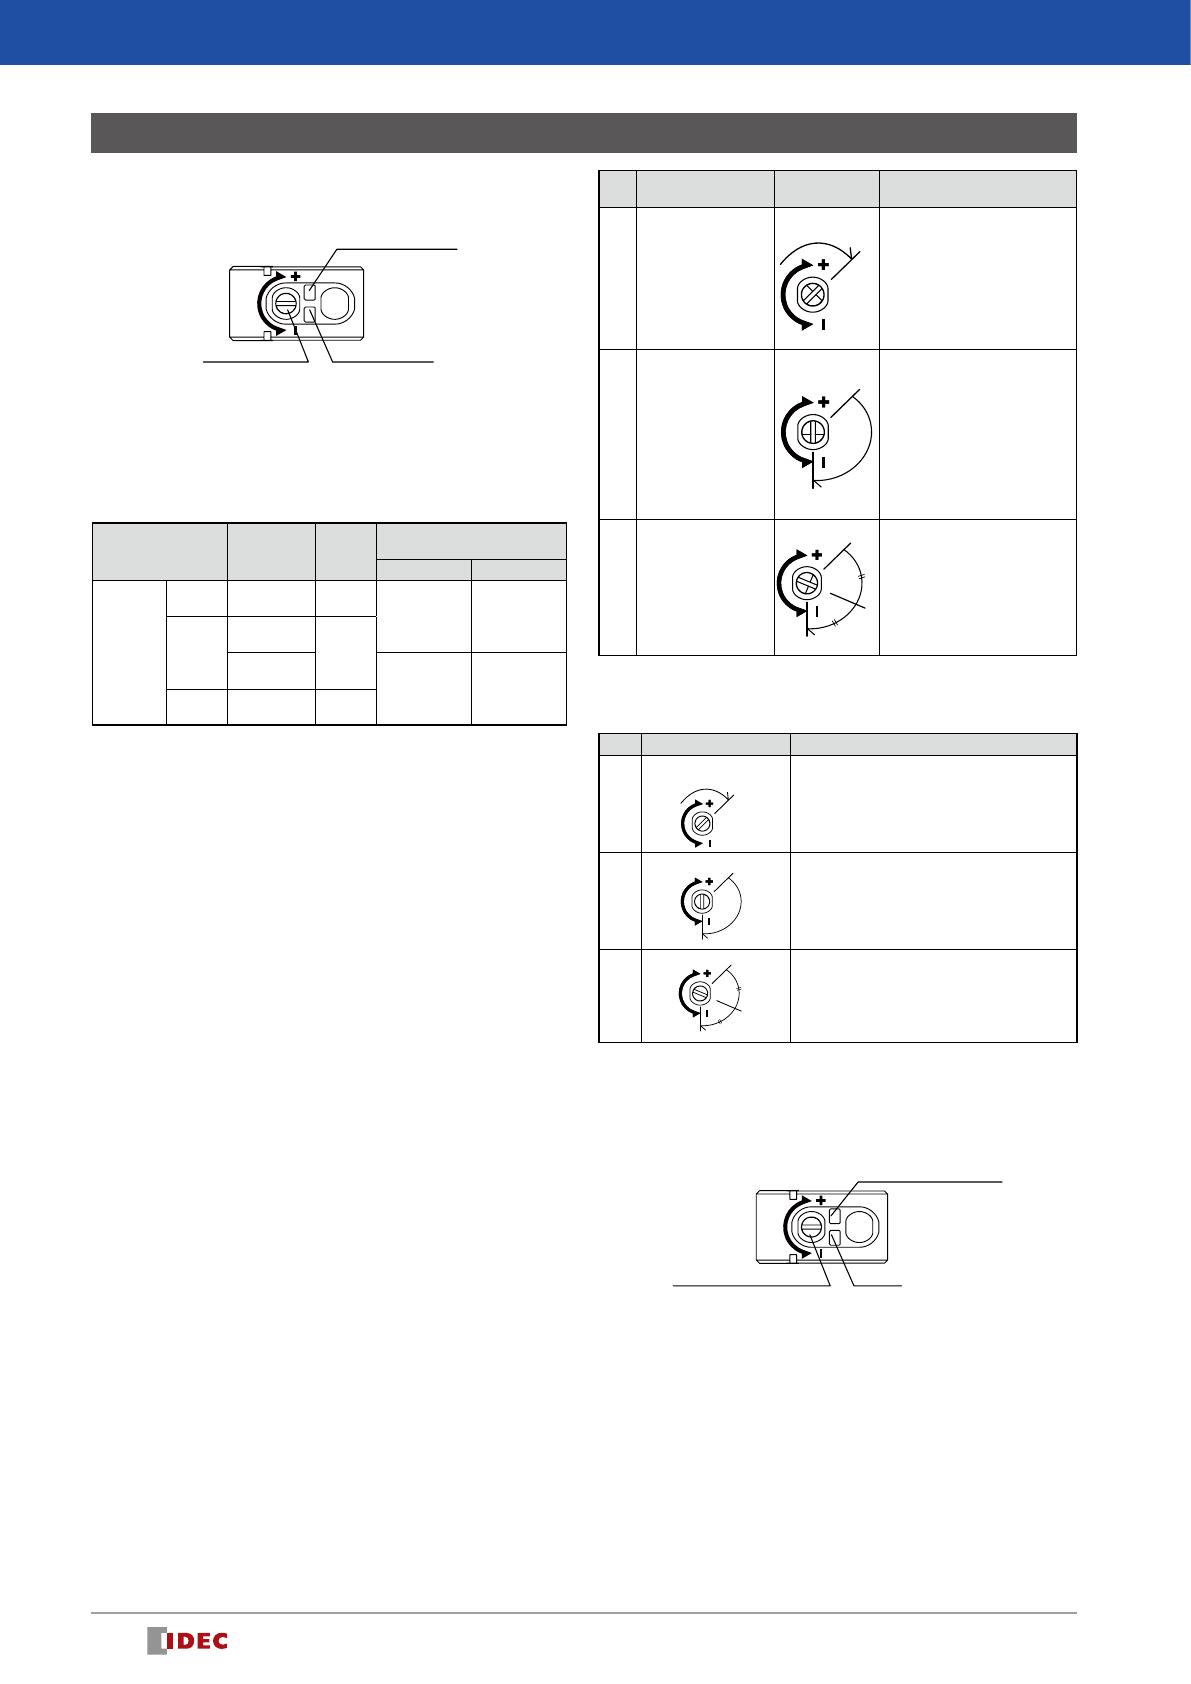
4. Adjustment of Sensing Range for Background
Sup pression (BGS) Model
•When adjusting the sensing range, follow the instruction below.
Step Distance Control Adjusting Procedure
1
Install the photoelectric switch and the object rmly.
Turn the control counterclockwise until the operation
LED turns off (turns on with dark ON type). From this
point, turn the con trol clockwise until the operation
LED turns on (turns off with dark ON type) (point A).
2
Remove the object, and conrm that the operation
LED turns off (turns on with dark ON type). Turn the
control clockwise until the operation LED turns on
(detecting the back ground) (turns off with dark ON
type) (point B). (Note 1)
3
Set the middle point between point A and B as point
C. (Note 2)
Note 1: When the background is far off and not detected, turn the control 360°,
and set the point as point C.
Note 2: Because the control is multi-turn, it may take more than one turn to
move from point A to point B.
Note 3: Turning the control clockwise lengthens the sensing dis tance.
Note 4: Background suppression (BGS) model is not provided with a stable LED.
Operation LED (yellow)
(Note 3)
Sensing Range Control
(6-turn)
(Note 4)
A
A
A
B
A
B
C
Operating Instructions
SA1E Miniature Photoelectric Switches (Built-in Amplifier)
19
5. Power Supply and Wiring
•Do not use the SA1E photoelectric switch at the transient status immedi-
ately after turning on the power (approx. 100 ms, back ground suppression
model: 200 ms). When the load and switch use different power supplies,
make sure to power up the switch rst.
•Use a power supply with little noise and inrush current, and use the photo-
electric switch within the rated voltage range. Make sure that ripple factor
is within the allowable limit. Do not apply AC volt age, otherwise the switch
may blow out or burn.
•When using a switching power supply, make sure to ground the FG (frame
ground) terminal, otherwise high-frequency noise may affect the photo-
electric switch.
•Turn power off before inserting/removing the connector on photo electric
switch. Make sure that excessive mechanical force is not applied to the
connector. Connect the connector cable to a tight ening torque of 0.5 N·m
maximum.
•To ensure the degree of protection, use the applicable connector cable for
the connector model. Connector cables are ordered sepa rately.
•Avoid parallel wiring with high-voltage or power lines in the same conduit,
otherwise noise may cause malfunction and damage. When wiring is long,
use a separate conduit for wiring.
•Use a cable of 0.3 mm
2
minimum core wires, then the cable can be ex-
tended up to 100m.
6. Installation
Installing the Photoelectric Switch
•Do not install the SA1E photoelectric switches in an area where the switch-
es are subject to the following conditions, otherwise mal function and dam-
age may be caused.
Inductive devices or heat source
Extreme vibration or shock
Large amount of dust
Toxic gases
Water, oil, chemicals
Outdoor
•Make sure to prevent sunlight, uorescent light, and especially the uo-
rescent light of inverters from entering the receiver of the pho toelectric
switch directly. Keep the through-beam model receiver away from intense
extraneous light.
•Interference prevention allows two SA1E switches to be mounted in close
proximity. However, the through-beam model is not equipped with inter-
ference prevention. Maintain appropriate dis tance between the switches
referring to the lateral displacement characteristics.
•Because the SA1E photoelectric switches are IP67 waterproof, the SA1E
can be exposed to water. However, wipe water drops and smears from the
lens and slit using a soft cloth to make sure of the best detecting perfor-
mance.
•Polycarbonate or acrylic resins are used for optical elements. Do not use
ammonia or caustic soda for cleaning, otherwise optical elements will be
dissolved. To remove dust and moisture build-up, use soft dry cloth.
•Tighten the mounting screws (M3) to a torque of 0.5 N·m. Do not tighten the
mounting screws excessively or hit the switch with a hammer, otherwise
the protection degree cannot be maintained.
Installing the Reector
•Use M4 mounting screws for the IAC-R5 and IAC-R8 reector, and M3
mount ing screws for the IAC-R6 reector. Tighten the mounting screws to a
tightening torque of 0.5 N·m maximum. Mounting screws are not supplied
with the switch.
•Use the M3 self-tapping screw, at washer, and spring washer to tighten
the IAC-R7 reector to a torque of 0.5 to 0.6 N·m.
•Optional reector mounting bracket IAC-L2 is not supplied with mounting
screws or nuts.
•IAC-L3 and IAC-L5 are supplied with mounting screws for mounting the
reector on the bracket.
•Reector IAC-RS1 and IAC-RS2 can be installed directly on a at surface
using the adhesive tape attached to the back of the reec tor. Before at-
taching the reector, clean the board surface to ensure secure attachment.
Installing the air blower mounting block SA9Z-A02
•When installing the SA9Z-A02 on the SA1E photoelectric switch, use the
attached M3 × 20 mounting screws and tighten to a torque of 0.5 N·m
maximum.
•Do not use the mounting screw (M3 × 12) supplied with the mount ing
bracket (SA9Z-K01) to mount the SA1E photoelectric switches.
•The SA9Z-A02 cannot be used with the through-beam slits (SA9Z-S06 to
S14).
•The air tube tting (M5) can be installed to either the top or side. The air
tube is not supplied.
•Close the unused port using the air supply port plugging screw and gasket
(supplied with SA1E) to a tightening torque of 1 to 2 N·m maximum. The
recommended air pressure is 0.1 to 0.3 MPa.
Installing the background suppression (BGS) model
•This sensor can detect objects correctly when the sensor head is installed
perpendicular to the moving object. Install the sensor head as shown below
to minimize sensing errors.
Correct
Object Object Object
Correct Incorrect
•If the sensor is used in a place subject to a large variations in the ambient
temperature, the characteristics may change depending on the target ob-
ject. Be sure to check the operation under the actual operating conditions.
Operating Instructions
www.idec.com
USA IDEC Corporation Tel:
+1-408-747-0550
Germany
IDEC Electrotechnik GmbH
Tel: +49-40-25 30 54 - 0 [email protected]
Singapore IDEC Izumi Asia Pte. Ltd. Tel: +65-6746-1155
Thailand
IDEC Asia (Thailand) Co., Ltd
Tel: +66-2-392-9765 [email protected]
Australia IDEC Australia Pty. Ltd. Tel:
+61-3-8523-5900
Taiwan IDEC Taiwan Corporation Tel: +886-2-2698-3929 service@tw.idec.com
Hong Kong IDEC Izumi (H.K.) Co., Ltd. Tel: +852-2803-8989
China/Shanghai
IDEC (Shanghai) Corporation Tel:
+
86-21-6135-1515
China/Shenzhen
IDEC (Shenzhen) Corporation
Tel: +86-755-8356-2977 [email protected]
China/Beijing IDEC (Beijing) Corporation Tel: +86-10-6581-6131 [email protected]
Japan IDEC Corporation Tel:
+81-6-6398-2527
Specications and other descriptions in this brochure are subject to change without notice.
2017 IDEC Corporation, All Rights Reserved.
EP1491-6 APRIL 2017
Head Office
6-64, Nishi-Miyahara-2-Chome, Yodogawa-ku, Osaka 532-0004, Japan
  • Page 1 1
  • Page 2 2
  • Page 3 3
  • Page 4 4
  • Page 5 5
  • Page 6 6
  • Page 7 7
  • Page 8 8
  • Page 9 9
  • Page 10 10
  • Page 11 11
  • Page 12 12
  • Page 13 13
  • Page 14 14
  • Page 15 15
  • Page 16 16
  • Page 17 17
  • Page 18 18
  • Page 19 19
  • Page 20 20

IDEC SA1E-PP1-2M User manual

Type
User manual

Ask a question and I''ll find the answer in the document

Finding information in a document is now easier with AI