Kofax Process Director 7.9 Configuration Guide

Category
Software
Type
Configuration Guide
PROCESS DIRECTOR 7.3
Advanced Configuration
Guide
September 2016ReadSoft AB
The contents of this document are subject to change without notice.
Questions or comments about this document may be emailed to documentation@readsoft.com.
02092016.1241
ReadSoft AB (Head office) | Södra Kyrkogatan 4 | SE-252 23 Helsingborg | Sweden | Phone: +46 42 490 21 00 | Fax: +46 42 490 21 20
ReadSoft AG | Falkstrasse 5 | 60487 Frankfurt | Germany | Phone: +49 69 1539402-0 | Fax: +49 69 1539402-13
info@readsoft.com | www.readsoft.com
Contents
Introduction ........................................................................................ 4
About this guide ........................................................................................................ 4
Typographical conventions ....................................................................................... 4
Advanced configuration tasks ................................................................ 5
Working with projects ............................................................................................... 5
Configuring an umbrella system ............................................................................... 11
Customizing the SAP GUI detail screen ..................................................................... 15
Customizing menus and buttons ............................................................................... 17
Developing user exits/BAdIs .................................................................................... 22
Creating custom rules ............................................................................................... 27
Defining document statuses ...................................................................................... 32
Configuring popups ................................................................................................. 33
Creating custom process types ................................................................................. 35
Integrating with SAP Business Workflow ................................................................... 45
Index ................................................................................................ 59
PROCESS DIRECTOR 7.3 Advanced Configuration Guide | page 3 of 60
Introduction
About this guide
This guide is intended for implementation consultants who are installing and configuring the
SAP/ABAP component of PROCESS DIRECTOR.
The guide describes advanced configuration tasks, such as developing BAdIs and creating
custom rules.
For further information, refer to the following guides:
Importing PROCESS DIRECTOR into SAP
PROCESS DIRECTOR SAP Configuration Guide
PROCESS DIRECTOR Reference Guide
PROCESS DIRECTOR Troubleshooting Guide
Typographical conventions
The following typographical conventions are used:
Menu names, commands, and dialog names appear in bold.
Names of keys on your keyboard appear in SMALL CAPITAL LETTERS.
Names of files, folders, and settings appear in Courier font.
SAP transaction codes and program names appear in ARIAL MONOSPACE.
Variables that have to be replaced by an actual value are italicized or appear in <>.
PROCESS DIRECTOR 7.3 Advanced Configuration Guide | page 4 of 60
Advanced configuration tasks
This chapter describes advanced configuration tasks that should only be performed by
experienced users.
Working with projects
Configuring an umbrella system
Customizing the SAP GUI detail screen
Customizing menus and buttons
Developing user exits/BAdIs
Creating custom rules
Defining document statuses
Configuring popups
Creating custom process types
Integrating with SAP Business Workflow
Working with projects
Projects give you a way to test your configurations in a sandbox, without interfering with the
production configuration. The entire project configuration is stored independently from the
standard configuration, so that changes to a project configuration do not affect the standard
configuration and vice versa.
Note: Projects are intended for use in ReadSoft systems only. Projects cannot be used in
production clients.
You can copy a project by downloading the project configuration to an XML file and then
uploading it to another project. You can also compare two project configurations, irrespective
of whether these are stored in the system or in XML files.
PROCESS DIRECTOR 7.3 Advanced Configuration Guide | page 5 of 60
Creating projects
For SAP GUI
1. Go to /EBY/PDBO_VPRJC (expert IMG > Change system settings > Project > Define
projects) and add a new project for your configuration tests.
2. Select the SAP GUI menu item System > User Profile > Own Data and then click the
Parameters tab.
3. Add the parameter ID /EBY/PDBO_PROJECT to the table and set it to the project ID you
wish to use.
Important: The project ID is case-sensitive.
4. Save your changes.
For the Web Application
Normally, project configurations are not available in the Web Application. However, if
necessary, you can use this workaround:
1. Create a new RFC user.
2. Add the project parameter ID to the user profile of this RFC user and set the parameter to
your project ID.
3. In the saplogon.properties file, configure a new connection to the SAP system and
specify the user name and password of your RFC user in this connection. For example:
MYPROJECT.activate = yes
MYPROJECT.client = 800
MYPROJECT.user = MYRFC
MYPROJECT.passwd = myrfcuser
MYPROJECT.lang = EN
MYPROJECT.ashost = s47.r3.ebydos.local
MYPROJECT.sysnr = 0
MYPROJECT.maxconnections = 10
Copying and comparing projects
1. Go to /EBY/PDBO_CONF_DUMP, or run the program /EBY/PDBO_CONFIG_DUMP in SAP
transaction SE38.
2. In the Task to perform area, select whether you want download a configuration to an
XML file, upload from an XML file, or compare one configuration with another.
PROCESS DIRECTOR 7.3 Advanced Configuration Guide | page 6 of 60
3. The Set of tables option enables you to define which tables should be processed
(customizing and system tables) during upload, download and comparison.
Note: Uploading a Worklist configuration to a project in which the Worklist has
already been configured is not recommended.
4. Enter the required parameters in the appropriate section and click the Execute button .
Note: After uploading a configuration, you need to generate the Worklist.
PROCESS DIRECTOR 7.3 Advanced Configuration Guide | page 7 of 60
/EBY/PDBO_CONFIG_DUMP settings
Task to perform
Select whether you want download a configuration to an XML file, upload from an XML file,
or compare one configuration with another.
In the Set of tables field you can specify which tables should be processed (customizing and
system tables) during upload, download and comparison.
Variant
Description
CUS&EPD_FLDCAT
Exclude the field catalog from comparison
CUS&EPD_MENU
Exclude the menu entries from comparison
CUS&EPD_WRKLST
Exclude the Worklist entries from download
CUS&IPD_WRKLST
Download only the Worklist entries
CUS&I_COCKPIT
Download only PROCESS DIRECTOR Accounts Payable tables
Download XML file
Setting
Description
To file
Name of the XML file in which the configuration will be stored.
Of document type
The document type to be downloaded. It includes independent tables of
all the document types. When a table is document dependent:
It contains all the entries where OBJ is empty.
It contains all the entries where OBJ is equal to that specified on the
selection screen.
From project
Project containing the configuration that will be stored.
PROCESS DIRECTOR 7.3 Advanced Configuration Guide | page 8 of 60
Setting
Description
Include system
tables
Activate this option to include not only customized tables but also
standard PROCESS DIRECTOR system tables in the downloaded XML
file.
This can be useful, for example, to check whether data in system tables
has changed, or whether there are differences in configuration between
two systems. Use the Compare function to compare system tables.
Upload XML file
Only data from customized tables is uploaded. If system tables were included when the
configuration was downloaded to XML, the data from these tables will not be uploaded.
Note: Uploading a Worklist configuration to a project in which the Worklist has already
been configured is not recommended.
Setting
Description
Request/Task
Name of a customizing request. All uploaded data is included in this
request, which can then be released and transported to another system.
From file
Name of the XML file from which the configuration will be uploaded.
To project
Name of the project to which the configuration will be uploaded.
Remove before
upload
Activate this option to remove existing entries in any PD or PDAP
customizing table stored in the uploaded file.
As it is possible to selectively download and upload parts of the
configuration, only entries in those tables that are available in the XML
file are removed before the upload; other tables remain untouched. You
can also download and upload PROCESS DIRECTOR Accounts Payable
tables.
If you deactivate this option:
Entries that are present in the system database, but not in the XML
file, are retained.
Entries that are present in the XML file, but not in the system, are
added to the database.
Entries in the XML file overwrite identical entries in the database.
PROCESS DIRECTOR 7.3 Advanced Configuration Guide | page 9 of 60
Compare
Setting
Description
Ignore field
'project'
Activate this option to exclude the project ID from the comparison
(recommended).
If this option is deactivated, the compared project configurations are
considered to be different even if they are identical apart from the
project ID.
Include system
tables
Activate this option to include system tables as well as customized
tables in the comparison.
If you are comparing XML files, the system tables must have been
included when the configuration was downloaded to the XML file (see
Include system tables).
Element 1,
Element 2
Select the elements that you want to compare. For example, to
compare a stored XML file with a project configuration in the system:
In the Element 1 section, select Local file and enter the file path and
name.
In the Element 2 section, select Customizing on server and select a
project.
PROCESS DIRECTOR 7.3 Advanced Configuration Guide | page 10 of 60
When you compare configurations, the differences are displayed in the ABAP Splitscreen
Editor. See the SAP ABAP documentation for information on working with this editor.
Configuring an umbrella system
An umbrella system enables you to provide a single user interface to display documents from
multiple systems. Currently the PROCESS DIRECTOR umbrella solution supports multiple
SAP systems that have PROCESS DIRECTOR/PROCESS DIRECTOR Accounts Payable
installed. The umbrella solution is currently only available in the SAP GUI and only for
Accounts Payable documents.
Minimum requirements
Umbrella system: PROCESS DIRECTOR 7.3 or PROCESS DIRECTOR Accounts Payable
3.2
Remote systems: PROCESS DIRECTOR 7.2 Service Pack 2 or PROCESS DIRECTOR
Accounts Payable 3.2
RFC user
In the umbrella system you need an RFC user with a role containing the authorization object
S_RFC. Add the following settings to the role authorizations.
Setting
Description
Activity
16 (Execute)
PROCESS DIRECTOR 7.3 Advanced Configuration Guide | page 11 of 60
Setting
Description
Name of RFC
Add the following RFC function groups:
/EBY/PDUM_RFC
/EBY/ICIV_UM_RFC
/EBY/ICWC_UM_RFC
/EBY/PDUM_WC_RFC
Type of RFC object
FUGR (Function group)
RFC destinations
In the umbrella system in SM59 you must set up an RFC destination for each remote system
that will be accessed by the umbrella system. Unless you are using trusted RFCs, it is
recommended that you create two RFC destinations per system:
A destination for "background" processing to enable users to view documents of this
system in the umbrella system. Access is via the umbrella RFC user.
A destination for "online/dialog" processing with the Current User flag set. Transactional
processing such as jumping to a document or posting a document should be performed by
real users, not the RFC user. Setting this flag will force users to log on with their own
credentials in order to process the document. They only need to log on to a remote system
once per session to process documents of that system.
Procedure
1. Make sure the prerequisites are fulfilled.
2. Go to /EBY/PDUM_VSYSC (Expert IMG > Change system settings > Umbrella Solution >
Umbrella source systems).
3. In change mode , click .
4. Enter a system ID for the remote system whose documents should be available in the
umbrella system and a corresponding background RFC destination. We recommend using
trusted RFCs so that users do not have to log on when accessing remote systems. See the
SAP documentation for information on trusted RFCs.
Tip: You can click the button to view and edit the RFC destination.
PROCESS DIRECTOR 7.3 Advanced Configuration Guide | page 12 of 60
5. (Optional, only if not using trusted RFCs) Enter a dialog/online RFC destination. This will
force users to log on to process documents. Within a session, log on is only necessary for
the first processing action for that system.
6. Repeat steps 3 to 5 for each remote system that should be available in the umbrella
system.
7. Save your changes.
8. Run the /EBY/ICIV_DOC_SYNCHRONIZE program for each remote system to make the
documents available in the umbrella system.
After the initial import of existing documents, you can create and schedule variants for each
remote system and use a dynamic document date to import new documents from the remote
system. For example, schedule the program to run in the early hours of the morning and set
the document date to the current date -1 using the variant selection variables. This will bring
all documents created on the previous day into the umbrella system.
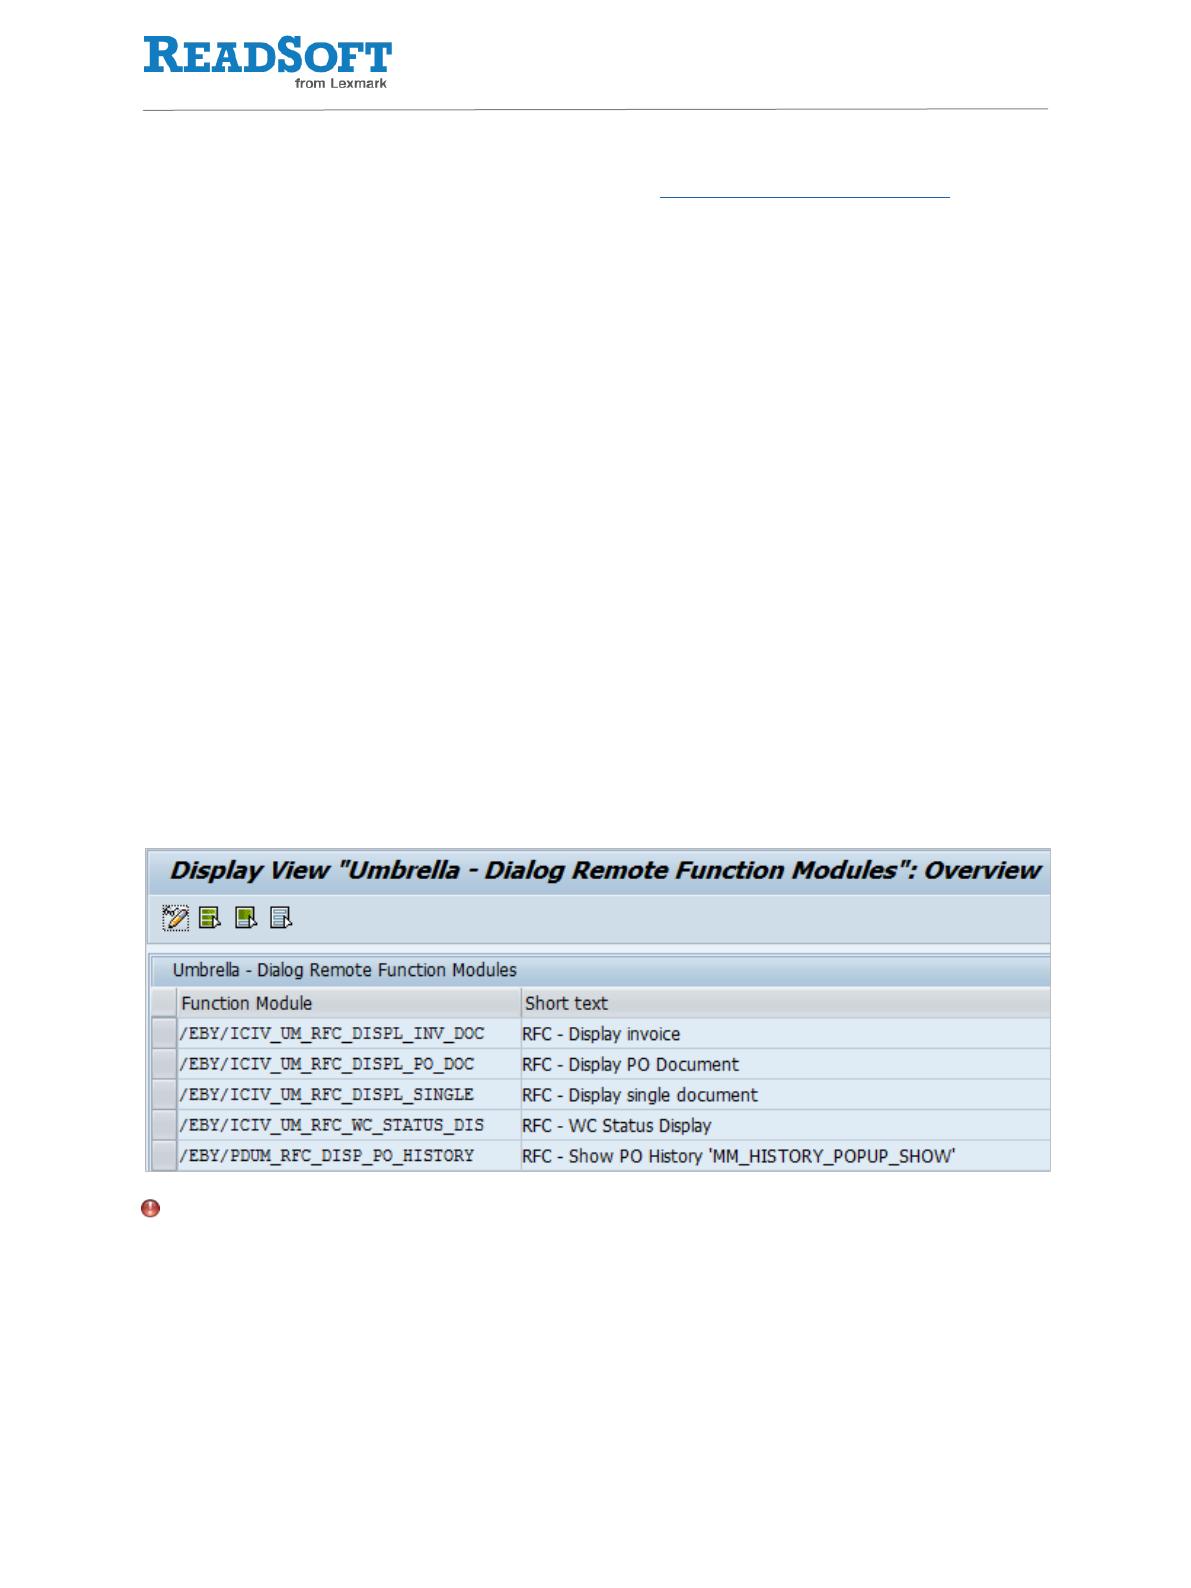
Configuring remote function modules
The default system settings for the umbrella solution specify which function modules force
the user to log on in order to process a document. For example, in order to display the invoice
or the PO document, the user must log on. Within a session, log on is only necessary for the
first processing action for that system.
Important: Do not make changes in the default system settings.
You can override the default system settings for the dialog remote function modules.
For example, if you do not want to force log on for displaying the workflow status, add the
/EBY/ICIV_UM_RFC_WC_STATUS_DIS function module and check the Repl./Rem. option.
PROCESS DIRECTOR 7.3 Advanced Configuration Guide | page 13 of 60
You can add any function modules from the following function groups:
/EBY/PDUM_RFC
/EBY/ICIV_UM_RFC
/EBY/ICWC_UM_RFC
/EBY/PDUM_WC_RFC
To configure remote function modules:
1. Go to /EBY/PDUM_VFMDC (Expert IMG > Change system settings > Umbrella Solution >
Dialog Remote Function Modules).
2. In change mode , click .
3. Enter the remote system ID or leave blank if the setting should apply for all remote
systems.
4. Enter the function module name.
5. To disable a default function module setting, check Repl./Rem.
6. Save your changes.
Mapping workflow descriptions
Workflows may have different descriptions in different systems, making it difficult for the
processor to decide which workflow to choose. You can therefore map the workflow
descriptions of the remote systems to a unified workflow description in the umbrella system.
The unified workflow description is only displayed on workflow start (and not, for example,
when forwarding a workflow step).
PROCESS DIRECTOR 7.3 Advanced Configuration Guide | page 14 of 60
1. Go to /EBY/PDUM_VWCMC (Expert IMG > Change system settings > Umbrella Solution >
Workflow description mapping).
2. Enter the system ID of the remote system and the workflow ID of the remote system
workflow.
3. Enter the unified description in the Workflow description field.
4. Repeat steps 2 and 3 for all remote workflow IDs that should be mapped to this unified
workflow description.
5. Save your changes.
Customizing the SAP GUI detail screen
You can customize the SAP GUI detail screen in the following ways:
Configure a runtime generated tab or static tabs
Configure a background screen to change the space available for the tab pages
Configuring static tabs for the SAP GUI
You can customize the tabs in the SAP GUI document detail screen. For example, you can
replace or hide the standard tabs or add your own customized tabs. Customized tabs can be
statically defined or generated dynamically at runtime.
Note: You can only create one custom runtime generated tab. You can create up to 12
statically defined tabs.
To create statically defined tabs, you can use an existing screen from the standard function
group or you can define a static detail screen in a customer function group. To define a screen
in a customer function group, you must also define a customer handler class.
1. Create a customer function group by copying the standard function group in SE80. The
standard function group will be called /EBY/SAPLPDxx_VIEW_SCREENS,
EBY/PDXX_DETAILSCREEN, or similar and will be contained in the /EBY/PDXX/VIEW
package (where ‘XX’ stands for the document object type).
PROCESS DIRECTOR 7.3 Advanced Configuration Guide | page 15 of 60
2. Create a screen in the newly created function group and add the necessary fields.
3. Rename the handler function module called /EBY/PDXX_VIEW_SET_HANDLER,
/EBY/PDXX_DETAILSCREEN, or similar, in the newly created function group to a customer
name.
4. Redefine the /EBY/CL_PDVI_DETAIL_SUBSC class or, preferably, the existing detail screen
handler class (which inherits from /EBY/CL_PDVI_DETAIL_SUBSC) for the document
object type, for example, /EBY/CL_PDPO_DETAIL_SUBSC.
5. Put the renamed function module from step 3 in the redefined
/EBY/IF_PDVI_DETAILSCR_HANDLER~SET_HANDLER method of the class from step 4.
6. Enter the customer function group and handler class in the detail screen tab configuration
in transaction /EBY/PDVI_VDSTC (/EBY/PDVI_CDSTC table).
PROCESS DIRECTOR 7.3 Advanced Configuration Guide | page 16 of 60
Configuring the SAP GUI background screen
The SAP GUI "background screen" determines the amount of space available for the tab
pages in the header data area.
You can increase or reduce the space available by selecting from pre-defined screen layouts.
To configure the background screen:
1. Go to /EBY/PDVI_VDBSC (Expert IMG > Change system settings > Presentation and
interface > SAP GUI detail screen > Background detail screen).
2. In change mode , click .
3. Enter the program name /EBY/SAPLPDVI_SCREEN.
4. Use search help to select a layout for the screen with tabs and the screen without tabs.
5. Save your changes.
Customizing menus and buttons
You can customize the menus items and buttons that are available in the SAP GUI and the
buttons that are available on the Actions bar in the Web Application.
Customizing action buttons in the Web Application
You can customize the actions (that is, the buttons) that are available in the Web Application.
For example, you can add or remove buttons, and change the label, icon, tooltip and position
of the buttons on the Actions bar.
Note: These settings determine the general availability of an action button. You can also
exclude actions for a specific document status, for workflows in general, or for a specific
workflow step.
PROCESS DIRECTOR 7.3 Advanced Configuration Guide | page 17 of 60
Tip: You can also create custom buttons for the Web Application that connect to an
external web server instead of a PROCESS DIRECTOR action. See the PROCESS
DIRECTOR Web Application Configuration Guide for details.
To customize actions:
1. Go to /EBY/PDWA_CACTC (Expert IMG > Change system settings > Web Application >
Available actions).
2. In change mode , click .
3. Enter the settings for the action.
4. Save your changes.
Examples
Add an action button
This example adds the Reject document button to the Web Application Actions bar for
Customer Orders in the document overview list.
Remove an action button
This example removes the Post button from the Web Application Actions bar for Requisitions
in the document detail view. Note that you must check the Repl./Rem. option to override the
standard system setting for this button.
Change label, tooltip and icon
This example changes the button label, icon and tooltip text for the workflow recall button in
the document overview list and the document detail view. Since the Object field is blank, it
applies for all process types.
PROCESS DIRECTOR 7.3 Advanced Configuration Guide | page 18 of 60
Before
After
Change position
This example positions the Status button between the Start and Approve buttons on the
Actions bar in the document overview list. Since the Object field is blank, it applies for all
process types.
First, check in Default system settings > Web Application > Available actions the standard
position (in the Order field) of the buttons Start and Approve. Do not make changes here!
For the Status button, we therefore have to assign an Order value between 40 and 50 in
Change system settings > Web Application > Available actions.
Before
After
Available actions for Web Application settings
/EBY/PDWA_CACTC
Change system settings > Web Application > Available actions
PROCESS DIRECTOR 7.3 Advanced Configuration Guide | page 19 of 60
Setting
Description
Object
Process type to which the setting applies. Left blank, the setting applies to all
process types.
Component
Area of the GUI to which the setting applies.
Edit mode
Editing mode to which the setting applies.
Action
Action to which the setting applies.
Description
Text displayed on the button.
Tooltip
Tooltip displayed when the mouse hovers over the button.
Icon
Icon displayed on the button.
Icon name
SAP icon name (automatically entered).
Repl./Rem.
Select to override the standard system setting for this action (that is, to remove
the action button).
Order
Position in which the button will appear on the Actions bar.
Customizing buttons in the SAP GUI
You can customize the buttons that are available on the PROCESS DIRECTOR SAP GUI
Application toolbar. For example, you can add or remove buttons and change the label, icon,
tooltip and position of the buttons.
PROCESS DIRECTOR provides a standard toolbar configuration for each standard process
type. Not all available buttons are displayed for all process types by default. For example, the
standard buttons Create and Copy are not displayed by default for Customer Orders. If you
want users to be able to create and copy Customer Orders, you must add these buttons to the
custom toolbar. You can also add custom buttons, that is, buttons for functions that are not
available by default.
First, you will need to find the appropriate function codes for the button that you want to
change in the standard menu structure:
PROCESS DIRECTOR 7.3 Advanced Configuration Guide | page 20 of 60
  • Page 1 1
  • Page 2 2
  • Page 3 3
  • Page 4 4
  • Page 5 5
  • Page 6 6
  • Page 7 7
  • Page 8 8
  • Page 9 9
  • Page 10 10
  • Page 11 11
  • Page 12 12
  • Page 13 13
  • Page 14 14
  • Page 15 15
  • Page 16 16
  • Page 17 17
  • Page 18 18
  • Page 19 19
  • Page 20 20
  • Page 21 21
  • Page 22 22
  • Page 23 23
  • Page 24 24
  • Page 25 25
  • Page 26 26
  • Page 27 27
  • Page 28 28
  • Page 29 29
  • Page 30 30
  • Page 31 31
  • Page 32 32
  • Page 33 33
  • Page 34 34
  • Page 35 35
  • Page 36 36
  • Page 37 37
  • Page 38 38
  • Page 39 39
  • Page 40 40
  • Page 41 41
  • Page 42 42
  • Page 43 43
  • Page 44 44
  • Page 45 45
  • Page 46 46
  • Page 47 47
  • Page 48 48
  • Page 49 49
  • Page 50 50
  • Page 51 51
  • Page 52 52
  • Page 53 53
  • Page 54 54
  • Page 55 55
  • Page 56 56
  • Page 57 57
  • Page 58 58
  • Page 59 59
  • Page 60 60

Kofax Process Director 7.9 Configuration Guide

Category
Software
Type
Configuration Guide

Ask a question and I''ll find the answer in the document

Finding information in a document is now easier with AI