Page is loading ...

14
FILTER CHANGE SCHEDULE
The system requires very little maintenance. Just change the filter cartridges regularly as suggested below.
Keep the system sheltered from the weather elements, and run the system within its reasonable output ca-
pacity (i.e. allow the system to rest a few hours a day).
Stages-1,2,3 Pre-filters:
City water usage: Replace the pre-filters at least once a year (annually), or about 8000 gallons of filtered
water produced, whichever comes first.
Well water usage: Replace the pre-filters every 6-8 months depending on well water quality.
Stage-4 Membrane: City Water: Replace every 3-5 years depending on input water quality, water usage,
and prefilter change maintenance.
Private Well Water: Replace every 2-3 years depending on well water quality, and
pre-filter change maintenance.
Membranes Replacement: (2 to 4 membranes depending on RO model)
Lite-180gpd Model: Two 90gpd membranes, replace both together.
Lite-240gpd Model: Three 90gpd membranes, replace all 3 together.
Lite-360gpd Model: Four 90gpd membranes, replace all 4 together.
Post Carbon Filter (Last Stage): Replace every 3-5 years.
It’s best to replace this filter when replacing the stage-4 membrane.
Important! It is important to change the 3 pre-filters timely, at least every 12 months. The pre-filters protect
the stage-4 membranes. If they are not changed timely and become over-depleted, the membrane will be
damaged and the RO system will be contaminated.
It’s best to use APEC replacement filters. Using “non APEC” and lesser quality filters may clog up the RO
system and damage the membrane.

15
FILTER CHANGE INSTRUCTIONS
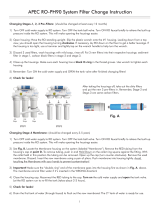
How To Replace Stages 1, 2, 3 Pre-Filters:
1. Turn OFF cold water supply to RO system. Turn OFF tank’s ball-valve. Lift up RO faucet lever
briefly to relief the built-up pressure inside the RO system. This will make opening the hous-
ings easier.
2. Open housing: Have the RO standing upright. Slip the plastic wrench onto the #1 housing.
Looking down from a top view, you should open the housing turning clockwise. If necessary,
lay the RO down on the floor to get a better leverage. If the housing is too tight, use a ham-
mer and tap on the wrench handle to help turn the wrench.
3. Discard 3 used filters, wash housings with mild soap, rinse off. Put 3 new filters into their re-
spective housing: sediment filter in stage-1, carbon block filter in stages 2 & 3.
4. Close up the housing. Make sure each housing has a black O-ring in the thread groves.
Use wrench to tighten each housing.
5. Remember: Turn ON the cold water supply and OPEN the tank valve after you fin-
ished changing filters!
6. Check for leaks!
Use
Wr
ench
3rd
Stage
2rd
Stage
1rd
Stage
After taking the housing off, take out the
dirty filters and put the new 3 pre=filters
in. Remember, Stage 2 and Stage 3 are
the same carbon filters.
STEP 1 STEP 2

16
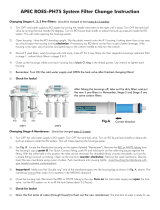
How to Replace Stage-4 Membrane:
There are several membranes (2 to 4 depending on model) provided with your system. Please
insert the membrane into each housing one-by-one to prevent mis-connecting the tubing.
1. Locate the Membrane housings on the system. See Fig 8
2. The number of housing matches with the number of membranes provided. Each housing is
labeled as: “MEM-1”, “MEM-2”, “MEM-3”, “MEM-4” depending on your Ro model.
3. Start with “MEM-1” housing: Insert the membrane into one housing at a time. Finish up the
connection before going onto the next housing. This will prevent confusing the tubing order.
Insert membrane: See Fig.8A Remove the tubing from the membrane housing cap. Open the
cap. Insert membrane all the way into the housing tightly with the correct side going in first as
shown below. The end with 2 black-rings goes in first.
4. Close the housing cap. Re-connect the tubing to cap as before. Make sure to connect each
color coded tubing to its corresponding (matching) housing. This is important for proper filtra-
tion.
5. Proceed to insert the other membranes in the same manner.
Note: Make sure the membrane’s end with 2 black-rings goes into housing first!
Fig. 8A
1. Push in and hold down on the collet ring
square against the tting. With the collet
held in this position the tube can be removed.
2. Unscrew membrane housing
cap (counter clockwise)
b
an
e
ho
us
in
g
Post Carbon Filter
Fig. 8

17
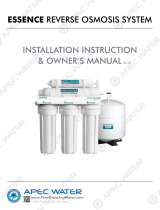
How to Replace Last Stage Post Carbon Filter:
Replace this last filter at the same time you replace the stage-4 membrane.
1. Locate the last stage carbon filter. See Fig 8 on Page 16.
2. Remove the OLD filter: Disconnect the input 3/8” tubing at Point G. and output 3/8” tubing
at Point H. Discard the old filter. (See Fig.6 on Page 10)
To disconnect: Push in and hold down on the collet ring square against the fitting. With the
collet held in this position the tubing can be removed. See Fig.1B on page 3.
3. Remove the 2 end plugs from the new filter to open up the parts.
4. Reconnect the input and output tubing. Make sure the “Flow ” on the filter is pointing to
the pure water output direction.
* * * End of Installation Manual * * *
/