Page is loading ...

1
1.800.221.3379
GETTING STARTED
BEFORE YOU BEGIN
We recommend consulting a professional if you are
unfamiliar with installing plumbing fixtures. Signature
Hardware accepts no liability for any damage to the
toilet, plumbing, flooring, or for personal injury during
installation.
Observe all local plumbing and building codes.
Unpack and inspect the toilet for shipping damage. If any
damage is found, contact our Customer Relations team
at 1-800-221-3379.
Ensure that you have gathered all the required
materials that are needed for the installation.
For these instructions, it is assumed that the old toilet
has been completely removed and any necessary
repairs or modifications to the water supply have
been completed.
Confirm that there is enough floor space to install the
toilet unit and that the bathroom door will open/close
without obstruction.
Shut off the water supply lines where the new toilet is
being installed.
Water Pressure: The product is designed to operate
with a minimum working pressure
of 20psi.
SARASOTA
ELONGATED TWO-PIECE TOILET
INODORO DE DOS PIEZAS
SKU: 946604
REVISED 08/07/2019
CODES: SHSR200W, SHSR240WH
ANTES DE COMENZAR
Le recomendamos que consulte a un profesional si no
sabe cómo instalar accesorios de plomería. Signature
Hardware no asume ninguna responsabilidad con respecto
a los daños causados al inodoro, sistema de plomería,
suelo o daños personales durante
la instalación.
Cumpla con todas las normas locales de plomería y
construcción.
Retire el inodoro del empaque y verifique si se produjeron
daños durante el envío. Si encuentra algún daño,
comuníquese con nuestro equipo de Servicio al cliente al
1-800-221.3379.
CÓMO COMENZAR
Asegúrese de haber reunido todos los materiales
necesarios para la instalación.
Para estas instrucciones, se supone que el inodoro
anterior se ha retirado por completo y cualquier
reparación o modificación necesaria al suministro de
agua se ha completado.
Confirme que exista suficiente espacio en el suelo para
instalar el inodoro y que la puerta del baño se abra o se
cierre sin obstrucciones.
Cierre las líneas de suministro de agua en donde se
instalará el nuevo inodoro.
Presión de agua: El producto está diseñado para
funcionar con una presión de operación mínima
de 20 psi.
Flathead
Screwdriver
Destornillador de
cabeza plana
Hacksaw
Sierra para
metales
Level
Nivelador
Wax Ring
Anillo de cera
TOOLS AND MATERIALS / HERRAMIENTAS Y MATERIALES:
Llave inglesa
ajustable
Adjustable
Wrench

2
bolt cap
nut
bolt cap base
bolt
washer
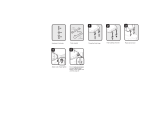
3. Place bolt cap bases over bolt. Place metal washers
and nuts on plastic bolt cap bases and bolts. Carefully
tighten nuts.
3. lnserte las bases de las tapes de los pernos sabre los
pernos. lnserte las arandelas y tuercas de metal en las
bases de las tapas plásticas de los pernos y los pernos.
Apriete con cuidado las tuercas.
4. If bolts extend more than 1/4” (6 mm) over top of
the nuts, cut off excess. Attach bolt caps.
NOTE: Risk of product damage - Protect the vitreous
china from exposure to the saw blade when cutting off
excess bolt length.
4. Si los pernos sobresalen más de 1/4” (6 mm) de la
parte superior de las tuercas, recorte la parte excesiva.
lnserte las tapes de los pernos.
NOTA: Riesgo de lesiones personales o daflon al
producto - Frágil. La superficie de porcelana puede
romperse o astillarse si el producto se manipula sin
cuidado.
1. Lay the toilet down on a padded surface. From the
bottom of toilet, firmly press a new wax ring around
toilet outlet.
1. Coloque el inodoro en el piso, sobre una superficie
acolchada. Por la parte inferior del inodoro, inserte
firmemente un nuevo sello de cera alrededor de la boca
de desague del inodoro.
2. Align and lower toilet over flange and bolts. Apply
your full body weight around the toilet to set seal.
NOTE: Risk of external leakage - Do not lift or rock the
bowl after placement. If you break the watertight seal,
you must install a new wax ring.
2. Aline e inserte el inodoro sobre el agujero de desagüe
y los pernos. Presione con todo el peso de su cuerpo
alrededor del inodoro para que el sello quede bien
instalado.
NOTA: Peligro de fuga de agua hacia el exterior del
inodoro - No levante ni sacuda el inodoro una vez
colocado. Si se rompe el sello hermetico, será necesario
instalar un nuevo sello de cera.
SARASOTA
Bottom of Bowl
wax seal
boltcloset flange
bolt
hacksaw
Sellado de cera
Parte inferior de la taza
brida del perno
del perno
arandela
tuerca
tapa del
pernoa
del perno
sierra para metales
base de la
tapa del perno
INSTALLATION
INSTALACIÓN
ELONGATED TWO-PIECE TOILET
INODORO DE DOS PIEZAS
SKU: 946604
1.800.221.3379

3
7. Insert bolts through holes inside tank and down
through holes in the bowl making sure tank is level.
7. Inserte los pernos a trovés de los agujeros dentro
de la cisterna y de los agujeros en la taza.
8. Assemble washers and nuts to tank bolts.
Altenately tighten nuts so that tank stays level. Be
sure nuts are tight enough to achieve a watertight
seal. Do not overtighten.
NOTE: Risk of product damage - Overtightening may
cause breakage or chipping of vitreous china.
8. Inserte las arandelas y tuercas en los pernos de la
cisterna. Apriete las tuercas alternativamente, de manera
que la cisterna quede a nivel. Asegurese de que las
tuercas queden lo suficientemente apretadas para que
se logre un sellado hermetico. No apriete más de lo
necesario.
NOTA: Riesgo de danos al producto - Si se aprietan
demasiado las piezas se puede romper o astillar la
superficie de porcelana vítrea.
5. Place the tank-to-bowl gasket onto the locknut on
the flush valve shank against the bottom of the tank
(be sure locknut is tight).
5. lnserte la junta hermetica (entre cisterna y taza) en la
contratuerca del conector de la válvula de descarga ,
contra la cisterna (asegurese de que la contratuerca
quede apretada).
6. Position tank on bowl by centering gasket on
bowl inlet.
6. Coloque la cisterna en la taza centrando la junta
hermet ica con la boca de entrada de la taza.
SARASOTA
tank to bowl gasket
lock nut
locknut
gasket
bowl inlet
metal washer
nut
rubber washer
bolt
metal washer
nut
junta del tanque a la taza
tuerca de cierre
tuerca
perno
arandela de goma
arandela de metal
arandela de metal
tuerca
junta de
entrada
contratuerca
de la taza
ELONGATED TWO-PIECE TOILET
INODORO DE DOS PIEZAS
SKU: 946604
1.800.221.3379

4
11. Adjust tank water level to the proper marked
waterline by rotating the threaded rod clockwise to
raise water level or counterclockwise to lower water
level. Carefully set cover onto tank.
11. Ajuste el nivel de agua del tanque a la morco de lfneo
de oguo girondo lo vorillo roscoda hacia la derecha (subir
el nivel del agua) o hacia la izquierda (bajar el nivel del
ague). Coloque con cuidado la tape de la cisterna.
SARASOTA
rubber washer
locknut
cap
filter screen
washer
fill valve
trip lever
cap
hose
clip
flush valve
waterline
flapper
seal
tank
fill valve nut
supply shank
seal washer
tubing
coupling nut
compression nut
compression nut
ferrule
ferrule
comp. washer
tubing
coupling nut
supply shut-off valve
9. Connect supply shut-off valve to toilet supply
shank. Open supply shut-off valve slowly
to check for leaks. If the connections have been
properly assembled, a slight tightening of the nuts
should stop any leakage.
9. lnstale la válvula de cierre del suministro en el conec-
tor de suministro del inodoro. Abra lentamente la válvula
de cierre del suministro para detector si hay fugas de
agua. Si las conexiones se han realizado correctamente,
será suficiente apretar un poco las tuercas para remediar
cualquier fuga de agua.
waterline
remove tape before flushing
filter screen
12. Place the toilet seat on top of the bowl and then
insert the provided seat bolt sets into the holes of the
toilet seat and bowl.
12. Coloque el asiento del inodoro sobre la taza y luego
inserte los juegos de pernos del asiento que se propor-
cionan dentro de los orificios del asiento y la taza.
línea de agua
rejilla filtrante
Retire la cinta antes de
descargar el inodoro
válvula de cierre de suministro
casquillo
tuerca de compresión
tuerca de acople
tubería
arandela de compresión
casquillo
tuerca de
compresión
tuerca de acople
tubería
arandela de sellado
vástago de suministro
tuerca de la válvula de llenado
tanque
línea de agua
válvula de descarga
gancho
manguera
tapa
tapón de descarga
sellado
contratuerca
arandela de goma
tapa
rejilla filtrante
arandela
válvula de
llenado
palanca de
desconexión
ELONGATED TWO-PIECE TOILET
INODORO DE DOS PIEZAS
SKU: 946604
1.800.221.3379

5
SARASOTA
13. Align the toilet seat to the top rim of the toilet
bowl. Use a screwdriver to firmly tighten both seat
bolts down to the bowl.
13. Alineé el asiento del inodoro con la orilla superior de
la taza del inodoro. Use un destornillador para apretar
firmemente ambos pernos a la taza.
14. Push the decorative caps down over the bolts.
NOTE: Do not push down on the seat with force, doing
so may damage the slow close mechanism.
14. Empuje las tapas decorativas sobre los pernos.
NOTA: No empuje el asiento con fuerza, el hacerlo podría
dañar el mecanismo de cierre suave. Empuje las tapas
decorativas sobre los pernos.
ELONGATED TWO-PIECE TOILET
INODORO DE DOS PIEZAS
SKU: 946604
1.800.221.3379

6
SARASOTA
CUIDADO Y LIMPIEZA
• Limpie la superficie exterior del depósito del inodoro de
porcelana vítrea, con jabón suave y agua tibia.
• NO usar limpiadores abrasivos en polvo o líquidos que
pudieran dañar la superficie del producto. ADVERTEN-
CIA: El producto es frágil. Manéjese con cuidado para
evitar su ruptura y el posible daño. Al apretar demasiado
la tuerca de seguridad o la tuerca de conexión, se podría
provocar su ruptura y anegamiento. NO use una arandela
cónica en la línea de abasto de plástico. NO use lubrican-
te de tubería ni otros materiales de silicona para ajustar la
tuerca de conexión del abasto.
• NO USE LIMPIADORES PARA INODORO DE USO
DENTRO DEL TANQUE QUE CON-TENGAN BLAN-
QUEADOR O CLORO. El uso de dichos productos
provocará daño resultante a los componentes y podrá
ocasionar anegaciones y daño a la propiedad.
CONFIRM OPERATION
• Flush toilet several times and check all connections
for leaks.
• Periodically check for leaks for several days following
the installation.
CONFIRMAR LA OPERACIÓN
• Descargar el inodoro varias veces y revisar que ninguna
conexión tenga pérdidas.
• Verificar periódicamente que no existan pérdidas
durante varios días después de la instalación.
CARE AND CLEANING
• Clean the outside surface of your vitreous china
water closet with mild soap and warm water.
• DO NOT use abrasive powder or liquid cleaners
which can damage the product surface. CAUTION:
Product is Fragile. To avoid breakage and possible injury
handle with care! Over tightening of lock nut or
coupling nut could result in breakage and flooding. DO
NOT use cone washer with plastic supply line. DO NOT
use pipe dope or other silicon based materials to
tighten supply coupling nut.
• DO NOT USE IN-TANK TOILET BOWL CLEANERS
CONTAINING BLEACH OR CHLORINE. Use of such
products will result in damage to tank components and
may cause flooding and property damage.
ELONGATED TWO-PIECE TOILET
INODORO DE DOS PIEZAS
SKU: 946604
1.800.221.3379
/