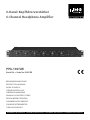
IMG STAGELINE 0244190 User manual
- Category
- Musical Instrument Amplifier
- Type
- User manual
This manual is also suitable for
Page is loading ...
Page is loading ...
Page is loading ...
Page is loading ...
Page is loading ...

6
English
Deutsch
Deutsch Seite
Français
Français Page
Italiano
Italiano Pagina
Español
Español Página
Nederlands
Nederlands Pagina
Polski
Polski Strona
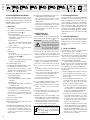
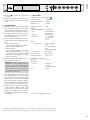
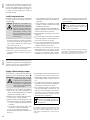
L
R
100 100 100 100 100 100100 100 100 100 100 100
PPA-100/SW
LEDS:
GREEN
–
SIGNAL
RED
–
PEAK
SOLO
MAIN
LEVEL
SOLO
MAIN
LEVEL
SOLO
MAIN
LEVEL LEVEL
SOLO
MAIN
SOLO
MAIN
LEVEL
SOLO
MAIN
LEVEL
LEDS:
GREEN
–
SIGNAL
RED
–
PEAK
HI
LO
MAIN
INPUT
POWER
INPUT LEVEL
CH 1 CH 2 CH 3 CH 4 CH 5 CH 6CH 1 CH 2 CH 3 CH 4 CH 5 CH 6
230V~/50 Hz
MAINS
L
R
MAIN INPUT SOLO INPUT
CH 6 CH 5
CH 4 CH 3
CH 2
CH 1
10982 31 4 5 76 11 12 13
6-Channel Headphone Amplifier
These instructions are intended for users
without any specific technical knowledge.
Please read these instructions carefully prior
to operation and keep them for later ref-
erence.
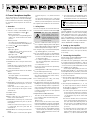
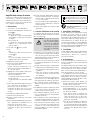
1 Overview
(channels 1 to 6 are identical)
1
Selector switch SOLO / MAIN for the
respective headphone output (2)
button not pressed:
the signal of the corresponding SOLO
INPUT (13) can be heard in the head-
phones
button pressed:
the signal of the MAIN INPUT (5, 7, 11
or 12) can be heard in the headphones
2 6.3 mm jack for the headphones
3 Signal LED
lights up in green:
starting from a certain volume at the
headphone output (2)
lights up in red:
in case of overload; turn back the con-
trol LEVEL (4) correspondingly
4 Volume control LEVEL
5 MAIN INPUT via 6.3 mm jack at the front
panel;
when this jack is connected, the signals
of the other MAIN INPUT jacks (7, 11, 12)
will be switched off
6 Level switch INPUT LEVEL for the MAIN
INPUT
button not pressed:
the input signal is not attenuated
button pressed:
the input signal is attenuated by 20 dB
to
1
⁄10
7
MAIN INPUT via RCA jacks; connected
in parallel with the RCA jacks (11) at the
rear panel;
when one of the 6.3 mm jacks (5 or
12) is connected, the RCA jacks will be
switched off
8 POWER switch
9 POWER LED
10
Mains cable for the connection to a
mains socket (230 V/ 50 Hz)
11
MAIN INPUT via RCA jacks; connected
in parallel with the RCA jacks (7) at the
front panel;
when one of the 6.3 mm jacks (5 or12)
is connected, the RCA jacks will be
switched off
12 MAIN INPUT via 6.3 mm jack at the rear
panel;
when this jack is connected, the signals
of the RCA jacks (7 + 11) will be switched
off;
on the other hand, this jack is switched
off when the 6.3 mm jack of the MAIN
INPUT (5) at the front panel is connected
13 Separate SOLO INPUT for each channel
2 Safety Notes
This unit corresponds to all relevant directives
of the EU and is therefore marked with .
WARNING
The unit uses dangerous
mains voltage. Leave servic-
ing to skilled personnel only.
Inexpert handling or modifi-
cation of the unit may result
in electric shock.
•
The unit is suitable for indoor use only. Pro-
tect it against dripping water and splash
water, high humidity and heat (admissible
ambient temperature range 0 – 40 °C).
•
Do not place any vessels filled with liquid,
e. g. drink ing glasses, on the unit.
•
Do not operate the unit or immediately
disconnect the plug from the mains socket
1. if there is visible damage to the unit or
to the mains cable.
2.
if a defect might have occurred after
the unit was dropped or suffered a sim-
ilar accident.
3. if malfunctions occur.
In any case the unit must be repaired by
skilled personnel.
•
A damaged mains cable must be replaced
by the skilled per sonnel only.
•
Never pull the mains cable to disconnect
the mains plug from the mains socket,
always seize the plug.
•
For cleaning only use a dry, soft cloth,
never use water or chemicals.
•
No guarantee claims for the unit and no
liability for any resulting personal damage
or material damage will be accepted if the
unit is used for other purposes than orig-
inally intended, if it is not correctly con-
nected or operated, or if it is not repaired
in an expert way.
•
Important for UK Customers!
The wires in this mains lead are coloured
in accord ance with the following code:
blue = neutral
brown = live
As the colours of the wires in the mains
lead of this appliance may not correspond
with the coloured markings identifying the
terminals in your plug, proceed as follows:
1.
The wire which is coloured blue must be
connect ed to the terminal in the plug
which is marked with the letter N or
coloured black.
2.
The wire which is coloured brown must
be connected to the terminal which is
marked with the letter L or coloured red.
If the unit is to be put out of oper-
ation definitively, take it to a local
recycling plant for a disposal which
is not harmful to the environment.
3 Applications
The PPA-100/SW is a 6-channel stereo head-
phone amplifier. It can be used to amplify
audio signals with line level (e. g. of CD play-
ers, tape decks, mixers) for reproduction via
up to six headphones. Via the inputs SOLO
INPUT, a different signal can be fed to each
channel. Input signals at the MAIN INPUT
can be distributed to multiple channels.
4 Setting up the Amplifier
The amplifier can be used as a tabletop unit
or insered into a rack (482 mm /19”). For in-
stallation into a rack, 1 rack space (=44 mm)
is necessary.
5 Connecting the Amplifier
Always switch off the amplifier before mak-
ing or changing any connections.
An audio unit can separately be connected
to a single channel (SOLO INPUT) – then it
can only be heard via the respective channel
– or to one of the inputs MAIN INPUT so that
it is audible for all channels.
Via the inputs INPUT MAIN, the level can
be reduced by 20 dB to
1
⁄10 by means of the
switch INPUT LEVEL (6); therefore, units with
a very high output level should be connected
to one of these inputs.
1) Use the inputs SOLO INPUT (13) to con-
nect up to six audio units that are to be
monitored by a single pair of headphones
each.
2)
Use the inputs MAIN INPUT (5, 7, 11, 12)
to connect up to three units; it will then
be possible to monitor one of the units
via multiple headphones:
a A unit may be connected to the RCA
jacks at the front panel (7) or alterna-
tively to the RCA jacks at the rear panel
(11). Both pairs of jacks are connected
in parallel.
b As soon as another unit is connected to
the 6.3 mm jack at the rear panel (12),
the unit cannot be heard any more at
the RCA jacks. The amplifier switches
to the unit connected to the 6.3 mm
jack (12).
c A third unit may be connected to the
6.3 mm jack at the front panel (5).
Now all other signals at the jacks MAIN
INPUT (7, 11, 12) are switched off, and
English
English Page

7
English
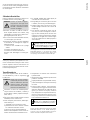
L
R
100 100 100 100 100 100100 100 100 100 100 100
PPA-100/SW
LEDS:
GREEN
–
SIGNAL
RED
–
PEAK
SOLO
MAIN
LEVEL
SOLO
MAIN
LEVEL
SOLO
MAIN
LEVEL LEVEL
SOLO
MAIN
SOLO
MAIN
LEVEL
SOLO
MAIN
LEVEL
LEDS:
GREEN
–
SIGNAL
RED
–
PEAK
HI
LO
MAIN
INPUT
POWER
INPUT LEVEL
CH
1 CH
2 CH
3 CH
4 CH
5 CH
6CH
1 CH
2 CH
3 CH
4 CH
5 CH
6
230V~/50 Hz
MAINS
L
R
MAIN INPUT SOLO INPUT
CH 6 CH 5
CH 4 CH 3
CH 2
CH 1
10982 31 4 5 76 11 12 13
only the unit at the jack (5) can be
heard. This jack is of highest priority.
Thus, it will be possible to switch between
up to three units by connecting and, if
necessary, disconnecting the correspond-
ing 6.3 mm plugs.
3)
Connect up to six headphones to the
jacks (2).
4)
Only connect the mains plug to the mains
socket (230 V/ 50 Hz) when all units have
been connected.
6 Operating the Amplifier
1) Prior to switching on the amplifier, turn
all controls LEVEL (4) to position “0”. This
will make sure that your hearing will not
be damaged at switch-on by a volume
which is too high.
2) Use the POWER switch (8) to switch on
the unit. The red LED (9) above the switch
will light up to indicate operation.
3) Use the appropriate switch SOLO / MAIN
(1) to select for each channel the signal
to be monitored.
Button not pressed:
The unit connected to the respective
jack SOLO INPUT (13) can be heard.
Button pressed:
The unit connected to one of the
jacks MAIN INPUT (5, 7, 11, 12) can
be heard. When multiple units are con-
nected, refer to chapter 5 “Connecting
the Amplifier” item 2.
4)
Use the control LEVEL (4) of the appropri-
ate channel to adjust the volume of the
headphones.
Caution! Do not adjust the head-
phones to a very high volume. Perma-
nent high volumes may damage your
hearing! Your ear will get accustomed
to high volumes which do not seem to
be that high after some time. Therefore,
do not further increase a high volume
after getting used to it.
5)
If the volume is too high when you switch
from SOLO to MAIN using the button
SOLO/MAIN (1), press the button INPUT
LEVEL (6) to attenuate the volume. This
button should also be pressed when a
unit with a very high output level is con-
nected to one of the inputs MAIN INPUT.
6) The LED (3) above the control LEVEL will
light up in green when a specific volume
has been reached. When it lights up in
red (even if only for a very short period
of time), the headphone amplifier is over-
loaded. In this case, turn back the control
LEVEL (4) accordingly.
7 Specifications
Block diagram see page 18
Frequency range:
. . . . .5 – 30 000 Hz
THD: . . . . . . . . . . . . . . . < 0.02 %
S / N ratio: . . . . . . . . . . . > 60 dB
Channel separation: . . . 50 dB
Inputs
(sensitivity/ impedance; connection)
Solo: . . . . . . . . . . . . . . 250 mV/ 50 kΩ
6.3 mm jack
Main Low: . . . . . . . . .250 mV/ 50 kΩ
Main High: . . . . . . . . . 2.2 V/ 60 kΩ
6.3 mm jack
and RCA
Outputs
6 × stereo headphones:
2 × 16 mW/ 8 Ω
or
2 × 45 mW/ 32 Ω
or
2 × 75 mW/ 600 Ω
Connection: . . . . . . . .6.3 mm jack
Power supply: . . . . . . . . 230 V/ 50 Hz
Power consumption: . . . 11 VA max.
Admissible
ambient temperature:
. . 0 – 40 °C
Dimensions
(W × H × D):
. . . . . . . . .482 × 44 ×
185 mm,
1 rack space
Weight:
. . . . . . . . . . . .2.3 kg
Subject to technical modification.
All rights reserved by MONACOR
®
INTERNATIONAL GmbH & Co. KG. No part of this instruction manual
may be reproduced in any form or by any means for any commercial use.
Page is loading ...
Page is loading ...
Page is loading ...
Page is loading ...
Page is loading ...
Page is loading ...
Page is loading ...
Page is loading ...
Page is loading ...
Page is loading ...
Page is loading ...

MONACOR INTERNATIONAL GmbH & Co. KG • Zum Falsch 36 • 28307 Bremen • Germany
Copyright
©
by MONACOR INTERNATIONAL. All rights reserved.
A-0376.99.04.10.2019
-
 1
1
-
 2
2
-
 3
3
-
 4
4
-
 5
5
-
 6
6
-
 7
7
-
 8
8
-
 9
9
-
 10
10
-
 11
11
-
 12
12
-
 13
13
-
 14
14
-
 15
15
-
 16
16
-
 17
17
-
 18
18
-
 19
19


IMG STAGELINE 0244190 User manual
- Category
- Musical Instrument Amplifier
- Type
- User manual
- This manual is also suitable for
Ask a question and I''ll find the answer in the document
Finding information in a document is now easier with AI
in other languages
- italiano: IMG STAGELINE 0244190 Manuale utente
- français: IMG STAGELINE 0244190 Manuel utilisateur
- español: IMG STAGELINE 0244190 Manual de usuario
- Deutsch: IMG STAGELINE 0244190 Benutzerhandbuch
- Nederlands: IMG STAGELINE 0244190 Handleiding
Related papers
-
IMG STAGELINE MMX-602/SW User manual
-
-
-
IMG Stage Line MMX-22UFX User manual
-
IMG Stage Line MPX-622/SW User manual
-
IMG STAGELINE MPX-20USB User manual
-
-
IMG STAGELINE DELTA-160R User manual
-
-
Other documents
-
Monacor 06.0320 Datasheet
-
-
-
Okayo MMX-602/SW Mic/Line Mixer Board Owner's manual
-
VINCENT KHV-1 Owner's manual
-
-
-
Behringer RX1202FX Quick start guide
-
Reloop ACCESS.4 Operating instructions
-