Page is loading ...

1
1 2
3
EN
A
B
R-AIL
L-AIL
R-AIL
L-AIL
Quickstart Guide
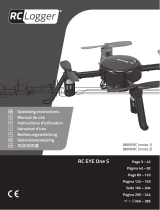
Charge the Flight Battery
Assemble the Aircraft
Install (4) AA Transmitter
Batteries (RTFAircraft)
CAUTION: See the aircraft
instruction manual for a
complete list of charging instructions
and warnings. All instructions and
warnings must be followed exactly.
Mishandling of LiPo batteries can
result in a re, personal injury and/or
property damage.
Refer to the aircraft instruction manual for complete step-by-step instructions.
Landing Gear Wing
Tail
USB power source,
not included
Both the charge lead (A) and the balance
lead (B) must be connected for the
charge cycle to begin.
LED Indications
Flashing purple: Charging
Solid green: Charging complete
Solid red: Charging error
Loosen the nose
gear bracket screw.
Insert the nose gear
in the collar and
tighten the
screw against
the at-spot
on the gear
wire.
Attach vertical n and
horizontal stabilizer into place
with 2 screws.
Attach clevises to vertical and
horizontal stabilizer control horns.
Peel the
pre-installed
two-sided tape
and adhere wing
covers to the front
and back of the wing.
Slide the
two wing
halves
together
over the
carbon
wing tube.
Connect the left and right
aileron servo connectors to the
aileron servo wire
extensions from
the ight controller.
Going from front to back
over the wing, attach 8
rubber bands to secure the
wing to the fuselage.
Connect clevises to
the control horns.
Remove the pin from nose gear bracket.
Slide the main
gear in the
slot until it
locks.
Install the stabilizer rod, then apply the
included two-sided tape to the
area where wings will meet.

2
7
10
9
11
8
64
EN
5
B
B
A
A
After Your Flight
Do not approach the aircraft until the propeller has stopped
spinning. When you are done ying, disconnect the battery (A) and
remove it from the aircraft, then power off the transmitter (B).
Install the Flight Battery
Power On the Aircraft
Power On the Transmitter
Roll
Pitch
Flight Mode
Landing
PANIC Function
Set the ight mode switch
to Beginner Mode (position
0)for the initial ights.
Aircraft pitch is limited.
Aircraft roll is limited.
Takeoff and Flying
With the throttle stick at the lowest position, set the motor
switch to “ARM.”
CAUTION: Always keep hands away from the
propeller. When armed, the motor will turn the
propeller in response to any throttle movement.
Position the model to take off into the wind. Slowly increase the
throttle. Small rudder inputs may be required for heading correction.
Trim the aircraft for hands-free, straight and level ight. When
properly trimmed, the aircraft will climb at full throttle without
the use of the elevator.
While ying in beginner mode, if you begin to lose control,
release the control sticks and the aircraft will self-level.
Set the Throttle Cut switch to
“DISARM” (A).
Power the transmitter on (B).
CAUTION:
Always keep
hands away from
the propeller. When
armed, the motor
will turn the
propeller in
response to any
throttle movement.
Find a Suitable Outdoor Flying Area
Consult local laws and ordinances before choosing a
ying location. Never y over other people, roads or
structures.
CAUTION: Always keep hands, hair and loose clothing
away from the propeller when disconnecting the battery.
Inspect the airframe for loose or damaged parts.
IMPORTANT: When nished ying, never keep the aircraft in
the sun. Do not store the aircraft in a hot, enclosed area such
as a car. Doing so can damage the foam.
1. Reduce the throttle to around 50% to slow the airspeed.
2. Turn the aircraft into the wind and line the aircraft up
with the runway center line.
3. Decrease the throttle further and begin descending
towards the runway, keeping the wings level during
approach. Try to have the aircraft at approximately
10ft (3m) altitude as it passes over the threshold of
the runway.
4. Decrease the throttle fully as the aircraft passes over
the threshold.
5. Just as the aircraft is about to touch down, gently
pull back on the elevator to raise the nose and are
for a gentle landing.
6. When the aircraft comes to a stop, set the motor
switch to “DISARM.”
If you become disoriented or the aircraft is in an unknown or
uncomfortable attitude:
1. Press and hold the Bind/PANIC button on the transmitter
and release the control sticks. The aircraft will immediately
pull out of a dive and roll wings upright and level.
2. Release the PANIC button and continue your ight.
WARNING: The PANIC recovery function will not
avoid obstacles in the aircraft ight path.
/