Electrolux EAT7810 User manual

Category
Toasters
Type
User manual

This manual is also suitable for

BG БРОШУРА С ИНСТРУКЦИИ
CS NÁVOD K POUŽITÍ
DA VEJLEDNING
DE GEBRAUCHSANWEISUNG
EE KASUTUSJUHEND
EN INSTRUCTION BOOK
ES LIBRO DE INSTRUCCIONES
FI OHJEKIRJA
FR MODE D’EMPLOI
HR KNJIŽICA S UPUTAMA
HU HASZNÁLATI ÚTMUTA
IT ISTRUZIONI
LT INSTRUKCIJŲ KNYGA
LV LIETOŠANAS INSTRUKCIJA
NL GEBRUIKSAANWIJZING
NO BRUKSANVISNING
PL INSTRUKCJA OBSŁUGI
PT MANUAL DE INSTRUÇÕES
RO MANUAL DE INSTRUCŢIUNI
RU ИНСТРУКЦИЯ
SK NÁVOD NA POUŽÍVANIE
SL NAVODILA
SR UPUTSTVO
SV BRUKSANVISNING
TR EL KITABI
UK ПОСІБНИК КОРИСТУВАЧА
The Expressionist
Collection
EAT7800
WE’RE THINKING OF YOU
CUSTOMER CARE AND SERVICE
Thank you for purchasing an Electrolux appliance. You’ve chosen a product that brings with it
decades of professional experience and innovation. Ingenious and stylish, it has been designed with
you in mind. So whenever you use it, you can be safe in the knowledge that you’ll get great results
every time.
Welcome to Electrolux.
Get usage advice, brochures, trouble shooter, service information:
www.electrolux.com
Register your product for better service:
www.electrolux.com/productregistration
Buy Accessories and Consumables for your appliance:
www.electrolux.com/shop
When contacting Service, ensure that you have the following data available.
The information can be found on the rating plate. Model, PNC, Serial Number.
Warning / Caution-Safety information
General information and tips
Enviromental information
Visit our website to:
Subject to change without notice.
www.electrolux.com2
CONTENTS
 .............................................. 3
ČEŠTINA ...................................................... 3
DANSK ......................................................... 3
DEUTSCH .................................................... 3
EESTI ........................................................... 11
ENGLISH ....................................................11
ESPAÑOL ..................................................11
SUOMI ........................................................ 11
FRANÇAIS.................................................19
HRVATSKI .................................................19
MAGYAR ....................................................19
ITALIANO .................................................. 19
LIETUVIŠKAI............................................27
LATVIEŠU ..................................................27
NEDERLANDS ......................................... 27
NORSK .......................................................27
POLSKI ....................................................... 35
PORTUGUÊS ............................................ 35
ROMÂNĂ ..................................................35
 ................................................. 35
SLOVENČINA ..........................................43
SLOVENŠČINA ........................................ 43
 ....................................................43
SVENSKA ..................................................43
TΫRKÇE ......................................................51
 ..........................................51
EN
Components
A. Toasting slot
B. Outer housing
C. Crumb tray
D. Defrost button
E. Bun warmer button
F. LCD Display
G. Check button
H. Cancel button
I. Browning control button
(
)
J. Browning control button
(
)
K. Start lever and bread lift
L. Bun warming rack for
warming up buns and rolls
M. Power cord and plug
N. Cord storage (on the
underside of the toaster)
A
B
K
M
N
L
C
D HIJ
E F G
ES
Componentes
A. Ranura de tostado
B. Carcasa externa
C. Bandeja recogemigas
D. Botón de descongelar
E. Botón para calentar pan
F. Pantalla LCD
G. Botón de comprobación
„CHECK“
H. Botón de cancelación
„CANCEL
I. Botón de control del nivel
de tostado (
)
J. Botón de control del nivel
de tostado (
)
K. Palanca de encendido y
elevador de pan
L. Rejilla para calentar
bollería y panecillos
M. Cable de alimentación y
enchufe
N. Compartimento para el
cable (en la parte inferior
del tostador)
FI
Osat
A. Paahto-aukko
B. Ulkokuori
C. Murualusta
D. Sulatuspainike
E. Sämpylätelineen painike
F. Nestekidenäyttö
G. Check-painike
H. Cancel-painike
I. Paahtoasteen säädin (
)
J. Paahtoasteen säädin (
)
K. Käynnistysvipu ja leivän
nostin
L. Sämpylän lämmitysteline
M. Sähköjohto ja pistoke
N. Johdon säilytyspaikka
(paahtimen alapuolella)
EE
Koostisosad
A. Röstimispilu
B. Väline kest
C. Purukandik
D. Sulatamisnupp
E. Kuklisoojendusnupp
F. LCD-ekraan
G. Kontrollimisnupp
H. Tühistusnupp
I. Pruunistustaseme nupp
(
)
J. Pruunistustaseme nupp
(
)
K. Käivitamishoob ja leiva
tõstuk
L. Soojendusrest saiakeste ja
kuklite soojendamiseks
M. Toitejuhe ja pistik
N. Juhtmehoidik (röstri
põhjal)
BG
CS
DA
DE
EE
EN
ES
FI
FR
HR
HU
IT
LT
LV
NL
NO
pL
pT
RO
RU
SK
SL
SR
SV
TR
UK
11
EN
BG
CS
DA
DE
EE
EN
ES
FI
FR
HR
HU
IT
LT
LV
NL
NO
pL
pT
RO
RU
SK
SL
SR
SV
TR
UK
13
Read the following instruction carefully before using the appliance for
the rst time.
 
persons with reduced physical, sensory or mental capabilities or lack
of experience and knowledge if they have been given supervision or
instruction concerning use of the appliance in a safe way and understand
the hazards involved.
 
 

 
 

 
– the supply cord is damaged,
– the housing is damaged.
 

 
manufacturer, its service agent or similarly qualied person, in order to
avoid hazard.
 
 
time after use, before cleaning and maintenance.
 
designated handles and knobs. Allow to cool down before cleaning or
storage.
 
appliance.

Do not immerse the appliance in water or any other liquid.
 
without crumb tray.
 
There is a risk of injury and damaging the appliance.
 
objects (e.g. curtains). The toaster must not be left unattended while
running.
 
 
 
timer or separate remote control system.
 
cannot accept any liability for possible damage caused by improper or
incorrect use.
EN
Getting started
1. Before you start using the toaster,
place it in an area with good
ventilation such as a stove vent hood
that is turned on or an open window.

turn the toaster on without any bread
in it. Repeat for a total of 2 to 3 times
as this will help remove any odors that
can occur during the rst few uses.
2. How to use the toaster:
Plug the cord into the mains.
Insert bread.
Press the browning control button
(
or ) to adjust the browning
level (1-7).
Press down the start lever.
The LCD display will show the process
time and starts to count down.
3. When the bread has reached the
desired degree of browning, the

the bread is lifted up. You can raise it
higher by lifting the start lever.
1
2
ES
Introducción /
1. Antes de empezar a usar la
tostadora, colóquela en una zona
bien ventilada como bajo la campana
extractora encendida o junto a una
ventana abierta. Ajuste el tueste en

pan dentro. Repítalo 2 o 3 veces
para eliminar los olores que pueden
aparecer durante los primeros usos.
2. Cómo utilizar el tostador:
Enchufe el cable a la corriente
eléctrica. Introduzca el pan. Pulse el
botón de control de nivel de tostado
(
o ) para ajustar dicho nivel (1-7).
Empuje hacia abajo la palanca de
encendido.
La pantalla LCD mostrará el tiempo de
proceso e iniciará la cuenta atrás.
3. Cuando el pan ha alcanzado el
grado de tostado deseado, el
tostador se apaga automáticamente
y el pan se eleva. Puede subirlo más
levantando la palanca de encendido.
FI
Aluksi
1. Ennen leivänpaahtimen
käyttöönottoa paahdin tulee
asettaa hyvin tuuletettuun tilaan,
kuten päällä olevan liesituulettimen
tai avoimen ikkunan läheisyyteen.

päälle ilman leipää. Toista 2 - 3 kertaa,
jotta ensimmäisten käyttökertojen
aikana ilmenevä haju poistuisi.
2. Ohjeita leivänpaahtimen
käyttämiseen:
Liitä virtajohto pistorasiaan. Aseta
leipä paahtimeen. Säädä paahtoaste
(1-7) painamalla paahtoasteen
säädintä (
tai ).
Paina käynnistysvipu alas.
Paahtoaika näkyy nestekidenäytössä,
ja ajan laskenta käynnistyy.
3. Kun leipä on paahtunut haluttuun
tummuusasteeseen, leivänpaahdin
sammuu automaattisesti ja
leipä kohoaa ylös. Voit kohottaa
sen korkeammalle nostamalla
käynnistysvivusta.
Alustamine /
EE
1. Enne röstri kasutamist asetage
see hästiventileeritavasse kohta,
näiteks aknalauale või sisselülitatud
õhupuhasti alla. Keerake

lülitage tühi röster sisse. Korrake seda
toimingut 2–3 korda, et eemaldada
uue seadme juurde kuuluv
spetsiiline lõhn.
2. Röstri kasutamine.
Ühendage toitejuhe vooluvõrku.
Sisestage sai/leib. Vajutage
pruunistustaseme reguleerimiseks
(aste 1–7) pruunistustaseme nuppu
(
või ).
Vajutage käivitamishoob alla.
LCD-ekraanil kuvatakse valmistusaeg
ja alustatakse pöördloendust nullini.
3. Kui leivaviil on saavutanud
soovitud pruunistusastme, lülitub
röster automaatselt välja ning leivaviil
tõstetakse üles. Käivitamishooba
kergitades saate selle kõrgemale
tõsta.
www.electrolux.com16
1. Operating features: to interrupt
toasting, press the Cancel button (A).
To toast frozen bread, press the Defrost
button (B).
Press the Check button (C) to pause
toasting. The bread is lifted up and the
toasting will pause (press down the

toasting). Press and hold the Cancel
button (A)
the LCD display.
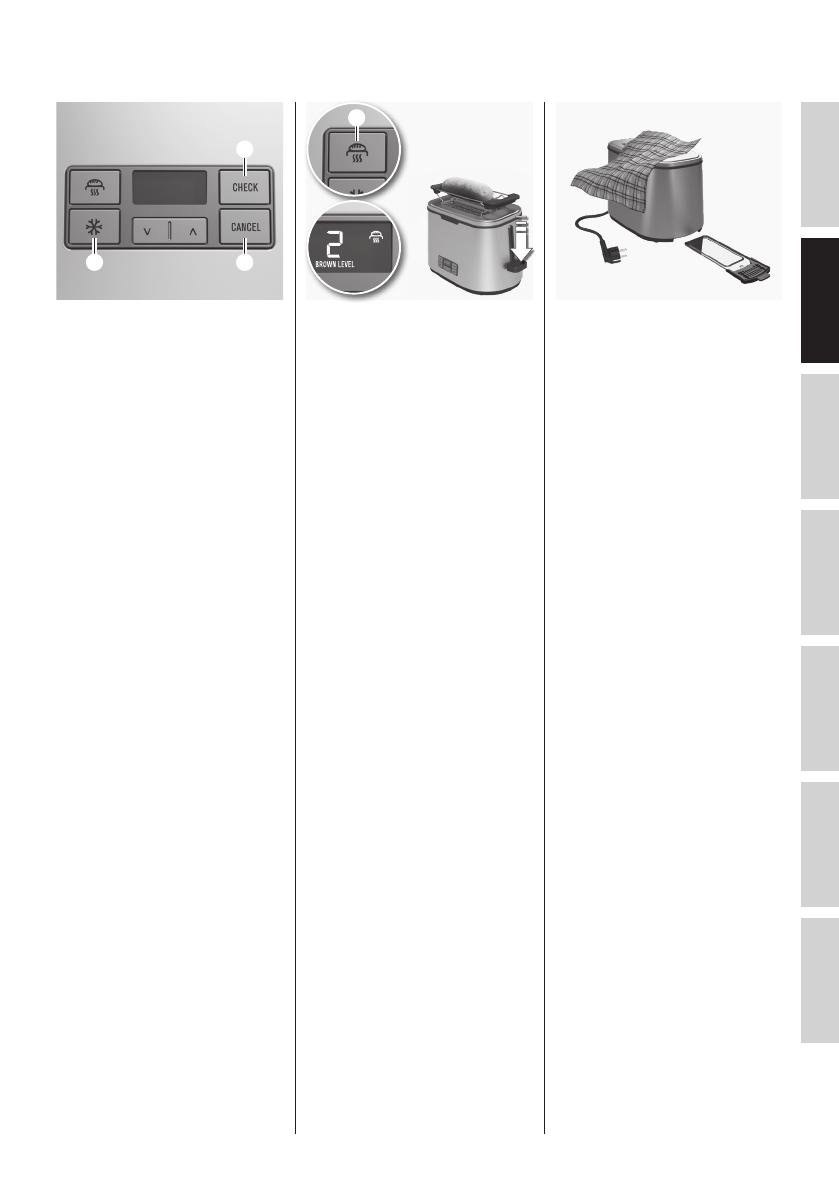
2. To warm buns, rolls, or other bread,
use the bun warmer rack.
Place the bun warmer rack on top of
the appliance. Press the bun warmer
button (D) (browning setting 2) and
then start the toaster by pressing
down the start lever.
Once nished, turn the bread over and
repeat if necessary.
Caution – Do NOT touch the rack
since it becomes very hot during use!
3. Cleaning and care: unplug the
toaster and allow it to cool down.
Empty the crumb tray. Wipe the
outer surfaces with a slightly moist
cloth. Never use caustic or abrasive
cleaners, and never immerse the
machine in liquid!
Features and cleaning
B
A
C
D
1. Características de funcionamiento:
para interrumpir el tostado, pulse el
botón de cancelación (A). Para tostar pan
congelado, pulse el botón de descongelar
(B). Pulse el botón de comprobación
(C) para detener el tostado. El pan sale
hacia arriba y se detiene el proceso de
tostado (presione la palanca de inicio

tostado). Mantenga pulsado el botón de
cancelación (A) durante dos segundos
para apagar la pantalla LCD.
2. Para calentar panecillos, bollería u
otro pan, use la rejilla.
Coloque la rejilla para calentar pan en
la parte superior del aparato. Pulse el
botón para calentar pan (D) (a un nivel
2 de tostado) y, a continuación, ponga
en marcha el tostador presionando la
palanca de inicio. Al terminar, de vuela
al pan y repita si es necesario.
Precaución: ¡NO toque la rejilla, se
calienta mucho durante el uso!
3. Limpieza y cuidado: desenchufe la
tostadora y deje que se enfríe. Vacíe
la bandeja recogemigas. Limpie las
supercies exteriores con un trapo
ligeramente humedecido. No utilice
nunca limpiadores cáusticos o
abrasivos, ni sumerja el aparato en
ningún líquido.
Características y limpieza /
1. Käyttöön liittyvät toiminnot:
Voit keskeyttää paahtamisen painamalla
Cancel-painiketta (A). Voit paahtaa jäistä
leipää painamalla Check-painiketta (B).
Voit keskeyttää paahtamisen painamalla
Check-painiketta (C). Paahdin
nostaa leivän ylös, ja paahtaminen
keskeytyy (voit jatkaa paahtamista

sekunnin kuluessa). Voit sammuttaa
nestekidenäytön painamalla Cancel-
painiketta (A) kahden sekunnin ajan.
2. Lämmitä sämpylät ja muut leivät
sämpylän lämmitystelinettä
käyttäen.
Aseta sämpyläteline laitteen päälle.
Paina sämpylätelineen painiketta (D)
(paahtoasetus 2) ja käynnistä paahdin
painamalla käynnistysvipu alas.
Käännä leipä tämän jälkeen ja toista
tarvittaessa.
Huomio – ÄLÄ kosketa telineeseen,
sillä se kuumenee erittäin kuumaksi
käytön aikana!
3. Puhdistus ja hoito: irrota virtajohto
pistorasiasta ja anna paahtimen
jäähtyä. Tyhjennä murualusta. Pyyhi
ulkopinnat kostealla liinalla. Älä
koskaan käytä syövyttäviä tai
hankaavia puhdistusaineita äläkä
upota laitetta nesteeseen.
Ominaisuudet ja puhdistus
1. Tööfunktsioonid: Röstimise
katkestamiseks vajutage tühistusnuppu
(A). Külmutatud saia/leiva röstimiseks
vajutage sulatamisnuppu (B). Röstimise
peatamiseks vajutage kontrollimisnuppu
(C). Sai/leib tõstetakse üles ja röstimine
peatub (röstimise jätkamiseks vajutage

ekraani väljalülitamiseks vajutage ja
hoidke tühistusnuppu (A) kaks sekundit
all.
2. Saiakeste, kuklite või muude
küpsetiste soojendamiseks kasutage
saiakeste soojendusresti.
Asetage kuklisoojendusraam seadme
kohale. Vajutage kuklisoojendusnuppu
(D) (pruunistussäte 2) ja käivitage röster,
vajutades käivitushooba.
Kui saiakesed on ühelt poolt valmis,
pöörake need ümber ja korrake vajadusel
toimingut.
Ettevaatust! ÄRGE puudutage resti,
sest see läheb kasutamisel väga
kuumaks!
3. Puhastamine ja hooldus: Võtke
röster vooluvõrgust välja ning laske
sel maha jahtuda. Tühjendage
purukandik. Pühkige välispinnad
kergelt niiske lapiga üle. Ärge
kasutage kunagi söövitavaid või
abrasiivseid puhastusvahendeid
ning ärge kastke seadet kunagi
vedelikku!
Funktsioonid ja puhastamine /
BG
CS
DA
DE
EE
EN
ES
FI
FR
HR
HU
IT
LT
LV
NL
NO
pL
pT
RO
RU
SK
SL
SR
SV
TR
UK
17
EN
Recycle the materials with the symbol
. Put the packaging in applicable
containers to recycle it.
Help protect the environment and human
health and to recycle waste of electrical
and electronic appliances.
Do not dispose appliances marked with
the symbol
with the household
waste. Return the product to your
local recycling facility or contact your
municipal oce.
Disposal
ES
Recicle los materiales con el símbolo
. Coloque el material de embalaje
en los contenedores adecuados para su
reciclaje.
Ayude a proteger el medio ambiente y la

de aparatos eléctricos y electrónicos.
No deseche los aparatos marcados con
el símbolo
junto con los residuos
domésticos. Lleve el producto a su centro
de reciclaje local o póngase en contacto
con su ocina municipal.
Cómo desechar el electrodoméstico /
FI
Kierrätä materiaalit, jotka on merkitty
merkillä
. Kierrätä pakkaus laittamalla
se asianmukaiseen kierrätysastiaan.
Suojele ympäristöä ja ihmisten
terveyttä kierrättämällä sähkö- ja
elektroniikkaromut.

merkittyjä
kodinkoneita kotitalousjätteen
mukana. Palauta tuote paikalliseen
kierrätyskeskukseen tai ota yhteyttä
paikalliseen viranomaiseen.
Hävittäminen
EE
Sümboliga tähistatud materjalid
võib ringlusse suunata. Selleks viige
pakendid vastavatesse konteineritesse.
Aidake hoida keskkonda ja inimeste
tervist ja suunake elektri- ja
elektroonilised jäätmed ringlusse.

tähistatud
seadmeid muude majapidamisjäätmete
hulka. Viige seade kohalikku ringluspunkti
või pöörduge abi saamiseks kohalikku
omavalitsusse.
Jäätmekäitlusse andmine /
www.electrolux.com18
www.electrolux.com/shop
Electrolux Appliances AB
St. Göransgatan 143

Sweden
Share more of our thinking at www.electrolux.com
Printed on recycled paper
3484 E EAT7800 02011113
  • Page 1 1
  • Page 2 2
  • Page 3 3
  • Page 4 4
  • Page 5 5
  • Page 6 6
  • Page 7 7
  • Page 8 8
  • Page 9 9
  • Page 10 10
  • Page 11 11
  • Page 12 12
  • Page 13 13
  • Page 14 14
  • Page 15 15
  • Page 16 16
  • Page 17 17
  • Page 18 18
  • Page 19 19
  • Page 20 20
  • Page 21 21
  • Page 22 22
  • Page 23 23
  • Page 24 24
  • Page 25 25
  • Page 26 26
  • Page 27 27
  • Page 28 28
  • Page 29 29
  • Page 30 30
  • Page 31 31
  • Page 32 32
  • Page 33 33
  • Page 34 34
  • Page 35 35
  • Page 36 36
  • Page 37 37
  • Page 38 38
  • Page 39 39
  • Page 40 40
  • Page 41 41
  • Page 42 42
  • Page 43 43
  • Page 44 44
  • Page 45 45
  • Page 46 46
  • Page 47 47
  • Page 48 48
  • Page 49 49
  • Page 50 50
  • Page 51 51
  • Page 52 52
  • Page 53 53
  • Page 54 54
  • Page 55 55
  • Page 56 56

Electrolux EAT7810 User manual

Category
Toasters
Type
User manual
This manual is also suitable for

Ask a question and I''ll find the answer in the document

Finding information in a document is now easier with AI