Electrolux EKF5110 User manual

Category
Coffee makers
Type
User manual
Instruction Book
BG БРОШУРА С ИНСТРУКЦИИ
CS PŘÍRUČKA K POUŽITÍ
DA VEJLEDNING
DE ANLEITUNG
EE KASUTUSJUHEND
EN INSTRUCTION BOOK
ES LIBRO DE INSTRUCCIONES
FI OHJEKIRJA
FR MODE D’EMPLOI
HR KNJIŽICA S UPUTAMA
HU HASZNÁLATI ÚTMUTATÓ
IT ISTRUZIONI
LT INSTRUKCIJŲ KNYGA
LV LIETOŠANAS INSTRUKCIJA
NL GEBRUIKSAANWIJZING
NO BRUKSANVISNING
PL INSTRUKCJA OBSŁUGI
PT MANUAL DE INSTRUÇÕES
RO MANUAL DE INSTRUCŢIUNI
RU ИНСТРУКЦИЯ
SK VOD NA POUŽÍVANIE
SL NAVODILA
SR UPUTSTVO
SV BRUKSANVISNING
TR EL KITABI
UK ПОСІБНИК КОРИСТУВАЧА
EKF5XXX
Coffee Maker
CUSTOMER CARE AND SERVICE
When contacting Service, ensure that you have the following data available:
- Model Number
- PNC number
- Serial number
The information can be found on the rating plate.
Visit our website to:
Get usage advice, brochures, trouble shooter,
service information: www.electrolux.com
Register your product for better service:
www.electrolux.com/productregistration
Buy accessories and consumables for your appliance:
www.electrolux.com/shop
CONTENTS
БЪЛГАРСКИ 3
ČEŠTINA 3
DANSK 3
DEUTSCH 3
EESTI 15
ENGLISH 15
ESPAÑOL 15
SUOMI 15
FRANÇAIS 27
HRVATSKI 27
MAGYAR 27
ITALIANO 27
LIETUVIŠKAI 39
LATVIEŠU 39
NEDERLANDS 39
NORSK 39
POLSKI 51
PORTUGUÊS 51
ROMÂNĂ 51
РУССКИЙ 51
SLOVENČINA 63
SLOVENŠČINA 63
СРПСКИ 63
SVENSKA 63
TΫRKÇE 75
УКРАЇНСЬКА 75
WE’RE THINKING OF YOU
Thank you for purchasing an Electrolux appliance. You’ve chosen a product that
brings with it decades of professional experience and innovation. Ingenious and stylish,
it has been designed with you in mind. So whenever you use it, you can be safe in the
knowledge that you’ll get great results every time.
Welcome to Electrolux.
www.electrolux.com2
www.electrolux.com14
EN
Components
A. ON/OFF switch with
power indicator light
B. Water tank
C. Water level indicator
D. Hinged lid
E.
F. Filter holder with anti-drip
valve
G. Microwave proof coee
jug with fresh water
graduation on both sides*
H. Warming plate*
I. Extendable power cord &
plug
J. Aroma button
K. Measuring spoon
L. Stainless steel thermo jug
with a trigger*
*sõltub mudelist *depending on model *según el modelo * vaihtelee malleittain
ES
Componentes
A. Interruptor de encendido/
apagado con indicador
luminoso de corriente
B. Depósito de agua
C. Indicador del nivel de
agua
D. Tapa con bisagras
E. Soporte para ltro de agua
con cartucho de ltro de
carbón activo
F. Compartimento del ltro
con válvula antigoteo
G. Jarra de café para
microondas con
indicación del nivel de
agua en ambos lados*
H. Base de calentamiento*
I. Cable extensible y enchufe
J. Botón de aroma
K. Cuchara dosicadora
L. Jarra térmica de acero
inoxidable con activador*
FI
Osat
A. ON/OFF (PÄÄLLE/POIS
PÄÄLTÄ) -katkaisin
merkkivalolla
B. Vesisäiliö
C. Veden tason ilmaisin
D. Avattava kansi
E. Vedensuodattimen pidike
aktiivihiilisuodattimelle
F. Suodatinpussin pidike
tippalukolla
G. Mikroaaltouunin kestävä
kahvikannu, jossa on
mitta-asteikko molemmilla
puolilla*
H. Lämpölevy*
I. Ulosvedettävä virtajohto
ja pistoke
J. Aromipainike
K. Mittalusikka
L. Termospullo
ruostumattomasta
teräksestä
painokytkimellä*
A
K
B
D
E
F
G*
L*
H
I
C
J
EE
Koostisosad
A. Märgutulega sisse-/
väljalülitamise lüliti
B. Veepaak
C. Veetaseme näidik
D. Hingedel kaas
E. Veeltrihoidik
aktiivsöeltri kassetiga
F. Tilgaluku klapiga
ltrihoidik
G. Mikrolainekindel
kohvikann mõlemal
küljel paiknevate
veetasemenäidikutega*
H. Soojendusplaat*
I. Pikendatav toitejuhe ja
pistik
J. Aroominupp
K. Mõõtelusikas
L. Roostevabast
terasest termoskann
avamisnupuga*
BG
CS
DA
DE
EE
EN
ES
FI
FR
HR
HU
IT
LT
LV
NL
NO
PL
PT
RO
RU
SK
SL
SR
SV
TR
UK
15
EN
BG
CS
DA
DE
EE
EN
ES
FI
FR
HR
HU
IT
LT
LV
NL
NO
PL
PT
RO
RU
SK
SL
SR
SV
TR
UK
17
Read the following instruction carefully before using the appliance for
the rst time.
This appliance can be used by children aged from 8 years and above and
persons with reduced physical, sensory or mental capabilities or lack
of experience and knowledge if they have been given supervision or
instruction concerning use of the appliance in a safe way and understand
the hazards involved.
Children shall not play with the appliance.
Cleaning and user maintenance shall not be made by children unless they
are older than 8 and supervised.
Keep the appliance and its cord out of reach of children less than 8 years.
The appliance may only be connected to a power supply whose voltage
and frequency comply with the specications on the rating plate!
Never use or pick up the appliance if
– the supply cord is damaged,
– the housing is damaged.
The appliance must only be connected to an earthed socket. If necessary
an extension cable suitable for 10 A can be used.
If the appliance or the supply cord is damaged, it must be replaced by the
manufacturer, its service agent or similarly qualied person, in order to
avoid hazard.
Always place the appliance on a at, level surface.
Never leave the appliance unattended while connected to the supply
mains.
The appliance must be switched o and the mains plug withdrawn each
time after use, before cleaning and maintenance.
The appliance and accessories become hot during operation. Use only
designated handles and knobs. Allow to cool down before cleaning or
storage.
The mains cable must not come into contact with any hot parts of the
appliance.
Do not immerse the appliance in water or any other liquid.
Do not exceed the maximum lling volume as indicated on the appliances.
Do not use or place the appliance on a hot surface or near source of heat.
This appliance is intended for domestic use only. The manufacturer cannot
accept any liability for possible damage caused by improper or incorrect
use.
EN
Getting started
1. Place the machine on a at surface.
When starting the machine for the
rst time, ll the tank with cold water.
Start the machine with the ON/OFF
switch. Let a full tank of water pass
through the machine once or twice to
clean it, without using paper lter or
coee.
3. Insert a size 1x4 paper lter in
the lter holder and ll it with
ground coee. There is a gauge for
recommended number of spoons of
coee next to the water gauge. For
average strong coee one measuring
spoon (approx. 6-7 g) per cup is
sucient. Close the water tank lid and
place the jug (complete with lid) onto
the warming plate.
2. Making coee: open the lid and ll
the water tank with fresh cold water
up to the desired level. There is a
Water level indicator for 2–10 big cups
/ 3–15 small cups inside the water
tank.
The machine must not be used with
empty tank!
ES
Introducción /
1. Coloque el aparato en una supercie
plana. Al encender el aparato
por primera vez, llene el depósito
de agua fría. Enciéndalo con el
interruptor de encendido/apagado.
Deje que el depósito lleno de agua
uya por el aparato una o dos veces
para limpiarlo. No utilice un ltro de
papel ni café.
3. Introduzca un ltro de papel de
tamaño 1x4 en el compartimento
del ltro y llénelo de café molido.
Existe una medida de la dosis de café
recomendada al lado del indicador
de nivel de agua. Para un café de
intensidad media, es suciente una
cucharilla (aprox. 6-7 g) por taza.
Cierre la tapa del depósito de agua y
coloque la jarra (con la tapa puesta)
en la base de calentamiento.
2. Hacer café: abra la tapa y llene el
depósito de agua con agua fría no
utilizada hasta el nivel deseado. Hay
un indicador de nivel de agua para
2–10 tazas grandes / 3–15 tazas
pequeñas dentro del depósito de
agua.
El aparato debe utilizarse nunca
con el depósito vacío.
FI
Aluksi
1. Sijoita laite tasaiselle pinnalle. Kun
käytät laitetta ensimmäisen
kerran, täytä säiliö kylmällä vedellä.
Käynnistä laite painamalla ON/OFF-
katkaisinta. Puhdista laite keittämällä
laitteella vain puhdasta vettä ilman
suodatinpaperia tai kahvia kerran tai
kaksi kertaa.
3. Aseta 1 x 4 -kokoinen
suodatinpussi suodattimen
pidikkeeseen ja annostele
kahvijauhe suodatinpaperiin.
Vesiasteikon vieressä on suositeltujen
mittalusikallisten määrä kahvin
annostelua varten. Jos haluat
keittää tavallista vahvaa kahvia, yksi
mittalusikallinen (6–7 grammaa)
kahvijauhetta riittää. Sulje vesisäiliön
kansi ja aseta pannu (kansi päällä)
lämpölevylle.
2. Kahvin valmistaminen: avaa kansi
ja täytä vesisäiliö raikkaalla kylmällä
vedellä haluttuun mittaan asti.
Vesisäiliön sisällä on veden tason
osoitin 2–10 isolle kupille / 3–15
pienelle kupille.
Laitetta ei saa käyttää, jos vesisäiliö
on tyhjä!
Alustamine /
EE
1. Asetage seade tasasele
pinnale. Seadme esmakordsel
käivitamiseltäitke nõu külma veega.
Käivitage seade sisse-/väljalülitamise
lülitiga. Laske paagitäiel veel
paberltrit või kohvi kasutamata
puhastamiseks kord või kaks läbi
masina voolata.
3. Sisestage ltrihoidikusse
paberlter suurusega 1 x 4 ja
täitke see jahvatatud kohviga.
Soovitatava kohvi hulk on ära toodud
ka lusikatäitena veenäidiku kõrval.
Keskmise kangusega kohvi puhul on
üks mõõtelusikatäis (u 6–7 g) tassi
kohta piisav. Sulgege veepaagi kaas
ning asetage kann (koos kaanega)
soojendusplaadile.
2. Kohvi valmistamine. Avage kaas
ning täitke paak külma puhta veega
soovitud tasemeni. Veemahutis on
veetaseme indikaator 2–10 suure tassi
ja 3–15 väikese tassi jaoks.
Tühja paagiga on seadme
kasutamine keelatud!
www.electrolux.com20
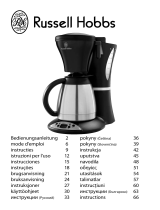
4. Start the machine with the ON/OFF
switch. The power indicator light will
come on and hot water will ow into
the lter. When water has stopped
owing, the warming plate keeps the
coee hot until the machine is turned
o with the ON/OFF switch. If the
machine is not turned o manually,
the Safety Auto-O function turns it
o after 40 minutes
(model EKF76XX - 5 minutes)
5. If the jug is removed, the lter valve
prevents coee from dripping onto
the warming plate.
While boiling, the jug must not
be removed for longer than 30
seconds or the lter will overow.
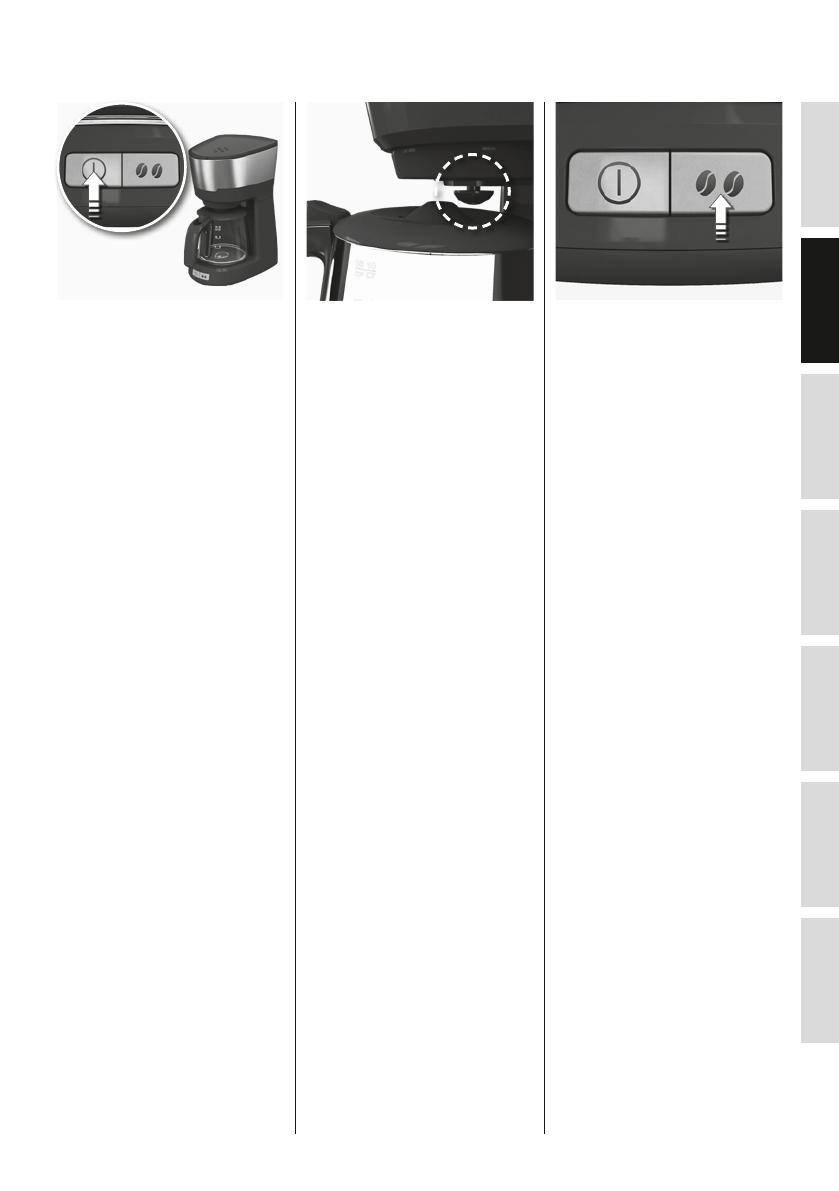
6. The Aroma Selector extends the
brewing time to maximize the avour
extraction and get a stronger coee
for a small number of cups (normally
less than 6). Press the Aroma button,
the aroma icon will turn on.
4. Encienda el aparato con el interruptor
de encendido/apagado. El indicador
luminoso de corriente se enciende y el
agua caliente empezará a uir en el ltro.
Cuando el agua deje de uir, la base de
calentamiento mantendrá el café caliente
hasta que se apague el aparato con el
interruptor de encendido/apagado. Si la
cafetera no se apaga manualmente, la
función de desconexión automática la
apaga transcurridos 40 minutos
(modelo EKF76XX - 5 minutos).
5. Si se extrae la jarra, la válvula del
ltro evitará que el café gotee en la
base de calentamiento.
Durante el proceso de hervido, no
se debe extraer la jarra durante
más de 30 segundos o el ltro se
derramará.
6. El selector de aroma prolonga
el tiempo de preparación a n de
conseguir más sabor y obtener un
café más fuerte para una cantidad
pequeña de tazas (normalmente
menos de 6). Al pulsar el botón de
aroma, la luz se enciende.
4. Käynnistä laite painamalla ON/
OFF-katkaisinta. Merkkivalo syttyy ja
kuuma vesi alkaa valua suodattimeen.
Kun vesi on valunut loppuun,
lämpölevy pitää kahvin kuumana,
kunnes laite sammutetaan ON/
OFF-katkaisimella. Mikäli et katkaise
laitteesta virtaa, automaattinen
virrankatkaisu katkaisee virran 40
minuutin kuluttua (malleittain
EKF76XX - 5 minuutin).
5. Jos pannu siirretään pois
lämpölevyltä, suodattimen
tippalukko estää kahvia tippumasta
levylle.
Kahvinkeiton aikana pannua
ei saa siirtää pois levyltä yli 30
sekunniksi, ettei suodatin vuoda
yli.
6. Aromitoiminto pidentää
valmistusaikaa varmistaen kahvin
parhaan mahdollisen aromin ja
täyteläisen maun myös silloin, kun
kahvia valmistetaan pieni määrä
(yleensä alle kuusi kupillista). Valo
syttyy, kun painat aromipainiketta.
6. Aroomivalija pikendab
tõmbamisaega, et tõhustada maitse
eraldumist ja saada vähema hulga
tasside jaoks kangemat kohvi
(tavaliselt alla 6 tassi). Vajutage
aroominuppu; süttib vastav tuli.
4. Käivitage seade sisse-/väljalülitamise
lülitiga. Toite märgutuli süttib ning
kuum vesi hakkab ltrisse valguma.
Kui vee voolamine on lõppenud, hoiab
soojendusplaat kohvi kuumana seni,
kuni seade on sisse-/väljalülitamise
lülitiga välja lülitatud. Kui seadet käsitsi
välja ei lülitata, lülitab automaatne
väljalülitusfunktsioon selle 40 minuti
pärast ise välja (mudelist EKF76XX -
5 minuti).
5. Kui kann on eemaldatud, ei lase
ltriklapp kohvil soojendusplaadile
tilkuda.
Keetmise ajal ei tohi kannu
kauemaks kui 30 sekundiks
eemaldada. Vastasel juhul tekib
ltris ületäitumine.
BG
CS
DA
DE
EE
EN
ES
FI
FR
HR
HU
IT
LT
LV
NL
NO
PL
PT
RO
RU
SK
SL
SR
SV
TR
UK
21
EN
Getting started
7. Installing the PureAdvantage™
Coee lter: Place the lter into a
container of clean cool water, and let
soak for 10 minutes.
We recommend to replace the
PureAdvantage™ Coee lter after 60
brew cycles.
8. Place the PureAdvantage™ Coee
lter (lter end rst) into the pocket
located at the bottom of the water
reservoir.
ES
Introducción /
7. Instalación del ltro para café
PureAdvantage™ : Coloque el ltro
en un contenedor con agua limpia y
fría y déjelo a remojo 10 minutos.
Recomendamos cambiar el ltro para
café PureAdvantage™ tras 60 ciclos de
preparación.
8. Coloque el ltro para café
PureAdvantage™ (primero el
extremo del ltro) en el receptáculo
de la parte inferior del depósito de
agua.
FI
Aluksi
7. PureAdvantage™-vedensuodatin:
Aseta suodatin astiaan, jossa on
puhdasta ja viileää vettä. Anna liota
10 minuuttia.
Suosittelemme vaihtamaan
PureAdvantage™-vedensuodattimen
60 käyttökerran jälkeen.
8. Aseta PureAdvantage™-
vedensuodatin (suodatinpää
ensimmäiseksi) vesisäiliön alaosassa
olevaan syvennykseen.
Alustamine /
EE
7. PureAdvantage™ kohviltri
paigaldamine: Pange lter puhta
veega täidetud nõusse ja jätke see
sinna 10 minutiks seisma.
Soovitus: vahetage PureAdvantage™
kohvilter 60 kasutuskorra järel välja.
8. Paigutage PureAdvantage™
kohvilter (ltriots allpool)
veemahuti põhjas olevasse vastavasse
taskusse.
www.electrolux.com22
1. Turn the machine o and unplug
the power cord. Wipe all outer
surfaces with a damp cloth. Coee
jug and jug lid are dishwasher proof.
Never use caustic or abrasive
cleaners, and never immerse the
machine in liquid!
2. To clean the lter holder, lift up the
handle and remove the lter holder.
To clean the lter valve thoroughly,
push it several times while it is being
rinsed. The lter holder can also be
washed in the dishwasher.
3. Decalcifying is recommended every
three months for best performance.
Fill the tank with water and decalcier
according to product instructions,
then follow steps 4
and 5.
Cleaning and care
1. Apague el aparato y desenchufe el
cable de alimentación. Limpie todas
las supercies exteriores con un trapo
húmedo. La jarra del café y su tapa
se pueden lavar en el lavavajillas. No
utilice nunca limpiadores cáusticos
o abrasivos, ni sumerja el aparato
en ningún líquido.
2. Para limpiar el compartimento
del ltro, levante el asa y extraiga el
compartimento. Para limpiar a fondo
la válvula del ltro, presiónela varias
veces mientras se enjuaga. El soporte
del ltro también se puede lavar en el
lavavajillas.
3. Recomendamos descalcicar cada
tres meses para obtener el mejor
rendimiento. Llene el depósito
de agua y descalcicador según
las instrucciones del producto y, a
continuación, siga los pasos 4 y 5.
Limpieza y mantenimiento /
1. Sammuta laite ja irrota virtajohto
pistorasiasta. Pyyhi laitteen
ulkopinnat kostealla liinalla.
Kahvipannun ja kannen voi pestä
astianpesukoneessa. Älä koskaan
käytä syövyttäviä tai hankaavia
puhdistusaineita äläkä upota
laitetta nesteeseen.
2. Nosta kahvasta ja poista
suodattimen pidike puhdistusta
varten. Puhdista tippalukko
huolellisesti painamalla sitä
useita kertoja huuhtelun aikana.
Suodattimen pidike voidaan pestä
myös astianpesukoneessa.
3. Suosittelemme poistamaan kalkin
kolmen kuukauden välein parhaan
suorituskyvyn takaamiseksi. Täytä
säiliö vedellä ja kalkinpoistoaineella
ohjeen mukaisesti ja tee sitten vaiheet
4 ja 5.
Puhdistaminen ja hoitaminen
1. Lülitage seade välja ja eemaldage
toitejuhe pistikust. Puhastage
kõiki välispindu niiske lapiga.
Kohvikannu ja selle kaant võib pesta
nõudepesumasinas. Ärge kasutage
kunagi söövitavaid või abrasiivseid
puhastusvahendeid ning ärge
kastke seadet kunagi vedelikku!
2. Filtrihoidiku puhastamiseks
tõstke käepide üles ning eemaldage
ltrihoidik. Filtriklapi põhjalikuks
puhastamiseks vajutage seda
loputamise ajal mitu korda.
Filtrihoidikut võib pesta ka
nõudepesumasinas.
3. Hea töö tagamiseks eemaldage
katlakivi iga kolme kuu
tagant. Täitke paak veega ning
katlakivieemaldajaga vastavalt
tootejuhistele ning järgige seejärel
juhiseid 4 ja 5.
Puhastamine ja hooldus /
BG
CS
DA
DE
EE
EN
ES
FI
FR
HR
HU
IT
LT
LV
NL
NO
PL
PT
RO
RU
SK
SL
SR
SV
TR
UK
23
EN
4. Place the coee jug with its lid
onto the warming plate. Allow the
decalcier to take eect for about 15
minutes, then switch the machine on.
Switch it o when the solution has
nished owing through. If necessary
repeat the decalcifying process.
5. Allow the machine to run at least
twice with plain water. Then
thoroughly rinse the coee jug, lid
and lter holder under running water,
activate the lter valve repeatedly
during the rinse process.
6. Never immerse the thermo jug in
liquid or wash it in dishwasher.*
Cleaning and care
*sõltub mudelist *depending on model *según el modelo * vaihtelee malleittain
ES
5. Deje que el aparato funcione
únicamente con agua al menos
dos veces. A continuación, lave
a conciencia la jarra, la tapa y el
compartimento del ltro con agua
corriente; active la válvula del ltro
en repetidas ocasiones durante el
proceso de limpieza.
6. No sumerja nunca en líquido
la jarra termo ni la lave en
lavavajillas.*
4. Coloque la jarra del café con la tapa
sobre la base de calentamiento. Deje
que el descalcicador haga efecto
durante 15 minutos y, a continuación,
encienda el aparato. Apáguelo
cuando la solución haya terminado
de uir por él. Si es necesario, repita el
proceso de descalcicación.
Limpieza y mantenimiento /
ES
FI
5. Keitä laitteella pelkkää vettä
ainakin kaksi kertaa. Huuhtele
kahvipannu, kansi ja suodattimen
pidike huolellisesti juoksevan veden
alla. Avaa ja sulje suodattimen läppää
toistuvasti huuhtelun aikana.
6. Älä koskaan upota termoskannua
nesteeseen äläkä pese sitä
astianpesukoneessa.*
4. Aseta kahvipannu
kansineen lämpölevylle. Anna
kalkinpoistoaineen vaikuttaa noin
15 minuuttia ja käynnistä sitten
laite. Sammuta laite, kun neste on
valunut kokonaan laitteen läpi. Toista
kalkinpoisto tarvittaessa.
Puhdistaminen ja hoitaminen
FI
EE
5. Laske seadmel vähemalt kaks
korda puhta veega töötada. Seejärel
loputage kohvikannu, kaant ning
ltrihoidikut põhjalikult jooksva vee
all, aktiveerides loputusprotsessi ajal
korduvalt ltriklappi.
6. Ärge kunagi kastke termoskannu
vette ega peske seda
nõudepesumasinas.*
4. Asetage kohvikann koos
kaanega soojendusplaadile. Laske
katlakivieemaldamise lahusel
umbes 15 minutit toimida, seejärel
lülitage seade sisse. Lülitage
seade välja, kui lahuse läbivool on
lõppenud. Vajadusel korrake katlakivi
eemaldamistoimingut.
Puhastamine ja hooldus /
EE
www.electrolux.com24
EN
Recycle the materials with the symbol
. Put the packaging in applicable
containers to recycle it.
Help protect the environment and human
health and to recycle waste of electrical
and electronic appliances.
Do not dispose appliances marked with
the symbol
with the household
waste. Return the product to your
local recycling facility or contact your
municipal oce.
Disposal
ES
Recicle los materiales con el símbolo
. Coloque el material de embalaje
en los contenedores adecuados para su
reciclaje.
Ayude a proteger el medio ambiente y la
salud pública, así como a reciclar residuos
de aparatos eléctricos y electrónicos.
No deseche los aparatos marcados con
el símbolo
junto con los residuos
domésticos. Lleve el producto a su centro
de reciclaje local o póngase en contacto
con su ocina municipal.
Cómo desechar el electrodoméstico /
FI
Kierrätä materiaalit, jotka on merkitty
merkillä
. Kierrätä pakkaus laittamalla
se asianmukaiseen kierrätysastiaan.
Suojele ympäristöä ja ihmisten
terveyttä kierrättämällä sähkö- ja
elektroniikkaromut.
Älä hävitä merkillä
merkittyjä
kodinkoneita kotitalousjätteen
mukana. Palauta tuote paikalliseen
kierrätyskeskukseen tai ota yhteyttä
paikalliseen viranomaiseen.
Hävittäminen
EE
Sümboliga tähistatud materjalid
võib ringlusse suunata. Selleks viige
pakendid vastavatesse konteineritesse.
Aidake hoida keskkonda ja inimeste
tervist ja suunake elektri- ja
elektroonilised jäätmed ringlusse.
Ärge visake sümboliga
tähistatud
seadmeid muude majapidamisjäätmete
hulka. Viige seade kohalikku ringluspunkti
või pöörduge abi saamiseks kohalikku
omavalitsusse.
Jäätmekäitlusse andmine /
BG
CS
DA
DE
EE
EN
ES
FI
FR
HR
HU
IT
LT
LV
NL
NO
PL
PT
RO
RU
SK
SL
SR
SV
TR
UK
25
www.electrolux.com26
www.electrolux.com38
www.electrolux.com50
www.electrolux.com62
www.electrolux.com74
electrolux.com/shop Electrolux Floor Care AB
S:t Göransgatan 143
S-105 45 Stockholm
Sweden
Share more of our thinking at www.electrolux.com
3481 E EKF5xxx 03100417
1 / 1

Electrolux EKF5110 User manual

Category
Coffee makers
Type
User manual

Ask a question and I''ll find the answer in the document

Finding information in a document is now easier with AI

Ask the document