Page is loading ...

www.bmb-home.com Rev: BMB-14.05.05
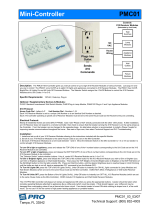
2 Way
Switching
Standard Switch or
momentary switch
N
N
L
SL
Lamp
Neutral
Live
Switch
Switch
N
N
L
SL
Lamp
Neutral
Live
Switch or Key
INSTALLATION INSTRUCTIONS FOR X10 IN-WALL APPLIANCE MODULE AW12
Switch off appropriate mains fuse and master switch!
Important: 230V - 50Hz - 16A max.
This module can be activated by using a toggle switch or a push button or using X10 PLC signals. It can be operated using the following X10 signals: "Address On", "Address
Off” and "All Lights On/All Lights Off/All Units Off" if this option is programmed. The unit will accept either a momentary acting key or a standard wall switch with latching
action. All key closures must be to Live. If a momentary key is used, the relay changes state each time the key is pressed, as long as the key press lasts for less than 1.75
seconds.
If a standard wall switch with latching action is used, it is assumed that the key press will last for more than 1.75 seconds. In this case the relay changes state on both the
closure and opening. This type of response will allow the unit to also perform 2-way control if 2 changeover latching switches are connected in series – as would be the case
with 2 way switching.
Installation
To install the AW12, neutral and phase are required at the installation point
- Switch off appropriate mains fuse and master switch!
- Take the wall switch out of the wall box.
- Disconnect all wires f rom the switch
- Pull an additional Neutral wire if it is missing
- Connect the live and neutral to the terminal wires of the AW12 as described in the drawing.
- Connect the wires from the In-Wall module to the switch.
- Connect the phase to the switch
- Re-install the wall switch on the wall box
- Switch on mains fuse and master switch
Programming
Default Setting:
The default factory address is A1. If the address and "All lights on/All lights off /All Units Off" option
settings are not known, the default address of A1 can be set by applying power to the unit and sending
the address P16 to the unit twice (using any X10 controller - i.e.: TM13 + RF remote control). This can
either be just the address “P16” or “P16 On” or “P16 Off”. The messages must be sent within 30
seconds of applying power to the unit .
Setting the default address automatically cancels the options to respond to either "All Lights On", "All
Lights Off" or "All Units Off".
Setting the Address and "All Lights On/All Lights Off/All Units Off" Option:
To change the address and set up the "All Lights On/All Lights Off/All Units Off " option the unit must first be put into Program Mode. To enter Program Mode either send
”Address On” and “Address Off” in a quick sequence or press the external key quickly . After the relay changes state 5 times, with no more than 1.75 seconds between each
change of state, the unit will enter Program Mode and the relay will stop responding to indicate that it has entered the Program Mode. Once in Program Mode the new
address can be set by sending an “Address” or “Address On” or ”Address Off” message on the new address code twice (using any X10 controller). If you want to change the
code again, just send the revised code twice – as before .
To set the unit to respond to "All Lights On" and/or "All Lights Off" and/or "All Units Off" just send these messages twice on the new address code (using any X10 controller).
Please note: The "All Lights On/All Lights Off /All Units Off " option can be disabled by setting a new address or by returning to the Default Setting – as above.
To return to Run Mode: either send "Address On", "Address Off" or press the key quickly (no more than 1.75 seconds between key press). After 5 key presses or "On/Off"
message, the relay will start to respond, indicating that the unit is back in Run Mode. If no action is taken, the unit will automatically return to Run Mode after 60 seconds.
Important notice: After the installation of the X10 controllers, all receiver modules have first to be checked for correct function and address!
Technical Data: Supply voltage: 230 V +10% -15% 50 Hz, Supply current: <20 mA capacitive. Making capacity: 2000 W (incandescent lamp), 3 A (motors), 16 A (resistive
loads).
INSTALLATION INSTRUCTIONS FOR X10 IN-WALL DIMMER MODULE LW12
Switch off appropriate mains fuse and master switch!
Important: 230V - 50Hz – 60 to 250W - Works with incandescent lamp and dimmable electronic low voltage transformer.
Not suitable for Low Energy Fluorescent lamps.
Must only be used in circuits protected by a Fuse or Circuit Breaker rated at 16A or less.
The module is protected against overload, but may be damaged if the SL Output is shorted directly to Neutral.
The LW12 is a 2-wire X10 compatible dimmer for controlling Incandescent Lamps and Dimmable Electronic Low Voltage Transformers down to 60W. This module can be
activated using a momentary action Key or using X10 PLC signals. It can be operated using the following X10 signals: "Address On", "Address Off” , “Address Bright”,
“Address Dim” and "All Lights On/All Lights Off/All Units Off" if these last 3 options are programmed. This unit will also respond to “Extended” X10 messages-Scenes. The
unit’s Address, Response Options, Scene Responses, Output Memory Level and On/Off Status are all stored in permanent memory and are preserved through a loss of
power. The output status is reinstated after power returns. The unit will accept a momentary action key. All key closures must be to live and to the same phase that the unit is
powered.
Installation
To install the LW12, only the phase is required at the installation point
- Switch off appropriate mains fuse and master switch!
- Take the wall switch (momentary action switch) out of the wall box
- Disconnect all wires from the switch
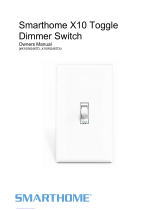
- Connect the live to the L terminal of the LW12
- Connect the momentary action switch between the live and the K terminal of the LW12
- Connect the load to SL terminal
- Re-fix the wall switch on the wall box
- Switch on mains fuse and master switch
Programming
Default Setting:
The default factory address is A1. If the address and "All lights On / All lights Off / All Units Off" option settings aren’t known, the default address of A1 can be set by applying
power to the unit and sending the address P16 to the unit twice (using any X10 controller - i.e.: TM13 + RF remote control). This can either be just the address “P16” or “P16
On” or “P16 Off”. The messages must be sent within 30 seconds of applying power to the unit. Setting the default address automatically cancels the options to respond to
either "All Lights On", "All Lights Off”, “All Units Off" or any scene command.
Setting the Address and "All Lights On/All Lights Off/All Units Off" Option
To change the address and set up the "All Lights On/All Lights Off/All Units Off” option the unit must first be put into Program Mode. To enter Program Mode either send
”Address On” and “Address Off” in quick succession or press the external key quickly. After 5 changes, with no more than 2 seconds between each change of state, the unit
will enter Program Mode and the unit will stop responding to indicate that it has entered the Program Mode.
Note: Because this is a dimmer with built in Fade-on and Fade-off it takes some seconds to visibly change the output on/off state. This can make it quite difficult to switch the
output on and off quickly and be able to see when the unit stops responding as it goes into program mode. To make it easier, it is recommended to first dim the unit somewhat
before starting the Program Mode sequence.
Once in Program Mode the new address can be set by sending an “Address” or “Address On” or ”Address Off” message on the new address code twice (using any X10
controller). If you want to change the code again, just send the revised code twice – as before.
To set the unit to respond to "All Lights On" and/or "All Lights Off" and/or "All Units Off" just send these messages twice on the new address code (using any X10 controller).
Please note: The "All Lights On/All Lights Off /All Units Off” option will be disabled by setting a new address or by returning to the Default Setting – as above.
K
L
SL
Incandescent Lamp
Neutral
Live
Momentary action
key

www.bmb-home.com Rev: BMB-14.05.05
To return to Run Mode: either send "Address On", "Address Off" or press the key quickly (no more than 2 seconds between key press). After 5 key presses or 5 "On/Off"
messages, the unit will start to respond, indicating that the unit is back in Run Mode. If no action is taken, the unit will automatically return to Run Mode after 60 seconds.
Important notice:
After the installation of the X10 controllers, all receiver modules have first to be checked for correct function and address!
External Key
A momentary action pushbutton switch can be connected between this input and Mains Live to give On/Off and Bright/Dim control. The switches must be returned to the
same Phase that the unit is powered from to give proper control.
Check the correct operation of the dimmer:
• A short key press of less than 0.5 seconds will cause the output to fade off if previously on, or fade on to the memory position if previously off.
• A longer key press than 0.5 seconds causes the output to cycle through to full bright then back to full dim and to continue to do this for as long as the key is pressed.
The final brightness level is stored as the memory position when the output is subsequently switched off. If the output was off when the key is pressed to brighten the
lamp, the unit fades on to the memory position but doesn’t continue past it. The Bright/Dim cycle only occur when the output is already on when the key is pressed.
It takes between 3.5 and 4 seconds to go from full dim to full bright.
Response to ‘Standard’ X10 messages
The unit becomes ‘addressed’ when it receives a A1-P15 message that matches it’s stored Address. P16 is reserved for setting in the Default Address A1. Once ‘addressed’
the unit will respond to function messages ON, OFF, BRIGHT and DIM.
When the unit receives a message, it will operate as follows:
• "Off": Light fades off gradually.
• "On”: Light fades on to memory level.
• "Dim”: Dims from current light level.
*If the unit was previously off brings the unit on at full bright before dimming
• “Bright”: Brightens from current light level.
• "All Lights On": Brings light 100% on immediately (no fade on).
• "All Units Off" & “All Lights Off”: Full Off immediately (no fade off).
Response to ‘Extended’ X10 messages – Scenes (for the professional)
The unit will respond to a set of control messages in Extended X10 message format that enable it perform timed fading to a new brightness level and also to perform scene changes. The unit will respond
to Preset Output, Include in Group, Activate Group, Brighten or Dim Group. See X10 Code Format for more details (Extended code message type 30hex, 31hex, 36hex and 3Chex.)
Troubleshooting
In general X10 products are extremely easy to install and very reliable. Like other electronic equipment, they do require proper set-up for correct operation. If you experience
any problems, first go through this troubleshooting guideline.
Having trouble with just one device...
• Does the X10 controller work with other modules? If it doesn’t refer to «Things to check if NOTHING works…».
• Is the module you are trying to control completely plugged into the wall outlet?
• Is the switch for the light or appliance you are trying to control turned on?
• Does the light or appliance work OK if you plug it directly into an outlet?
• Is the module plugged into a surge protector? A surge protector might block signals from your interface or controller!
• Noise on your house wiring could cause a module not to work at all or only work intermittently. Although not very likely, as special circuitry has been designed into the
X10 modules and CE product standards require that electrical devices do not generate noise, check to see if any of these (noisy) devices are operating when you are
having problems :
Wireless intercoms in transmit (talk) mode, Baby Monitors that transmit over your house wiring, Wireless Doorbells that use the house wiring, Laser Printers,
Electric Motors (old ones), Electric hair dryers, Electric shavers, Vacuum cleaners, Floor scrubbers, Electric Carving Knives, Food Processors, Blenders, Mixers,
Micro-wave ovens.
To determine if you have an interference (noise) problem, unplug anything that you suspect might be causing the problem and try controlling your device again.
Noisy devices could be anywhere in your house, but start looking around the area that you are having a problem.
There is a device available called a Plug-in Noise Filter (FM10) that will reduce the noise injected into the house wiring from a noisy device. You plug the noisy
device into the filter and then plug the filter into the wall outlet. Contact X10 Europe for your nearest supplier.
• If you cannot locate any things that are interfering with your system, try using a different module of the same type at this same location in your home. Remember to set
the correct House Code/Unit Code on the new module. If this fixed the problem, the original module is possibly defective.
• If no modules work in that location, you may have a problem with the wall outlet, you may have a noise problem as describe above, or you may have a problem with
your house wiring. Contact your local electrician.
Things to check if NOTHING works......
• Is the X10 controller plugged into a working outlet? Is the outlet controlled by a wall switch? If so, is it turned on?
• Is the House Code set correctly?
• If you still cannot control any modules, plug your controller and module into the same outlet (using a non surge protected outlet strip, if necessary). See if you can
control this module. If not, contact your supplier for help.
• If it does work correctly with the controller and the module into the same outlet, try plugging the module in where you originally had it. If it doesn’t work when you plug
the module in somewhere else in your home (try several different locations and several modules of the same type), contact your supplier for help.
Safety Warnings
• To prevent short circuits, this product (except if specified for outdoor usage) should only be used inside and only in dry spaces. Do not expose the components to rain or
humidity. Do not use the product close to a bath, swimming pool etc.
• Only connect the adapter to the mains after checking whether the mains voltage is the same as the values on the rating labels. Never connect an adapter or power
cord when it is damaged. In that case, contact your supplier.
• Avoid strong mechanical tear and wear, high temperatures, strong vibrations and high humidity.
• Do not open the product: the device contains live parts. The product should only be repaired or serviced by a qualified repairman. Defected pieces must be replaced by
original parts.
• Adapters: Only connect the adapters to the mains after you have checked whether the mains voltage corresponds with the value on the type tags. Never connect an
adapter or cable when it is damaged. In that case, contact your supplier.
• Batteries: keep batteries out of the reach of children. Dispose of batteries as chemical waste. Never use old and new batteries or different types of batteries together.
Remove the batteries when you are not using the system for a longer period of time. When inserting batteries be sure the polarity is respected. Make sure that the
batteries are not short circuited and are not disposed in fire (danger of explosion).
• In case of improper usage or if you have opened, altered and repaired the product yourself, all guarantees expire. The supplier does not accept responsibility in the
case of improper usage of the product or when the product is used for purposes other than specified. The supplier does not accept responsibility for additional damage
other than covered by the legal product responsibility.
/