Acer AL2016W User manual

Category
Monitors CRT
Type
User manual

The Acer AL2016W LCD Monitor offers stunning visuals with its 20-inch widescreen display, delivering crystal-clear images and immersive viewing experiences. It features a user-friendly design with external controls for easy access to brightness, contrast, and other display settings. With VGA and DVI connectivity options, you can seamlessly connect to various devices like PCs, laptops, or gaming consoles. Experience enhanced visual clarity and comfortable viewing angles, making it ideal for work, multimedia, or gaming.

The Acer AL2016W LCD Monitor offers stunning visuals with its 20-inch widescreen display, delivering crystal-clear images and immersive viewing experiences. It features a user-friendly design with external controls for easy access to brightness, contrast, and other display settings. With VGA and DVI connectivity options, you can seamlessly connect to various devices like PCs, laptops, or gaming consoles. Experience enhanced visual clarity and comfortable viewing angles, making it ideal for work, multimedia, or gaming.

Table of Contents
TCO03 Notice............................................................................................................................................................
FCC Statement Warning............................................................................................................................................
Canadian DOC Notice...............................................................................................................................................
Precautions................................................................................................................................................................
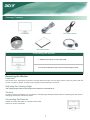
Package Contents......................................................................................................................................................
Installation Instructions..............................................................................................................................................
Assembling the Monitor...................................................................................................................................
Detaching the Monitor .....................................................................................................................................
Adjusting the Viewing Angle ...........................................................................................................................
Connecting the Devices ..................................................................................................................................
Switching the Power .......................................................................................................................................
Adjusting Display Settings .........................................................................................................................................
External Controls ............................................................................................................................................
OSD Options .............................................................................................................................................................
OSD Menu ......................................................................................................................................................
Brightness & Contrast .............................................................................................................................
Tracking .................................................................................................................................................
Position ...................................................................................................................................................
Color .......................................................................................................................................................
Language Setting.....................................................................................................................................
Auto Configuration...................................................................................................................................
Information ............................................................................................................................................
Recall.......................................................................................................................................................
General Specifications...............................................................................................................................................
Technical Information.................................................................................................................................................
Pin Assignment ................................................................................................................................................
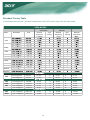
Standard Timing Table.....................................................................................................................................
Troubleshooting................................................................................................................................................
1
2
3
3
4
4
4
4
4
4
5
5
5
5
6
6
6
6
6
7
7
7
7
7
8
8
9
10
11
OSD Option.............................................................................................................................................
Congratulations!
The display you have just purchased carries the TCO’03
Displays label. This means that your display is designed,
manufactured and tested according to some of the strictest
quality and environmental requirements in the world. This
makes for a high performance product, designed with the
user in focus that also minimizes the impact on our natural
environment.
Some of the features of the TCO’03 Display requirements:
Good visual ergonomics and image quality in order to improve the working environment
for the user and to reduce sight and strain problems. Important parameters are luminance,
contrast, resolution, reflectance, colour rendition and image stability.
Emissions
Electromagnetic fields
Noise emissions
The requirements included in this label have been developed by TCO Development in co-
operation with scientists, experts, users as well as manufacturers all over the world. Since the
end of the 1980s TCO has been involved in influencing the development of IT equipment in a
more user-friendly direction. Our labelling system started with displays in 1992 and is now
requested by users and IT-manufacturers all over the world.
Ergonomics
Energy
Energy-saving mode after a certain time – beneficial both for the user and the
environment
Electrical safety
Ecology
The product must be prepared for recycling and the manufacturer must have a certified
environmental management system such as EMAS or ISO 14 001
Restrictions on
chlorinated and brominated flame retardants and polymers
heavy metals such as cadmium, mercury and lead.
For more information, please visit
www.tcodevelopment.com
2
IT Equipment Recycling Information:
Acer is strongly committed to environmental protection and views recycling, in the form
of salvaging and disposal, of used equipment as one of the company’s top priorities in
minimizing the burden placed on the environment.
We at Acer are very conscious of the environmental forces that impose on our business
and strive to identify and provide the best working products to reduce the environmental
impact of our products.
For more information and help in recycling, please visit the following websites:
Worldwide:
http://global.acer.com/about/sustainability.htm
Visit www.global.acer.com for further information on our other products and its features
and benefits.
Lamp Disposal
IT Equipment Recycling Information
LAMP(S) INSIDE THIS PRODUCT CONTAIN MERCURY AND MUST BE RECYCLED OR DISPOSED OF
ACCORDING TO LOCAL, STATE OR FEDERAL LAWS. FOR MORE INFORMATION, CONTACT THE
ELECTRONIC INDUSTRIES ALLIANCE AT WWW. EIAE. ORG. FOR LAMP SPECIFIC DISPOSAL
INFORMATION CHECK WWW. LAMPRECYCLE. ORG.
Waste Electrical and Electronic Equipment (WEEE) Directive
Do not throw this electronic device into the municipal trash bin when discarding. To
minimize pollution and ensure utmost protection of the global environment, please recycle
it. For more information about the collection of WEEE welcome to visit our homepage at
www.acer.com under environment.
This manual is designed to assist users in setting up and using the LCD Monitor. Information in his document has
been
carefully checked for accuracy; however, no guarantee is given to the correctness of the contents. The
information
in this document is subject to change without notice. This document contains proprietary information
protecte
d by copyright. All rights are reserved. No part of this manual may be reproduced by any mechanical,
ele
ctronic or other means, in any form, without prior written permission of the manufacturer.
Canadian DOC Notice
This Class B digital apparatus meets all requirements of the Canadian Interference-
Causing
Equipment Regulations.
Cet
appareil numerique de la classe B repecte toutes les exigences du Reglement
sur
le materiel brouilleur du Canada.
Preface
Important Safety Instructions
1. To clean LCD Monitor screen;Power off LCD Monitor and unplug the AC Cord.
Spra
y a non-solvent cleaning solution onto a rag and clean the screen gently.
2. Do not place the LCD Monitor near a window. Exposing the monitor to rain
water, moisture or sunlight can severely damage it.
3.
Do not apply pressure to theLCDscreen.Excess pressure may cause permanent
damageto the display.
4. Do not remove the cover or attempt to service this unit by yourself. Servicing of any
nature should be performed by an authorized technician.
5. Operate LCD Monitor in a room with a room temperature of 5°C~ 40°C (or 41°F ~ 104°F).
Operating LCD Monitor outside this range could result in permanent damage.
6. If any of the following occurs, immediately unplug your monitor and call an authorized
technician.
* Monitor to PC signal cable is frayed or damaged.
* Liquid spilled into LCD Monitor or the monitor has been exposed to rain.
* LCD Monitor or the case is damaged.
3
NOTE
A shielded-type signal cord is required in order to meet the FCC emission limits and also to prevent interference to
the radio and television reception. It is essential that only the supplied signal cord be used.
1. Position the monitor on top of the stand.
Assembling the Monitor
2.Connect the stand into the neck of monitor along the track.
Detaching the Monitor
Important
First, find a clean, flat surface to place the monitor after removing it from the stand. Place a clean dry cloth under the
monitor to protect it further. Pull the monitor slightly up and away from the stand.
Adjusting the Viewing Angle
The viewing angle of the monitor ranges from forward to backward 15°.
Caution:
Do not force the LCD Monitor over its maximum viewing angle settings as stated above. Attempting this will result in
damaging the Monitor and Monitor stand.
Connecting the Devices
Please shut down the power of computer and monitor
before you do the connection..
Package Contents
LCD Monitor Power Cord
User Manual (CD) Quick Start Guide VGA Cable
DVI Cable (option)
WARNING: The D-Sub 15 pin plug of the VGA cable is trapezoid in shape. Make sure the shape of the plug matches
the shape of the socket it is inserted into, and that none of the pins are bent or otherwise damaged.
Operating Your Monitor
If OSD is active, press to select or adjust OSD options.
Press to view OSD. Press AUTO to exit.
Please refer to "External Controls " on Page 5. To adjust the OSD settings :
1. Press the MENU button to open the OSD menu.
2. Use the buttons marked < or >, to highlight a control, then press the MENU button to enter
3. Use the buttons marked < or >, to adjust the control to the desired level.
4. When you have finished making all selections, press the MENU button to exit the OSD. (Or the adjustment
will auto-save after 20 seconds.)
First, switch the power on to the monitor, then switch the power on to the computer. When you see the LED on
the power button go green, this indicates the computer is ready for use. Allow about 10 seconds for the video
signal to appear. If you do not see the green light on the power button or a video signal, check the connections .
If OSD is active, press to exit. If OSD is inactive, press and the
monitor will automatically optimize the display position, clock and
phase of your display.
If OSD is active, press to select or adjust OSD options.
Power on/off
Green: power on
Orange: in sleep mode
1
2
4
OSD Options
Attach the monitor to the power cord which should then be
inserted into a properly grounded electric socket.
Connect the signal cable to the VGA output socket of the graphics card
on the computer. Then tighten the thumbscrews on the connector
(1)
(2)
Power Cord
VGA Cable
Connect the signal cable to the DVI output socket of the graphics card
on the computer. Then tighten the thumbscrews on the connector
(3) DVI Cable (option)
Power
Auto Configuration
Plus
OSD Menu
Minus
AUTO
MENU
BRIGHTNESS:
This adjusts the brightness of the picture on the screen.Adjustable range
from the value of 0 to 100.
CONTRAST:
This adjusts dark and light shades of color relative to each other to achieve
a comfortable contrast. Adjustable range from the value of 0 to 100.
Brightness & Contrast
Tracking
FOCUS:
This removes any horizontal distortion and makes the picture clear and sharp.
CLOCK:
If there are any vertical stripes seen on the background of the screen this renders
them less noticeable by minimizing their size. It also changes the size of horizontal
screen.
Position
V-Position:
This removes any horizontal distortion and makes the picture clear and sharp.
H-Position:
This adjusts the horizontal.
Color Temperature
There are three ways of adjusting color temperature:
WARM:
Set the color temperature as CIE coordinate 6500°K.
COOL:
Set the color temperature as CIE coordinate 9300°K.
OSD Menu
User defined:
You can adjust the colors red, green and blue to the intensity you
desire.
AUTO Configuration
Adjust the monitor parameter automatically.
Source Change
Analog and Digital source change .(option)
Select the OSD menu language.
Language
OSD Position
This changes the position of the OSD window on the screen.
TIMEOUT function allow user define the OSD appearing period from 10 seconds to
120 seconds.
Information
This shows brief information on the screen.
General Specification
Item
Display 20-inch Flat panel active-matrix TFT LCD
Max Resolution 1680 x 1050 @75Hz
Pixel Pitch 0.258 mm X 0.258 mm
Color 16.2M
Brightness 300nits ( Typical)
Contrast Ratio 600:1 (Typical)
Response Time 8ms (Typical)
View Angle of Horizontal
14
View Angle of Vertical 130°
Power Buttons ON/ OFF
Control Buttons AUTO, MENU, <, >
Video
VGA + DVI-D (option)
Sync
TTL (+
/ -)
8
Plug & Play
DDC2B
Power Source 100~240V AC, 50/60 Hz, 1.5A
Power Consumption During
Normal Operation
<55W
Power Consumption During
Active of
f Operation
< 1
W
Dimension (W_H_D)
476x384x184.6mm (base included)
Weight (Net/Gross) 5.5Kg/6.7Kg
Specification
Recall
In
Recall to factory default settings
9
Pin Assignment Signal
PIN Description PIN Description
1 Red 9 +5V
2 Green 10 N.C.
3 Blue 11 N.C.
4 N.C. 12 DDC_SDA
5 GND 13 HSYNC
6 Red_GND 14 VSYNC.
7 Green_GND 15 DDC_SCL
8 Blue_GND
Technical Information
Signal
Digital Video Input Connector : DVI – D (option)
1 TX1-
TX0-
2
TX1+
18
Shield (TX2 / TX4)
NC
12
20
5
13
21
6
22
23
8
Hot plug detect
TX2-
TX2+
9
17
10
TX0+
11
Shield (TX0 / TX5)
3
Shield (TX1 / TX3)
19
4
NC
NC
NC
NC NC
+5V power DDC-Serial Clock
14
Shield (TXC)
7
15
Ground (+5V)
TXC+
NC
DDC-Serial Data
16
TXC-
24
Standard Timing Table
If the selected timing is NO T included in table below, this LCD monitor will go into the sleep mode.
VESA MODES
Mode
10
Horizontal Vertical
Resolution
Total Nominal
Frequency
+/-0.5KHz
Sync
Polarity
Nominal
Frequency
+/-1Hz
Sync
Polarity
Nominal
Pixel Clock
(MHz)
VGA
SVGA
XGA
SXGA
UXGA
WXGA
WXGA+
WSXGA+
640*350@70Hz 800*449 31.469 P 70.087 25.175
EGA
720x400@70Hz 900*449 31.469 N 70.087 28.322
SVGA
832*624@75Hz 1152*667 49.725 N 74.550 57.283
XGA
1024*768@75Hz 1328*804 60.241 N 7 4.927 80.000
1152*870@75Hz 1456*915 68.681 N 75.062 100.00
VGA
864*525
35.000
P 66.667 P 30.240
XGA
1024*768@72Hz
1360* 800
57.669 N
72.086
N
N
N
N
78.434
SXGA
1280*1024@70Hz 1696*1072 74.882 P 69.853
P
N
P
127.000
OTHER MODES
PROBLEM There is no picture on LCD Monitor
Troubleshooting
This LCD Monitor has pre-adjusted using factory standard VGA timings. Due to the output timing differences among
various VGA cards in the market, users may initially experience an unstable or unclear display whenever a new
display mode or new VGA cardis selected.
Attention
This LCD Monitor Supports Multiple VGA Modes. Refer to the Standard Timing Table for a listing of modes supported
by this LCD Monitor.
The picture is unclear and unstable, please perform the following steps :
1. Enter PC to "Shut Down Windows" status while you're in MS-Windows environment.
2. Check the screen to see if there's any black vertical stripes appear. If there are,take advantage of the "Clock"
function in OSD menu and adjust (by increment or decrement numbers)until those bars disappear.
3. Move to "FOCUS" function in OSD menu again and adjust the monitor screen to its most clear display.
4. Click "No" on "Shut Down Windows" and back to the normal PC operating environment.
If there's no picture on the LCD Monitor, please perform the following steps:
1. Make sure the power indicator on the LCD Monitor is ON, all connections are secured,and the system is running
on the correct timing. Refer to Chapter 3 for information on timing.
2. Turn off the LCD Monitor and then turn it back on again. If there is still no picture,press the Adjustment Control
button several times.
3. If step 2 doesn't work, connect your PC system to another external CRT.If your PC system Functions properly with
a CRT Monitor but it does not function with the LCD Monitor,the output timing of the VGA card may be out of the
LCD's synchronous range.
Please change to an alternative mode listed in the Standard Timing Table or replace the VGA card,and then repeat
steps 1 and 2.
If you have chosen an output timing that is outside of the LCD Monitor's synchronous range (Horizontal: 31.5 ~ 84 KHz
and Vertical:56 ~ 75 Hz), the OSD will display a "Out of Range" message. Choose a mode that is supported by your
LCD Monitor. Also, if the signal cable is not connected to LCD monitor at all or properly, the monitor screen will
display
a message "No Input Signal".
Caution: Do not attempt to service the monitor yourself or open the computer yourself.
Please refer all servicing to qualified service personnel if the problems cannot be solved in "Troubleshooting" section.
PROBLEM Picture is unclear and unstable
PROBLEM There is no picture on LCD Monitor
  • Page 1 1
  • Page 2 2
  • Page 3 3
  • Page 4 4
  • Page 5 5
  • Page 6 6
  • Page 7 7
  • Page 8 8
  • Page 9 9
  • Page 10 10
  • Page 11 11
  • Page 12 12

Acer AL2016W User manual

Category
Monitors CRT
Type
User manual

The Acer AL2016W LCD Monitor offers stunning visuals with its 20-inch widescreen display, delivering crystal-clear images and immersive viewing experiences. It features a user-friendly design with external controls for easy access to brightness, contrast, and other display settings. With VGA and DVI connectivity options, you can seamlessly connect to various devices like PCs, laptops, or gaming consoles. Experience enhanced visual clarity and comfortable viewing angles, making it ideal for work, multimedia, or gaming.

Ask a question and I''ll find the answer in the document

Finding information in a document is now easier with AI