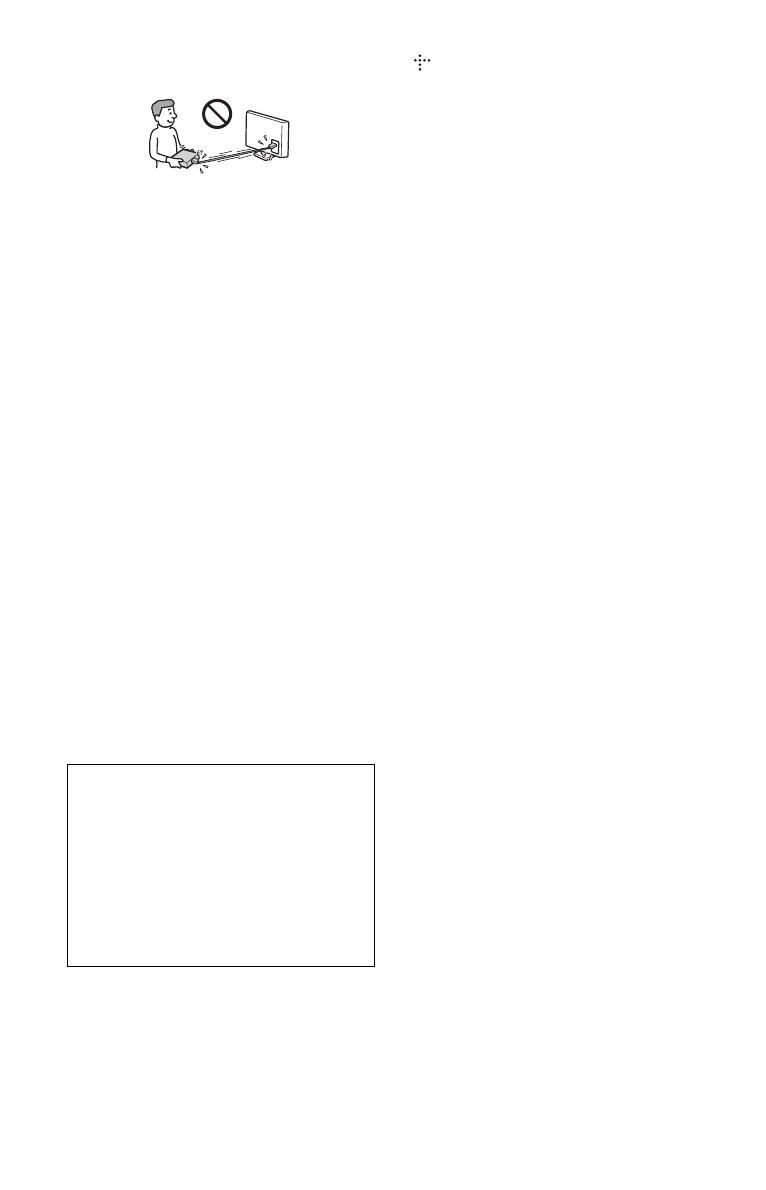
Sony SMP-N200 Owner's manual

Category
Digital media players
Type
Owner's manual
4-295-323-32(1)
Network Media
Player
Operating Instructions
SMP-N200
2
WARNING
To reduce the risk of fire or electric shock, do not
expose this apparatus to rain or moisture.
To avoid electrical shock, do not open the cabinet.
Refer servicing to qualified personnel only.
Batteries or batteries installed apparatus shall not be
exposed to excessive heat such as sunshine, fire or the
like.
Notice for Customers in the United Kingdom
and Republic of Ireland
A molded plug complying with BS1363 is fitted to this
equipment for your safety and convenience.
Should the fuse in the plug supplied need to be
replaced, a fuse of the same rating as the supplied one
and approved by ASTA or BSI to BS1362, (i.e.,
marked with or mark) must be used.
If the plug supplied with this equipment has a
detachable fuse cover, be sure to attach the fuse cover
after you change the fuse. Never use the plug without
the fuse cover. If you should lose the fuse cover, please
contact your nearest Sony service station.
Disposal of Old Electrical & Electronic
Equipment (Applicable in the European
Union and other European countries
with separate collection systems)
This symbol on the product or on its packaging
indicates that this product shall not be treated as
household waste. Instead it shall be handed over to the
applicable collection point for the recycling of
electrical and electronic equipment. By ensuring this
product is disposed of correctly, you will help prevent
potential negative consequences for the environment
and human health, which could otherwise be caused by
inappropriate waste handling of this product. The
recycling of materials will help to conserve natural
resources. For more detailed information about
recycling of this product, please contact your local
Civic Office, your household waste disposal service or
the shop where you purchased the product.
For customers in Australia
The above symbol is applicable in the European Union
and other European countries with separate collection
systems.
Disposal of waste batteries (applicable
in the European Union and other
European countries with separate
collection systems)
This symbol on the battery or on the packaging
indicates that the battery provided with this product
shall not be treated as household waste.
On certain batteries this symbol might be used in
combination with a chemical symbol. The chemical
symbols for mercury (Hg) or lead (Pb) are added if the
battery contains more than 0.0005% mercury or
0.004% lead.
By ensuring these batteries are disposed of correctly,
you will help prevent potentially negative
consequences for the environment and human health
which could otherwise be caused by inappropriate
waste handling of the battery. The recycling of the
materials will help to conserve natural resources.
In case of products that for safety, performance or data
integrity reasons require a permanent connection with
an incorporated battery, this battery should be replaced
by qualified service staff only.
To ensure that the battery will be treated properly, hand
over the product at end-of-life to the applicable
collection point for the recycling of electrical and
electronic equipment.
For all other batteries, please view the section on how
to remove the battery from the product safely. Hand the
battery over to the applicable collection point for the
recycling of waste batteries.
For more detailed information about recycling of this
product or battery, please contact your local Civic
Office, your household waste disposal service or the
shop where you purchased the product.
Notice for customers
The following information is only applicable to
equipment sold in countries applying EU
directives.
The manufacturer of this product is Sony Corporation,
1-7-1 Konan Minato-ku Tokyo, 108-0075 Japan. The
Authorized Representative for EMC and product safety
is Sony Deutschland GmbH, Hedelfinger Strasse 61,
70327 Stuttgart, Germany. For any service or guarantee
matters please refer to the addresses given in separate
service or guarantee documents.
Precautions
The nameplate is located on the bottom of the unit.
To prevent fire or shock hazard, do not place objects
filled with liquids, such as vases, on the apparatus.
This unit operates on 110 V – 240 V AC, 50 Hz/
60 Hz. Check that the unit’s operating voltage is
identical with your local power supply.
Install this unit so that the mains lead can be
unplugged from the wall socket immediately in the
event of trouble.
Europe Only
3
Precautions
This equipment has been tested and found to
comply with the limits set out in the EMC Directive
using a connection cable shorter than 3 metres.
On placement
Place the player in a location with adequate
ventilation to prevent heat build-up in the player.
Do not place any cloth on the player, do not place
any objects in front of the player, and do not place
the player on soft surfaces such as a rug, as it may
block the ventilation holes.
Do not install this player in a confined space, such
as a bookshelf or similar unit.
Do not place the player in a location near heat
sources, or in a place subject to direct sunlight,
excessive dust, or mechanical shock.
Do not place the player outdoors, in vehicles, on
ships, or on other vessels.
Do not install the player in an inclined position. It
is designed to be operated in a horizontal position
only.
Do not place metal objects in front of the front
panel. It may limit reception of radio waves.
Do not place the player in a place where medical
equipment is in use. It may cause a malfunction of
medical instruments.
If you use a pacemaker or other medical device,
consult your physician or the manufacturer of
your medical device before using the wireless
LAN function.
This player should be installed and operated with
a minimum distance of at least 20 cm or more
between the player and a person’s body
(excluding extremities: hands, wrists, feet and
ankles).
Do not place heavy or unstable objects on the
player.
Disconnect the AC power cord (mains lead) and
all other cables from the player when you move
the player.
On power sources
The player is not disconnected from the AC
power source (mains) as long as it is connected to
the wall outlet, even if the player itself has been
turned off.
Disconnect the player from the wall outlet if you
are not going to use the player for a long time. To
disconnect the AC power cord (mains lead), grasp
the plug itself; never pull the cord.
Observe following points to prevent the AC
power cord (mains lead) being damaged. Do not
use the AC power cord (mains lead) if it is
damaged, as doing so may result in an electric
shock or fire.
– Do not pinch the AC power cord (mains lead)
between the player and wall, shelf, etc.
– Do not put anything heavy on the AC power
cord (mains lead) or pull on the AC power cord
(mains lead) itself.
On AC adapter
Use the supplied AC adapter (AC-NX1W) for
this player, as other adapters may cause a
malfunction.
Do not disassemble or reverse-engineer.
Do not confine the AC adapter in a closed place
such as a bookshelf or an AV cabinet.
Do not connect the AC adapter to a traveler’s
electric transformer, which may generate heat and
cause a malfunction.
Do not drop or apply shock.
On adjusting volume
Do not turn up the volume while listening to a
section with very low level inputs or no audio
signals. If you do, your ears and the speakers may
be damaged when a peak level section is played.
On cleaning
Clean the cabinet, panel, and controls with a soft
cloth. Do not use any type of abrasive pad, scouring
powder or solvent such as alcohol or benzine.
On replacement of parts
In the events that this player is repaired, repaired
parts may be collected for reuse or recycling
purposes.
On connecting to the HDMI OUT jack
Observe the following as improper handling may
damage the HDMI OUT jack and the connector.
Carefully align the HDMI OUT jack on the rear
of the player and the HDMI connector by
checking their shapes. Make sure the connector is
not upside down or tilted.
,continued
4
Be sure to disconnect the HDMI cable when
moving the player.
Hold the HDMI connector straight when
connecting or disconnecting the HDMI cable. Do
not twist or force the HDMI connector into the
HDMI OUT jack.
On watching 3D video images
Some people may experience discomfort (such as
eye strain, fatigue, or nausea) while watching 3D
video images. Sony recommends that all viewers
take regular breaks while watching 3D video
images. The length and frequency of necessary
breaks will vary from person to person. You must
decide what works best. If you experience any
discomfort, you should stop watching the 3D video
images until the discomfort ends; consult a doctor if
you believe necessary. You should also review (i)
the instruction manual and/or the caution message
of any other device used with, or streaming contents
played with this product and (ii) our website*
for the latest information. The vision of young
children (especially those under six years old) is
still under development. Consult your doctor (such
as a pediatrician or eye doctor) before allowing
young children to watch 3D video images.
Adults should supervise young children to ensure
they follow the recommendations listed above.
* For customers in European countries
http://www.sony-europe.com/myproduct/
For customers in Australia
http://www.sony-asia.com/support/
If you have any questions or problems concerning
your player, please consult your nearest Sony
dealer.
Copyrights and Trademarks
“AVCHD” and the “AVCHD” logo are
trademarks of Panasonic Corporation and Sony
Corporation.
, “XMB,” and “xross media bar” are
trademarks of Sony Corporation and Sony
Computer Entertainment Inc.
This product incorporates High-Definition
Multimedia Interface (HDMI™) technology.
HDMI, the HDMI logo and High-Definition
Multimedia Interface are trademarks or registered
trademarks of HDMI Licensing LLC in the
United States and other countries.
“x.v.Colour” and “x.v.Colour” logo are
trademarks of Sony Corporation.
“BRAVIA” is a trademark of Sony Corporation.
“PhotoTV HD” and the “PhotoTV HD” logo are
trademarks of Sony Corporation.
MPEG Layer-3 audio coding technology and
patents licensed from Fraunhofer IIS and
Thomson.
Windows Media is either a registered trademark
or trademark of Microsoft Corporation in the
United States and/or other countries.
This product contains technology subject to
certain intellectual property rights of Microsoft.
Use or distribution of this technology outside of
this product is prohibited without the appropriate
license(s) from Microsoft.
Content owners use Microsoft PlayReady™
content access technology to protect their
intellectual property, including copyrighted
content. This device uses PlayReady technology
to access PlayReady-protected content and/or
WMDRM-protected content. If the device fails to
properly enforce restrictions on content usage,
content owners may require Microsoft to revoke
the device’s ability to consume PlayReady-
protected content. Revocation should not affect
unprotected content or content protected by other
content access technologies. Content owners may
require you to upgrade PlayReady to access their
content. If you decline an upgrade, you will not be
able to access content that requires the upgrade.
“Wi-Fi
®
,” “Wi-Fi Protected Access
®
” and “Wi-
Fi Alliance
®
” are registered marks of the Wi-Fi
Alliance.
“Wi-Fi CERTIFIED™,” “WPA™,” “WPA2™”
and “Wi-Fi Protected Setup™” are marks of the
Wi-Fi Alliance.
The Wi-Fi CERTIFIED Logo is a certification
mark of the Wi-Fi Alliance.
The Wi-Fi Protected Setup Mark is a mark of the
Wi-Fi Alliance.
•DLNA
®
, the DLNA Logo and DLNA
CERTIFIED™ are trademarks, service marks, or
certification marks of the Digital Living Network
Alliance.
All other trademarks are trademarks of their
respective owners.
Other system and product names are generally
trademarks or registered trademarks of the
manufacturers. ™ and ® marks are not indicated
in this document.
IMPORTANT NOTICE
Caution: This player is capable of holding a
still video image or on-screen display image on
your television screen indefinitely. If you leave
the still video image or on-screen display
image displayed on your TV for an extended
period of time you risk permanent damage to
your television screen. Plasma display panel
televisions and projection televisions are
susceptible to this.
5
Table of Contents
WARNING . . . . . . . . . . . . . . . . . . . . . . . . . . . . . . . . . . . . . . . . . . . . . . . . . . . . 2
Precautions . . . . . . . . . . . . . . . . . . . . . . . . . . . . . . . . . . . . . . . . . . . . . . . . . . .3
Guide to Parts and Controls . . . . . . . . . . . . . . . . . . . . . . . . . . . . . . . . . . . . . . 6
Hookups and Settings
Step 1: Connecting the Player . . . . . . . . . . . . . . . . . . . . . . . . . . . . . . . . . . . . . 9
Connecting to the Network . . . . . . . . . . . . . . . . . . . . . . . . . . . . . . . . . . . . . . 11
Step 2: Easy Setup . . . . . . . . . . . . . . . . . . . . . . . . . . . . . . . . . . . . . . . . . . . . 12
Playback
Playing via a Network . . . . . . . . . . . . . . . . . . . . . . . . . . . . . . . . . . . . . . . . . . 13
Playing from a USB Device . . . . . . . . . . . . . . . . . . . . . . . . . . . . . . . . . . . . . . 14
Available Options . . . . . . . . . . . . . . . . . . . . . . . . . . . . . . . . . . . . . . . . . . . . . . 15
Internet
Browsing Websites . . . . . . . . . . . . . . . . . . . . . . . . . . . . . . . . . . . . . . . . . . . . 16
Settings and Adjustments
Using the Settings Displays . . . . . . . . . . . . . . . . . . . . . . . . . . . . . . . . . . . . . . 18
Network Update . . . . . . . . . . . . . . . . . . . . . . . . . . . . . . . . . . . . . . . . . . . . . . . 18
Screen Settings . . . . . . . . . . . . . . . . . . . . . . . . . . . . . . . . . . . . . . . . . . . . . . . 18
Audio Settings . . . . . . . . . . . . . . . . . . . . . . . . . . . . . . . . . . . . . . . . . . . . . . . . 19
Parental Control Settings . . . . . . . . . . . . . . . . . . . . . . . . . . . . . . . . . . . . . . . . 20
System Settings . . . . . . . . . . . . . . . . . . . . . . . . . . . . . . . . . . . . . . . . . . . . . . . 20
Network Settings . . . . . . . . . . . . . . . . . . . . . . . . . . . . . . . . . . . . . . . . . . . . . . 21
Easy Setup . . . . . . . . . . . . . . . . . . . . . . . . . . . . . . . . . . . . . . . . . . . . . . . . . . 21
Resetting . . . . . . . . . . . . . . . . . . . . . . . . . . . . . . . . . . . . . . . . . . . . . . . . . . . . 21
Additional Information
Troubleshooting . . . . . . . . . . . . . . . . . . . . . . . . . . . . . . . . . . . . . . . . . . . . . . . 22
Specifications . . . . . . . . . . . . . . . . . . . . . . . . . . . . . . . . . . . . . . . . . . . . . . . . . 24
Index . . . . . . . . . . . . . . . . . . . . . . . . . . . . . . . . . . . . . . . . . . . . . . . . . . . . . . . 27
6
Guide to Parts and Controls
A Remote sensor B Indicator
Lights up when the player is turned on.
A DC IN 12V (AC adapter input)
jack
B COMPONENT VIDEO OUT
(
Y, PB,PR) jacks
C LINE OUT (R-AUDIO-L/VIDEO)
jacks
D HDMI OUT jack
E DIGITAL OUT (OPTICAL) jack
F LAN (100) terminal
A (USB) jack
Front panel
Rear panel
Right panel
7
The available functions of the remote differ
depending on the situation.
z
The N button has a tactile dot. Use the tactile dot
as a reference when operating the player.
A [/1 (on/standby)
Turns on the player, or sets to standby
mode.
B Colour buttons (RED/GREEN/
YELLOW/BLUE)
Shortcut keys for interactive functions.
C DISPLAY (page 13)
Displays the playback and web browsing
information on the screen.
SEN
Accesses the SEN (Sony Entertainment
Network) online service.
OPTIONS (page 15)
The options menu that can be selected
appears on the screen.
HOME
Enters the player’s home menu.
Displays the wallpaper when pressed on
the category icon of the home menu.
RETURN
Returns to the previous display.
</M/m/,
Moves the highlight to select a displayed
item.
Centre button (ENTER)
Enters the selected item.
D ./> (previous/next)
Skips to the previous/next chapter, track,
or file.
N (play)
Starts or re-starts playback.
m/M (fast/slow/freeze frame)
Fast reverses/fast forwards when
pressed during playback. Each time
you press the button during playback of
videos, the search speed changes.
Plays in slow motion, when pressed for
more than one second in pause mode.
Plays one frame at a time, when pressed
briefly in pause mode.
x (stop)
Stops playback and remembers the stop
point (resume point).
The resume point for a title/track is the
last point you played or the last photo for
a photo folder.
X (pause)
Pauses or re-starts playback.
Remote
,continued
8
The home menu appears when you press
HOME. Select a category using </,.
Select an item using M/m, and press ENTER.
(Setup): Adjusts the player settings.
(Photo): Displays photos.
(Music): Plays music.
(Video): Plays videos.
(Network): Displays network items.
Home menu display
Item Category
9
Hookups and Settings
Step 1: Connecting the Player
Do not connect the mains lead until you have made all the connections.
For supplied accessories, see “Supplied accessories” (page 24).
Select one of the following connection methods according to the input jacks on your TV.
Match the colour of the plug to that of the jack when connecting.
z
To enjoy 3D content, connect the player to your 3D-compatible TV using a high-speed HDMI cable.
Connecting to your TV
High quality
Standard
quality
HDMI cable (not supplied)
Audio/video cable (not supplied)
Component video cable
(not supplied)
Audio/video cable (not supplied)
,continued
10
b
Do not connect the player through a VCR. Video signals fed through VCRs may be affected by copyright
protection systems and the picture will be distorted on the television.
Select one of the following connection methods according to the input jacks on your AV
amplifier (receiver). When you select A or B, make the appropriate settings in the “Audio
Settings” setup (page 19).
Connecting to your AV amplifier (receiver)
HDMI cable
(not supplied)
HDMI cable (not supplied)
t Set “Dolby Digital
*1
” (page 19) and “DTS
*2
” (page 19).
Optical digital cable (not supplied)
Audio/video cable (not supplied)
*1 *2
11
Hookups and Settings
Connecting to the
Network
Use a LAN cable to connect to the LAN (100)
terminal on the player.
z
Using a shielded interface cable (LAN cable) is
recommended.
Use the wireless LAN that is built into the
player.
z
Use a wireless LAN router supporting 802.11b/g or
802.11b/g/n.
Before setting the network settings
When your wireless LAN router (access
point) is Wi-Fi Protected Setup (WPS)-
compatible, you can easily set the network
settings with the WPS button.
If not, check the following information in
advance, and record it in the space provided
below.
The network name (SSID
*1
) that identifies
your network
*2
.
______________________
If security is set on your wireless network,
the security key (WEP key, WPA key)
*2
.
______________________
*1
SSID (Service Set Identifier) is a name that
identifies a particular wireless network.
*2
You need to check the setting of your wireless
LAN router to get the information about SSID
and security key. For details:
– visit the following website:
http://support.sony-europe.com/
– refer to the instruction manual supplied with
the wireless LAN router
– consult the manufacturer of the wireless LAN
router
Wired Setup
Wireless Setup
ADSL modem/
Cable modem
Broadband
router
LAN cable
(not supplied)
Internet
Wireless LAN
router
ADSL modem/
Cable modem
LAN cable (not supplied)
Internet
12
Step 2: Easy Setup
1 Remove the insulation film from the
remote.
2 Connect the supplied AC adapter and
mains lead in the numeric order
shown below.
When removing them, do so in reverse
order.
After connecting, wait for about 30
seconds until the player enters standby.
3 Press [/1 on the remote to turn on the
player.
4 Turn on the TV, then switch the input
selector on your TV so that the signal
from the player appears on your TV
screen.
5 Perform “Easy Setup.
Follow the on-screen instructions to
make the basic settings using </M/m/
, and ENTER on the remote.
When turned on for the first time
Wait for a short while before the player
turns on and starts “Easy Setup.”
to DC IN 12V
AC adapter (supplied)
Mains lead (supplied)
to mains
ENTER
</M/m/,
13
Playback
Playback
Playing via a Network
Serves as a gateway delivering the selected
Internet content and a variety of on-demand
entertainment straight to your player.
z
Some Internet content requires registration via a
PC before it can be played.
Some Internet content may not be available in
some regions/countries.
1 Prepare for Sony Entertainment
Network.
Connect the player to a network
(page 11).
2 Select (Video), (Music), or
(Photo) on the home menu using
</,.
3 Select an Internet content provider
icon using M/m, and press ENTER.
When an Internet content list has not
been acquired, an unacquired icon or a
new icon is displayed.
To use the control panel
The control panel appears when the video file
starts playing. The displayed items may differ
depending on Internet content providers.
To display again, press DISPLAY.
A Control display
Press </M/m/, or ENTER for
playback operations.
B Playing status bar
Status bar, Cursor indicating the
current position, Playing time,
Duration of the video file
C Network condition
indicates the signal strength for
wireless connection.
indicates the wired connection.
D Network transmission speed
E The next video file name
F The currently selected video file name
The player (DLNA Player) can play video/
music/photo files stored on another DLNA-
compatible product (DLNA Server) via a
network.
1 Prepare for using DLNA.
Connect the player to a network
(page 11).
Prepare the other necessary DLNA-
compatible products. Refer to the
instruction manual supplied with the
product.
2 Select the DLNA Server icon from
(Video), (Music), or
(Photo) on the home menu.
3 Select the file you want to play using
M/m, and press ENTER.
Enjoying Sony Entertainment
Network (SEN)
Playing files on a Home
Network (DLNA)
Server
Player
,continued
14
To control the player using another
product (Renderer)
When you play files from a DLNA Server on
the player, you can use a DLNA Controller-
compatible product (a phone, etc.) to control
playback.
z
Refer to the instruction manual supplied with the
DLNA Controller.
You can play music files on the player
(PARTY host) in other rooms simultaneously
through Sony products (PARTY guest)
which are compatible with DLNA and the
PARTY STREAMING function, or vice
versa.
1 Prepare for PARTY STREAMING.
Connect the player to a network
(page 11).
Connect the products which are
compatible with the PARTY
STREAMING function to a network.
2 Select a track in (Music) on the
home menu.
3 Select “Start Party” from the options
menu.
To join in a PARTY (for the PARTY guest
only)
Select (Party) in (Music), then select
the PARTY host device icon.
To close the PARTY
Press HOME.
z
The sale and lineup of products that are compatible
with the PARTY STREAMING function differ
depending on the area.
Playing from a USB
Device
You can play video/music/photo files on the
connected USB device.
For playable USB devices, see “Playable
types of files” (page 25).
1 Connect the USB device to the USB
jack on the right of the player.
Refer to the instruction manual supplied
with the USB device before connecting.
2 Select (Video), (Music), or
(Photo) on the home menu using
</,.
3 Select (USB device) using M/m,
and press ENTER.
Playing the same music in
different rooms (PARTY
STREAMING)
Server
Controller
Renderer
PARTY host
PARTY guest
PARTY guest
USB device
15
Playback
Available Options
Various settings and playback operations are
available by pressing OPTIONS. The
available items differ depending on the
situation.
Common options
(Video) only
(Music) only
(Photo) only
Item Details
Repeat
Setting
Sets the repeat mode.
Favourites List Displays the Favourites List.
Play/Stop Starts or stops the playback.
Play from start Plays the item from the
beginning.
Add to
Favourites
Adds Internet content to the
Favourites List.
Remove from
Favourites
Removes Internet content
from the Favourites List.
Item Details
3D Output
Setting
Sets whether or not to output
3D video automatically.
A/V SYNC Adjusts the gap between
picture and sound, by
delaying the sound output in
relation to the picture output
(0 to 120 milliseconds).
Video Settings Picture Quality Mode:
Selects the picture settings
for different lighting
environments.
FNR: Reduces the random
noise appearing in the
picture.
BNR: Reduces the mosaic-
like block noise in the
picture.
MNR: Reduces minor
noise around the picture
outlines (mosquito noise).
Pause Pauses the playback.
Chapter
Search
Searches for a chapter and
starts playback from the
beginning.
IP Content
Noise
Reduction
Adjusts the picture quality of
Internet content.
Item Details
Add
Slideshow
BGM
Registers music files in the
USB memory as slideshow
background music (BGM).
Start Party Starts a PARTY with the
selected source.
This item may not appear
depending on the source.
Leave Party Leaves from a PARTY
which the player is
participating in. The
PARTY STREAMING
function continues among
other participating products.
Close Party Closes a PARTY which the
player is participating in.
The PARTY STREAMING
function ends for all other
participating products.
Item Details
Slideshow
Speed
Changes the slideshow
speed.
Slideshow
Effect
Sets the effect for
slideshows.
Slideshow
BGM
Off: Turns off the
function.
My Music from USB: Sets
the music files registered
in “Add Slideshow BGM.
Slideshow Plays a slideshow.
Rotate Left Rotates the photo
counterclockwise by
90 degrees.
Rotate Right Rotates the photo clockwise
by 90 degrees.
16
Internet
Browsing Websites
You can connect to the Internet and enjoy
websites.
1 Prepare for Internet Browser.
Connect the player to a network
(page 11).
2 Select (Network) on the home
menu using </,.
3 Select (Internet Browser) using M/
m, and press ENTER.
z
Some websites use functions which this browser
does not support. Some websites may not be
displayed correctly, or may not function.
To enter a URL
Select “URL entry” from the options menu.
Enter the URL using the software keyboard,
then select “Enter.”
To set the default start page
While displaying the page you want to set,
select “Set as start page” from the options
menu.
To return to the previous page
Select “Previous page” from the options
menu.
When the previous page does not appear even
if you select “Previous page,” select
“Window List” from the options menu and
select the page you want to return to from the
list.
To quit the Internet browser
Press HOME.
You can check the website information by
pressing DISPLAY.
The display information differs depending on
the website and page status.
A Page title
B Cursor
To view a linked site, press </M/m/,
to move the cursor, and press ENTER.
C Page address
D SSL icon
Appears when the website is secured.
E Signal strength indicator (wireless
network connection only)
F Progress bar/Loading icon
Appears when the page is being read, or
during file download/transfer.
G Text input field
Press ENTER and select “Input” from
the options menu to display the software
keyboard.
H Scroll bar
Press </M/m/, to move the page
display.
Internet browser display
17
Internet
Various settings and operations are available
by pressing OPTIONS.
The available items differ depending on the
situation.
Available options
Item Details
Browser
Setup
Zoom: Increases or
decreases the size of the
displayed content.
JavaScript Setup: Enables
or disables JavaScript.
Cookie Setup: Sets
whether or not to accept
cookies.
SSL Alarm Display:
Enables or disables SSL.
Input Displays the software
keyboard to enter characters
while browsing a website.
Break Moves the cursor to the next
line in the text input field.
Delete Erases one character on the
left side of the cursor during
text input.
Window List Displays a list of currently
opened windows of website.
Allows you to return to a
previously displayed
website by selecting the
window.
Bookmark List Displays the bookmark list.
Character
encoding
Sets the character code.
Previous
page/Next
page
Moves to the previous/next
page.
Cancel
loading
Stops loading a page.
Reload Reloads the same page.
URL entry Allows you to enter a URL
when the software keyboard
is displayed.
Add to
Bookmark
Adds the currently displayed
website to the bookmark list.
Set as start
page
Sets the currently displayed
website as the default start
page.
Open in new
window
Opens a link in a new
window.
Display
certificate
View server certificates sent
from pages that support
SSL.
Item Details
18
Settings and Adjustments
Using the Settings
Displays
Select (Setup) on the home menu when
you need to change the settings of the player.
The default settings are underlined.
1 Select (Setup) on the home menu
using </,.
2 Select the setup category icon using
M/m, and press ENTER.
Network Update
Select “OK” to update the player’s software
via the network.
z
We recommend the network update every 2
months or so.
For information about update functions, visit the
following website:
For customers in European countries
http://support.sony-europe.com/
For customers in Australia
http://www.sony-asia.com/support/
Screen Settings
3D Output Setting
Auto: Normally select this.
Off: Select this to display all content in 2D.
TV Type
16:9: Select this when connecting to a wide-
screen TV or a TV with a wide mode
function.
4:3: Select this when connecting to a 4:3
screen TV without a wide mode function.
Screen Format
Original: Select this when connecting to a TV
with a wide mode function. Displays a
4:3 screen picture in 16:9 aspect ratio
even on a wide-screen TV.
Fixed Aspect Ratio: Changes the picture size
to fit the screen size with the original
picture aspect ratio.
Cinema Conversion Mode
Auto: Normally select this. The player
automatically detects whether the
material is video-based or film-based,
and switches to the appropriate
conversion method.
Video: The conversion method suited for
video-based material will always be
selected regardless of the material.
Icon Explanation
Network Update (page 18)
Updates the software of the
player.
Screen Settings (page 18)
Makes the video settings
according to the type of
connecting jacks.
Audio Settings (page 19)
Makes the audio settings
according to the type of
connecting jacks.
Parental Control Settings
(page 20)
Makes detailed settings for the
Parental Control function.
System Settings (page 20)
Makes the player-related
settings.
Network Settings (page 21)
Makes detailed settings for the
Internet and network.
Easy Setup (page 21)
Re-runs the Easy Setup to make
the basic settings.
Resetting (page 21)
Resets the player to the factory
settings.
19
Settings and Adjustments
Output Video Format
HDMI: Normally select “Auto.”
Component Video: Select the resolution that
suits your TV.
Video: Automatically sets the lowest
resolution.
z
When connecting the HDMI OUT jack and other
video output jacks at the same time, select
“Component Video.”
If no picture appears when setting “HDMI” or
“Component Video” resolution, try another
resolution setting.
YCbCr/RGB (HDMI)
Auto: Automatically detects the connected
TV type, and switches to the matching
colour setting.
YCbCr (4:2:2): Outputs YCbCr 4:2:2 video
signals.
YCbCr (4:4:4): Outputs YCbCr 4:4:4 video
signals.
RGB: Outputs RGB video signals.
HDMI Deep Colour Output
Auto: Normally select this.
16bit/12bit/10bit: Outputs 16bit/12bit/10bit
video signals when the connected TV is
compatible with Deep Colour.
Off: Select this when the picture is unstable
or colours appear unnatural.
Pause Mode
Auto: Normally select this. Dynamic moving
pictures appear without blurring.
Frame: Displays static pictures at high
resolution.
Audio Settings
Audio (HDMI)
Auto: Normally select this. Outputs audio
signals according to the status of the
connected HDMI device.
PCM: Outputs PCM signals from the HDMI
OUT jack.
Dolby Digital
Downmix PCM: Converts to output Linear
PCM signals. Select this when
connecting an audio device without a
built-in Dolby Digital decoder.
Dolby Digital
: Select this when connecting
an audio device with a built-in Dolby
Digital decoder.
DTS
Downmix PCM: Converts to output Linear
PCM signals. Select this when
connecting to an audio device without a
built-in DTS decoder.
DTS
: Select this when connecting to an audio
device with a built-in DTS decoder.
Audio DRC
Auto: Performs playback at the dynamic
range specified by the current file.
On: Performs playback at a standard
compression level.
Off: No compression works. A more dynamic
sound is produced.
Downmix
Surround: Outputs audio signals with
surround effects. Select this when
connecting an audio device that supports
Dolby Surround (Pro Logic) or DTS
Neo:6.
Stereo
: Outputs audio signals without
surround effects. Select this when
connecting an audio device that does not
support Dolby Surround (Pro Logic) or
DTS Neo:6.
20
Parental Control
Settings
Password
Sets or changes the password for the Parental
Control function. A password allows you to
set a restriction on Internet video playback.
Parental Control Area Code
Playback of some Internet videos can be
limited according to the geographic area.
Scenes may be blocked or replaced with
different scenes. Follow the on-screen
instructions and enter your four-digit
password.
Internet Video Parental Control
Playback of some Internet videos can be
limited according to the age of the users.
Scenes may be blocked or replaced with
different scenes. Follow the on-screen
instructions and enter your four-digit
password.
Internet Video Unrated
Allow: Allows the playback of unrated
Internet videos.
Block: Blocks the playback of unrated
Internet videos.
System Settings
OSD
Selects your language for the player on-
screen displays.
Control for HDMI
On: The following BRAVIA Sync features
are available:
–One-Touch Play
System Power-Off
Language Follow
Off: Turns off the function.
z
For details, refer to the instruction manual supplied
with the TV or components.
HDMI:Linked to TV-off
On: Automatically turns off the player and
HDMI-compatible components when the
connected TV enters standby mode
(BRAVIA Sync).
Off: Turns off the function.
Quick Start Mode
On: Shortens the startup time when turning
on the player.
Off
: Reduces standby power consumption.
Auto Standby
On: Automatically returns to standby mode if no
button is pressed for more than 30 minutes.
Off: Turns off the function.
Auto Display
On: Automatically displays information on
the screen when changing the viewing
titles, picture modes, audio signals, etc.
Off: Displays information only when you
press DISPLAY.
Screen Saver
On: Turns on the screen saver function. The
screen saver image appears when you do
not use the player for more than 10
minutes while an on-screen display is
displayed.
Off: Turns off the function.
Software Update Notification
On: Sets the player to inform you of newer
software version information (page 18).
Off: Turns off the function.
System Information
Displays the player’s software version
information and the MAC address.
  • Page 1 1
  • Page 2 2
  • Page 3 3
  • Page 4 4
  • Page 5 5
  • Page 6 6
  • Page 7 7
  • Page 8 8
  • Page 9 9
  • Page 10 10
  • Page 11 11
  • Page 12 12
  • Page 13 13
  • Page 14 14
  • Page 15 15
  • Page 16 16
  • Page 17 17
  • Page 18 18
  • Page 19 19
  • Page 20 20
  • Page 21 21
  • Page 22 22
  • Page 23 23
  • Page 24 24
  • Page 25 25
  • Page 26 26
  • Page 27 27
  • Page 28 28

Sony SMP-N200 Owner's manual

Category
Digital media players
Type
Owner's manual

Ask a question and I''ll find the answer in the document

Finding information in a document is now easier with AI