Page is loading ...

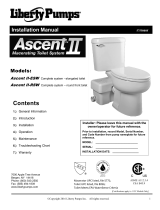
TWO PIECE TOILET
INODORO DOS PIEZAS
FELICITACIONES, USTED HA ADQUIRIDO UN PRODUCTO DE ALTA CALIDAD,
POR ESO RECOMENDAMOS A USTED LEER LAS SIGUIENTES INDICACIONES.
CONGRATULATIONS, YOU HAVE PURCHASED A HIGH-QUALITY PRODUCT.
THEREFORE, WE RECOMMEND THAT YOU READ THE FOLLOWING INSTRUCTIONS.
ASME A112.19.2-2013 / CSA B45.1-13
BENEFITS
• Modern two-piece toilet design
• Permanent shine, stain resistant
(vitreous china)
• Efficient flush by siphon action to floor
• Exceeds local and international quality standards
BENEFICIOS
• Moderno diseño de dos piezas
• Brillo inalterable y resistencia a las manchas (cerámica sanitaria
vitrificada)
• Eficiente descarga de acción sifónica al piso
• Excede normas nacionales e internacionales de calidad
GARANTÍA
La GARANTÍA brinda a nuestros clientes la seguridad de que fabricamos todos los
productos con un alto estándar de calidad, otorgándoles la confianza de un
eficiente y adecuado funcionamiento de los mismos, contamos con la tecnología
necesaria y cumplimos con estrictas normas de calidad nacionales e
internacionales en la industria de fabricación y comercialización de cerámica
sanitaria, grifería, broncería, bañeras, hidromasajes y repuestos.
GARANTÍA DE LOS PRODUCTOS
Garantiza que sus productos están libres de defectos de fabricación, a partir de la
fecha de compra del producto, conforme a los períodos adjuntos:
• Cerámica Sanitaria: De por vida en funcionamiento y acabado de la
cerámica sanitaria.
• Herraje y Asiento plástico: Dos (2) años.
•
Complementos: Dos (2) años. Aquellos que para el caso de ciertas griferías
vienen en el mismo embalaje y/o que se emplean para su instalación, es decir:
• Sifones plásticos y metálicos
• Desagües plásticos y metálicos
• Llaves angulares y mangueras flexibles
• Aireadores, Empaques
• Cartuchos cerámicos y de compresión
• Repuestos de cerámica sanitaria: componentes de cerámica sanitaria que
conforman un inodoro o un lavamanos, adquiridos por partes, tienen garantía
de por vida.
RECOMENDACIONES DE INSTALACIÓN
• La presión mínima de agua debe ser 20 psi (140 KPa) y máxima 80 psi (550
KPa) para un eficiente funcionamiento de los productos. Se recomienda no
exceder los 80 psi (550 KPa).
• Limpiar las tuberías previa la instalación de los productos. No deben existir
restos de viruta metálica, piedras, arena, material sellante o cualquier otro
material que pudiera obstruir la salida o paso de agua.
• La instalación de los productos debe realizarse según el Instructivo que viene
adjunto con el producto y de su correcta aplicación depende el buen
funcionamiento del producto.
INSTRUCCIONES DE MANTENIMIENTO
El seguimiento de estas instrucciones prolongará la vida útil de sus productos:
• Usar repuestos originales.
• Evitar el uso de cloraminas, productos con cloro o azufre; polvos de limpieza;
detergentes o limpiadores ácidos, abrasivos, de fibra o similares.
• Limpiar la grifería diariamente con un paño húmedo solamente. Para
manchas fuertes utilice jabones líquidos y/o shampoo.
La obligación bajo la GARANTÍA estipulada, será la de reemplazar o reparar los
productos que resulten con defectos de fabricación. Esta garantía se otorgará
como única y específica, en lugar de toda otra existente, y será exclusivamente
para el comprador de un producto con Garantía, comercializado por sus
Distribuidores Autorizados. La GARANTÍA no cubre los gastos de instalación o
mano de obra en los que se incurra por reemplazo y/o instalación de productos
defectuosos.
VALIDEZ DE LA GARANTÍA
La GARANTÍA aplica cuando:
• La solicitud de garantía está dentro del tiempo estipulado en la misma.
• En el mantenimiento del producto se utilizan repuestos originales.
• El defecto del producto no se debe al desgaste natural de los componentes ni
de la apariencia derivada del uso normal.
• Los daños en el producto no han sido ocasionados por una mala instalación
como son: Torques (ajustes) excesivos de los elementos de instalación o
mangueras estranguladas, mal mantenimiento, mal uso, abuso o descuido en
su operación.
• Los productos presenten fallas o daños que no sean resultado de un
accidente: explosiones, golpes, incendios o de fuerza mayor.
• Las fallas en el producto no se deben al uso de aguas que contengan altas
concentraciones de cloro o de productos relacionados.
• El producto no haya sido afectado por situaciones externas tales como:
problemas hidráulicos, baja presión, alta presión, aire en las líneas de
conducción.
Para hacer efectiva la garantía USTED debe presentar el producto y la factura en
el punto de compra, o enviarlo junto con la factura en el empaque original o uno
similar que ofrezca igual grado de protección, a cualquier oficina dirigido a
Servicio al Cliente, en caso que no haya sido instalado.
Si ha sido instalado USTED debe llamar a Servicio al Cliente, quienes le atenderán
en el lugar indicado con la presentación de la factura original.
GUARANTEE offers our clients the security that we manufacture all products with
high quality standards and the confidence of an efficient and adequate product
operation. We uses the most up-to-date technology and fulfils strict local and
international quality regulations for the production and commercialization of
sanitary ceramic, bathroom fixtures, faucets, brass valves, bathtubs, shower boxes
and spare parts.
RODUCTS GUARANTEE
We guarantees that its products are free of manufacturing defects from the date
of purchase, within the following periods:
•
Sanitary ceramic: lifetime guarantee in operation and sanitary ceramic
finish.
• Fittings and plastic seats: Two (2) years.
•
Complementary products: Two (2) years. Products that come in the same
packing as certain faucets and/or that are used for faucet installation, such as:
• Metallic and plastic p-traps
• Metallic and plastic drains
• Angle valves and flexible hoses
• Aerators, Washers
• Ceramic and compression cartridges
• Spare Parts for Sanitary Ceramic: components of the sanitary ceramic part
of a toilet or a wash basin, acquired separately, have a lifetime guarantee.
INSTALLATION RECOMMENDATIONS
• For an efficient operation of the products, minimum water pressure should be
20 psi (140 KPa). It is recommended not to exceed 80 psi (550 KPa).
• Cleaning water conducting pipes before installing our products. Remnants of
metallic shaving, stones, sand, sealing material or any other material that could
block water flow should not remain in the pipes.
• Installation of products should be carried out according to the instructions
enclosed with the product and efficient product operation depends on the
correct application of the instructions.
MAINTENANCE INSTRUCTIONS
Following these instructions will extend the useful lifespan of the products:
• Use of original spare parts sold by authorized dealers.
• Avoid the use of chlorine products, cleaning powders, detergents, acidic
and/or abrasive and/or fiber or similar cleaning products.
• Clean the bathroom fixtures daily just with a wet cloth. Use liquid soaps
and/or shampoos for strong spots.
Our responsibility under the stipulated GUARANTEE will be to replace or to repair
the products that result with manufacturing defects. This guarantee will be
offered as unique and specific, instead of all other existing and it will be exclusively
for the buyer of a product with Guarantee, sold by Authorized Dealers. Our
GUARANTEE does not cover the expenses of installation or labour incurred for the
replacement and/or installation of defective products.
GUARANTEE VALIDITY
GUARANTEE applies when:
• The request of guarantee is within the time span stipulated in this document.
• Products maintenance was performed using original spare parts.
• Product defect is not caused by natural wear of the components or the
appearance due to product normal use.
• Damages in the product have not been caused by a wrong installation such
as: Excessive torques (adjustments) of installation elements or squashed hoses,
wrong maintenance, incorrect or careless use or abuse during their operation.
• Products present failures or damages that were not caused by an accident.
For example: explosions, collisions, bumps, fire or any other similar
circumstances.
• Defects in the product were not caused by the use of water with high
chlorine or related products concentration.
• Product has not been affected by external situations such as: hydraulic
problems, low pressure, over pressure, or air inside water conduction piping.
To claim the guarantee YOU should present the product and the purchase bill at
the purchase point, or send the product along with the bill in the original
package or a similar package that offers the same protection to the product, to
any customer service offices.
If the product has been installed, YOU should call to Customer Service in order to
be attended in situ this process also requires you to present the purchase bill.

INSTALLATION INSTRUCTIONS
INSTRUCCIONES DE INSTALACIÓN
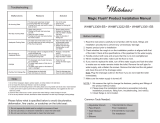
TECHNICAL INFORMATION / INFORMACIÓN TÉCNICA
TOOLS NEEDED / HERRAMIENTAS NECESARIAS
• Drill / Taladro
• Flexible Hose / Manguera Flexible
• Adjustable key / Llave ajustable
• Screwdriver / Destornillador
Distance between wall and the hole /
Distancia entre la pared y el agujero del desague
BEFORE INSTALLATION, YOU SHOULD:
1. The wall and floor fully complete with the
construction and leave space for the pipe and
water supply.
2.
The middle of the pipe to the wall suits the
country request. (Such as: Some area request
S-trap 250mm and some request S-trap 300mm,
depends on different place. Please check first).
3. Turn off water supply before removing the
existing old toilet and cleaning the floor. If the
toilet is installed at a new location, please Turn
off water supply and clean the floor.
Note: a)
If the new toilet is not installed immediately,
the bowl water drainage pipe opening
should be pluged in order to prevent
dropping of cement or other foreign
matters into the pipe to block the pipings.
b) The floor surface should be leveled and
completed so as to have a complete
water flushing.
NOTICE
1. Don’t install toilet by cement. The toilet will be
cracked if installing by cement.
2. The connection of water inlet pipe, angle valve,
and tank must be strong. Water leakage will be
happened probably without strong installation.
3. ¡CAUTION! Do not over tighten the plastic
nuts. Do not use pipe joint compound or oil
base caulks.
ANTES DE LA INSTALACIÓN DEL SANITARIO USTED DEBE:
1.
La pared y el piso deben estar completamente
terminados, deje un espacio suficiente para la
tubería de desagüe y el abastecimiento de agua.
2. La distancia de la pared terminada al centro de
la tube
ría de desagüe debe ser de 300 mm (en
algunas áreas se requiere que sea de 250 mm)
revise primero.
3. Cierre la llave de entrada de agua antes de
remover el sanitario viejo, limpie el piso. Si va a
colocar el sanitario en una construcción nueva
asegúrese de que el piso esté limpio.
Nota: a) Si el sanitario no va a ser instalado
inmediatamente, tape la tubería de
desagüe.
b) La superficie debe estar completamente
nivelada con la finalidad de obtener una
buena descarga.
AVISO
1. No instale el sanitario con cemento, este puede
fisurarse.
2. La conexion de la manguera flexible de la llave
angular y la valvula de entrada de agua debe
ser lo suficientemente fuerte como para que no
haya fugas.
3. ¡CUIDADO! No sobreapriete las tuercas
plásticas. No use pasta gasfiter ni compuestos
para unión de cañerías.
Make sure the
floor drain pipe
hole center,
remark cross on
the floor to be
sure that aligning
the toilet outlet
hole to floor
drain pipe.
Asegúrese de que la tubería de drenaje esté
centrada, marque una cruz en el piso para alinear la
salida del sanitario con la tubería de desagüe.
Mark location of
holes. Drill holes.
Marque la
ubicación de los
orificios. Perfore
los orificios.
Put the toilet on a
soft mat (prevent
the surface of the
toilet scratching).
Take the new
wax ring to be
sure that it fits
over the floor
flange and fix it.
Also check the
sewer whether is
clear to pass the water.
Coloque el sanitario sobre un material suave (para
prevenir daños en la superficie del sanitario), ponga
el sello de cera en el desagüe del sanitario, también
revise que la tubería de desagüe esté limpia y pase
libremente el agua.
Carefully align
the toilet to the
hole on floor,
adjust toilet until
balance. Fix toilet
by installing
expansion bolts
through toilet
screw holes.
Mildew proof
silicon need to
use on the connect place between toilet and floor.
Cuidadosamente alinee el sanitario sobre el hueco de
desagüe del piso y ajuste el sanitario hasta que quede
nivelado, fíjelo con los pernos de anclaje al piso.
Necesita usar silicona antihongos entre el piso y el
sanitario para fijarlo al piso.
Install the gasket,
then place tank
over bowl and fix
it with washers
and nuts.
Remove the push
button screw
(included). Insert
the push button
through the hole
in the tank and fix it with the screw.
Instale el empaque de caucho (gasket), fije el tanque
sobre la taza y asegure con los tornillos y arandelas.
Luego retire la tuerca del pulsador (incluido). Inserte
el pulsador a través de la perforación del estanque,
ajuste la tuerca del pulsador.
Connect the sink
water inlet piping
to the inlet angle
valve.
NOTE: Water
boost pump
should be installed
if the water
pressure is not
high enough.
Switch on the inlet
water value slowly and check whether the toilet is leaking.
Conecte el abastecimiento de agua a través de la
manguera flexible de la llave angular.
NOTA: No habrá entrada de agua si la presión de
abastecimiento no es suficiente (20 a 80 psi). Abra
lentamente la entrada de agua y verifique que el
sanitario no tenga fugas.
PIPE /
DESAGÜE
WALL /
PARED
FLEXIBLE HOSE
MANGUERA FLEXIBLE
1 2
3 4
5 6
WAX SEAL
SELLO DE CERA
SOFT MAT /
MATERIAL SUAVE
GASKET
305 mm (12")
/