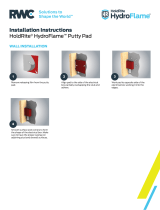
Installing the Material (cont.)
5. For 16" on center (o.c.)
framing, hammer the nail
and washer through
SoundSafe every 24" o.c.
along the top plate length
of each stud. For 24" o.c.
framing, hammer another nail into the top
and bottom plate between
each stud.
6. Do not cover electrical
outlet boxes. Expose the
outlet boxes as you install
each length of material.
Find the electrical box in
the wall and gently press
the material against the box. Using a
razor blade knife carefully cut the opening
along the edges of the box. Keep this
hole as tight as possible to the electrical
box, so you get a good seal. Note about
Putty Pads: For superior sound isolation
results, use outlet Putty Pads over electrical
boxes before installing material.
7. Continue with steps 1-6
until your entire ceiling or
wall is covered. Where
seams fall on a stud,
butt panels against one
another and affix with
foil or vinyl tape. Where seams fall
between studs, overlap the material by 2".
Note: See "Handling Seams" sections for
more detailed instructions.
8. Put your drywall over SoundSafe, vertically
or horizontally. Caulk all seams around the
perimeter with acoustical sealant. Quality
sealing is required for good sound
deadening results.
9. Mud drywall seams and finish wall as
needed.
Handling Seams when Applying
the Material
Handling Seams on the Stud
Having a seam on a stud makes it easy to
apply vinyl or foil tape. To install on a seam,
butt two panels of material. Do not allow
any overlap, Fasten each separately to the
framing. Finally, cover each seam with about
a 2" strip of foil or vinyl tape.
THIS WARRANTY IS SUBJECT TO THE TERMS, LIMITATIONS AND CONDITIONS
DESCRIBED BELOW. THERE ARE NO WARRANTIES WHICH EXTEND BEYOND
THE FACE HEREOF. NO REPRESENTATIVE OF ENGINEERED POLYMER
TECHNOLOGIES HAS AUTHORITY TO MAKE ANY REPRESENTATIONS OR
PROMISES EXCEPT AS STATED HEREIN. THIS WARRANTY PERTAINS TO THE
ENGINEERED POLYMER TECHNOLOGIES MATERIALS ONLY.
WARRANTY: Because of the many installation variables beyond our control, we
shall not be liable for incidental and consequential damages, either in contract
or tort including negligence, directly or indirectly sustained, nor for any
loss
caused by application of these goods not in accordance with current
printed instructions or for other than the intended use. Engineered Polymer
Technologies liability is expressly limited to replacement of defective goods not
to exceed the original value of the Engineered Polymer Technologies materials.
Any claims shall be deemed waived unless made in writing to us within thirty (30)
days from the date it was or reasonably should have been discovered.
BUILDING CODE: Engineering Polymer Technologies presents these construction
concepts with the understanding that local Building Codes vary. It is the responsi-
bility of the installer to ensure that these concepts and recommended installation
methods meet local Building Code. Engineering Polymer Technologies is not
liable for mis-installation or non-compliance with local code. This warranty
supersedes and is in lieu of any and all other expressed warranties that are in
conflict with the terms and conditions stated herein.
MLV Acoustic Barrier
Installation Manual
2” Vinyl Tape
Cut away top layer
of MLV. Tape seam
with Vinyl Tape.
Add Extra Vinyl
or Foil Tape
over seams.
Handling Seams between the Studs
When the length of the material does not fit your
entire framing, seams can occur between studs.
Overlap approximately 2" of material over the
next panel. Cut away the layer overlapping top
and bottom plates of the framing. Seal seam with
2' wide vinyl tape strip.
Note about overlapping SoundSafe: Be sure to
avoid putting two layers of overlapping material
on the framing. This will avoid any issues with
installing drywall flush to the wall.
Note about Steel Stud Installation: Use 3/4"
wafer head with self-tapping screws and
washers or equivalent.
Made in the USA by Engineered Polymer Technologies
1227 Central Avenue, Hillside, NJ 07205
www.epttech.com
Step 5
Step 6
Step 8
Step 7
®
C
M
Y
CM
MY
CY
CMY
K
EPT SoundSafe Manual MAY2018 FINAL.pdf 1 5/23/18 7:08 PM