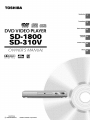
Toshiba SD-1800 Owner's manual
- Category
- DVD players
- Type
- Owner's manual
This manual is also suitable for

TOSHIBA
Introduction
OICITAL AU 010
DVD VIDEO PLAYER
SD.1800
SD.310V
Connections
Basic playback
Advanced
playback
Function setup
0 VVNER'S MA N UAL
Others
oo_ _ !_
DIGITAL
79077228
_) PM0004506010 @2002 Toshiba Corporation

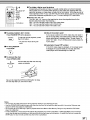
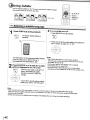
SAFETY PRECAUTIONS
The lightning flash with arrowhead symbol, within an equilat-
eral triangle, is intended to alert the user to the presence of
uninsulated "dangerous voltage" within the product's enclo-
sure that may be of sufficient magnitude to constitute a risk
of electric shock to persons,
The exclamation point within an equilateral triangle is in-
tended to alert the user to the presence of important operat-
ing and maintenance (servicing) instructions in the literature
accompanying the appliance,
r_ The symbol for CLASS tl (Double Insulation)
WARNING:
TO REDUCE THE RISK OF FIRE OR ELECTRIC SHOCK, DO NOT EXPOSE THIS APPLIANC E
TO RAIN OR MOISTURE. DANGEROUS HIGH VOLTAGES ARE PRESENT INSIDE THE
ENCLOSURE. DO NOT OPEN THE CABINET. REFER SERVICING TO QUALIFIED PERSONNEL
ONLY.
CAUTION: TO PREVENT ELECTRIC SHOCK, MATCH WIDE BLADE OF PLUG TO WIDE SLOT, FULLY
INSERT.
ATTENTION: POUR EVITER LES CHOCS ELECTRIQUES, INTRODUIRE LA LAME LA PLUS LARGE DE LA
FICHE DANS LA BORNE CORRESPONDANTE DE LA PRISE ET POUSSER JUSQU'AU FOND.
CAUTION:
This Digital Video Disc Player employs a Laser System.
To ensure proper use of this product, please read this owner's manual carefully and retain for
future reference. Should the unit require maintenance, contact an authorized service location -
see service procedure.
Use of controls or adjustments or performance of procedures other than those specified herein
may result in hazardous radiation exposure.
To prevent direct exposure to laser beam, do not try to open the enclosure.
Visible and invisible laser radiation when open and interlocks defeated.
DO NOT STAREINTO BEAM.
FCC NOTICE: This equipment has been tested and found to comply with the limits for a Class B digital device,
pursuant to part 15 of the FCC Rule. These limits are designed to provide reasonable protection
against harmful interference in a residential installation.
This equipment generates, uses, and can radiate radio frequency energy and, if not installed
and used in accordance with the instructions, may cause harmful interference to radio
communications.
However, there is no guarantee that interference will not occur in a particular installation.
If this equipment does cause harmful interference to radio or television reception, which can be
determined by turning the equipment off and on, the user is encouraged to try to correct the
interference by one or more of the following measures:
- Reorient or relocate the receiving antenna,
- increase the separation between the equipment and receiver,
- Connect the equipment into an outlet on a circuit different from that to which the receiver is
connected.
- Consult the dealer or an experienced radio/TV technician for help,
WARNING: Changes or modifications made to this equipment, not expressly approved by Toshiba, or parties
authorized by Toshiba, could void the user's authority to operate the equipment.
12

The instructions shall state that an ALL-POLE MAINS SWITCH with a contact separation of at least 3 mm in
each pole shall be incorporated in the electrical installation of the building.
CAUTION: These servicing instructions are for use by qualified service personnel only. To reduce the risk of
electric shock do not perform any servicing other than that contained in the operating
instructions unless you are qualified to do so.
In the spaces provided below, record the Model and Serial No. located on the rear panel of your DVD video
player.
Model No. Serial No.
Retain this information for future reference.
=:
a
€
O
Location of the required label
PRODUCT iS CERTIFIED BY THE MANUFACTURER TO
COMPLY WITH DHHS RULE 21 CFR SUBCHAPTER J
APPLICABLE AT THE DATE OF MANUFACTURE.
MANUFACTURED
TO6HIBA CORPORATION
1-1,SHIBAURA 1-CHOME,M[NATO-KU.
TOKYO 105-8001 ,JAPAN
31

IMPORTANT SAFETY INSTRUCTIONS
CAUTION: PLEASE READ AND OBSERVE ALL WARNINGS AND INSTRUCTIONS GWEN tN TH|S
OWNER'S MANUAL AND THOSE MARKED ON THE UNIT. RETAIN THIS BOOKLET FOR
FUTURE REFERENCE.
This set has been designed and manufactured to assure personat safety. Improper use can result in electric
shock or fire hazard. The safeguards incorporated in this unit will protect you if you observe the following
procedures for installation, use and servicing. This unit is fully transistorized and does net contain any parts that
can be repaired by the user.
DO NOT REMOVE THE CABINET COVER, OR YOU MAY BE EXPOSED TO DANGEROUS VOLTAGE,
REFER SERVICING TO QUALIFIED SERVICE PERSONNEL ONLY.
1. Read these instructions.
2. Keep these instructions.
3. Heed aU warnings.
4. Fo_}ow all instructions.
5. Do not use this apparatus near water.
6, Clean only with dry cloth,
14

7. Do not block any ventilation openings. Install in accordance with the manufacturer's instructions.
8. Do not install near any heat sources such as radiators, heat registers, stoves, or other apparatus (including
amplifiers) that produce heat.
O
9. Do not defeat the safety purpose of the polarized or grounding-type plug. A polarized plug has two blades
with one wider than the other. A grounding type plug has two blades and a third grounding prong. The
wide blade or the third prong are provided for your safety. If the provided plug does not fit into your outlet,
consult an electrician for replacement of the obsolete outlet.
10. Protect the power cord from being walked on or pinched particularly at plugs, convenience receptacles,
and the point where they exit from the apparatus.
11. Only use attachments/accessories specified by the manufacturer.
12.Use only with the cart, stand, tripod, bracket, or table specified by the
manufacturer, or sold with the apparatus. When a cart is used, use caution
when moving the cart/apparatus combination to avoid injury from tip-over.
51

IMPORTANT SAFETY INSTRUCTIONS
13. Unplug this apparatus during lightning storms or when unused for long periods of time.
14. Refer all servicing to qualified service personnel. Servicing is required when the apparatus has been
damaged in any way, such as power-supply cord or plug is damaged, liquid has been spilled or objects
have fallen into the apparatus, the apparatus has been exposed to rain or moisture, does not operate
normally, or has been dropped.
ADDITIONAL SAFETY INSTRUCTIONS
15. When you use headphones, keep the volume at a moderate level. If you use the headphones continuously
with high volume sound, it may cause hearing damage.
16. Do not overload wall outlets; extension cords, or integral convenience receptacles as this can result in a
risk of fire or electric shock.
17. Apparatus shall not be exposed to dripping or splashing and no objects filled with liquids, such as vases,
shall be placed on the apparatus.
16

18. Keep your fingers well clear of the disc tray as it is closing, Neglecting to do so may cause serious
personal injury,
19. Do not place a heavy object on or step on the apparatus. The object may fall, causing serious personal
injury and serious damage to the apparatus.
O
20. Do not use a cracked, deformed, or repaired disc. These discs are easily broken and may cause serious
personal injury and apparatus malfunction.

• WhenshippingtheDVDvideoplayer,theoriginal
shippingcartonandpackingmaterialscomeinhandy.
Formaximumprotection,repacktheunitasitwas
originallypackedatthefactory.
• Donotusevolatileliquids,suchasinsectspray,near
theDVDvideoplayer.Donatleaverubberorplastic
productsincontactwiththeDVDvideoplayerfora
longtime.Theywillleavemarksonthefinish.
• ThetopandrearpanelsoftheDVDvideoplayermay
becomewarmafteralongperiodofuse.Thisisnota
malfunction.
• WhentheDVDvideoplayerisnotinuse,besureto
removethediscandturnoffthepower.
• IfyoudonotusetheDVDvideoplayerforalong
period,theunitmaynotfunctionproperlyinthe
future.TurnonandusetheDVDvideoplayer
occasionally.
• PlacetheDVDvideoplayeronalevelsurface.Donot
useitonashakyorunstablesurfacesuchasa
wobblingtableorinclinedstand.Theloadeddiscmay
comeofftheproperpositionandcausedamageto
theDVDvideoplayer.
• WhenyouplacethisDVDvideoplayernearaTV,
radio,orVCR,theplaybackpicturemaybecomepoor
andthesoundmaybedistorted.Inthiscase,place
theDVDvideoplayerawayfromtheTV,radio,or
VCR.
Moisture condensation damages the DVD video
player. Please read the following carefully.
Moisture condensation occurs, for example, when you
pour a cold drink into a glass on a warm day. Drops of
water form on the outside of the glass. Inthe same way,
moisture may condense on the optical pick-up lens
inside this unit, one of the most crucial internal parts of
the DVD video player.
• Moisture condensation occurs during the
following cases.
• When you bring the DVD video player directly from a
cold place to a warm place.
• When you use the DVD video player in a room where
you just turned on the heater, or a place where the
cold wind from the air conditioner directly hits the unit.
• In summer, when you use the DVD video player in a
hot and humid place just after you move the unit from
an air conditioned room.
• When you use the DVD video player in a humid place.
Use a soft, dry cloth for cleaning.
• For stubborn dirt, soak the cloth in a weak detergent
solution, wring well and wipe. Use adry cloth to wipe
it dry.
Do not usa any type of solvent, such as thinner and
benzine, as they may damage the surface of the DVD
video player.
• If you use a chemical saturated clothto clean the unit,
follow that product's instructions.
18
The DVD video player is a hLghtechnology, precision
device. If the optical pick-up lens and disc drive parts
are dirty or worn down, the picture quality becomes
poor. To obtain a clear picture, we recommend regular
inspection and maintenance (cleaning or parts
replacement) every 1,OOOhours of use depending on
the operating environment. For details, contact your
nearest dealer.
• Do not use the DVD video player when moisture
condensation may occur.
Ifyou use the DVD video player in such a situation, it
may damage discs and internal parts. Remove the
disc, connect the power cord of the DVD video player
to the wall outlet, turn on the DVD video player, and
leave it for two or three hours. After two or three
hours, the DVD video player will have warmed up and
evaporated any moisture. Keep the DVD video player
connected to the wall outlet and moisture
condensation will seldom occur.

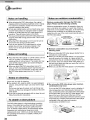
on Discs
• Do not touch the playback side of the disc.
O _ Playback side
• Do not attach paper or tape to discs,
• Fingerprints and dust on the disc cause picture and
sound deterioration. Wipe the disc from the center
outwards with a soft cloth. Always keep the disc
clean.
O
X
• If you cannot wipe off the dust with asoft cloth, wipe
the disc lightly with a slightly moistened soft cloth and
finish with a dry cloth.
• Do not use any type of solvent such as thinner,
benzine, commercially available cleaners or antistatic
spray for vinyl LPs. It may damage the disc.
• Do not store discs in a place subject to direct sunlight
or near heat sources.
• Do not store discs in places subject to moisture and
dust such as a bathroom or near a humidifier.
• Store discs vertically in acase. Stacking or placing
objects on discs outside of their case may cause
warping.
Normally, DVD video discs are divided into titles, and
the titles are sub-divided into chapters. VIDEO CDs and
audio CDs are divided into tracks.
DVD video disc
"C_hapterTitIC:apter2DV'_hvia_tlliiSiT_'pee_2 C_,a#lte__
VIDEO CD/audio CD
• VIDEO CD/audio CD "
Track I Track 2 Track 3 Track 4 Track 5
L
L L
t
Each title, chapter or track is assigned a number, which
is called 'title number", "chapter number" or "track
number" respectively.
There may be discs that do not have these numbers.
It is forbidden by law to copy, broadcast, show,
broadcast on cable, play in public, and rent copyrighted
material without permission.
DVD video discs are copy protected, and any recordings
made from these discs will be distorted.
This product incorporates copyright protection
technology that is protected by method claims of certain
U.S. patents and other intellectualproperty rights owned
by Macrovision Corporation and other rights owners.
Use of this copyright protection technology must be
authorized by Macrovision Corporation, and is intended
for home and other limited viewing uses only unless
otherwise authorized by Macrovision Corporation.
Reverse engineering or disassembly is prohibited.
a
€
O
91

@tes on Discs (continued)
This owner's manual explains the basic instructionsof
this DVD video player. Some DVD video discs are
produced in a manner that allows specificor limited
operation dudng playback. ASsuch, the DVD video
player may not respond to all operating commands.This
is nota defect in the DVD video player. Refer to
instruction notes of discs.
'_" may appear on the TV screen during operation.
A'_" means that the operation is not permitted by the
DVD video player orthe disc.
The region number of this DVD video player is 1. If
region numbers, which stand for their playable area, ere
on your DVD video disc and you do not find I_1
pd
or ,disc playback will not be allowed by the player.
(In this case, the DVD video player will display a
message on-scraen.)
This DVD video player can play the following discs.
Disc Maximum
Disc Mark Contents Size playback time
Appmx &hour$
,"sin;e siced ¢s¢)
12 crn
l_.dio Approx. 8 houPs
"dcub e sded disc
DVD v i D E O video
video (novirg
discs _ poJms) Approx.80minutes
,"sin_e siced ¢s¢)
8 all
App_x. 160mi_e_
_dcube sded dit,_
VIDEO vdeo
CDa
_ovin_
pi_ure¢)
12 ¢m App,¢x. 74 ninut_
8 Qll A_p_x20 Tinu_s
This DVD video player supportsVIDEO CDs equipped
with the PBC (Version 2.0) function. (PBC is the
abbreviationof Playback Control.) You can enjoy two
playback variations depending on types of discs.
• VIDEO CD not equipped with PBC function
(Version 1.1}
Sound and movie can be played onthis DVD video
player in the same way as an audio CD.
• VIDEO CD equipped with PBC function
(version 2,0)
In addition to operation of e Vl DEO CD not equipped
withthe PBC function, you can enjoy playback of
interactive software with search function by using the
menu displayed on the TV screen (Menu Playback).
Some of the functions described in this owner's
manual may not work withsome discs.
d2 Qll Approx 74 mir _PJ_
CDs DIGITAL AUDIO 8 Cm
_CD Approx. 20 minutes
The following discs aru also available.
• DVD-R discs of DVD video farther
• CD-RJCD-RW discs of CD-DA format
Soma of these discs may be incornpatiblo.
• YOUcannotplay discs other than those listed above.
• You cannot play DVD-RAM discs or
non-standardized discs, etc., even if they may be
labeled as above,
• This DVD video player uses the NTSC colorsystem,
and cannot play DVD videodiscs recorded in any
other color system (PAL, SECAM, etc.).
10

+ ble of"Contents
Introduction
• SAFETY PRECAUTIONS .......................... 2
• IMPORTANT SAFETY INSTRUCTIONS .,,4
• Precautions ............................................... 8
• Notes on Discs .......................................... 9
Notes on region numbers ............................... '10
• Table of Contents ................................... 11
• Identification of Controls ....................... 12
Front panel ..................................................... 12
Rear panel ...................................................... 12
DVD display .................................................... 13
Remote control ............................................... 14
Leading batteries ............................................ 15
Operating with the remote control .................. 15
Connections
• Connecting to a TV ................................. 18
Connecting to a TV ......................................... 18
Connecting to an audio system and TV
equipped with component video inputs ........ 19
• Connecting to Optional Equipment ...... 20
Connecting to an amplifier equipped with a
Delby Digital decoder ................................... 21
Connecting to an amplifier equipped with
Delby Surround Pro Logic ............................ 21
Connecting to an amplifier equipped with a
DTS decoder ................................................ 22
Connecting to an amplifier equipped with an
MPEG2 audio decoder ................................. 22
Connecting to an amplifier equipped with a
digital audio input ......................................... 23
Basic playback
• Playing a Disc ......................................... 26
Basic playback ................................................ 26
• Variable Speed Playback ....................... 28
Playing in fast reverse or fast forward
directions ...................................................... 28
Playing frame by frame ................................... 28
Playing in slow-motion .................................... 29
Resuming playback from the same location ...29
• Locating a Desired Section ................... 30
Locating a title using the top menu ................. 30
Locating a desired section by entering the
corresponding number ................................. 31
Locating a specific chapter or track ................ 31
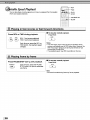
• Playing an MP3 Encoded CD ................. 32
Playing an MP3 encoded CD ......................... 32
Advanced playback
• Accessing a Specific Location Directly ... 34
Entering the time counter ofthe desired
location ......................................................... 34
• Playing Repeatedly ................................. 35
Repeating a title, chapter, or track .................. 35
Repeating a specific segment ........................ 35
• Playing in a Favorite Order .................... 36
Setting titles, chapters, or tracks in a favorite
order ............................................................. 36
• Playing in Random Order ...................... 37
Playing titles, chapters er tracks in random
order ............................................................. 37
• Zooming a Picture .................................. 38
Zooming a picture ........................................... 38
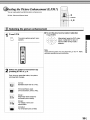
• Selecting the Picture Enhancement
(E,P.M.) ..................................................... 39
Selecting the picture enhancement ................ 39
• Selecting the Sound Enhancement
(E,A.M.) .................................................... 40
Selecting the sound enhancement ................. 40
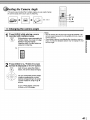
• Selecting the Camera Angle .................. 41
Changing the camera angle ........................... 41
• Selecting Subtitles ................................. 42
Selecting a subtitle language ......................... 42
• Selecting a Language ............................. 43
Selecting a playback audio setting ................. 43
• On-screen Display Operation ................ 44
On-screen display operation ........................... 44-
Function setup
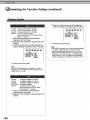
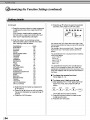
• Customizing the Function Settings ...... 48
Setting procedure ........................................... 48
Setting details ................................................. 50
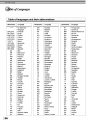
• Table of Languages ................................ 56
Others
• Before Calling Service Personnel ......... 58
• Specifications ......................................... 59
• LIMITED WARRANTY DVD VIDEO
PLAYER ................................................... 60
!!
=2
a
OL
C
O
11

_ntif!cation of"Controls
So€.,th_ pago in _ fordotails,
DVD display [_
ON/STANDBY indicator [_
f
/
I-_" °
Remote sensor [_
ON/STANDBY button[_
Disc tray _ PLAY button [_
1
OPEN/CLOSE button [_ I STOP button
/
SKIP buttons [_
PAUSE button
VIDEO OUTjack [_
VIDEO OUT (Y/Pm'PR)
(Component video) jacks [_
BITSTREAM/PCM DIGITAL COAXIAL
AUDIO OUT jack [_[_[_
ANALOG AUDIO OUT (L/R) jacks [_ [1_
- Power cord
S VIDEO OUT jack [1_
12

• Pressing of the FL DIM button on the remote
control changes the brightness of the display.
FL-DIM Narrnal_ Dimrn_.,d_ Off
Total playing time indicator
Play mode indicator
]3tie number indicator
Chapter number indicator
Memory playback indicator
Track number
indicator Random playback indicator
Multifunctional indicator (indicates operating status or
messages, etc.) Angle icon indicator
DVD/VlDEO CD/CD indicator
Repeat playback indicator
• When you start playback, the elapsed time indicators appear. Pressing the FL SELECT button switches
them to the titlelchaptarftrack number indicators. Some discs may not permit this operation.
The indicatorsvarydependingon the kinds of discsyou play.
During playback:
Example
Playing chapter 3 of title 2
$orn_.,discs may not display chapter
numbers or elapsed tirn_.,.
During playback:
Example
Playing track 6
Soma discs may not display track
nurnbars or _.,laps_.,dtima.
• During playback:
Example
Playing track 6
I
=2
a
O.
C
O
13

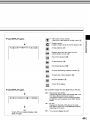
_ntif!cation of"Controls (continued)
The irTstnJ_.'tiorTsinthismanuald¢_ribothofurTctiorTSonth_rarnotocorTtrOl.$oo thopagoin[_) fordotails,
OPEN/CLOSE button [_
REV button
FWD button
PAUSE/STEP button _[_ -
STOP button
TOP MENU button
CLEAR button [3_
ANGLE button [_
SETUP button
DISPLAY button [_
SUBTITLE button _ _,
E.A,M. button [_ _-
E,P.M. button [_
Number buttons
RANDOM button [_
MEMORY button [_
ANGLE SUBTITLE AUDIO
E__._1 E.E_. FL SELEC" FL DIM
QQD--
o
00
O0
RAN[30M MEMORY REFEA-" AB RFT
J
)utton
button [4_
J button*
-- AUDIO button [_
-- SLOW button[29_
ZOOM button [_
-- FL DIM button[-13_
FL SELECT button [_
-- T button [_
--A-B RPT button
REPEAT button [_
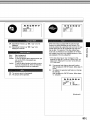
* MENU button
Use the MENU button to display the menu included on
many DVD video discs, 7o operate a menu, follow the
instructions in "Locating a title using the top menu,"
14

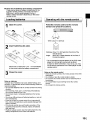
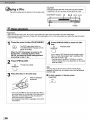
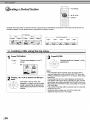
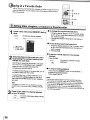
• About the illustrations of the battery compartment
There are two types of battery compartment in the
suppliedremote controls. (This does not mean a
difference in performance between the two.}
Refer to either illustrationdepending on the actual
remote control.
Open the cover.
Insert batteries (AA size).
Make sure to match the ÷ and - on the batteries
to the marks inside the battery compartment.
Closethecover
Notes on batteries
Impropor usa of battorias may cause battory Ioakaga and
oorrosiorL TOoporate the rornoto control corroutly, follow tho
irlatruotiorla bolow.
• Do nat insort battork_ irlto tho rornoto control in the wrong
diroction.
• Do not chaco, boat, apart, or short-cirouit tho battodos.
Do not throw battodas into a _ro.
• Do notIoavodead or axhaustod battorioaintho rornata
_ntrol.
• Do not use difforont typos of batteries togothor, or mix old
and now battados.
• If you do not usa the r_rnoto control for a long poriod of
tirrto, rornova tho bai:tados to avoid possiblo darnago from
battory corrosion.
• If tho romoto {;ontr_l daos riot function _rr_utly or if tho
operating tango bo¢orrlos r_ducod, rupiah., all battorias
with now arias.
• If battery laakago occurs, wipo tho battory liquid from the
battory oorrtpartmont, than insort now battofias.
Point the remote control at the remote
sensor and press the buttons.
Withirl about 7 rn (23 foot)
Distance: About 7 m (23 feet) from the front of the
remote sensor
Angle: About 30° in each direction of the front of
the remote sensor
* Do not expose the remote sensor of the DVD video
playerto a stronglight source such as direct
sunlight or other illumination.Ifyou do so, you may
not be able to operate the DVD video player via the
remote control.
Notes on the remote control
•Dir_ccttho r_crnotocontrol at the rornota sonsor oftho DVD
vidoo player.
• Do rTotdrop or givo the rorrtoto control a shock.
• Do not Ioava the rornoto control hoar an oxtrornoly hat or
hurnid place.
• Do rTotspillwator or put anything war on the rornoto
control.
•Do not opon tho rornota oontrol.
m
=2
a
0.
C
0
15


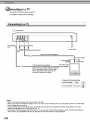
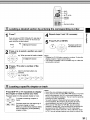
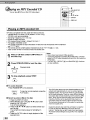
nnecting to a TV
Connoct tha DVD vidoo playor to your TV,
For details of output sound, see [4_.
Siqnal flow
To S VIDEO
OUT
To wall outlot
OUT
I
[ ____ Audioh.,id co cablo (suppliod)
io inputs
TOvidao input _ _
If tha TV has an S vidco irrput, connact tho I H
DVD vidco playor with art S vidco cable.
Wh,:n using an S vidco cable, do riot
_orrrloci: t to yo owv doo _b a.
1%' or monitor with
oudio/vidco inputs
* Make the following setting.
"AurJioO_t Select" "Ar_'_o_ 2¢h"
Notes
• Rofor to tho owrror'_ rnanual of tho conrractod TV as wall.
• Wharf you csrmact tho DVD vidco playor to your TV, bo sur_ to turn off tho powor and urrplug b_h urli_sfTOmtho wall outl_
ba_r_ rnakirlg any oorlrro_iorls.
• If your tolavisiorl s_ has orra audio input, corlrro_ tha I_.,_and right audio outputs of tha DVD vidao play_.,r_ a Y cablo
adaptor (not suppliod) orrd than _nrroct to your TV.
• Conrroct tho DVD vidco playor dir_'tly to your 1%'. If you conn_'t tho DVD vidco playor to a VCR, TVNCR combination or
vidco salcotor, tho playback picturo may bo di_'tort_.,das DVD vidco discs or_ copy protoct_.,d.
18

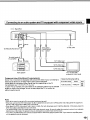
Signal flow
f
ToANALOG AUDIO OUT
To audio inputs of
tho arnplifior "_ (whi[$)
ro F'r
ilDE
T-oP_ ToY
_'IDE VIDEO
9UT OUT
ToY vidco input
TOP5 vidoo input
TOPR vidoo input
To wall outlot
Audio sy_'torn
TV or rnordtor_dth
cornponortl: vidoo irtputa
Component video (ColorStream ®}outputs/inputs
Some T'_e cr monitors are _y:_uipped'_th ¢._mp_er_t video inputs, Co_e_i_g to
these inputsallows you to enjoy higher quality picture playback.
Actual labels for component video inputs may very depending on the TV
manufacturer. (ex. Y, R-Y,B-Y crY, C_, CR)
In some TVs or monitors, the color levels of the playback picture may be reduced
slightly or the tint may change. In such e case, adjustthe TV or monitor for
optimum performance.
• Make the following se_ing.
"A_di_ Out Select" _A_al_g2oh"
/
0
0
Notes
• Rofor to tho owr_or's manual of tho connoctod oquiprnont as woll.
• Whon you conr_o_ tho DVD vidoo playor _ othor oquiprnont, bo su_ to turn _ tho powor and unplug all _ tho oquiprnont
from tho wall outl_ bo_r_ making any corTr_o_ion_.
• If you plato tho DVD vidoo playor hoar a tunor or radio, tho _dio broadcast _uund rniqht bo distortod. In this ca_o, placo tho
DVD vidco player away from tho tonor and radio.
• Tho output _ound of tho DVD vidoo playor ha_ a wido dynamic tango. Bo _ur¢ _ adjust tho rcooivor'a volurno to a rnodor,_to
li_toning Iovol. Othorwiao, tho apoakors may bo darna.qod by a _uddon high volurno _ound.
• Turn off tho arnplifior bo_ you connoct or di_c_nnc_'t tho DVD vidoo playor'_ powor cord. If you Ioavo tho arnplifior powor
ofT,tho apoako_ may bo darrta_od.
1,I

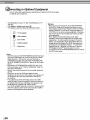
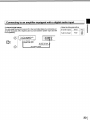
nnecting to Optional Equipment
YOUcarl on[oy high quality dynamic sounds by uonrlocting tho DVD vidao playor
to optional audio oquipmont.
• For connection to your TV, see "Connecting to a TV"
• For details of output sound, see [43>.
• This section uses the following reference marks.
] : Front speaker
] : Rearspeaker
] : Sub woofer
I_ : Center speaker
: Signal flow
Notes
• DO NOT connact tho BITSTREAM/PCM AUDIO OUT [aGk
of tha DVD vidaa playor to tho AC-3 RF input of a Dalby
Digital Rouaivor. This input on your AN Rouoivor is
rasorv_J for Lasordiscusa only and is in_rnpatiblo with
tho BITSTREAM/PCM AUDIO OUT iauk of tho DVD vidco
playor.
• Connoot tho BITSTREAMiPCM AUDIO OUT jack of tho
DVD vidoo player to tha "DIGITAL (COAXIALJ" input of a
Rouoivor or Prouossor.
• Rofor to tho owrror's manual of tho conrractod oquiprnont
as wall.
• Whan you uannoct tho DVD vidoo player to othor
oquiprnont, bo sur_ to turn off tho powor arid unplug all of
tho oquiprnont from tho wall outlct boforo making any
conrtoctiorts.
• Tho output sound of tha DVD vidoo playor has a wido
dynamic tango. Bo suro to adjust tho touaivor's volurno to
a rnodorato Ilstorfing lavol. Othorwiso, tha spoakors may
ba darnagcd by a suddon high volurno sound.
• Turn of_tho arnplifior bofora you _nnoct or disuonnoct tho
DVD vidoo playor's powor cord. If you Ioava tho arnplifiar
powor art, _Io spoakors may ba darnagod.
Warning
• Whon yau ar_ _nncy_'tirlg (via tho BITSTREAMiPCM
AUDIO OUT iack) arl AV dcoodor that does not havo
Dolby Digital, Digital Thoator Sy_'torns (DTS) or MPEG2
dcooding funutian, bo sura to sot "Audio Out Soloct _to
"PCM" from tho on-surcon displays [_i_[_. Othorwiso,
high volurno sound fflay darnago your hoadng as wall
as tha spaakots.
• Whon playing DTS-onuodad discs (audio CDs),
oxG_,_iva noiso rnay bo output fmrn tha anal_-1 audio
output iauks. To avoidpossiblo darnaga rathe audio
systorm you should tako propor procautions whon tho
analog audio output jacks oftho DVD vidao playor aro
connactod to art amplification systorn. To anjoy DTS
Digital Surround TM playbauk, an oxtomal 5.1 chanrlol
DTS Digital Surround TM docodor systam must bo
connactod to tho BITSTREAMfPCM AUDIO OUT iack of
tho DVD vidoo playor.
2O

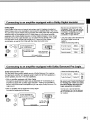
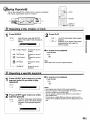
Oolby Digital
Dolby Digital is the surround sound technology used in theaters showing the
latest movies, and is now available to reproduce this realistic effect inthe home.
You can enjoy motion picture and live concertDVD video discs with this dynamic
realistic sound by connecting the DVD video player to a 8 channel amplifier
equipped witha Dolby Digital decoder or Dolby Digital processor. Ifyou have a
Dolby Surround Pro Logic decoder, you will obtain the full benefit of Pro Logic
from the same DVD movies that provide full 5.1-channel Dalby Digital
saundtrecks, aswell as from titles with the Dolby Surround mark.
I To COAXIAL type !
digital aL_dioi_pL_t TOBITSTREAM_ _,
F_OMAUDIO GUT
f
75 _'_c_ial cable
ManLr_aC_L_redunder li_nz, e from DctPy
Laborataries. "Dolb__ =Pro Logic" and the
do_ble_D symb_ are tredemar_,_ of DctPy
Laboratories.Co_6_er_al unpublished
v_rl_. Copyright _992-_997 goIpy
Laboratories. All rightS rose#peP.
• Use DVD video discs encoded via
the Dolby Digital recording
system.
• Make the following setting.
Om_cree_ hi,play Select: F,'a_e
_A_dts Out Select" "Bit_keam _ [_
Reco_i_£ systam E]_ D [_
!!
0
0
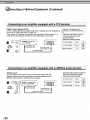
Dolby Surround Pro Logic
You can enjoy the dynamic realistic sound of Delby Surround Pro Logic by
connecting an amplifier and speaker system (rightand leftfront speakers, a
center speaker, and one or two rear speakers).
• With an amplifier equipped with Dolby Digital
Connect the equipment the same way as describedin "Connecting to an
amplifier equipped with a Dolby Digital decoder." Refer to that amplifier's
owner's manual and set the amplifier so you can enjoy Dalby Surround Pro
Logic sound.
• With an amplifier not equippedwith Dolby Digital
Connect the equipment as follows.
*'_,_mplifierequipped witriq
DOIby $L_rmunb Ftr_ Legi_ I
F[
Make the followingsetting.
Om_creen hi,play Select: _F,'a_e
"A_dts Out Select" "Analog 2oh"
Be sure to set "Audio Out Select"
to "Analog 2ch" when you enjoy
sounds of Dolby Surround Pro
Logic using this connection,
Co_3ne_ one Or _'_o rear speakers.
The output sou=_b {ram trio rear speakers
will be monaural even if you _n _ect two
rear spe_ket_.
211
Page is loading ...
Page is loading ...
Page is loading ...
Page is loading ...
Page is loading ...
Page is loading ...
Page is loading ...
Page is loading ...
Page is loading ...
Page is loading ...
Page is loading ...
Page is loading ...
Page is loading ...
Page is loading ...
Page is loading ...
Page is loading ...
Page is loading ...
Page is loading ...
Page is loading ...
Page is loading ...
Page is loading ...
Page is loading ...
Page is loading ...
Page is loading ...
Page is loading ...
Page is loading ...
Page is loading ...
Page is loading ...
Page is loading ...
Page is loading ...
Page is loading ...
Page is loading ...
Page is loading ...
Page is loading ...
Page is loading ...
Page is loading ...
Page is loading ...
Page is loading ...
Page is loading ...
-
 1
1
-
 2
2
-
 3
3
-
 4
4
-
 5
5
-
 6
6
-
 7
7
-
 8
8
-
 9
9
-
 10
10
-
 11
11
-
 12
12
-
 13
13
-
 14
14
-
 15
15
-
 16
16
-
 17
17
-
 18
18
-
 19
19
-
 20
20
-
 21
21
-
 22
22
-
 23
23
-
 24
24
-
 25
25
-
 26
26
-
 27
27
-
 28
28
-
 29
29
-
 30
30
-
 31
31
-
 32
32
-
 33
33
-
 34
34
-
 35
35
-
 36
36
-
 37
37
-
 38
38
-
 39
39
-
 40
40
-
 41
41
-
 42
42
-
 43
43
-
 44
44
-
 45
45
-
 46
46
-
 47
47
-
 48
48
-
 49
49
-
 50
50
-
 51
51
-
 52
52
-
 53
53
-
 54
54
-
 55
55
-
 56
56
-
 57
57
-
 58
58
-
 59
59


Toshiba SD-1800 Owner's manual
- Category
- DVD players
- Type
- Owner's manual
- This manual is also suitable for
Ask a question and I''ll find the answer in the document
Finding information in a document is now easier with AI
Related papers
Other documents
-
Sylvania DVL515SL Owner's manual
-
Sony DVP-NS715P Owner's manual
-
 Vidao 818 Quick start guide
-
Soundstream VCM-81D Owner's manual
-
Kenwood DPF-J5020 User manual
-
Audiovox AVT 1498 User manual
-
Vidao VS55U22 User manual
-
 ASA Electronics JE4023S Owner's manual
-
 ASA Electronics JE3223S Owner's manual
-
Magnavox DVD400AT User manual


