V-ZUG 68A Installation guide
- Category
- Kitchen & houseware accessories
- Type
- Installation guide
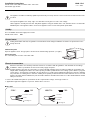
V-ZUG 68A combi-steam cooker offers a range of features for preparing delicious meals. With its steam function, you can gently cook vegetables, fish, and meat while preserving their nutrients and flavors. The hot air mode allows you to roast and bake dishes, while the combination of steam and hot air ensures crispy results. The appliance also features various automatic programs for easy and convenient cooking.
V-ZUG 68A combi-steam cooker offers a range of features for preparing delicious meals. With its steam function, you can gently cook vegetables, fish, and meat while preserving their nutrients and flavors. The hot air mode allows you to roast and bake dishes, while the combination of steam and hot air ensures crispy results. The appliance also features various automatic programs for easy and convenient cooking.


-
 1
1
-
 2
2
-
 3
3
-
 4
4
-
 5
5
-
 6
6


V-ZUG 68A Installation guide
- Category
- Kitchen & houseware accessories
- Type
- Installation guide
V-ZUG 68A combi-steam cooker offers a range of features for preparing delicious meals. With its steam function, you can gently cook vegetables, fish, and meat while preserving their nutrients and flavors. The hot air mode allows you to roast and bake dishes, while the combination of steam and hot air ensures crispy results. The appliance also features various automatic programs for easy and convenient cooking.
Ask a question and I''ll find the answer in the document
Finding information in a document is now easier with AI
Related papers
-
V-ZUG 953 Installation guide
-
V-ZUG 2300775002 Installation guide
-
-
-
-
Whirlpool MWC-XSL/60 Mirror Installation guide
-
-
-
-
Other documents
-
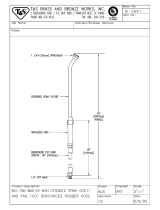 T & S Brass & Bronze Works B-0691 Datasheet
-
Miele G 7859 User manual
-
-
-
-
-
-
Miele G 6410 SCi Operating instructions
-
-
Miele G6310 SC BRWS User manual
