replaced.
• The temperature of the water must not exceed 35°C.
• The maximum depth of immersion is 1 m.
• Ensure that your home is protected by an automatic
breaker switch with an operating current of no more than
30 mA.
Installation and operation
Attach the lter to the desired position in the aquarium
using the suckers provided. The water jet should be
about 1-2 cm below the surface of the water. This will
create good surface movement which ensures the best
gaseous exchange. It will also create a slight circular
current which ensures an optimum ow of water in the
aquarium and simpli es the removal of dirt particles.
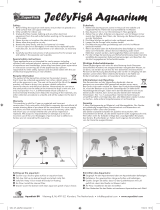
Adjusting the ow of water
It may be necessary to adjust the BLUCOMPACT ow of
water according to the number of sh and size of your
aquarium. To increase it: turn the control clockwise. To
decrease it: turn the control anti-clockwise. (1)
Adjusting the direction of the ow
The special adjustable direction jet at the lter outlet can
reproduce a ow of water similar to that found in your
shes’ natural environment. To change the direction of
the water, simply rotate it with your ngers. (2)
Adjusting the ow of air
If you want to use the supplementary aeration, attach
the air suction tube between the ow regulator and the
adjustable circulation jet. It is possible to increase the
concentration of oxygen in the water with the adjustable
Venturi air intake. (3)
BLUCOMPACT 01 CARE AND MAINTENANCE
Important! Always disconnect the appliance from the
power supply before removing the lter from the water
or carrying out any maintenance work. Over time, the
ltration material in the lterbecomes blocked, reducing
the ow of water. Regular cleaning and/or replacement
of the lter cartridge is necessary to ensure that the lter
operates at peak performance.
Cleaning the lter cartridge
Remove the lter from the aquarium. Open the lter as
shown in the picture. Remove the lter cartridge. The
lter cartridge made of special sponge material must be
rinsed at least every 2-3 weeks. (4/5)
Replacing the lter cartridge
To ensure its e ectiveness, the cartridge should be
replaced regularly or, in any case, at least every 2-3
months. The replacement ltering element is available at
leading retailers. If necessary, the sponge lter cartridge
may be replaced with di erent types of lter material.
An active carbon lter, available as an accessory, will
eliminate aromatic and coloured compounds along with
medical treatment residues.
Cleaning the rotor
Thanks to its innovative conception, the rotor does not
require frequent cleaning. Cleaning it every 4-6 months
is su cient. Use a soft brush and warm water to clean it.
DO NOT use detergents or abrasives. (6)
BLUCOMPACT 02
Congratulations on having chosen the BLUCOMPACT
02 lter. BLUCOMPACT is a highly-e cient, easy-to-
maintain internal lter. It not only cleans the water, but
gives it natural movement and enriches it with oxygen.
It can be easily and quickly adapted to suit any aquarium,
providing the best conditions for plants and sh. Read
the instructions carefully before installing the lter.
INSTALLING BLUCOMPACT 02: A FEW RULES, TOTAL
SAFETY.
Preliminary warnings
• Ensure that the voltage shown on the appliance
corresponds to that of your home electrical power
supply.
• Disconnect the appliance from the power supply
before carrying out any maintenance work.
• The lter is intended only for indoor use.
• The power supply cable can not be repaired or
replaced: if damaged, the whole appliance must be
replaced.
• The temperature of the liquid must not exceed 35°C.
• The maximum depth of immersion is 1 m.
• Ensure that your home is protected by an automatic
breaker switch with an operating current of no more than
30 mA.
Installation and operation
Attach the lter in the desired position in the aquarium
using the suckers provided. The water jet should be
about 1-2 cm below the surface of the water. This will
create good surface movement which ensures the best
gaseous exchange. It will also create a slight circular
current which ensures an optimum ow of water in the
aquarium (and simpli es the removal of dirt particles if
a heater is installed).
Adjusting the ow of water
It may be necessary to adjust the BLUCOMPACT ow of
water according to the number of sh and size of your
aquarium. To increase it: turn the control clockwise. To
decrease it: turn the control anti-clockwise (a).
Adjusting the direction of the ow
The special adjustable direction jet at the lter outlet can
reproduce a ow of water similar to that found in your
shes’ natural environment. To change the direction of
the water, simply rotate it with your ngers (b).
Adjusting the ow of air
If you want to use the supplementary aeration, attach
the air suction tube between the ow regulator and the
adjustable circulation jet. It is possible to increase the
c
V
B
I
p
o
t
o
o
C
A
p
o
t
(
r
u
c
d
T
ri
c
i
R
T
r
a
R
T
s
F
•
c
•
o
B
B
r
t
y
t
•
o
b
•
B
s
a
c
a
IT
PL
RU
DA
SV
HU
CS
SK
ES
NL
D
FR
EN
CAYMAN 40 PLUS/COLOURS/CLASSIC
363108-2_Cayman40_BC 01_02.indd 14
363108-2_Cayman40_BC 01_02.indd 14
20/12/10 17:53
PANTONE 648 CPANTONE 648 C