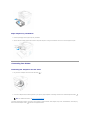
Dell 1125 Owner's manual
- Category
- Laser/LED printers
- Type
- Owner's manual
This manual is also suitable for

Dell™LaserMulti-Function Printer 1125 User's Guide
About Your Multi-Funtion PrinterFaxing
Setting Up Your PrinterUnderstanding the Software
Paper HandlingMaintenance
PrintingTroubleshooting
CopyingSpecifications
Scanning
Model MFP 1125
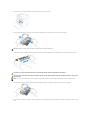
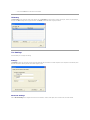
Order Toner Cartridges
Dell™tonercartridgesareavailableonlythroughDell.Youcanordertonercartridgesonlineatwww.dell.com/supplies or by phone.
Notes, Notices, and Cautions
Information in this document is subject to change without notice.
©2007DellInc.Allrightsreserved.
Reproduction in any manner whatsoever without the written permission of Dell Inc. is strictly forbidden.
Trademarks used in this text: Dell, the DELL logo, and Dell Toner Management System are trademarks of Dell Inc.; Pentium is a registered trademark of Intel Corporation; Microsoft,
Windows, Windows Server, MS-DOS, Internet Explorer, and Windows Vista are either trademarks or registered trademarks of Microsoft Corporation in the United States and/or other
countries.
ENERGY STAR is a registered trademark of the U.S. Environmental Protection Agency. As an ENERGY STAR Partner, Dell Inc. has determined that this product meets the ENERGY
STAR guidelines for energy efficiency.
Other trademarks and trade names may be used in this document to refer to either the entities claiming the marks and names or their products. Dell Inc. disclaims any
proprietary interest in trademarks and trade names other than its own.
UNITED STATES GOVERNMENT RESTRICTED RIGHTS
This software and documentation are provided with RESTRICTED RIGHTS. Use, duplication or disclosure by the Government is subject to restrictions as set forth in subparagraph (c)
(1)(ii) of the Rights in Technical Data and Computer Software clause at DFARS.
252.227-7013 and in applicable FAR provisions: Dell Inc., One Dell Way, Round Rock, Texas, 78682, USA.
July 2007 Rev. A00
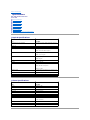
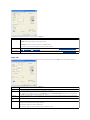
Canada
877-501-4803
Colombia
01800-9-155676
Mexico
866-851-1754
Puerto Rico
866-851-1760
Trinidad and Tobago
1-800-805-8035
United States
877-INK-2-YOU
NOTE: If your country is not listed, contact your Dell distributor to order supplies.
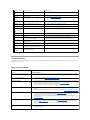
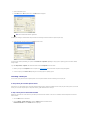
Toner cartridge
Part number
1,000 page toner
XP092
2,000 page toner
XP407
Drum
TU031
NOTE: A NOTE indicates important information that helps you make better use of your computer.
NOTICE: A NOTICE indicates either potential damage to hardware or loss of data and tells you how to avoid the problem.
CAUTION: A CAUTION indicates a potential for property damage, personal injury, or death.

Back to Contents Page
Dell™Multi-Function Printer 1125
User's Guide
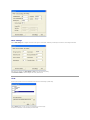
Order Toner Cartridges
Order Toner Cartridges
Dell™tonercartridgesareavailableonlythroughDell.Youcanordertonercartridgesonlineatwww.dell.com/supplies or by phone.
Information in this document is subject to change without notice.
©2007DellInc.Allrightsreserved.
Reproduction in any manner whatsoever without the written permission of Dell Inc. is strictly forbidden.
Trademarks used in this text: Dell, the DELL logo, and Dell Toner Management System are trademarks of Dell Inc.; Pentium is a registered trademark of Intel Corporation; Microsoft,
Windows, Windows Server, MS-DOS, Internet Explorer, and Windows Vista are either trademarks or registered trademarks of Microsoft Corporation in the United States and/or other
countries.
ENERGY STAR is a registered trademark of the U.S. Environmental Protection Agency. As an ENERGY STAR Partner, Dell Inc. has determined that this product meets the ENERGY
STAR guidelines for energy efficiency.
Other trademarks and trade names may be used in this document to refer to either the entities claiming the marks and names or their products. Dell Inc. disclaims any
proprietary interest in trademarks and trade names other than its own.
UNITED STATES GOVERNMENT RESTRICTED RIGHTS
This software and documentation are provided with RESTRICTED RIGHTS. Use, duplication or disclosure by the Government is subject to restrictions as set forth in subparagraph (c)
(1)(ii) of the Rights in Technical Data and Computer Software clause at DFARS.
252.227-7013 and in applicable FAR provisions: Dell Inc., One Dell Way, Round Rock, Texas, 78682, USA.
July 2007 Rev. A00
Back to Contents Page
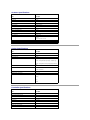
Canada
1-877-501-4803
Colombia
1-800-915-4755
Mexico
001 866 851 1754
Puerto Rico
866-851-1760
Trinidad and Tobago
1-800-805-8035
United States
877-INK-2-YOU
NOTE: If your country is not listed, contact your Dell distributor to order supplies.
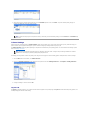
Toner cartridge
Part number
1,000 page toner
XP092
2,000 page toner
XP407
Drum
TU031
NOTE: A NOTE indicates important information that helps you make better use of your computer.
NOTICE: A NOTICE indicates either potential damage to hardware or loss of data and tells you how to avoid the problem.
CAUTION: A CAUTION indicates a potential for property damage, personal injury, or death.

Back to Contents Page
Troubleshooting
Dell™Multi-Function Printer 1125
User's Guide
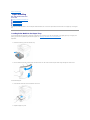
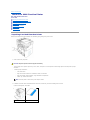
Clearing Jams in the ADF
Clearing Jams in the Paper Paths
Clearing LCD Error Messages
Troubleshooting
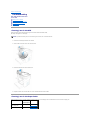
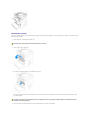
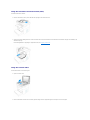
Clearing Jams in the ADF
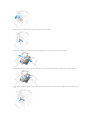
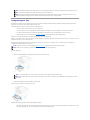
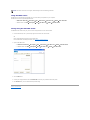
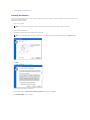
When a document jams while passing through the Automatic Document Feeder (ADF),
ADF Paper Jam appears on the display.
1. Remove the remaining documents from the ADF.
2. Open the ADF cover and remove the roller as shown.
3. Remove the document by gently pulling it out.
4. Replace the roller and close the ADF cover. Then reload the document into the ADF.
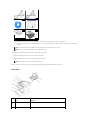
Clearing Jams in the Paper Paths
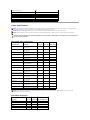
When a paper jam occurs, a location specific message appears on the LCD display. See the table below to locate and clear the paper jam.
NOTE: To prevent document jams, use the scanner glass for thick, thin or mixed documents.
Operator Panel Message
Location of Jam
Go to
Feed area paper jam
Clear Paper Jam
Paper tray
Paper Feed Jam
Fuser area paper jam
Fuser area
Fuser Area Jam

To avoid tearing the paper, pull the jammed paper out gently and slowly. Follow the steps below to clear jams.
Paper Feed Jam
1. Open and close the front cover. The jammed paper automatically exits the printer.
If the paper does not exit, go to the next step.
2. Remove the paper tray cover.
3. Remove the paper by gently pulling it straight out.
If you cannot see the paper or the paper does not move when pulled, check the fuser area. For more information, see Fuser Area Jam.
4. Insert the paper tray into the printer until it snaps into place.
Printing automatically resumes.
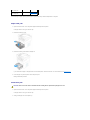
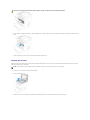
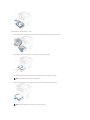
Fuser Area Jam
1. Open and close the front cover. The jammed paper automatically exits the printer.
If the paper does not exit, go to the next step.
2. Gently pull the paper out of the output tray.
Clear Paper Jam
Drum area paper jam
Clear Paper Jam
Drum area
Drum Area Jam
CAUTION: The fuser area is hot. Allow a reasonable amount of cooling time to elapse before opening the rear cover.

3. If you cannot see the paper in the output tray or the paper does not move when pulled, open the rear cover.
4. Pull the jammed paper out directly upward, to avoid tearing the paper on the rear paper guide parts.
5. Close the rear cover.
6. Open and close the front cover.
Printing automatically resumes.
Drum Area Jam
1. Open the front cover and lightly pull the toner cartridge straight out.
2. Remove the paper by gently pulling it straight out.

3. Replace the toner cartridge and close the front cover.
Printing automatically resumes.
Tips for Avoiding Paper Jams
By selecting the correct paper types, most paper jams can be avoided. When a paper jam occurs, follow the steps outlined in Clearing Jams in the Paper
Paths.
l Follow the procedures in Loading Print Media in the Paper Tray. Ensure that the adjustable guides are correctly positioned.
l Do not overload the paper tray. Ensure that the paper is below the paper capacity mark on the inside wall of the paper tray.
l Do not remove the paper from the tray while your printer is printing.
l Flex, fan, and straighten the paper before loading.
l Do not use creased, damp, or curled paper.
l Do not mix paper types in the paper tray.
l Use only recommended print media. See Recommended Paper.
l Ensure that the recommended print side of print media is facing down in the paper tray and facing up in the bypass tray.
l Ensure that the duplex unit is installed correctly.
Clearing LCD Error Messages
The following table lists error messages that the LCD may display.
NOTE: The Status Monitor displays the same errors but in a different format, though the cause and solution are identical. See Using the Dell MFP 1125
Status Monitor for more information.
Display
Likely cause
Suggested solutions
Tray error
Reinsert Input
tray
Paper tray not installed.
Install paper tray.
Engine Comms Error
Printer engine may be damaged or connection
faulty.
Restart printer. If message reappears, call Dell.
No Paper
Add Paper
No paper in trays.
Insert paper. (see Loading Print Media in the Paper Tray)
Paper Jam
Fuse Area
Paper jam in fuser area.
Remove jam (see Fuser Area Jam).
Paper Jam
Drum Area
Paper jam in drum area.
Remove jam (see Fuser Area Jam).
Paper Jam
Feeder Area
Paper jam in feeder area.
Remove jam (see Paper Feed Jam).
Toner Low
Toner 75% depleted.
Toner almost empty. Prepare replacement toner.
Toner Empty
Toner 95% depleted.
Replace toner (see Replacing the Toner Cartridge).
Invalid Toner/ No
Toner Found
Incorrect or empty toner installed.
InstallnewDell™genuinetonercartridge(seeReplacing the Toner Cartridge).
Drum Life Exceeded
The drum life is depleted.
Replace drum cartridge(see Replacing the Drum Cartridge).

Troubleshooting
The following chart lists some conditions that may occur and the recommended solutions. Follow the suggested solutions until the problem is corrected. If the
problem persists, contact Dell.
Paper Feeding Problems
Cover Open
Front cover is open.
Close front cover.
Cover Open - Rear
Cover
Rear Cover is open.
Close rear cover.
Paper Size Error
Paper size mismatch.
Insert correct paper size.
Paper jam
ADF area
Paper jam in ADF.
Clear jam (see Clearing Jams in the ADF).
Scanner module
error
Unspecified scanner error.
Restart printer.
Scan Memory Full
Scanning attempted while no memory
available.
Wait for current print/fax job to complete and retry.
Fax TX Error
No tone or comms error.
Check connections and try again.
Fax RX Error
Check telephone
cable
Fax comms error.
Check connections and try again.
Dial Fail
Dial failed.
Try again.
Memory Full
Attempted to send a fax while the system is
printing a job.
Scanning is stopped and display shows whether or not operator want to start
transmission of correctly scanned pages or abort transmission.
Memory Full
Attempted to receive a fax while the system is
doing a scan job with 1200dpi.
Reception is stopped and transmitter may result in Comm. Error. Operator must
release memory space by clearing printer error for further reception.
Fax Jobs Full
Attempted to enter a new delay fax when the
delay fax list is full.
Release some fax jobs and retry.
Group No. is
assigned
Attempted to add a new group when the
number has already been assigned.
Select an alternate number or delete and replace an existing number.
This Speed Num is
Assigned
Attempted to add a new speed dial no. when
the number has already been assigned
Select an alternate number or delete and replace an existing number.
No. not
Assigned
Attempted to input a speed dial number which
has not been assigned.
Select an alternate number or create speed dial entry and retry.
Condition
Suggested solutions
Paper in the output tray is misaligned or falls
out from the output tray.
l Please check the media packaging for the correct preferred printing side or turn the paper in the input
tray over. For more information, see the instructions on the media packaging.
Paper is jammed during printing.
l Clear the paper jam. See Clearing Jams in the Paper Paths.
Paper sticks together.
l Ensure that there is not too much paper in the paper tray. The paper tray can hold up to 250 sheets of
paper, depending on the thickness of your paper.
l Make sure that you are using the correct type of paper. See Recommended Paper.
l Remove paper from the paper tray and flex or fan the paper.
l Humid conditions may cause some paper to stick together.
Multiple sheets of paper do not feed.
l Different types of paper may be stacked in the paper tray. Load paper of only one type, size and
weight.
l If multiple sheets have caused a paper jam, clear the paper jam. See Clearing Jams in the Paper Paths.
Paper does not feed into the printer.
l Remove any obstructions from inside the printer. See Cleaning the Interior.
l Paper has not been loaded correctly. Remove paper from the tray and reload it correctly.
l There is too much paper in the paper tray. Remove excess paper from the tray.
l The paper is too thick. Use only paper that meets the specifications required by the printer. See
Recommended Paper.
The paper keeps jamming.
l Make sure that the correct paper size is selected. See Setting the Paper Size.
l An incorrect type of paper is being used. Use only paper that meets the specifications required by the
printer. See Recommended Paper.
l There may be debris inside the printer. Open the front cover and remove the debris.
Transparencies stick together in the paper
exit.
l Use only the transparencies specifically designed for a laser printer. Remove each transparency as it
exits from the printer.

Printing Problems
Printing Quality Problems
The inside of the printer may be dirty or improper paper loading may reduce the print quality. See the table below to clear the problem.
Envelopes skew or fail to feed correctly.
l Ensure that the paper guides are against both sides of the envelopes.
Condition
Possible cause
Suggested solutions
The printer does not print.
The printer is not receiving power.
Check the power cord connections. Check the power switch and the power source.
The printer is not selected as the
default printer.
Select Multi-Function Printer 1125 as your default printer in your Windows.
Click Start® Settings® Printers. Right-click the Multi-Function Printer 1125 printer
icon and select Set as Default Printer.
Check the printer for the following:
The front or rear cover is not closed.
l Paper is jammed.
l No paper is loaded.
l The toner cartridge is not installed.
If a printer system error occurs, contact your service representative.
The connection cable between the
computer and the printer is not
connected properly.
Disconnect the printer cable and reconnect it.
The connection cable between the
computer and the printer is defective.
If possible, attach the cable to another computer that is working properly and print a
job. You can also try using a different printer cable.
The printer may be configured
incorrectly.
Check the printer properties to ensure that all of the print settings are correct.
The printer driver may be incorrectly
installed.
Remove the printer driver and then reinstall it; see Uninstalling Software and Installing
Software in Windows respectively.
The printer is malfunctioning.
Check the display message on the operator panel to see if the printer is indicating a
system error.
The printer selects print
media from the wrong
paper source.
The paper source selection in the
printer properties may be incorrect.
For many software applications, the paper source selection is found under the Paper
tab within the printer properties. Select the correct paper source. See Paper Tab.
A print job is extremely
slow.
The job may be very complex.
Reduce the complexity of the page or try adjusting the print quality settings.
The maximum print speed of your printer is 27 PPM for Letter-sized paper.
If you are using Windows 98/Me, the
Spooling Setting may be set
incorrectly.
Click Start® Settings® Printers. Right-click the Multi-Function Printer 1125 printer
icon, click Properties® Details® Spool Settings. Select the desired spool setting.
Half the page is blank.
The page orientation setting may be
incorrect.
Change the page orientation in your application. See Layout Tab.
The paper size and the paper size
settings do not match.
Ensure that the paper size in the printer driver settings matches the paper in the tray.
The printer prints, but the
text is wrong, garbled, or
incomplete.
The printer cable is loose or defective.
Disconnect the printer cable and reconnect. Try a print job that you have already
printed successfully. If possible, attach the cable and the printer to another computer
and try a print job that you know works. Finally, try a new printer cable.
The wrong printer driver was
selected.
Check the application's printer selection menu to ensure that your printer is selected.
The software application is
malfunctioning.
Try printing a job from another application.
The operating system is
malfunctioning.
Exit Windows and reboot the computer. Power the printer off and then back on again.
Pages print, but are blank.
The toner cartridge is defective or out
of toner.
Thoroughly shake the toner. See Redistributing Toner.
If necessary, replace the toner cartridge.
The file may have blank pages.
Check the file to ensure that it does not contain blank pages.
Some parts, such as the controller or
the board, may be defective.
Contact a service representative.
The illustrations print
incorrectly in Adobe
Illustrator.
The setting in the software
application is wrong.
Print the document by selecting Download as Bit Image in the Advanced Options
window of the Graphics properties.
Condition
Suggested solutions
Light or faded print
If a vertical white streak or faded area appears on the page:

l The toner supply is low. You may be able to temporarily extend the toner cartridge life. See Redistributing Toner. If this does
not improve the print quality, install a new toner cartridge.
l The paper may not meet paper specifications; for example, the paper is too moist or too rough. See Recommended Paper.
l If the entire page is light, the print resolution setting is too low or the toner save mode is on. Adjust the print resolution and
turn the toner save mode off. See Graphics Tab.
l A combination of faded or smeared defects may indicate that the toner cartridge needs cleaning. See Cleaning the Interior.
l The surface of the LSU part inside the printer may be dirty. Clean the LSU (see Cleaning the Interior).
Toner specks
l The paper may not meet specifications; for example, the paper is too moist or too rough. See Recommended Paper.
l The transfer roller may be dirty. Clean the inside of your printer. See Cleaning the Interior.
l The paper path may need cleaning. See Maintaining the Drum Cartridge.
Dropouts
If faded areas, generally rounded, occur randomly on the page:
l A single sheet of paper may be defective. Try reprinting the job.
l The moisture content of the paper is uneven or the paper has moist spots on its surface. Try a different brand of paper. See
Recommended Paper.
l The paper lot is bad. The manufacturing process can cause some areas to reject toner. Try a different kind or brand of paper.
l The toner cartridge may be defective. See Vertical repetitive defects.
l If these steps do not correct the problems, contact a service representative.
Vertical lines
l If black vertical streaks appear on the page, the drum inside the toner cartridge has probably been scratched. Install a new
toner cartridge. See Replacing the Toner Cartridge.
l If white vertical streaks appear on the page, the surface of the LSU part inside the printer may be dirty. Clean the LSU (see
Cleaning the Interior).
Gray background
If the amount of background shading becomes unacceptable:
l Change to lighter weight pages. See Recommended Paper.
l Check the printer's environment; very dry (low humidity) or high humidity (higher than 80% RH) conditions can increase the
amount of background shading.
l Remove the old toner cartridge and install a new one. See Replacing the Toner Cartridge.
Toner smear
l Clean the inside of the printer. See Cleaning the Interior.
l Check the paper type and quality. See Recommended Paper.
l Remove the toner cartridge and install a new one. See Replacing the Toner Cartridge.
Vertical repetitive
defects
If marks repeatedly appear on the printed side of the page at even intervals:
l The toner cartridge may be damaged. If a repetitive mark occurs on the page, print a cleaning sheet several times to clean the
cartridge; see Maintaining the Drum Cartridge. After the printout, if you still have the same problems, install a new toner
cartridge. See Replacing the Toner Cartridge.
l Parts of the printer may have toner on them. If the defects occur on the back of the page, the problem will likely correct itself
after a few more pages.
l The fusing assembly may be damaged. Contact a service representative.
Background scatter
Background scatter results from bits of toner distributed on the printed page.
l The paper may be too damp. Try printing with a different batch of paper. Do not open packages of paper until necessary so that
the paper does not absorb too much moisture.
l If background scatter occurs on an envelope, change the printing layout to avoid printing over areas that have overlapping
seams on the reverse side. Printing on seams can cause problems.
l If background scatter covers the entire surface area of a printed page, adjust the print resolution through your software
application or the printer properties.
Misformed
characters
l If characters are improperly formed and produce hollow images, the paper stock may be too slick. Try a different paper. See
Recommended Paper.
l If characters are improperly formed and produce a wavy effect, the scanner unit may need service. For service, contact a service
representative.
Page skew
l Ensure that the paper is loaded properly.

l Check the paper type and quality. See Recommended Paper.
l Ensure that the paper or other material is loaded correctly and the guides are not too tight or too loose against the paper
stack.
Curl or wave
l Ensure that the paper is loaded properly.
l Check the paper type and quality. Both high temperatures and humidity can cause paper curl. See Recommended Paper.
l Turnoverthestackofpaperinthepapertray.Alsotryrotatingthepaper180°inthepapertray.
l Try printing to the rear cover.
Wrinkles or creases
l Ensure that the paper is loaded properly.
l Check the paper type and quality. See Recommended Paper.
l Turnoverthestackofpaperinthepapertray.Alsotryrotatingthepaper180°inthepapertray.
l Try printing to the rear cover.
Back of printouts
are dirty
Check for leaks in the toner. Clean the inside of the printer. See Cleaning the Interior.
Black pages
l The toner cartridge may not be installed properly. Remove the cartridge and reinsert.
l The toner cartridge may be defective and need replacing. Install a new toner cartridge. See Replacing the Toner Cartridge.
l The printer may require repair. Contact a service representative.
Loose toner
l Clean the inside of the printer. See Cleaning the Interior.
l Check the paper type and quality. See Recommended Paper.
l Install a new toner cartridge. See Replacing the Toner Cartridge.
l If the problem persists, the printer may require repair. Contact a service representative.
Character voids
Character voids have white areas where they should be solid black:
l If you are using transparencies, try another type of transparency. Because of the composition of the transparency, some
character voids are normal.
l You may be printing on the wrong surface of the paper. Turn over the stack of paper in the paper tray.
l The paper may not meet paper specifications. See Recommended Paper.
Horizontal stripes
If horizontally aligned black streaks or smears appear:
l The toner cartridge may be installed improperly. Remove the toner cartridge and reinsert.
l The toner cartridge may be defective. Install a new toner cartridge. See Replacing the Toner Cartridge.
l If the problem persists, the printer may require repair. Contact a service representative.
Curl
If the printed paper is curled or the paper does not feed into the printer:
l Turnoverthestackofpaperinthepapertray.Alsotryrotatingthepaper180°inthepapertray.
l Try printing to other rear cover.

Fax Problems
Copying Problems
Scanning Problems
Condition
Suggested solutions
The printer is not working, there is no display and the
buttons are not working.
l Unplug the power cord and plug it in again.
l Ensure that there is power to the electrical receptacle.
No dial tone sounds.
l Check that the phone line is connected properly. See Connecting the Telephone and Fax
Lines.
l Check that the phone socket in the wall is working by plugging in another phone.
The numbers stored in the memory do not dial
correctly.
Make sure that the numbers are stored in the memory correctly. Print a Directory list, referring to
Printing Reports.
The document does not feed into the printer.
l Make sure that the document is not wrinkled and you are putting it in correctly. Check that
the document is the right size, not too thick or thin.
l Make sure that the ADF cover is firmly closed.
Faxes are not received automatically.
l The FAX mode should be selected.
l Make sure that there is paper in the paper tray.
l Check to see if the display shows Memory Full.
The printer does not send.
l Make sure that the document is loaded in the ADF or on the scanner glass.
l Sending should show up on the display.
l Check the other fax machine you are sending to, to see if it can receive your fax.
The incoming fax has blank spaces or is received in
poor-quality.
l The fax machine sending you the fax may be faulty.
l A noisy phone line can cause line errors.
l Check your printer by making a copy.
l The toner cartridge may be empty. Replace the toner cartridge, referring to Replacing the
Toner Cartridge.
Some of the words on an incoming fax are stretched.
The fax machine sending you the fax had a temporary document jam.
There are lines on the documents you send.
Check your scan glass for marks and clean it. See Cleaning the Scanner.
The printer dials a number, but the connection with
another fax machine fails.
The other fax machine may be turned off, out of paper, or cannot answer incoming calls. Speak with
the other machine operator and ask her/him to sort out the problem.
Documents are not stored in the memory.
There may not be enough memory to store the document. If the display shows a Memory Full
message, delete any documents you no longer need from the memory and then restore the
document.
Blank areas appear at the bottom of each page or on
other pages, with a small strip of text at the top.
You may have chosen the wrong paper setup in the user option setting. See Setting the Paper Type
and Setting the Paper Size.
Condition
Suggested solutions
Copies are too light or too dark.
Use the Contrast menu to darken or lighten the background of the copies.
Smears, lines, marks or spots appear on
copies.
l If defects are on the original, select Copy® Contrast to lighten the background of your copies.
l If no defects are on the original, clean the scanner glass and underside of the scanner cover. See
Cleaning the Scanner.
Copy image is skewed.
l Ensure that the original is positioned correctly on scanner glass.
l Check that the copy paper is loaded correctly.
Blank copies print out.
l Ensure that the original is face down on the scanner glass or face up in the ADF.
Image rubs off the copy easily.
l Replace the paper in the paper tray with paper from a new package.
l In high humidity areas, do not leave paper in the printer for extended periods of time.
Frequent copy paper jams occur.
l Fan the stack of paper, then turn it over in the paper tray. Replace the paper in the tray with a fresh
supply. If necessary, check/adjust the paper guides.
l Ensure that the paper is the proper paper weight. 75 g/m2 (20 lb) bond paper is recommended.
l Check for copy paper or pieces of copy paper remaining in the printer after a paper jam has been cleared.
Fewer copies from the toner cartridge
than expected print out.
l Your originals may contain pictures, solids, or heavy lines. For example, your originals may be forms,
newsletters, books, or other documents that use more toner.
l The printer may frequently be powered on and off.
l The scanner cover may be left open while copies are being made.

Common Windows Problems
Back to Contents Page
Condition
Suggested solutions
The scanner does not work.
Make sure that you place the document to be scanned face down from the scanner glass, or
face up in the ADF.
There may not be enough available memory to hold the document you want to scan. Try the
Prescan function to see if that works. Try lowering the scan resolution rate.
Check that the USB cable is connected properly.
Make sure that the USB cable is not defective. If necessary, replace the cable.
Check that the scanner is configured correctly. Check the application you want to use to make
certain that the scanner job is being sent to the correct port.
The unit scans very slowly.
Check if the printer is printing received data. Scan the document after the current job is
completed.
Graphics are scanned more slowly than text.
Communication speed becomes slow in scan mode because of the large amount of memory
required to analyze and reproduce the scanned image.
Message appears on your computer screen:
l Device can't be set to the H/W mode you want.
l Port is being used by another program.
l Port is Disabled.
l Scanner is busy receiving or printing data. When
the current job is completed, try again.
l Invalid handle.
l Scanning has failed.
There may be a copying or printing job in progress. When the current job is complete, try the job
again.
The selected port is currently being used. Restart your computer and try again.
The printer cable may be improperly connected or the power may be off.
The scanner driver is not installed or an operating environment is not set up properly.
Ensure that the port is properly connected and the power is turned on. Then restart your
computer.
Check that the USB cable is properly connected.
Condition
Suggested solutions
File in Use message appears during
installation.
Exit all software applications. Remove all software from the StartUp Group, then restart Windows. Reinstall the
printer driver.
Error Writing to LPTx message appears.
Ensure that the cables are connected correctly and the machine is on.
This message may also appear if bi-directional communication is not turned on in the driver.
General Protection Fault, Exception OE,
Spool32, or Illegal Operation messages
appear.
Close all other applications, reboot Windows and try printing again.
Fail To Print, A printer timeout error occurred
messages appear.
These messages may appear during printing. Just keep waiting until the machine finishes printing. If the
message appears in standby mode or after printing has been completed, check the connection and/or whether
an error has occurred.
NOTE: Refer to Microsoft Windows XP/Vista User's Guide that came with your PC for further information on Windows error messages.

Back to Contents Page
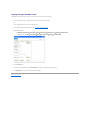
Specifications
Dell™Multi-Function Printer 1125
User's Guide
Physical Specifications
Printer Specifications
Scanner Specifications
Copier Specifications
Facsimile Specifications
Paper Specifications
Print Media Guidelines
Storing Print Media
Identifying Print Media Sources and Specifications
Physical Specifications
Printer Specifications
Item
Description
Dimensions (tray not extended)
W x D x H
413 x 274.5 x 376 mm (depth measured from front
cover to back cover)
Weight
10 kg (including toner cartridge)
Paper Tray
250 page capacity
Weight: 16 to 24 lb (60 to 90 g/m2)
ADF
30 page capacity
Weight: 55 to 125 g/m2
Paper Output
100 page capacity
Weight: 80 g/m2
USB
USB 2.0 (High Speed) Controller to PC host data flow
Security
Security Cable Lock
Acoustics
Standby: 39 dBA (sound pressure)
Printing: 64 dBA (sound power)
Scanning: 50 dBA
Operator Panel
2 x 16 character LCD supporting 50 characters and
scroll capability
LCD
80 degree viewing cone with backlight
Supported Operating Systems
Windows XP, Windows Vista
Item
Description
Speed
20 ppm (A4, LTR)
Resolution
600 x 600 dpi
Print Language
GDI
Duty Cycle
9000 pages/month
Engine Life
50000 pages
Fuser
Permanent (same as engine)
Warm up Time
20 secs
FPOT
16 secs (warm start)
25 secs (cold start)
Memory (DRAM)
32 Mb
Processor Speed
67 MHz (ARMs) 133 MHz (DSP)
Color Modes
Monochrome, Grayscale

Scanner Specifications
Copier Specifications
Facsimile Specifications
Item
Description
Technology
CIS
Resolution
600 dpi
Scan Modes
Mono, grayscale, Full Color, 256 color
Scan Resolution
75, 150, 200, 300, 600 dpi
ADF Scanning
30 page capacity
Scan Speed
11 ppm
Scan Size
A4, LTR
Warm-up/calibrate Time
10 secs
Zoom
25 to 400%
Scanner Glass Capacity
1 in book capacity
Scan Features
Cloning, N-up
Scan Software
TWAIN-Dell MFP 1125 Scanner, WIA-Dell MFP 1125
Scanner
Nuance PaperPort v11 SE
Scan Support
Scan to application from control panel
Supported File Types
.bmp, .pdf, .tiff, .jpeg
Item
Description
Copy Modes
Mono, Grayscale
Scan Resolution
75, 150, 200, 300, 600 dpi
Print Resolution
600 dpi
Copy Speed
20 ppm - single page, multiple copy
20 ppm - ADF @300 dpi single page, multiple copy
11 ppm - ADF @300 x 300 dpi single page, multiple
copy
Number of Copies
1 to 99
FCOT
20 secs (warm start)
30 secs (cold start)
Zoom
25 to 400%
Lighter/Darker increments
5 (-2 to +2)
Copy Features
ID Copy
Cloning
N-up
Collate
Item
Description
Maximum Modem Speed
33.6K
Single World Wide Solution
Yes
Fax Transmission Speed
3 secs/page
Maximum Fax Resolution
400 dpi
Fax Memory
200 pages
Speed Dial Entries
99
Speed Dial Entry Length
50 characters
Speed Dial Group Entries
10
Number of Entries per Group
30

Paper Specifications
Print Media Sizes and Support
Print Media Supported
Receive Forward to Fax
Yes
Broadcast Fax Support
Yes
Stamped Received Report
Yes
Auto Redial
Yes
Auto Reduction
Yes
Delay Fax
Yes
NOTE: Some paper may meet all of the guidelines in this guide and still not produce satisfactory results. This may be the result of improper handling,
unacceptable temperature and humidity levels, or other variables over which Dell has no control.
NOTE: Before purchasing large quantities of paper, ensure the paper meets the requirements specified in this User's Guide.
NOTE: Please load paper to print on the preferred side if the paper packaging indicates it. Failure to do so may result in paper curl or paper jam.
CAUTION: Using paper that does not meet these specifications may cause problems, requiring repairs. These repairs are not covered by the Dell
warranty or service agreements.
Print Media Size
Dimensions
Paper Tray
Bypass Tray
Duplex Printing
A4
8.27 x 11.7 in.
(210 x 297 mm)
Y
Y
Y
A5
5.83 x 8.27 in.
(148 x 210 mm)
Y
Y
N
A6
4.13 x 5.85 in.
(105 x 148.5 mm)
Y
Y
N
JIS B5
7.17 x 10.1 in.
(182 x 257 mm)
Y
Y
N
ISO B5
6.93 x 9.84 in.
(176 x 250 mm)
Y
Y
N
Letter
8.5 x 11 in.
(215.9 x 279.4 mm)
Y
Y
Y
Legal
8.5 x 14 in.
(215.9 x 355.6 mm)
Y
Y
Y
Executive
7.25 x 10.5 in.
(184.2 x 266.7 mm)
Y
Y
N
Oficio
8.5 x 13.5 in.
(216 x 343 mm)
Y
Y
Y
Folio
8.5 x 13 in.
(216 x 330 mm)
Y
Y
Y
Envelope 7-3/4 (Monarch)
3.875 x 7.5 in.
(98.4 x 190.5 mm)
N
Y
N
Envelope COM-10
4.12 x 9.5 in.
(105 x 241 mm)
N
Y
N
Envelope DL
4.33 x 8.66 in.
(110 x 220 mm)
N
Y
N
Envelope C5
6.38 x 9.01 in.
(162 x 229 mm)
N
Y
N
Envelope C6
4.49 x 6.38 in.
(114 x 162 mm)
N
Y
N
Custom
3 x 5 in. to 8.5 x 14 in.
(76 x 127 mm to 216 x 356 mm)
N
Y
N
NOTE: Please follow the instructions on the paper packaging for a preferred printing side. Printing on the wrong side may cause some paper
misalignment on the paper output tray.
Print Media
Paper Tray
Bypass Tray
Standard Output Tray
Paper
Y
Y
Y
Card Stock
N
Y
Y
Transparencies
N
Y
Y
Labels
N
Y
Y
Dual-web and Integrated Labels
N
Y
Y

Print Media Types and Weights
Print Media Guidelines
Print media refers to paper, card stock, transparencies, labels, and envelopes. Your printer provides high quality printing on a variety of print media. Selecting
the appropriate print media for your printer helps you avoid printing problems.
Paper
For the best print quality, use 75 g/m2 (20 lb) xerographic, long grain paper. Try a sample of any paper you are considering using with the printer before
buying large quantities.
When loading paper, note the recommended print side on the paper package, and load paper accordingly. See Loading Print Media in the Paper Tray and
Using the Bypass Tray for detailed loading instructions.
Paper Characteristics
The following paper characteristics affect print quality and reliability. Use the following guidelines when evaluating new paper stock.
Weight
The printer automatically feeds paper weights from 60 to 105 g/m2 (16 to 28 lb bond) grain long in the Automatic Document Feeder (ADF) and from 60 to 90
g/m2 (16 to 24 lb bond) grain long in the paper tray. Paper lighter than 60 g/m2 (16 lb) may not be stiff enough to feed properly, causing jams. For best
performance, use 75 g/m2 (20 lb bond) long grain paper.
For duplex printing, use 75 to 90 g/m2 (20 to 24 lb bond) paper.
Envelopes
N
Y
Y
Print Media
Type
Print Media Weight
Paper Tray
Print Media Weight
Bypass Tray
Paper
Xerographic or business paper
60-90 g/m2 grain
long
(16-24 lb bond)
60-135 g/m2 grain
long
(16 to 36 lb bond)
Card stock-maximum (grain long). See note below
Index Bristol
120 g/m2 (31 lb)
Tag
120 g/m2 (31 lb)
Cover
135 g/m2 (35 lb)
Card stock-maximum (grain short). See note below
Index Bristol
163 g/m2 (43 lb)
Tag
163 g/m2 (43 lb)
Cover
163 g/m2 (43 lb)
Transparencies
Laser printer
138-146 g/m2
(37-39 lb bond)
Labels-maximum
Paper
163 g/m2
(43 lb bond)
Dual-web paper
163 g/m2
(43 lb bond)
Polyester
163 g/m2
(43 lb bond)
Vinyl
163 g/m2
(43 lb liner)
Integrated Forms
Pressure- sensitive area (must enter the printer
first)
135-140 g/m2
(36-40 lb bond)
Paper base (grain long)
75-135 g/m2
(20-36 lb bond)
Envelopes 100% Cotton Content Maximum Weight- 24
lb
Sulfite, wood-free or up to 100% cotton bonds
75-90 g/m2
(20-24 lb)
NOTE: Grain short is preferred for papers over 163 g/m2 (43 lb bond.
NOTE: Dell recommends using 3M transparencies for the Dell MFP 1125.
NOTE: Please follow the instructions on the paper packaging for a preferred printing side. Printing on the wrong side may cause some paper
misalignment on the paper output tray.

Curl
Curl is the tendency of print media to curve at its edges. Excessive curl can cause paper feeding problems. Curl usually occurs after the paper passes through
the printer, where it is exposed to high temperatures. Storing paper unwrapped in humid conditions, even in the paper tray, can contribute to paper curling
prior to printing and can cause feeding problems.
Smoothness
The degree of smoothness of paper directly affects print quality. If the paper is too rough, the toner does not fuse to the paper properly, resulting in poor print
quality. If the paper is too smooth, it can cause paper feeding problems. Smoothness between 100 and 300 Sheffield points is recommended; however,
smoothness between 150 and 250 Sheffield points produces the best print quality.
Moisture Content
The amount of moisture in the paper affects both print quality and the ability of the printer to feed the paper properly. Leave the paper in its original wrapper
until you are ready to use it. This limits the exposure of the paper to moisture changes that can degrade its performance.
Grain Direction
Grain refers to the alignment of the paper fibers in a sheet of paper. Grain is either long grain, running the length of the paper, or short grain, running the
width of the paper.
For 60 to 90 g/m2 (16 to 24 lb bond) paper, grain long fibers are recommended. For papers heavier than 90 g/m2 (24 lb bond), grain short is preferred. For the
bypass tray, 60 to 90 g/m2 (16 to 24 lb bond) paper, grain long fibers are recommended.
Fiber Content
Most high-quality xerographic paper is made from 100% chemically pulped wood. This content provides the paper with a high degree of stability resulting in
fewer paper feeding problems and better print quality. Paper containing fibers such as cotton possess characteristics that can result in degraded paper
handling.
Recommended Paper
To ensure the best print quality and feed reliability, use 75 g/m2 (20 lb) xerographic paper. Business papers designed for general business use may also
provide acceptable print quality.
Always print several samples before buying large quantities of any type of print media. When choosing any print media, consider the weight, fiber content, and
color.
Use only paper able to withstand these temperatures without discoloring, bleeding, or releasing hazardous emissions. Check with the paper manufacturer or
vendor to determine whether the paper you have chosen is acceptable for laser printers.
Unacceptable Paper
The following papers are not recommended for use with the printer:
l Chemically treated papers used to make copies without carbon paper, also known as carbonless papers, carbonless copy paper (CCP), or no
carbon required (NCR) paper
l Preprinted papers with chemicals that may contaminate the printer
l Preprinted papers that can be affected by the temperature in the printer fuser
l Preprinted papers that require a registration (the precise print location on the page) greater than 0.09 in., such as optical character recognition
(OCR) forms
l Coated papers (erasable bond), synthetic papers, thermal papers
l Rough-edged, rough or heavily textured surface papers or curled papers
l Recycled papers containing more than 25% post-consumer waste that do not meet DIN 19 309
l Recycled paper having a weight less than 60 g/m2 (16 lb)
l Multiple-part forms or documents
Selecting Paper
Proper paper loading helps prevent jams and ensures trouble-free printing.
To help avoid jams or poor print quality:

l Always use new, undamaged paper
l Before loading paper, know the recommended print side of the paper you are using. This information is usually indicated on the paper package
l Do not use paper that you have cut or trimmed yourself
l Do not mix print media sizes, weights, or types in the same source; mixing may result in jams
l Do not use coated papers
l Remember to change the paper size setting when you use a source that does not support auto size sensing
l Do not remove trays while a job is printing or Busy is displayed on the operator panel
l Ensure that the paper is properly loaded in the source
l Flex paper back and forth. Do not fold or crease the paper. Straighten the edges on a level surface.
Selecting Preprinted Forms and Letterhead
Use the following guidelines when selecting preprinted forms and letterhead paper for the printer:
l Use long grain papers for best results.
l Use only forms and letterhead printed using an offset lithographic or engraved printing process.
l Choose papers that absorb ink, but do not bleed.
l Avoid papers with rough or heavily textured surfaces.
Use papers printed with heat-resistantinksdesignedforuseinxerographiccopiers.Theinkmustwithstandtemperaturesof180°C(356°F)withoutmeltingor
releasing hazardous emissions. Use inks that are not affected by the resin in toner or the silicone in the fuser. Inks that are oxidation-set or oil-based must
meet these requirements; some latex inks are not appropriate. If you are in doubt, contact your paper supplier.
Preprinted papers such as letterhead must be able to withstand temperatures up to 180C (356F) without melting or releasing hazardous emissions.
Printing on Letterhead
Check with the manufacturer or vendor to determine whether the preprinted letterhead you have chosen is acceptable for laser printers.
Page orientation is important when printing on letterhead. Use the following table for help when loading letterhead in the print media sources.
Selecting Prepunched Paper
Prepunched paper brands differ in the number and placement of holes and in manufacturing techniques.
Use the following guidelines to select and use prepunched paper:
l Test paper from several manufacturers before ordering and using large quantities of pre-punched paper.
l Select paper punched at the paper manufacturer and not drilled into paper already packaged in a ream. Drilled paper can cause jams when
multiple sheets feed through the printer.
l Prepunched paper can include more paper dust than standard paper. Your printer may require more frequent cleaning and feed reliability may not
be as good as that of standard paper.
Transparencies
Try a sample of any transparencies you are considering using with the printer before buying large quantities:
l Usetransparenciesdesignedspecificallyforlaserprinters.Transparenciesmustbeabletowithstandtemperaturesof180°C(356°F)without
melting, discoloring, offsetting, or releasing hazardous emissions.
l To avoid print quality problems, avoid getting fingerprints on the transparencies.
l Before loading transparencies, fan the stack to prevent sheets from sticking together.
l Load one transparency at a time in the bypass tray.
Print Media Source
Print Side
Top of Page – Portrait
Top of Page – Landscape
Paper tray
Face down
Front of tray
Left side of tray
Bypass tray
Face up
Logo enters the printer first
Left side of tray

Selecting Transparencies
The printer is designed to print directly on transparencies manufactured for use in laser printers. Print quality and durability depend on the transparency used.
Always print samples on the transparencies you are considering before buying large quantities.
Checkwiththemanufacturerorvendortodeterminewhetheryourtransparenciesarecompatiblewithlaserprintersthatheattransparenciesto180°C(356°
F). Use only transparencies that are able to withstand these temperatures without melting, discoloring, offsetting, or releasing hazardous emissions.
Envelopes
Load one envelope at a time in the bypass tray. Try a sample of any envelopes you are considering using with the printer before buying large quantities. See
Using the Bypass Tray for instructions on loading an envelope.
When printing on envelopes:
l To achieve the best possible print quality, use only high-quality envelopes that are designed for use in laser printers.
l For best performance, use envelopes made from 75 g/m2 (20 lb bond) paper. You can use up to 90 g/m2 (24 lb bond) weight for the bypass tray
as long as the cotton content is 25 percent or less.
l Use only new, undamaged envelopes.
l Useenvelopesthatcanwithstandtemperaturesof180°C(356°F)withoutsealing,curling,wrinkling,orreleasinghazardousemissions.Ifyou
have any doubts about the envelopes you are considering using, check with the envelope supplier.
l Load an envelope with the flap side down and with the stamp area on the top left side. The end of the envelope with the stamp area enters the
bypass tray first. See Using the Bypass Tray for instructions on loading envelopes.
l Adjust the width guide to fit the width of the envelopes.
l A combination of high humidity (over 60%) and the high printing temperatures may seal the envelopes.
For best performance and to minimize jams, do not use envelopes that:
l Have excessive curl or twist.
l Are stuck together or damaged in any way.
l Contain windows, holes, perforations, cutouts, or embossing.
l Use metal clasps, string ties, or metal folding bars.
l Have an interlocking design.
l Have postage stamps attached.
l Have any exposed adhesive when the flap is in the sealed or closed position.
l Have nicked edges or bent corners.
l Have rough, cockle, or laid finishes.
Labels
The printer is designed to print on many labels manufactured for use with laser printers. These labels are supplied in letter size, A4 size, and legal size sheets.
Labeladhesives,facesheet(printablestock),andtopcoatsmustbeabletowithstandtemperaturesof180°C(356°F)andpressureof25poundspersquare
inch (psi). You should load only one label sheet at a time in the bypass tray.
When printing on labels:
l Use full label sheets. Partial sheets may cause labels to peel off during printing, resulting in a jam. Partial sheets also contaminate your printer
and your cartridge with adhesive, and could void your printer and cartridge warranties.
l Uselabelsthatcanwithstandtemperaturesof180°C(356°F)withoutsealing,curling,wrinkling,orreleasinghazardousemissions.
l Do not print within 0.04 in. (1 mm) of the edge of the label, of the perforations, or between die-cuts of the label.
l Do not use label sheets that have adhesive to the edge of the sheet. We recommend zone coating of the adhesive at least 0.04 in. (1 mm) away
from edges. Adhesive material contaminates your printer and could void your warranty.
l If zone coating of the adhesive is not possible, a 0.125 in. (3 mm) strip must be removed on the leading and driver edge, and a non-oozing
adhesive used.
l Remove a 0.125 in. (3 mm) strip from the leading edge to prevent labels from peeling inside the printer.
l Portrait orientation is preferred, especially when printing bar codes.
l Do not use labels that have exposed adhesive.
NOTE: Dell recommends using 3M transparencies for the Dell MFP 1125.
NOTE: Try a sample of any labels you are considering using with the printer before purchasing a large quantity.

Card Stock
Card stock is single ply, and has a large array of properties, such as the moisture content, thickness, and texture, that can significantly affect print quality. See
Identifying Print Media Sources and Specifications for information on the preferred weight for the grain direction of print media.
When printing on card stock:
l Be aware that preprinting, perforation, and creasing can significantly affect the print quality and cause print media handling or jamming problems.
l Avoid using card stock that may release hazardous emissions when heated.
l Do not use preprinted card stock manufactured with chemicals that may contaminate the printer. Preprinting introduces semi-liquid and volatile
components into the printer.
l We recommend the use of grain long card stock.
Storing Print Media
Use the following guidelines for proper print media storage. These help avoid print media feeding problems and uneven print quality:
l Forbestresults,storeprintmediainanenvironmentwherethetemperatureisapproximately21°C(70°F)andtherelativehumidityis40%.
l Store cartons of print media on a pallet or shelf, rather than directly on the floor.
l If you store individual packages of print media out of the original carton, make sure they rest on a flat surface so the edges do not buckle or curl.
l Do not place anything on top of the print media packages.
Identifying Print Media Sources and Specifications
The following tables provide information on standard and optional sources, including the print media sizes available from the paper size menu, and supported
weights.
Print Media Sizes and Support
Print Media Supported
NOTE: Try a sample of any card stock you are considering using with the printer before purchasing a large quantity.
NOTICE: Within the tables, Y indicates the item is supported, N indicates the item is not supported.
NOTICE: Print Media Sizes in normal style are not supported in the US.
NOTE: If you use a print media size not listed, select the next larger size.
Print Media Size
Dimensions
Paper Tray
Bypass Tray
A4
8.27 x 11.7 in. (210 x 297 mm)
Y
Y
A5
5.83 x 8.27 in. (148 x 210 mm)
Y
Y
A6
4.13 x 5.85 in. (105 x 148.5 mm)
Y
Y
JIS B5
7.17 x 10.1 in. (182 x 257 mm)
Y
Y
ISO B5
6.93 x 9.84 in. (176 x 250 mm)
Y
Y
Letter
8.5 x 11 in. (215.9 x 279.4 mm)
Y
Y
Legal
8.5 x 14 in. (215.9 x 355.6 mm)
Y
Y
Executive
7.25 x 10.5 in. (184.2 x 266.7 mm)
Y
Y
Oficio
8.5 x 13.5 in. (216 x 343 mm)
Y
Y
Folio
8.5 x 13 in. (216 x 330 mm)
Y
Y
Envelope 7-3/4 (Monarch)
3.875 x 7.5 in. (98.4 x 190.5 mm)
N
Y
Envelope COM-10
4.12 x 9.5 in. (105 x 241 mm)
N
Y
Envelope DL
4.33 x 8.66 in. (110 x 220 mm)
N
Y
Envelope C5
6.38 x 9.01 in. (162 x 229 mm)
N
Y
Envelope C6
4.49 x 6.38 in. (114 x 162 mm)
N
Y
Custom
3 x 5 in. to 8.5 x 14 in.
(76 x 127 mm to 216 x 356 mm)
N
Y
NOTE: Please follow the instructions on the paper packaging for a preferred printing side. Printing on the wrong side may cause some paper
misalignment on the paper output tray.
Page is loading ...
Page is loading ...
Page is loading ...
Page is loading ...
Page is loading ...
Page is loading ...
Page is loading ...
Page is loading ...
Page is loading ...
Page is loading ...
Page is loading ...
Page is loading ...
Page is loading ...
Page is loading ...
Page is loading ...
Page is loading ...
Page is loading ...
Page is loading ...
Page is loading ...
Page is loading ...
Page is loading ...
Page is loading ...
Page is loading ...
Page is loading ...
Page is loading ...
Page is loading ...
Page is loading ...
Page is loading ...
Page is loading ...
Page is loading ...
Page is loading ...
Page is loading ...
Page is loading ...
Page is loading ...
Page is loading ...
Page is loading ...
Page is loading ...
Page is loading ...
Page is loading ...
Page is loading ...
Page is loading ...
Page is loading ...
Page is loading ...
Page is loading ...
Page is loading ...
Page is loading ...
Page is loading ...
Page is loading ...
Page is loading ...
Page is loading ...
Page is loading ...
Page is loading ...
Page is loading ...
Page is loading ...
Page is loading ...
Page is loading ...
Page is loading ...
Page is loading ...
Page is loading ...
Page is loading ...
Page is loading ...
Page is loading ...
Page is loading ...
Page is loading ...
Page is loading ...
Page is loading ...
Page is loading ...
Page is loading ...
Page is loading ...
Page is loading ...
Page is loading ...
Page is loading ...
Page is loading ...
Page is loading ...
Page is loading ...
Page is loading ...
Page is loading ...
Page is loading ...
Page is loading ...
Page is loading ...
Page is loading ...
Page is loading ...
Page is loading ...
Page is loading ...
Page is loading ...
Page is loading ...
Page is loading ...
Page is loading ...
Page is loading ...
Page is loading ...
Page is loading ...
-
 1
1
-
 2
2
-
 3
3
-
 4
4
-
 5
5
-
 6
6
-
 7
7
-
 8
8
-
 9
9
-
 10
10
-
 11
11
-
 12
12
-
 13
13
-
 14
14
-
 15
15
-
 16
16
-
 17
17
-
 18
18
-
 19
19
-
 20
20
-
 21
21
-
 22
22
-
 23
23
-
 24
24
-
 25
25
-
 26
26
-
 27
27
-
 28
28
-
 29
29
-
 30
30
-
 31
31
-
 32
32
-
 33
33
-
 34
34
-
 35
35
-
 36
36
-
 37
37
-
 38
38
-
 39
39
-
 40
40
-
 41
41
-
 42
42
-
 43
43
-
 44
44
-
 45
45
-
 46
46
-
 47
47
-
 48
48
-
 49
49
-
 50
50
-
 51
51
-
 52
52
-
 53
53
-
 54
54
-
 55
55
-
 56
56
-
 57
57
-
 58
58
-
 59
59
-
 60
60
-
 61
61
-
 62
62
-
 63
63
-
 64
64
-
 65
65
-
 66
66
-
 67
67
-
 68
68
-
 69
69
-
 70
70
-
 71
71
-
 72
72
-
 73
73
-
 74
74
-
 75
75
-
 76
76
-
 77
77
-
 78
78
-
 79
79
-
 80
80
-
 81
81
-
 82
82
-
 83
83
-
 84
84
-
 85
85
-
 86
86
-
 87
87
-
 88
88
-
 89
89
-
 90
90
-
 91
91
-
 92
92
-
 93
93
-
 94
94
-
 95
95
-
 96
96
-
 97
97
-
 98
98
-
 99
99
-
 100
100
-
 101
101
-
 102
102
-
 103
103
-
 104
104
-
 105
105
-
 106
106
-
 107
107
-
 108
108
-
 109
109
-
 110
110
-
 111
111


Dell 1125 Owner's manual
- Category
- Laser/LED printers
- Type
- Owner's manual
- This manual is also suitable for
Ask a question and I''ll find the answer in the document
Finding information in a document is now easier with AI
Related papers
-
Dell 1133 Laser Mono Printer Owner's manual
-
Dell 2130cn Color Laser Printer User guide
-
-
-
-
Dell 962 All In One Photo Printer User guide
-
-
-
-