Lexmark X340N User manual
- Category
- Scanner Transparancy Adapters
- Type
- User manual

Lexmark™ X342
Clearing Jams
Guide
Avoiding jams
The following hints can help you avoid jams:
• Use only recommended print media.
• Do not overload the print media sources. Make
sure the stack height does not exceed the
maximum height indicated by the stack line on
the labels in the sources.
• Do not load wrinkled, creased, damp, or curled
print media.
• Flex, fan, and straighten print media before you
load it. If jams do occur with print media, try
feeding one sheet at a time through the
multipurpose feeder.
• Do not use print media that you have cut or
trimmed yourself.
• Do not mix print media sizes, weights, or types
in the same print media source.
• Make sure the recommended print side is
loaded in the source according to your simplex
or duplex needs.
• Keep print media stored in an acceptable
environment.
• Do not remove trays during a print job.
• Push all trays in firmly after loading them.
• Make sure the guides in the trays are properly
positioned for the size of print media you have
loaded. Make sure the guides are not placed
too tightly against the stack of print media.
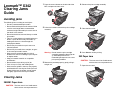
Clearing Jams
200/201 Paper Jam
CAUTION: The fuser area is hot. Avoid contact
with the fuser area to prevent burns.
1 Press the access button on the left side of the
MFP, and open the front cover.
2 Pull on the handle to remove the print cartridge
assembly.
Warning: Do not leave the print cartridge
assembly exposed to direct light for
an extended period of time.
Extended light exposure can cause
print quality problems.
3 Remove the jammed paper by gently pulling it
straight out.
4 Reinsert the print cartridge assembly.
5 Close the front cover.
6 Press Start to resume printing.
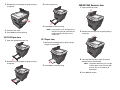
202 Paper Jam
CAUTION: The fuser area is hot. Avoid contact
with the fuser area to prevent burns.
1 Open the rear cover.
1
2

2 Remove the jammed paper by gently pulling it
straight out.
3 Close the rear cover.
4 Press Start to resume printing.
241/242 Paper Jam
1 Open the appropriate paper tray.
2 Remove the jammed paper by gently pulling it
straight out.
3 Insert the paper tray.
4 Press Start to resume printing.
Note: If you receive a 241.18 paper jam at
the start of a print job, verify that the
media settings match the acutal
media size.
251 Paper Jam
1 Remove the jammed paper by gently pulling it
straight out of the MFP.
2 Press Start to resume printing.
290/291/292 Scanner Jam
1 Open the ADF top cover.
2 Remove the jammed paper by gently pulling it
straight out.
3 Close the ADF top cover, and then load the
documents back into the ADF.
Note: To prevent document jams, use the
scanner glass rather than the ADF
for thick, thin, or a mixed set of
documents.
4 Press Start to resume.
-
 1
1
-
 2
2


Lexmark X340N User manual
- Category
- Scanner Transparancy Adapters
- Type
- User manual
Ask a question and I''ll find the answer in the document
Finding information in a document is now easier with AI
Related papers
Other documents
-
HP LaserJet 4100 Multifunction Printer series User manual
-
HP LaserJet 4345 Multifunction Printer series User guide
-
-
OKI MC560n User guide
-
-
-
OKI MC860n MFP User manual
-
HP Color LaserJet 9500 Multifunction Printer series User manual
-
-
Olivetti d_Color MF3200 Owner's manual