Bosch ROTAK 34 User manual

Category
Lawnmowers
Type
User manual

This manual is also suitable for

| 3
Bosch Power Tools F 016 L70 763 | (24.5.11)
STOP
STOP
CLICK!
CLICK!
CLICK!
3
4
5
6
Rotak 34/37 LI Rotak 43 LI
AL 3620 CV
Professional
AL 3640 CV
Professional
OBJ_BUCH-1329-002.book Page 3 Tuesday, May 24, 2011 4:24 PM
F 016 L70 763 | (24.5.11) Bosch Power Tools
4 |
7
6
5
4
3
2
STOP
8
7
9
70 mm
20 mm
30 mm
20 mm
180°
OBJ_BUCH-1329-002.book Page 4 Tuesday, May 24, 2011 4:24 PM
F 016 L70 763 | (24.5.11) Bosch Power Tools
12 | English
en
Safety Notes
Warning! Read these instructions carefully, be famil-
iar with the controls and the proper use of the ma-
chine. Please keep the instructions safe for later use!
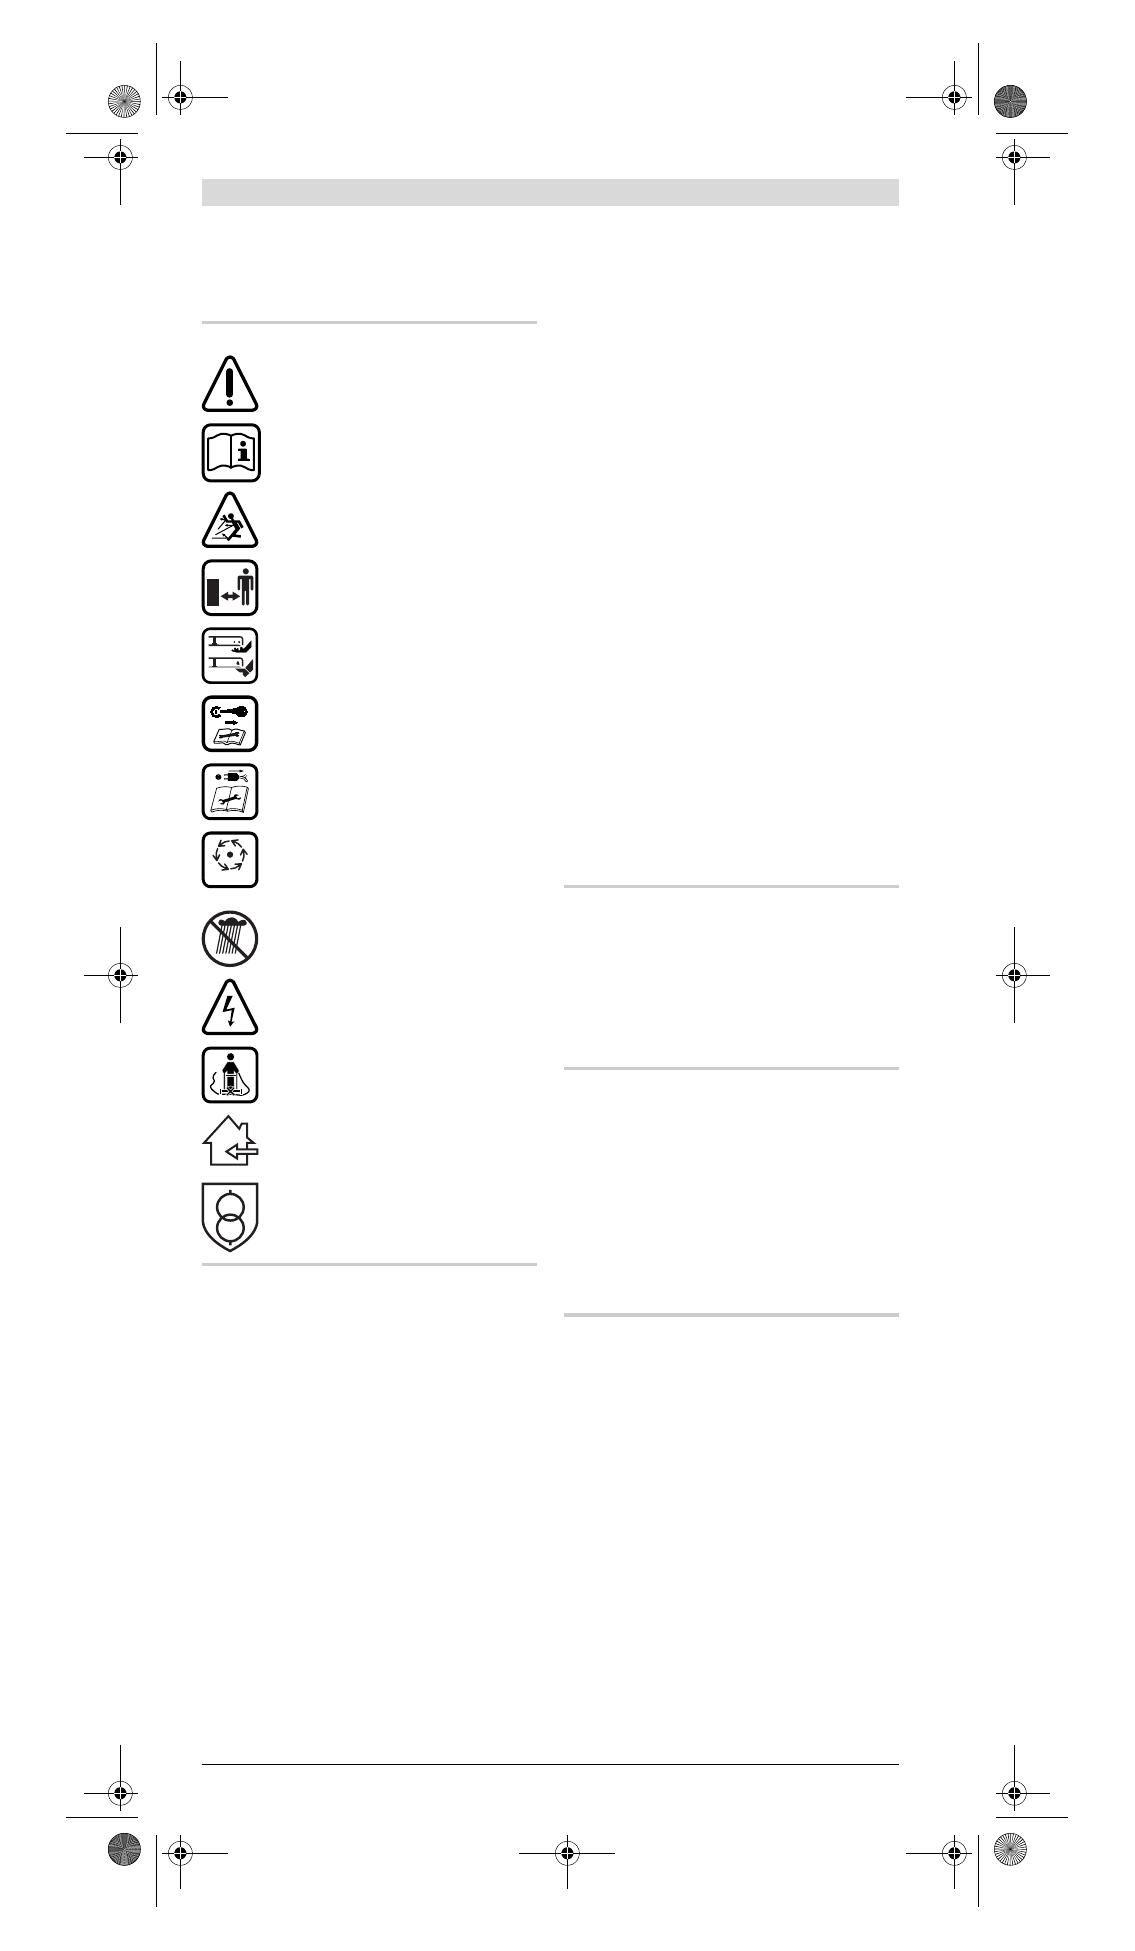
Explanation of symbols on the machine
General hazard safety alert.
Read instruction manual.
Pay attention that bystanders are not in-
jured through foreign objects thrown from
the machine.
Keep bystanders a safe distance away from
the machine.
Sharp blade(s). Beware of severing toes or
fingers.
Switch off and remove isolator key before
adjusting, cleaning and before leaving the
product unattended for any period.
Not applicable.
Wait until all machine components have
completely stopped before touching them.
The blades continue to rotate after the ma-
chine is switched off, a rotating blade can
cause injury.
Do not use the machine in the rain or leave
it outdoors when it is raining.
Beware electric shock hazard.
Keep supply flexible cord away from cut-
ting means.
Only use the battery charger indoors.
Battery charger contains a safety trans-
former.
Operation
f Never allow children or people unfamiliar with
these instructions to use the machine. Local regu-
lations may restrict the age of the operator. When
not in use store the machine out of reach of chil-
dren.
f This tool is not intended for use by persons (in-
cluding children) with reduced physical, sensory
or mental capabilities, or lack of experience and
knowledge, unless they have been given supervi-
sion or instruction concerning use of the appliance
by a person responsible for their safety.
Children should be supervised to ensure that they
do not play with the appliance.
f Never mow while people, especially children or
pets, are nearby.
f The operator or user is responsible for accidents
or hazards occurring to other people or their prop-
erty.
f Do not operate the machine when barefoot or
wearing open sandals, always wear substantial
footwear and long trousers.
f Thoroughly inspect the area where the machine is
to be used and remove all stones, sticks, wires,
bones and other foreign objects.
f Before using, always visually inspect to see that
the blades, blade bolts and cutter assembly are
not worn or damaged. Replace worn or damaged
blades and bolts in sets to preserve balance.
f Mow only in daylight or in good artificial light.
f Avoid operating the machine in wet grass, where
feasible.
f Walk, never run.
f Never operate the appliance with defective guards
or shields, or without safety devices, for example
deflectors and/or grass catchers in place.
f Working on banks can be dangerous.
Do not mow excessively steep slopes.
Always be sure of your footing on slopes or wet
grass.
Mow across the face of slopes
never up and
down.
Exercise extreme caution when changing direc-
tion on slopes.
Use extreme caution when stepping back or
pulling the machine towards you.
Never mow by pulling the mower towards you.
f Stop the blades if the machine has to be tilted for
transportation when crossing surfaces other than
grass and when transporting the machine to and
from the area to be mowed.
f Do not tilt the machine when starting or switching
on the motor, except if the machine has to be tilted
for starting in long grass. In this case, do not tilt it
more than absolutely necessary and tilt only the
part which is away from the operator. Always en-
sure that both hands are in the operating position
before returning the machine to the ground.
f Switch on the motor according to the instructions
with feet well away from rotating parts.
f Do not put hands or feet near or under rotating parts.
f Always stand clear of the discharge zone when op-
erating the machine.
f Never pick up or carry the machine while the motor
is running.
f Do not modify this product. Unauthorized modifi-
cations may impair the safety of your product and
may result in increased noise and vibration.
Remove the isolator key:
whenever you leave the machine,
before clearing a blockage,
before checking, cleaning or working on the
machine,
after striking a foreign object. Inspect the ma-
chine for damage and make repairs as neces-
sary,
if the machine starts to vibrate abnormally
(check immediately).
Maintenance
f Always wear gardening gloves when handling or
working near the sharp blades.
f Keep all nuts, bolts and screws tight to be sure
that the machine is in safe working condition.
f Check the grass catcher frequently for wear or de-
terioration.
f Examine the machine and replace worn or dam-
aged parts for safety.
f Ensure replacement cutting means of the right
type are used.
f Ensure replacement parts fitted are Bosch ap-
proved.
Recommendations for Optimal Handling of
the Battery
f Ensure the switch is in the off position before in-
serting battery pack. Inserting the battery pack into
machines that have the switch on invites accidents.
f Keep the battery charger away from rain or mois-
ture. Penetration of water in the battery charger
increases the risk of an electric shock.
f Recharge only with the charger specified by the
manufacturer. A charger that is suitable for one
type of battery pack may create a risk of fire when
used with another battery pack.
f Do not charge other batteries. The battery charg-
er is suitable only for charging Bosch lithium ion
batteries within the listed voltage range. Other-
wise there is danger of fire and explosion.
f Keep the battery charger clean. Contamination
can lead to danger of an electric shock.
f Before each use, check the battery charger, cable
and plug. If damage is detected, do not use the
battery charger. Never open the battery charger
yourself. Have repairs performed only by a quali-
fied technician and only using original spare
parts. Damaged battery chargers, cables and plugs
increase the risk of an electric shock.
STOP
OBJ_BUCH-1329-002.book Page 12 Tuesday, May 24, 2011 4:24 PM
English | 13
Bosch Power Tools F 016 L70 763 | (24.5.11)
f Do not operate the battery charger on easily in-
flammable surfaces (e. g., paper, textiles, etc.) or
surroundings. The heating of the battery charger
during the charging process can pose a fire hazard.
f Use only Bosch battery packs intended specifi-
cally for the machine. Use of any other battery
packs may create a risk of injury and fire.
f When battery pack is not in use, keep it away
from other metal objects like paper clips, coins,
keys, nails, screws, or other small metal objects
that can make a connection from one terminal to
another. Shorting the battery terminals together
may cause burns or a fire.
f Under abusive conditions, liquid may be ejected
from the battery; avoid contact. If contact acci-
dentally occurs, flush with water. If liquid con-
tacts eyes, additionally seek medical help. Liquid
ejected from the battery may cause irritations or
burns.
f Do not open the battery. Danger of short-
circuiting.
f Protect the battery against heat, e. g., against
continuous intense sunlight, fire, water, and
moisture. Danger of explosion.
f Do not short-circuit the battery. There is danger
of explosion.
f In case of damage and improper use of the bat-
tery, vapours may be emitted. Provide for fresh
air and seek medical help in case of complaints.
The vapours can irritate the respiratory system.
f Protect the battery against moisture and water.
f Store the battery only within a temperature range
between 0 °C and 50 °C. As an example, do not
leave the battery in the car in summer.
f Occasionally clean the venting slots of the battery
using a soft, clean and dry brush.
Symbols
The following symbols are important for reading and
understanding the operating instructions. Please take
note of the symbols and their meaning. The correct in-
terpretation of the symbols will help you to use the
garden product in a better and safer manner.
Intended Use
The garden product is intended for domestic lawn
mowing.
Technical Data
Symbol Meaning
Movement direction
Wear protective gloves
Weight
Switching On
Switching Off
Permitted action
Prohibited action
Accessories/Spare Parts
Cordless Lawnmower Rotak 34 LI Rotak 37 LI Rotak 43 LI
Article number
3 600 H81 E.. 3 600 H81 J.. 3 600 H81 K..
Blade width
cm 34 37 43
Height of cut
mm 20 70* 20 70* 20 70*
Grassbox, capacity
l4040 50
Weight according to EPTA-Procedure 01/2003
kg 12.8 13.0 13.7
Serial number
see type plate on the garden product
Battery
Li-Ion Li-Ion Li-Ion
Article number
2 607 336 107 2 607 336 107 2 607 336 107
Rated voltage
V= 36 36 36
Capacity
Ah 2.6 2.6 2.6
Charging period (battery discharged)**
min 60 60 60
Number of battery cells
20 20 20
Battery
Li-Ion Li-Ion Li-Ion
Article number
2 607 336 005 2 607 336 005 2 607 336 005
Rated voltage
V= 36 36 36
Capacity
Ah 4.5 4.5 4.5
Charging period (battery discharged)**
min 95 95 95
Number of battery cells
30 30 30
Battery Charger
AL 3620 CV
Professional
AL 3620 CV
Professional
AL 3620 CV
Professional
Article number
EU
UK
AU
2 607 225 657
2 607 225 659
2 607 225 661
2 607 225 657
2 607 225 659
2 607 225 661
2 607 225 657
2 607 225 659
2 607 225 661
Charging current
A2.02.0 2.0
Allowable charging temperature range
°C 0 45 0 45 0 45
Weight according to EPTA-Procedure 01/2003
kg 0.6 0.6 0.6
Protection class
/II /II /II
Battery Charger AL 3640 CV
Professional
AL 3640 CV
Professional
AL 3640 CV
Professional
Article number
EU
UK
AU
2 607 225 099
2 607 225 101
2 607 225 103
2 607 225 099
2 607 225 101
2 607 225 103
2 607 225 099
2 607 225 101
2 607 225 103
Charging current
A4.04.0 4.0
Allowable charging temperature range
°C 0 45 0 45 0 45
Weight according to EPTA-Procedure 01/2003
kg 1.0 1.0 1.0
Protection class
/II /II /II
*with the blanking plate removed
**with AL 3640 CV Professional charger
Please observe the article number on the type plate of your garden product. The trade names of the individual
garden products may vary.
OBJ_BUCH-1329-002.book Page 13 Tuesday, May 24, 2011 4:24 PM
F 016 L70 763 | (24.5.11) Bosch Power Tools
14 | English
Noise/Vibration Information
Declaration of Conformity
Equipment category: 32
Notified body:
SRL, Sudbury, England, Nr. 1088
Technical file at:
Bosch Lawn and Garden Ltd., PT-LG/EAE,
Stowmarket, Suffolk IP14 1EY, England
08
Robert Bosch GmbH, Power Tools Division
D-70745 Leinfelden-Echterdingen
14.09.2010
Mounting and Operation
Starting
For Your Safety
f Warning! Switch off, remove the isolator key and
the battery before adjusting, cleaning or if cable
is cut, damaged or entangled.
f The blades continue to rotate for a few seconds
after the machine is switched off.
f Caution
do not touch the rotating blade.
Battery Charging
f Do not use other battery chargers. The supplied
battery charger is designed for the Lithium-Ion bat-
tery in your garden product.
f Observe the mains voltage! The voltage of the
power supply must correspond with the data given
on the nameplate of the battery charger. Battery
chargers marked with 230 V can also be operated
with 220 V.
The battery is equipped with temperature monitoring
that allows charging only in the temperature range be-
tween 0 °C and 45 °C. In this manner, a high battery
service life is achieved.
Note: The battery is supplied partially charged. To en-
sure full capacity of the battery, completely charge the
battery in the battery charger before using your power
tool for the first time.
The lithium-ion battery can be charged at any time
without reducing its service life. Interrupting the
charging procedure does not damage the battery.
The “Electronic Cell Protection (ECP)” protects the
lithium ion battery against deep discharging. When the
battery is run down or discharged, the garden product
is shut off by means of a protective circuit: The blade
no longer moves.
Do not continue to press the
On/Off switch after the garden
product has been automatically switched off. The
battery can be damaged.
Charging Procedure
The charging procedure starts as soon as the mains
plug of the battery charger is plugged into the socket
outlet and the battery is inserted into the charging
compartment.
Due to the intelligent charging method, the charging
condition of the battery is automatically detected and
the battery is charged with the optimum charging cur-
rent, depending on battery temperature and voltage.
This gives longer life to the battery and always leaves
it fully charged when kept in the charger for storage.
Rapid-charging Procedure
The rapid-charging procedure is indicated by flashing
of the green charge control LED.
Indication element of the battery: During the charging
procedure, the three green LEDs light up one after the
other and briefly go out. The battery is fully charged
when the three green LEDs light up continuously. The
three LEDs go out again approx. 5 minutes after the
battery has been fully charged.
Note: The rapid-charging procedure is only possible when
the battery temperature is within the allowable charging
temperature range, see section “Technical Data”.
Battery Charged
Measured sound values determined according to 2000/14/EC (1.60 m
height, 1 m distance away).
3 600 ... H81 E.. H81 J.. H81 K..
Typically the A-weighted noise levels of the product are:
Sound pressure level
Sound power level
Uncertainty K
Wear hearing protection!
dB(A)
dB(A)
dB
81.0
89.4
=0.6
81.0
89.7
=0.3
81.0
90.2
=0.8
Vibration total values (triax vector sum) determined according to
EN 60335:
Vibration emission value a
h
Uncertainty K
m/s
2
m/s
2
<2.5
=1.5
<2.5
=1.5
<2.5
=1.5
3 600 ... H81 E.. H81 J.. H81 K..
We declare under our sole responsibility that the product described un-
der “Technical data” is in conformity with the following standards or
standardization documents: EN 60335, EN 50338 (battery powered
product) and EN 60335 (battery charger) according to the provisions of
the directives 2006/95/EC, 2004/108/EC, 2006/42/EC, 2000/14/EC.
2000/14/EC: Guaranteed sound power level
Conformity assessment procedure according to Annex VI.
dB(A) 90.0 90.0 91.0
Dr. Egbert Schneider
Senior Vice President
Engineering
Dr. Eckerhard Strötgen
Head of Product
Certification
Action Figure
Delivery Scope 1
Handle Assembly 2
Snap together the Grassbox 3
Grassbox fitting/removing 4
Battery Charging 5
Inserting/Removing the Battery 6
Remove Isolator Key and fit in the Storage
Position
7
Adjusting the Cutting Height 8
Starting 9
Stopping 9
Working Advice 9
10
Blade Maintenance 11
Selecting Accessories 12
AL 3640 CV
Professional
AL 3620 CV
Professional
AL 3640 CV
Professional
AL 3620 CV
Professional
W
ARN
I
N
G
OBJ_BUCH-1329-002.book Page 14 Tuesday, May 24, 2011 4:24 PM
English | 15
Bosch Power Tools F 016 L70 763 | (24.5.11)
Continuous lighting of the green charge control LED
signals that the battery is fully charged.
Additionally, a signal tone sounds for approx.
2 seconds, which acoustically indicates that the bat-
tery is fully charged.
Afterwards, the battery can be removed for immediate
use.
With no battery inserted, continuous lighting of the
green charge control LED indicates that the mains
plug is plugged into the socket and that the battery
charger is ready for operation.
Battery Temperature below 0 °C and
above 45 °C
Continuous lighting of the red LED indicates that the
battery temperature is not within the rapid-charging
temperature range of 0 °C
45 °C. As soon as the al-
lowable temperature range is reached, the battery
charger automatically switches to rapid charging.
When the battery is not within the allowable tempera-
ture range, the red battery LED lights up when insert-
ing the battery into the battery charger.
No charging procedure possible
If a different malfunction of the charging procedure is
present, this will be indicated through flashing of the
red charge control LED.
The charging procedure cannot be started and the bat-
tery cannot be charged (see section “Troubleshooting”).
Charging Advice
With continuous or several repetitive charging cycles
without interruption, the charger can warm up. This is
not meaningful and does not indicate a technical de-
fect of the battery charger.
A significantly reduced working period after charging in-
dicates that the battery is used and must be replaced.
Observe the notes for disposal.
Battery Cooling (Active Air Cooling)
The fan control integrated in the battery charger con-
trols the temperature of the inserted battery. When
the battery temperature is above 30 °C, a fan cools
down the battery to the optimal charging temperature.
The switched-on fan produces a fan noise.
The battery temperature is within the optimal charging
temperature range when the fan is not running. Anoth-
er reason for a non working fan might be that it is de-
fective. In this case, the charging time of the battery
might be extended.
Working Advice
Battery Charge-control Indication
The battery is equipped with a charge-control indica-
tor which indicates its charge condition. The charge-
control indicator consists of 3 green LEDs.
Press the button to actuate the charge-control
indicator. After approx. 5 seconds, the charge-control
indicator goes out automatically.
The charge condition can also be checked when the
battery is removed.
When no LED lights up after actuating the button, the
battery is defective and must be replaced.
For safety reasons, the charge condition of the battery
can only be checked when the garden product is at a
standstill.
During the charging procedure, the three green LEDs
light up one after the other and briefly go out. The bat-
tery is fully charged when the three green LEDs light
up continuously. The three LEDs go out again approx.
5 minutes after the battery has been fully charged.
Temperature Control Indicator
The red LED signals that the battery or the electronics
of the garden product (with battery inserted) are not
within the optimum temperature range. When this oc-
curs the garden product will not operate or not at full
capacity.
Temperature Control of the Battery
The red LED flashes when pushing button or pressing
the On/Off switch (when the battery is inserted): The
battery is not wihin the temperature range for opera-
tion of
10 °C to +60 °C.
The battery switches off at a temperature above 70 °C
until the optimum temperature range is reached again.
Temperature Control of the Garden Prod-
uct Electronics
The red LED lights up continuously when pressing the
On/Off switch: The temperature of the garden product
electronics is below 5 °C or above 75 °C.
At a temperature above 90 °C, the electronics of the
garden product switch off until the temperature is
within the allowable temperature range again.
Area of Cut (Battery Duration)
The area of cut (battery duration) depends on lawn
conditions, grass density, mositure content, grass
length and height of cut.
Switching the machine on and off frequently during
cutting will also reduce the area of cut (battery dura-
tion).
To improve the area of cut (battery duration) it is rec-
ommended to cut more frequently, raise the cutting
height and walk at a normal pace.
The example below shows impact of conditions
against run time, for one battery.
*with battery 2 607 336 107
To increase the run time an additional battery or high-
er capacity battery (Ah) can be purchased from an au-
thorised customer service agent for Bosch garden
products.
AL 3640 CV
Professional
AL 3620 CV
Professional
AL 3640 CV
Professional
AL 3620 CV
Professional
LED Indicators Battery Capacity
Continuous lighting of 3 green LEDs
2/3
Continuous lighting of 2 green LEDs
1/3
Continuous lighting of 1 green LED
1/3
Flashing of 1 green LED Reserve
Cutting Conditions
Very light, dry
grass
Light, dry grass Medium, dense
grass
Area of cut (Rotak 34 LI)*
up to 300 m
2
up to 150 m
2
up to 100 m
2
Area of cut (Rotak 37 LI)*
up to 300 m
2
up to 150 m
2
up to 100 m
2
Area of cut (Rotak 43 LI)*
up to 300 m
2
up to 150 m
2
up to 100 m
2
6cm
4cm
8cm
4cm
15cm
4cm
OBJ_BUCH-1329-002.book Page 15 Tuesday, May 24, 2011 4:24 PM
F 016 L70 763 | (24.5.11) Bosch Power Tools
16 | English
Troubleshooting
Maintenance and Service
Battery Maintenance
f Warning! Switch off, remove the isolator key,
battery and grassbox before adjusting or clean-
ing.
f Always wear gardening gloves when handling or
working near the sharp blades.
Use the following procedures to enable optimum us-
age of the battery:
Protect the battery against moisture and water.
Store the battery only within a temperature range
between 0 °C and 50 °C. As an example, do not
leave the battery in the car in summer.
Do not leave the battery in the product in direct
sunlight.
The ideal storage condition for the battery is 5 °C.
Occasionally clean the venting slots of the battery
using a soft, clean and dry brush.
A significantly reduced working period after charging
indicates that the battery is used and must be re-
placed.
STOP
Problem Possible Cause Corrective Action
Garden product
fails to operate
Possible clogging Check underneath the garden product and
clear out as necessary (always wear garden-
ing gloves)
Battery not fully charged Battery Charging
Battery not inserted (properly) Inserting the Battery
Fuse faulty/blown in isolator key Contact Service Agent
Grass too long Increase height of cut and tilt garden prod-
uct to reduce starting load
Motor protector has activated Allow motor to cool and increase height of cut
Battery too hot/cold Allow to cool/warm
Isolator key not inserted correctly/fully Fit correctly
There is a short delay in the motor starting
after engaging the On/Off switch
Hold On/Off switch for 1
3 s to start motor
Motor starts and
stops immediately
Battery not fully charged Battery Charging
Isolator key not inserted correctly/fully Fit correctly
Battery not inserted (properly) Inserting the Battery
Battery too hot/cold Allow to cool/warm
Increase height of cut
Garden product
functions
intermittently
Internal wiring of garden product damaged Contact Service Agent
Motor protector has activated Allow motor to cool and increase height of
cut
Garden product
leaves ragged finish
and/or
Motor labours
Height of cut too low Increase height of cut
Cutting blade blunt Replace the blade
Possible clogging Check underneath the garden product and
clear out as necessary (always wear garden-
ing gloves)
Blade fitted upside down Refit blade correctly
Area of cut (battery
duration) not large
enough
Height of cut too low Increase height of cut and walk slower
Grass too high Increase height of cut and walk slower
Grass wet or damp Wait until grass is dry and walk slower
Grass is dense Increase height of cut, walk slower and cut
more frequently
An additional battery can be purchased from
an authorised customer service agent for
Bosch garden products
Contact Service Agent
Cutting blade not
rotating while gar-
den product
switched on
Cutting blade obstructed Switch off garden product
Clear obstruction (always wear gardening
gloves)
Blade nut/bolt loose Tighten blade nut/bolt (17 Nm)
Excessive vibra-
tions/noise
Blade nut/bolt loose Tighten blade nut/bolt (17 Nm)
Cutting blade damaged Replace the blade
No charging proce-
dure possible
Battery contacts contaminated Clean the battery contacts (e.g. by inserting
and removing the battery several times) or
replace the battery
The battery is defective, due to a disconnec-
tion in the battery (individual cells)
Replace the battery
The charge control
LEDs and respec-
tively, do not light
up after inserting
the mains plug into
the socket
Mains plug of battery charger not plugged in
(properly)
Insert mains plug (fully) into the socket out-
let
Socket outlet, mains cable or battery charger
defective
Check the mains voltage and if necessary,
have the battery charger checked by an au-
thorized customer service station for Bosch
power tools
OBJ_BUCH-1329-002.book Page 16 Tuesday, May 24, 2011 4:24 PM
English | 17
Bosch Power Tools F 016 L70 763 | (24.5.11)
After-sales Service and Customer Assist-
ance
www.bosch-garden.com
In all correspondence and spare parts orders, please
always include the 10-digit article number given on the
type plate of the garden product.
Great Britain
Robert Bosch Ltd. (B.S.C.)
P.O. Box 98
Broadwater Park
North Orbital Road
Denham
Uxbridge
UB 9 5HJ
Tel. Service: +44 (0844) 736 0109
Fax: +44 (0844) 736 0146
E-Mail: boschservicecentre@bosch.com
Ireland
Origo Ltd.
Unit 23 Magna Drive
Magna Business Park
City West
Dublin 24
Tel. Service: +353 (01) 4 66 67 00
Fax: +353 (01) 4 66 68 88
Australia, New Zealand and Pacific Islands
Robert Bosch Australia Pty. Ltd.
Power Tools
Locked Bag 66
Clayton South VIC 3169
Customer Contact Center
Inside Australia:
Phone: +61 (01300) 307 044
Fax: +61 (01300) 307 045
Inside New Zealand:
Phone: +64 (0800) 543 353
Fax: +64 (0800) 428 570
Outside AU and NZ:
Phone: +61 (03) 9541 5555
www.bosch.com.au
Republic of South Africa
Customer service
Hotline: +27 (011) 6 51 96 00
Gauteng – BSC Service Centre
35 Roper Street, New Centre
Johannesburg
Tel.: +27 (011) 4 93 93 75
Fax: +27 (011) 4 93 01 26
E-Mail: bsctools@icon.co.za
KZN – BSC Service Centre
Unit E, Almar Centre
143 Crompton Street
Pinetown
Tel.: +27 (031) 7 01 21 20
Fax: +27 (031) 7 01 24 46
E-Mail: [email protected]sch.com
Western Cape – BSC Service Centre
Democracy Way, Prosperity Park
Milnerton
Tel.: +27 (021) 5 51 25 77
Fax: +27 (021) 5 51 32 23
Bosch Headquarters
Midrand, Gauteng
Tel.: +27 (011) 6 51 96 00
Fax: +27 (011) 6 51 98 80
Environmental Protection
Rotak 34/37 LI
Environmental label “Blue Angel”.
Awarded for low noise and low emission
garden tools.
RAL-UZ 129
Transport
The contained lithium-ion batteries are subject to the
Dangerous Goods Legislation requirements. The user
can transport the batteries by road without further re-
quirements.
When being transported by third parties (e.g.: air
transport or forwarding agency), special requirements
on packaging and labelling must be observed. For
preparation of the item being shipped, consulting an
expert for hazardous material is required.
Dispatch batteries only when the housing is undam-
aged. Tape or mask off open contacts and pack up the
battery in such a manner that it cannot move around in
the packaging.
Please also observe possibly more detailed national
regulations.
Disposal
Do not dispose of garden products, battery chargers
and batteries/rechargeable batteries into household
waste!
Only for EC countries:
According to the European law
2002/96/EC, electrical and electronic
equipments that are no longer usable,
and according to the European law
2006/66/EC, defective or used battery
packs/batteries, must be collected sepa-
rately and disposed of in an environmentally correct
manner.
Batteries no longer suitable for use can be directly re-
turned at:
Great Britain
Robert Bosch Ltd. (B.S.C.)
P.O. Box 98
Broadwater Park
North Orbital Road
Denham
Uxbridge
UB 9 5HJ
Tel. Service: +44 (0844) 736 0109
Fax: +44 (0844) 736 0146
E-Mail: boschservicecentre@bosch.com
Battery packs/batteries:
Li-Ion:
Please observe the instructions in
section “Transport”.
Subject to change without notice.
OBJ_BUCH-1329-002.book Page 17 Tuesday, May 24, 2011 4:24 PM
  • Page 1 1
  • Page 2 2
  • Page 3 3
  • Page 4 4
  • Page 5 5
  • Page 6 6
  • Page 7 7
  • Page 8 8
  • Page 9 9
  • Page 10 10
  • Page 11 11
  • Page 12 12
  • Page 13 13
  • Page 14 14
  • Page 15 15
  • Page 16 16
  • Page 17 17
  • Page 18 18
  • Page 19 19
  • Page 20 20
  • Page 21 21
  • Page 22 22
  • Page 23 23
  • Page 24 24
  • Page 25 25
  • Page 26 26
  • Page 27 27
  • Page 28 28
  • Page 29 29
  • Page 30 30
  • Page 31 31
  • Page 32 32
  • Page 33 33
  • Page 34 34
  • Page 35 35
  • Page 36 36
  • Page 37 37
  • Page 38 38
  • Page 39 39
  • Page 40 40
  • Page 41 41
  • Page 42 42
  • Page 43 43
  • Page 44 44
  • Page 45 45
  • Page 46 46
  • Page 47 47
  • Page 48 48
  • Page 49 49
  • Page 50 50
  • Page 51 51
  • Page 52 52
  • Page 53 53
  • Page 54 54
  • Page 55 55
  • Page 56 56
  • Page 57 57
  • Page 58 58
  • Page 59 59
  • Page 60 60
  • Page 61 61
  • Page 62 62
  • Page 63 63
  • Page 64 64
  • Page 65 65
  • Page 66 66
  • Page 67 67
  • Page 68 68
  • Page 69 69
  • Page 70 70
  • Page 71 71
  • Page 72 72
  • Page 73 73
  • Page 74 74
  • Page 75 75
  • Page 76 76
  • Page 77 77
  • Page 78 78
  • Page 79 79
  • Page 80 80
  • Page 81 81
  • Page 82 82
  • Page 83 83
  • Page 84 84
  • Page 85 85
  • Page 86 86
  • Page 87 87
  • Page 88 88
  • Page 89 89
  • Page 90 90
  • Page 91 91
  • Page 92 92
  • Page 93 93
  • Page 94 94
  • Page 95 95
  • Page 96 96
  • Page 97 97
  • Page 98 98
  • Page 99 99
  • Page 100 100
  • Page 101 101
  • Page 102 102
  • Page 103 103
  • Page 104 104
  • Page 105 105
  • Page 106 106
  • Page 107 107
  • Page 108 108
  • Page 109 109
  • Page 110 110
  • Page 111 111
  • Page 112 112
  • Page 113 113
  • Page 114 114
  • Page 115 115
  • Page 116 116
  • Page 117 117
  • Page 118 118
  • Page 119 119
  • Page 120 120
  • Page 121 121
  • Page 122 122
  • Page 123 123
  • Page 124 124
  • Page 125 125
  • Page 126 126
  • Page 127 127
  • Page 128 128
  • Page 129 129
  • Page 130 130
  • Page 131 131
  • Page 132 132
  • Page 133 133
  • Page 134 134
  • Page 135 135
  • Page 136 136
  • Page 137 137
  • Page 138 138
  • Page 139 139
  • Page 140 140
  • Page 141 141
  • Page 142 142
  • Page 143 143
  • Page 144 144
  • Page 145 145
  • Page 146 146
  • Page 147 147
  • Page 148 148
  • Page 149 149
  • Page 150 150
  • Page 151 151
  • Page 152 152
  • Page 153 153
  • Page 154 154
  • Page 155 155
  • Page 156 156
  • Page 157 157
  • Page 158 158
  • Page 159 159
  • Page 160 160
  • Page 161 161
  • Page 162 162
  • Page 163 163
  • Page 164 164
  • Page 165 165
  • Page 166 166
  • Page 167 167
  • Page 168 168
  • Page 169 169
  • Page 170 170
  • Page 171 171
  • Page 172 172
  • Page 173 173
  • Page 174 174
  • Page 175 175
  • Page 176 176

Bosch ROTAK 34 User manual

Category
Lawnmowers
Type
User manual
This manual is also suitable for

Ask a question and I''ll find the answer in the document

Finding information in a document is now easier with AI