Salus ST898ZB Installation guide

Category
Thermostats
Type
Installation guide

Salus ST898ZB is a smart thermostat that can be controlled remotely via an app or voice commands. It offers precise temperature control, energy-saving features, and compatibility with a variety of HVAC systems. With its sleek design and intuitive interface, the ST898ZB is a great choice for those looking to upgrade their home's heating and cooling system. It's easy to install and configure, making it a perfect DIY project for homeowners.

Salus ST898ZB is a smart thermostat that can be controlled remotely via an app or voice commands. It offers precise temperature control, energy-saving features, and compatibility with a variety of HVAC systems. With its sleek design and intuitive interface, the ST898ZB is a great choice for those looking to upgrade their home's heating and cooling system. It's easy to install and configure, making it a perfect DIY project for homeowners.

OPTIMA S THERMOSTAT
INSTALLATION GUIDE
SALUS North America, Inc.
2215 Cornell Avenue
Montgomery, IL 60538
www.salusinc.com
STEP 1
TURN OFF POWER TO THE HVAC SYSTEM
STEP 2
DETERMINE WIRING CONFIGURATION
or
Use the Wire Labels and the following table to keep track of wire colors
on the old thermostat or on the heat pump / furnace / air conditioner.
HP
NON-HP
Wire Color
R
R or RH
---
RC
C
Y or Y1
Y2
AUX
W or W1
O/B
W2
G
L
---
For new installations, refer to Appendix A and the Install Mounting Plate
sections of the Optima S User Manual.
STEP 3
REMOVE OLD THERMOSTAT
STEP 4
INSTALL MOUNTING PLATE
Remove the old thermostat from the wall, taking care not to allow
the wiring to fall inside the wall.
If there is space on the wall that needs to be covered, insert the Wall Plate
between the Mounting Plate and the wall, and mount both plates using
the same screws.
Make sure the wires run through the center opening.
or
Thermostat with
Mounting Plate
Wall Plate
2 x Wall Plate Spacers
2 x Wood Screws
2 x Wall Anchors
2 x Locking Pins
Wire
Labels
2 x AA
Alkaline
Batteries
User
Manual
Installation
Guide
#1 Phillips or flathead screwdriver
Drill with 3/16” bit
(only if you cannot mount the thermostat using the existing
holes)
Optional Tools
Smartphone or digital camera to take picture of wiring for later
reference
Screwdriver to disconnect wires from old thermostat
Pencil
TIP: Wrap the
wire ends around
a long stick (such
as a pencil) to
keep the wires
from falling into
the wall.
[email protected] SMC-QG-ST898ZB-EN-202208v1
Copyright © SALUS North America, Inc. 2022
STEP 5
ATTACH WIRING
STEP 6
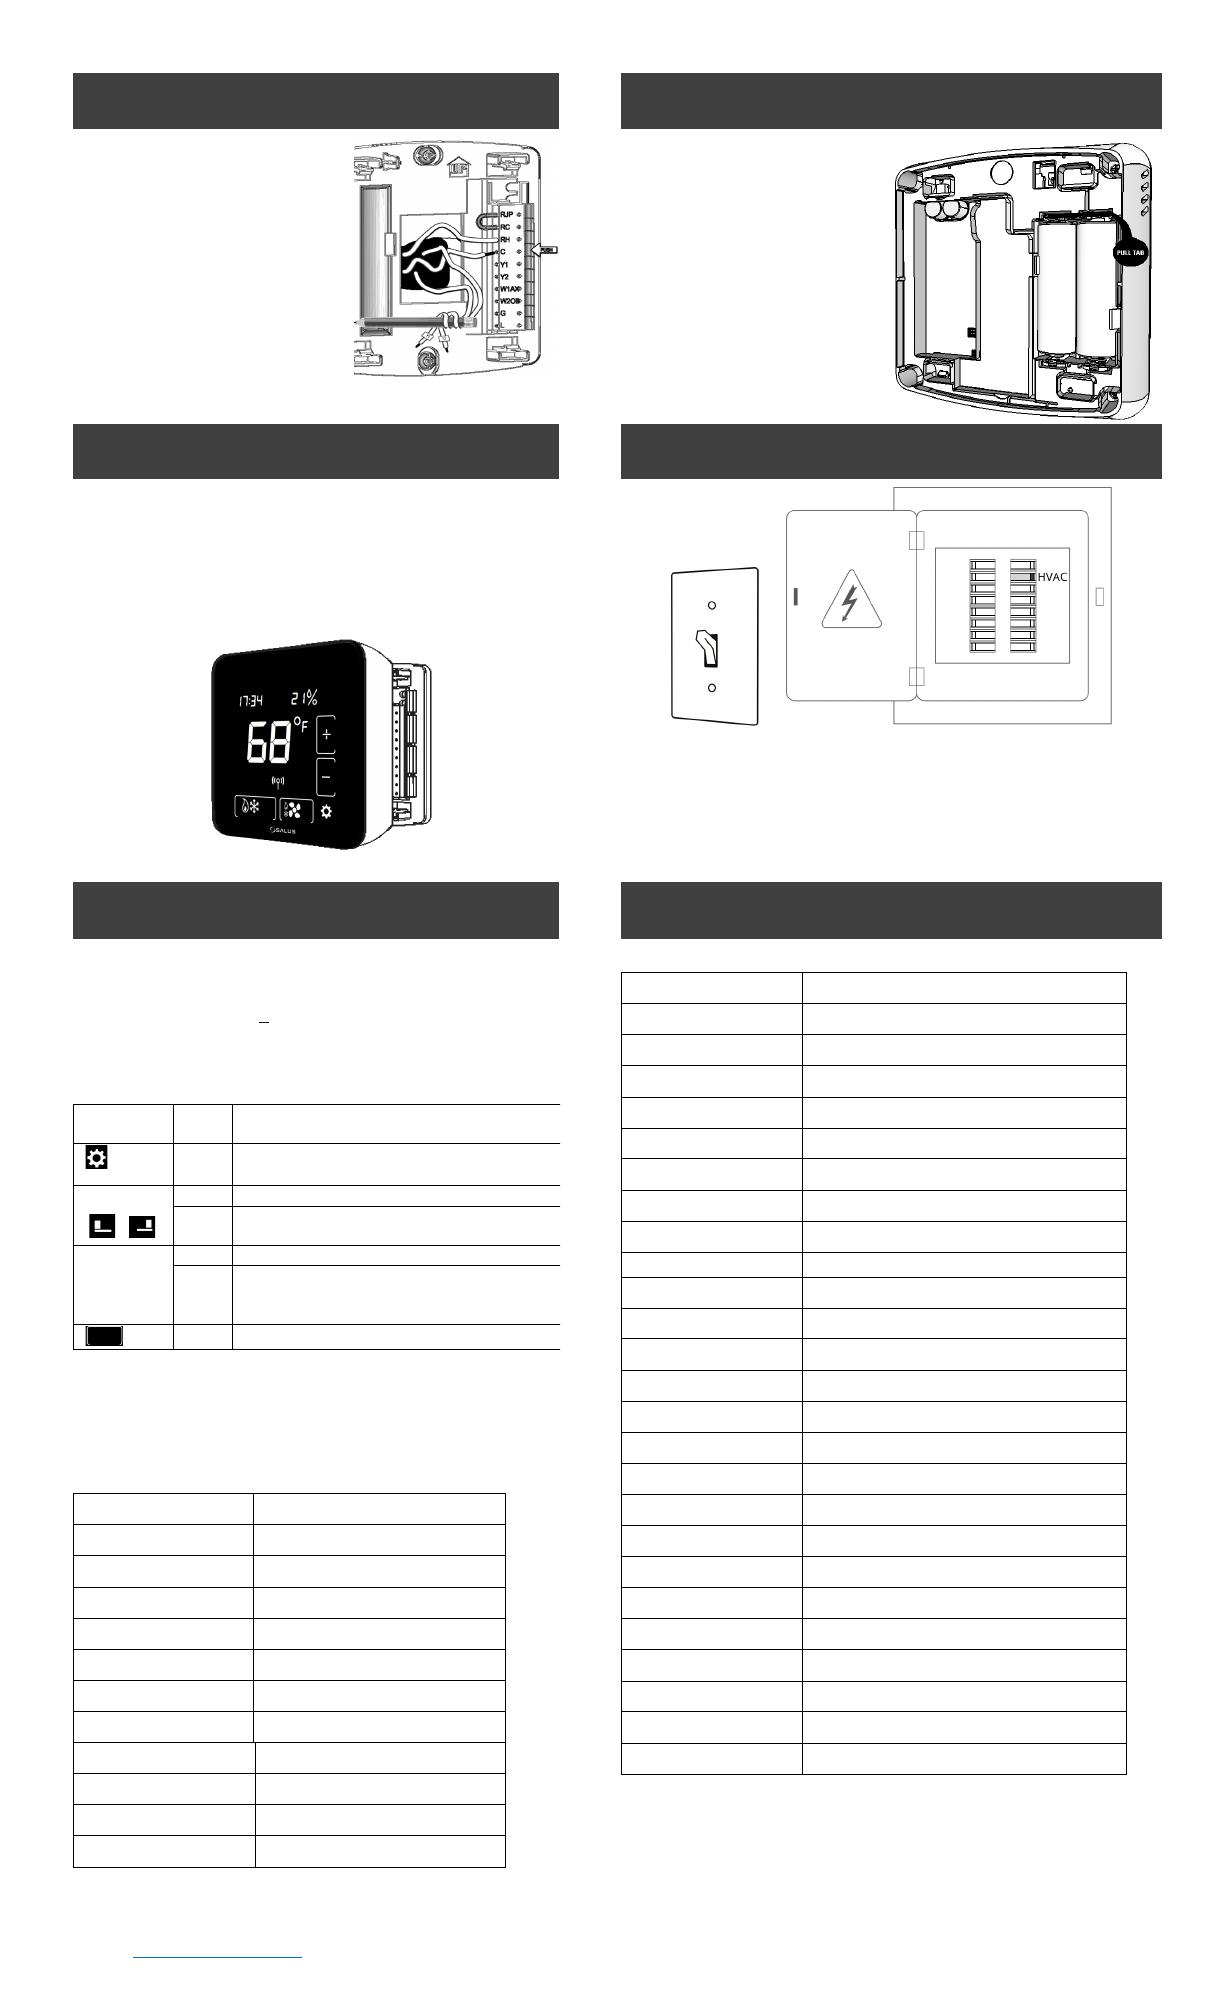
CONNECT THE BATTERIES
Using the labels, match the
wires to the appropriate
terminal.
For each wire, press the
terminal button and fully insert
the wire into the side hole.
Release the terminal button to
secure the wire.
If you have RC and RH wires,
remove the jumper betweeen
RC and RJP.
ST898ZBR works as a router and requires RH/RC and C-wire.
Pull the battery tab from the
back of the thermostat to
activate the batteries.
If the C wire is connected, the
thermostat will draw power
from the AC connection and
use the batteries as backup.
Battery-only operation
typically lasts 18 months.
ST898ZBR works as a router
and cannot run on batteries.
STEP 7
ATTACH THERMOSTAT TO MOUNTING PLATE
STEP 8
TURN POWER BACK ON TO THE HVAC SYSTEM
After the initial configuration, the home screen will be displayed,
and the thermostat is ready to be attached to the Mounting Plate.
Align the connector pins and the plastic retention posts, then
push the thermostat onto the Mounting Plate.
Make sure the connector pins are not bent and that the
thermostat is fully seated on the Mounting Plate.
or
STEP 9
INITIAL CONFIGURATION
OPTIONAL STEP
CONFIGURE THE NEW THERMOSTAT
After initial power-up, the thermostat will attempt to pair with a
network for 10 minutes. You may need to initiate scanning for
devices in your connected home system. Once paired, canceled
with the Down button ( X ), or timed out, the device will ask for
the following initial settings.
To move forward and back through the Settings menu and make
any changes to the settings, the buttons function as follows:
Touch
Button
Type
Action
Settings
--
Enter Settings menu,
Save and go to next parameter setup
+ or
/
Short
Increment parameter value by 1
Long
After long press time, increment by 1 at 4 Hz
rate while key remains down
-
Short
Decrement parameter value by 1
Long
If applicable, decrement value by 1. After long
press time, decrement by 1 at 4 Hz rate while
key remains down
Back
--
Save and go to previous parameter setup
After 30 seconds of no user input, changes will be saved, and the
device will return to Home screen.
Configuration Parameters
See “Configuring the Thermostat” section in the Optima S User
Manual for more details.
EQPT TYP-
Choose HVAC Type
REVERS VALVE-
Set Reversing Valve
FAN CNTL-
Select fan control
AUX FUNC-
Auxiliary Relay function
AUX ACTIVE-
Auxiliary Relay operation
TEMP SEL-
Internal or remote temperature sensor
INT TEMP OFFST
Internal temperature sensor offset
RMT TEMP OFFST
Remote temperature sensor offset
DLTA 1ST STAGE
Heating differential 1st stage
DLTA 2ND STAGE
Heating differential 2nd stage
DLTA 1ST STAGE
Cooling differential 1st stage
DLTA 2ND STAGE
Cooling differential 2nd stage °
Settings that can be changed include:
Y1Y2 MIN OFF T
Compressor protection.
FAN DELAY
Fan Delay after cooling stops.
HEAT MAX SETPT
Max Heating Set point
COOL MIN SETPT
Min Cooling Set point
DEAD BAND
Dead band value is used for Auto mode.
SET FROST TEMP
Frost setpoint
HEAT PROTECT
Heat Protect Setpoint
LOCK SRC-
Key Lock Source (Device+App or App Only)
LCK-
Key Lock Type (Mode / FAN / Set Pt / Param / Combinations)
DEGREE UNITS
C/F Selection
BRIGHTNESS
Set display brightness
DISPLAY ON-
Display On Time in seconds
LANGUAGE-
Language Selection
24 HOUR CLOCK
Time Display Format
shOw HUMIDITY
Show or hide humidity reading
HUMIDITY SETPT
Humidity Set Point
TIME
Set Time and Date (see note)
DST ADJUST
Enable Day Light Saving (see note)
SET YEAR
Set Year (see note)
DATE M/D-
Set Month and Date (see note)
EDIT-
Display current schedule mode:
LOCK KEYS?
To lock and unlock the keypad
IDENTIFY?
Identify devices on the shared channel
JOIN NETWORK?
Initiate Join to available network
NEW NETWORK?
Delete network and Join new network
FACTORY RESET?
Reset to Factory default settings
Note: These settings will not appear if you are connected to the Internet.
  • Page 1 1
  • Page 2 2

Salus ST898ZB Installation guide

Category
Thermostats
Type
Installation guide

Salus ST898ZB is a smart thermostat that can be controlled remotely via an app or voice commands. It offers precise temperature control, energy-saving features, and compatibility with a variety of HVAC systems. With its sleek design and intuitive interface, the ST898ZB is a great choice for those looking to upgrade their home's heating and cooling system. It's easy to install and configure, making it a perfect DIY project for homeowners.

Ask a question and I''ll find the answer in the document

Finding information in a document is now easier with AI