
Connection
S-Video
Note:
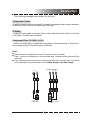
The following available video output for this unit .
Use the AVc able (yellow terminal)to connect composite video output terminal
of this unit to the TV/monitor video input terminal.
Use the S-video cable to connect the s-video output terminal of this unit to the
TV/monitor S-video input terminal.
Use -core AV cable to connect the component output terminals of this unit to
3
the corresponding TV/monitor input terminals.
Component Video (Y, Cb/Pb, Cr/Pr)
Composite Video
Connection
S-Video
Note:
The following available video output for this unit .
Use the AVc able (yellow terminal)to connect composite video output terminal
of this unit to the TV/monitor video input terminal.
Use the S-video cable to connect the s-video output terminal of this unit to the
TV/monitor S-video input terminal.
Use -core AV cable to connect the component output terminals of this unit to
3
the corresponding TV/monitor input terminals.
Component Video (Y, Cb/Pb, Cr/Pr)
Composite Video
Y
Cb/Pb
Cr/Pr
Component Input
YCr/PrCb/Pb
Component Video
Output
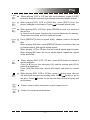
VIDEO
S-VIDEO
Connection
S-Video
Note:
The following available video output for this unit .
Use the AVc able (yellow terminal)to connect composite video output terminal
of this unit to the TV/monitor video input terminal.
Use the S-video cable to connect the s-video output terminal of this unit to the
TV/monitor S-video input terminal.
Use -core AV cable to connect the component output terminals of this unit to
3
the corresponding TV/monitor input terminals.
Component Video (Y, Cb/Pb, Cr/Pr)
Composite Video
Y
Cb/Pb
Cr/Pr
Component Input
YCr/PrCb/Pb
Component Video
Output
VIDEO
S-VIDEO
VIDEO
S-VIDEO
Video and
S-Video Output
Real connection depends on the TV/monitor input terminal.
Don't use the all connections at the same time, otherwise the picture will be
affected.
Only the physical connection conforms to the video setting can it produce
the normal picture (please refer to the Video Setup in System Setup).
-7-


 1
1
 2
2
 3
3
 4
4
 5
5
 6
6
 7
7
 8
8
 9
9
 10
10
 11
11
 12
12
 13
13
 14
14
 15
15
 16
16
 17
17
 18
18
 19
19
 20
20
 21
21
 22
22


