Page is loading ...

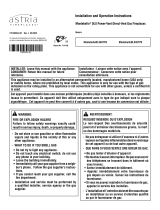
Figure 1 - Kit components
Parts Included With Kit:
KEY NO. CATALOG NO. DESCRIPTION QTY.
1 J7881 Side Face Filler 2
2 J7889 Rail, Barrier Linear 1
3 J7457 Barrier 43" 1
4 J7890 Retainer, safety Barrier 2
5 900750-00 Instruction Sheet 1
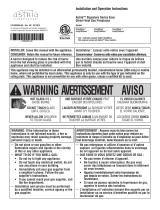
WARNING: The installation of this kit is required
when draft shield kit is installed.
READ ALL THE STEPS BEFORE STARTING THE INSTALLATION
THE FIREPLACE MUST BE OFF AND COLD BEFORE BEGINNING.
ALL WARNINGS, PRECAUTIONS AND INSTRUCTIONS IN THE
INSTALLATION AND OPERATION MANUAL PROVIDED WITH THE
APPLIANCE APPLY TO THESE INSTRUCTIONS.
If you encounter any problems, need clarification of these instructions
or are not qualified to properly install this kit, contact you local dis-
tributor or dealer.
1
2
4
3
INSTALLING BARRIER
1. Remove old side fillers and replace with new side fillers. New
side fillers have the barrier retainer slots already attached. See
Figure 2.
Figure 2 - Installing Side Face Fillers
INSTALLATION INSTRUCTIONS FOR LVI43B VF BARRIER KIT (F2882)
[FOR USE WHEN UPGRADING MODELS PARISLIGHTS43ZEN/ZEP, LEXINGTONLIGHTS43ZEN/ZEP AND VRL4543ZEN/ZEP]
VF BARRIER KIT
43" VENT-FREE LINEAR FIREPLACES
P/N 900750-00
Rev. C, 04/2018
HEARTH PRODUCTS
KITS AND ACCESSORIES
NOTE: DIAGRAMS & ILLUSTRATIONS ARE NOT TO SCALE.
If any of these parts are missing or damaged, contact your dealer or
IHP.us.com for referral information.

Figure 3 - Positioning Rail
3. Slide hood through screws as shown in Figure 4. Tighten screws
securing both rail barrier and hood to fireplace.
4. Hold barrier in front of the fireplace face and slide it up into the
channel underneath the upper front face. see Figure 5.
5. Slide the barrier bottom down into the slots securing it in place.
Figure 4 - Installing Hood
Figure 5 - Installing barrier
Upper Front Face
Bottom
Front Face
Barrier
Frame
Slot
Channel
2. locate screws at the front face and remove as shown on Figure
3. Mount rail barrier using screws recently removed but do not
overtighten.
Innovative Hearth Products reserves the right to make changes at any time, without notice, in
design, materials, specifications, prices and also to discontinue colors, styles and products.
Consult your local distributor for fireplace code information.
Printed in U.S.A. © 2016 Innovative Hearth Products LLC
P/N 900750-00 Rev. C 04/2018 1769 East Lawrence Street • Russellville, AL 35654
NOTE: DIAGRAMS & ILLUSTRATIONS ARE NOT TO SCALE.
/