Page is loading ...

Use & Safety Instructions
Save This Document Keep these instructions for the safety warnings and precautions, assembly, operating, inspection, maintenance and cleaning procedures. Write the product’s
serial number on this document (or month and year of purchase if product has no number). Keep this document and the receipt in a safe and dry place for future reference.
Visit our website at: http://www.harborfreight.com
Email our technical support at: [email protected]
3491 Mission Oaks Blvd. • PO Box 6009 Camarillo, CA 93011 • 1-888-866-5797
63418
When unpacking, make sure that the product is intact and undamaged. If any parts are missing or broken, please call 1-888-866-5797 as soon as possible.
Copyright
©
2017 by Harbor Freight Tools
®
. All rights reserved. No portion of this document or any artwork contained herein may be reproduced in any shape or form without the express written consent of Harbor Freight Tools. Diagrams within
this document may not be drawn proportionally. Due to continuing improvements, actual product may differ slightly from the product described herein. Tools required for assembly and service may not be included.
IMPORTANT SAFETY INSTRUCTIONS
Read all safety warnings and instructions.
Failure to follow the warnings and instructions may result in electric shock and/or serious injury.
Save all warnings and instructions for future reference.
1. DANGER! METAL CONDUCTS ELECTRICITY! Do not
let the ladder come in contact with live electrical wires.
2. Read all labels on the ladder before use.
3. Wear ANSI-approved safety goggles and
heavy-duty work gloves during use.
4. Do not use ladder in high winds or storms.
5. Do not overreach, move ladder when needed.
6. To prevent injuries from pinching, keep hands and
feet away from moving parts during set up.
7. Use only on a firm, level surface with all feet contacting
the surface.
Do not use on slippery surfaces.
8. Face ladder and maintain a firm hold when climbing
up or down; keep body centered between side rails.
9. Do not place ladder in front of doors
opening toward the ladder.
10. Destroy ladder if broken, worn or if exposed
to fire or chemical corrosion.
11. Do not exceed listed weight capacity.
12. Dress properly. Do not wear loose clothing or
jewelry. Keep hair, clothing and gloves away
from moving parts. Loose clothes, jewelry or
long hair can be caught in moving parts.
13. Wear slip resistant shoes. Do not
wear shoes with leather soles.
14. Properly secure and support ladder while in transit.
15. Do not store materials on ladder.
16. Keep work area clean and well lit.
17. Keep bystanders out of the area during use.
18. Do not use when tired or when under the
influence of alcohol, drugs or medication.
19. This product is not a toy. Do not allow
children to play with or near this item.
20. Use as intended only.
21. Store in a safe, dry place out of the reach of children.
22. Inspect before every use; do not use
if parts are loose or damaged.
23. Maintain product labels and nameplates. These carry
important safety information. If unreadable or missing,
contact Harbor Freight Tools for a replacement.
USE INSTRUCTIONS
Read the ENTIRE IMPORTANT SAFETY INFORMATION section at the beginning of this document
including all text under subheadings therein before set up or use of this product.
Before Each Use
1. Lubricate hinges with light machine
oil or similar substance.
2. Inspect ladder:
a. Make sure all rivets, joints, nuts and bolts are tight; feet,
steps and rungs are secure; all hinges function properly.
b. Check for dents, bends, damage from fire
or corrosive substances. Take damaged
ladders out of service until repaired by a
competent mechanic or destroyed.
3. CAUTION! To avoid slipping injuries, clean all
foreign materials from ladder and shoes.
UNLOCKED LOCKED
Hinge Lock
Push Knob in
until it clicks
into unlocked
position.
Side Lock
Pull Side Lock
out, then rotate
away from hole.
Hinge Lock
Hinges lock
into place
at 0°, 75°
and 180°.
Pull Side Lock out,
rotate to hole, then
release into hole. Side
lock must extend
fully into hole.
Side Lock
CAUTION! To prevent injury, lay Ladder flat on the ground before making adjustments. Keep hands and feet away from moving parts during adjustments.
Step / A-Frame
1. Unlock Side Locks
on top side.
2. Adjust top rail to
desired length.
Side Locks
(both sides)
3. Lock Side Locks.
4. Turn Ladder over.
5. Unlock Side Locks
on top side.
6. Adjust top rail to same
length as other rail.
7. Lock Side Locks.
8. Unlock Hinges.
9. Pull top side up until
Hinges lock into place.
Hinges
(both sides)
10. Stand Ladder upright.
11. Verify all Hinges and
Side Locks are in
locked positions.
Staircase
1. Unlock Side Locks
on top side.
2. Adjust top rail to
desired length.
Side Locks
(both sides)
3. Lock Side Locks.
4. Turn Ladder over.
5. Unlock Side Locks
on top side.
6. Adjust top rail to
desired length.
7. Lock Side Locks.
8. Unlock Hinges.
9. Pull top side up until
Hinges lock into place.
Hinges
(both sides)
10. Stand Ladder upright.
11. Verify all Hinges and
Side Locks are in
locked positions.
12. Place long end
on ground.
13. Place short end on step.
Wall / 90 Degree
1. Make Staircase Ladder
with one side 1 rung
shorter than other side.
2. Verify all Hinges and
Side Locks are in
locked positions.
3. Place short end
against wall.
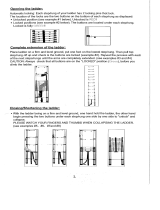
Extension
1. Unlock Hinges.
2. Pull top side up until
Hinges lock into place.
Hinges
(both sides)
3. Hold top side securely in place while
unlocking Hinges again.
CAUTION! To prevent injury, keep a firm grip on top side
while unlocking Hinges. When Hinges are unlocked,
it is possible for the top side to drop forcefully.
4. Pull top side up and over until Hinges
lock into place again.
5. Unlock Side Locks.
6. Adjust rails to desired lengths.
7. Lock Side Locks.
Side Locks (both sides)
8. Verify all Hinges and Side Locks
are in locked position.
9. Stand Ladder against vertical surface.
10. Make sure Ladder is at
75.5° angle to the ground.
11. Make sure top of Ladder
is at least 3' above top
of vertical surface.
12. Secure Ladder to top
of vertical surface.
CAUTION! To prevent injury, do
not stand closer to the top than
3' from the top. Do not climb
above the top support point.
Note: Can also be used as
workbench in this position.
1. Unlock Side Locks
on top side.
2. Slide top rail
completely off.
Side Locks
(both sides)
3. Turn Ladder over.
4. Unlock Side Locks
on top side.
5. Slide top rail
completely off.
6. Unlock Hinges.
7. Pull top side up until
Hinges lock into place.
Hinges
(both sides)
8. Stand first section
upright.
9. Place rails upright and
against each other
with rungs facing
same direction.
10. Unlock Side Locks.
11. To connect, move
left Side Lock into
hole on right rail.
12. Repeat on other side.
Rungs
facing same
direction
13. Using an OSHA
grade scaffold plank
(sold separately),
place plank on rungs
between the two ladder
sections, no higher than
second rung from top.
14. Secure plank to
ladder sections.
15. Use a separate ladder
(sold separately)
to access plank.
Second rung
from top
maximum
height.
CAUTION! To prevent injury; do not place
anything on Scaffold to gain additional height.
After Use
1. Return Ladder to storage position:
a. Lay Ladder flat on the ground.
b. Unlock Side Locks, slide rails all the
way in, then lock side Locks.
c. Stand Ladder upright.
d. Unlock Hinges, then pull sides together
until Hinges lock into place.
2. Clean all foreign materials from ladder.
3. Store in a safe, dry place out of the reach of children.
3'
75.5°
MAINTENANCE INSTRUCTIONS
Procedures not specifically explained in this document must be performed only by a qualified technician.
TO PREVENT SERIOUS INJURY FROM TOOL FAILURE:
Do not use damaged equipment. Take damaged ladders out of service until repaired by a competent mechanic or destroyed.
1. BEFORE EACH USE:
a. Inspect ladder:
• Make sure all rivets, joints, nuts and bolts are tight; feet, steps
and rungs are secure; all hinges function properly.
• Check for dents, bends, damage from fire or corrosive substances. Take damaged
ladders out of service until repaired by a competent mechanic or destroyed.
• Clean all foreign materials from ladder.
2. PERIODICALLY, lubricate hinges with light machine oil or similar substance.
3. AFTER USE:
a. Return Ladder to storage position.
b. Clean all foreign materials from ladder.
c. Store in a safe, dry place out of the reach of children.
Limited 90 Day Warranty
Harbor Freight Tools Co. makes every effort to assure that its products meet high quality and durability standards, and warrants to the original purchaser that this product is free from defects in materials and
workmanship for the period of 30 days from the date of purchase. This warranty does not apply to damage due directly or indirectly, to misuse, abuse, negligence or accidents, repairs or alterations outside
our facilities, criminal activity, improper installation, normal wear and tear, or to lack of maintenance. We shall in no event be liable for death, injuries to persons or property, or for incidental, contingent,
special or consequential damages arising from the use of our product. Some states do not allow the exclusion or limitation of incidental or consequential damages, so the above limitation of exclusion may
not apply to you. THIS WARRANTY IS EXPRESSLY IN LIEU OF ALL OTHER WARRANTIES, EXPRESS OR IMPLIED, INCLUDING THE WARRANTIES OF MERCHANTABILITY AND FITNESS.
To take advantage of this warranty, the product or part must be returned to us with transportation charges prepaid. Proof of purchase date and an explanation of the complaint must accompany the merchandise.
If our inspection verifies the defect, we will either repair or replace the product at our election or we may elect to refund the purchase price if we cannot readily and quickly provide you with a replacement. We will
return repaired products at our expense, but if we determine there is no defect, or that the defect resulted from causes not within the scope of our warranty, then you must bear the cost of returning the product.
This warranty gives you specific legal rights and you may also have other rights which vary from state to state.
Rev 18a
SAVE THESE INSTRUCTIONS.
Scaffold
Trestles
SAVE THESE INSTRUCTIONS.
/