Page is loading ...

®
Better by Design Since 1939
™
™
Operation and Safety Instructions
4358-5064
Step Ladder
1
Extension
Ladder
5
Scaffold
Stairway Ladder
2
Wall Ladder
3
4
®
Mejor Diseño Desde 1939
™
Instrucciones de operación y seguridad
Escalera de
un peldaño
Escalera
con extensión
5
5
Escalera para utilizar
sobre andamios
Escalera para utilizar
en escalinatas
2
2
Escalera de pared
3
4
1
1
4358-5064

Use of any ladder can be hazardous.
Read all instructions, both below and on ladder.
Always make sure the work
surface you are positioning
ladder on is able to support both
the ladder and your weight.
When used as a stairway ladder,
position only the short end on
a step. The longer end MUST BE
USED on floor or landing area.
Hold onto ladder at all times
when climbing. Maintain 3
points of contact (hands, feet,
etc.) at all times.
To prevent slip-out or tipping,
position ladder at an approxi-
mate 75 degree angle against
surface when used as an
extension
ladder. To determine
approximate
angle, 1, place toes
against bottom of ladder side
rails. 2, stand erect. 3, extend
arms straight out. 4, palms of
hands should touch top of rung
at shoulder level. 5, extend
ladder one to three feet above
top support.
Stay away from electrical lines;
this ladder will conduct
electricity.
When climbing up to a roof, always
secure ladder to roof to prevent
side motion or ladder slip-out.
Keep hands out from between
rail sections and hinges while
making adjustments.
Ladder feet must always be on
a flat surface. Do not use ladder
on unstable surfaces such as
mud, sand, slick areas, soft clay,
etc. where ladder may shift.
Never climb any ladder higher
than second rung from top.
Wear slip resistant shoes and
always check that rungs are
free of oil or other substances.
Always make sure ladder is in
good working order.
Never lean beyond ladder center
to avoid ladder tipping.
Never use ladder as a bridge or
ramp.
Always practice safe ladder usage
1
2 3
4
5
Read all instructions before using! Keep for future reference
Make sure all locks are in working order and completely
locked before using ladder.
Table of Contents:
___________________________________________________
Specifications........................................................................................... .1
Warnings & Safe Ladder Usage................................................................. 2
A. Product description............................................................................... 3
B. Product components............................................................................. 3
C. Hinge Lock operation............................................................................ 4
D. Rail Lock operation............................................................................... 5
E. Adjusting height................................................................................ 6, 7
F. Step Ladder setup................................................................................. 8
G. Stairway Ladder setup..........................................................................9
H. Wall Ladder setup................................................................................. 9
J. Extension Ladder setup.......................................................................10
K. Scaffold setup............................................................................... 11, 12
L. Warning labels..............................................................................13,
14
M. Warranty, Model & Contact Information
..............................................15
Product specifications:
➊➋➌ ➎ ➍
Weight Storage Step Ladder Scaffold Extension
Model Capacity* Height Height**
†
Height
†
Ladder Height
†
13 Ft Type II 225 lb 3 ft, 7 in 3 ft to 5 ft 1 ft to 2 ft 7 ft to 11 ft
_________________________________________________________________
13 Ft Type IA 300 lb 3 ft, 7 in 3 ft to 5 ft 1 ft to 2 ft 7 ft to 11 ft
_________________________________________________________________
17 Ft Type II 225 lb 4 ft, 7 in 4 ft to 7 ft 1 ft to 3 ft 9 ft to 15 ft
_________________________________________________________________
17 Ft Type IA 300 lb 4 ft, 7 in 4 ft to 7 ft 1 ft to 3 ft 9 ft to 15 ft
_________________________________________________________________
21 Ft Type IA 300 lb 5 ft, 7 in 5 ft to 9 ft 1 ft to 3 ft 11 ft to 19 ft
_________________________________________________________________
*Includes user and materials
**Step ladder, Stairway ladder and Wall ladder
†
Heights are rounded to nearest foot
1 2

A. Product description:
The Cosco
®
All-In-One-Ladder is com-
prised of a system of three components,
an Inner Ladder Unit and two
Outer Ladder Units
which telescope over
the Inner Ladder Unit.
Inner Ladder Unit
Outer Ladder Units
B. Product components:
The Cosco
®
All-In-One-Ladder utilizes two types of locking systems. The
Inner Ladder Unit has two center locking hinges which allow the ladder
system to be reconfigured into five ladder types: ➊
Step, ➋
Stairway,
➌
Wall, ➍ Scaffold and ➎ Extension ladder configurations.
Four Rail Lock Pins on the Outer Ladder Units of the ladder permit the
telescoping sections to be adjusted in length. This rail lock pin assembly
fits in any Rail Lock Port of the Inner Ladder Unit, allowing foot by foot
adjustment on either end of the ladder.
Storage
position
Fig. A1
Fig. B1
Rungs
C. Hinge Lock operation
The hinges are locked when the small arrow on the Hinge Lock Knobs are
aligned with the arrow stamped on the hinge body, (See Fig. C1) and
unlocked when the arrows are mis-aligned. (See Fig. C2).
Fig. C1
Fig. C2
3 4
Fig. C4
To return ladder to the storage configuration (See Fig. A1), repeat hinge
release procedure (press and rotate Hinge Lock Knobs) and fold ladder
halves together, repeating lock release/fold procedure as necessary until
ladder is completely folded.
Note: Pinch hazard! Be aware of sliding/moving parts. Keep hands and feet
clear.
LO CKED WH EN
AR ROWS AL IGN ED
Hinge
Lock
Knobs
Hinge
Lock
Knobs
Rail
Lock
Pins
Rail
Lock Ports
LOCKED WHEN
ARROWS ALIGNED
LOCKED
LOCKED WHEN
ARROWS ALIGNED
UNLOCKED
LOC K E D WHEN
ARR O W S ALIGNED
1. The hinges operate as follows:
To release locks, press in on Hinge
Lock Knobs and rotate in the direc-
tions indicated by large arrows, (See
Fig. C3). An audible “click” will be
heard, indicating the hinge locks are
released (See Fig. C2). The ladder
may now be opened to
the next locked position.
2. Pull the two ladder
halves apart (See Fig.
C4) until another,
louder “click”
is heard, indicating
the next locked
position has been
reached (See Fig.
C1).
1
Push
2
Turn
Fig. C3

D. Rail Lock operation:
The second locking component of the ladder system is the Rail Lock
system. There are four spring-loaded Rail Lock Pins that permit you to
change the height of the ladder. Rail locks operate as follows:
Note: Always adjust ladder while it is flat on the ground to ensure locks
don’t slip. Always start with folded ladder flat with the rail locks on sides,
as shown. Be aware of sliding/moving parts. Keep hands and feet clear.
1. To Unlock: Pull out both Rail Lock
Pins and rotate to rest on
Outer Ladder Units. Release.
See Fig. D1.
Fig. D1
Fig. D2
2. To Lock: Rotate both Rail Lock Pins back and align with Rail Lock Ports
in Inner and Outer Ladder Units. Release and insert Rail Lock Pins
into ports in both the Outer Ladder Unit and the rung
ports in the Inner Ladder Unit. See Fig. D2.
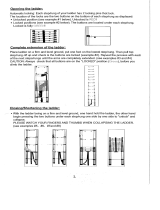
E. Adjusting height:
Use these instructions when ladder is used in
➊
Step, ➋
Stairway, ➌
Wall ladder and ➍
Extension
Ladder configurations.
Note: Always adjust ladder while it is flat
on the ground to ensure locks
don’t slip. Always start with
folded ladder flat with the
rail locks on sides,
as shown in Fig. E1.
1. Unlock both Rail Lock Pins
as described in D. Rail Lock
operation, Step 1 (page 5).
2. Slide top Outer Ladder Unit
to desired length, aligning
ports in Outer Ladder
Unit with ports in Inner
Ladder Unit.
5 6
Fig. E2
Fig. E3
Fig. E1
Note: Pinch hazard! Be aware of sliding/moving parts. Keep hands and
feet clear.

F. Step Ladder
➊ setup:
1. To configure as a Step Ladder, begin by adjusting
rail length as outlined in E. Adjusting Height,
Steps E1 through E5.
3. Pull ladder into
upright position
for use.
Reverse steps
to fold.
3. At the desired length, insert both Rail Lock Pins
into aligned ports in both Outer Ladder Unit
and Inner Ladder Unit.
See Fig. E4.
4. Flip ladder over and repeat length adjustment Steps E1 through E4 for
opposite Outer Ladder Unit. (Note, in the Wall ladder configuration, one rail
section must be one rung shorter than the other. In the Stairway
configuration, either one or a maximum of two rungs shorter.)
5. Recheck all four Rail Lock Pins to ensure that all are fully seated
and securely engaged in the Rail Lock Ports of both the Inner and Outer
Ladder Units. Reverse steps for storage.
7 8
Fig. E4
Fig. F1
Fig. F2
Fig. F3
Fig. E5
2. With ladder flat on the ground, release Hinge Locks
(See C. Hinge Lock Operation, steps 1 & 2). Pull
two ladder sections apart until you hear hinges
lock. Check to make sure small arrows
on Hinge Lock Knobs are aligned with
the arrows stamped on the hinge
bodies, indicating hinges are locked.
See Fig. C1, Pg. 4.
Note: Pinch hazard! Be aware of sliding/moving parts. Keep hands and
feet clear.

G. Stairway Ladder ➋ setup:
To use as a Stairway Ladder, use
same set up procedure as with the Step
Ladder setup (Steps F1 through F3, Pg. 8),
EXCEPT one side of ladder MUST be
adjusted one or two rungs shorter (See
Adjusting height, Pg. 6). Check
to make sure small arrows on Hinge
Lock Knobs are aligned with the
arrows stamped on the hinge
bodies, indicating hinges are
locked.
(See Fig. C1, Pg. 4).
To utilize, place the
short side of ladder on desired
stairway step (long side
must ALWAYS be on floor or
large landing area). Make sure
ladder is completely to back of step to avoid
slippage. Do not use on open-back steps.
Reverse steps to fold.
H. Wall Ladder ➌ setup:
To use as a Wall Ladder, use same set
up procedure as with the Step Ladder
setup (Steps F1 through F3), EXCEPT
one side of ladder MUST be adjusted
one rung shorter than the other. Check
to make sure small arrows on Hinge
Lock Knobs are aligned with
the arrows stamped on the hinge
bodies, indicating hinges are
locked. (See Fig. C1, Pg. 4).
To utilize, place the short
side of ladder next to wall.
Reverse steps to fold.
Note: Pinch hazard! Be aware of sliding/moving
parts. Keep hands and feet clear.
J. Extension Ladder ➎ setup:
To configure as an Extension Ladder, begin
by adjusting rail length as outlined in
E. Adjusting height, Steps E1
through E5, Pgs. 6 & 7. NOTE, in the
Extension Ladder configuration, adjust the
rail length to desired ladder length
at this time.
With ladder flat on the ground, release Hinge
Locks (See C. Hinge Lock operation, steps C1,
C2, Pg. 4). Pull two rail sections apart until
hinges are locked into the A-frame config-
uration. Check to make sure small
arrows on Hinge Lock Knobs are
aligned with the arrows stamped
on the hinge bodies, indicating
hinges are locked. (See Fig. C1,
Pg. 4).
With one hand supporting elevated rail, release Hinge Locks again, one at
a time. Attempting to release hinge locks without supporting elevated rail
may result in rail sections folding violently risking injury. Pull two rail
sections further apart until hinge locks “click” into extension ladder
configuration. Check to make sure
small arrows on Hinge Lock
Knobs are aligned with the
arrows stamped on the
hinge bodies,
indicating hinges
are locked,
(See Fig. C1,
Pg. 4).
Reverse steps
to fold.
9 10
Fig. G1
Fig. H1
Fig. J1
Fig. J2
Fig. J3
To back of step
Note: Pinch hazard Be aware of sliding/moving
parts. Keep hands and feet clear.

4. Place second Outer Ladder Unit (with rungs facing up) on top of first
Outer Ladder Unit. Pivot Rail Lock Pins on bottom Outer Ladder Unit into
ports on top Outer Ladder Unit. (Fig. K4)
K. Scaffold ➍ setup:
1. To configure as a scaffold, with ladder flat on
the ground, unlock the two Rail Lock Pins
on the top Outer Ladder Unit (See step
D1 of D. Rail Lock operation, Pg. 5)
and slide Outer Ladder Unit
completely off. Flip ladder over
and repeat for other Outer Ladder
Unit. Note: Be aware of sliding/moving
parts. Keep hands and feet clear.
2. Open Inner Ladder Unit (See steps C1 and C2 of
C. Hinge Lock operation, Pg. 4) and place upright
(Fig. K2).
3. Using separated Outer Ladder Units,
place one unit flat on floor with rungs facing up. (Fig. K3)
6. Position two parts of scaffold side by side. Place a scaffold-grade plank*
no longer than 10 feet long (3.05 m) across all four rungs at desired height
leaving at least 2 inches (5.08 cm) extending beyond outer rung on each
end (See Fig. K7). Refer to chart below for maximum plank height for your
ladder model. Use only scaffold-grade plank that is rated strong enough to
support you and your equipment. Do not use split, broken or partial-cut
wood as plank. Too much plank
deflection or bowing may result in
serious injury.
*Scaffold-grade plank not included.
11 12
Fig. K2
Fig. K3
Fig. K4
Fig. K1
DANGER
INSERT
LOCK
COMPLETELY
INTO HOLE
BEFORE USING
DANGER
INSERT
LOCK
COMPLETELY
INTO HOLE
BEFORE USING
Fig. K6
Fig. K7
Model Size Maximum plank height
__________________________
20-413 13 ft 2 rungs maximum
________________________________
20-417 17 ft 3 rungs maximum
________________________________
20-421 21 ft 3 rungs maximum
________________________________
Per ANSI A14.2 Standard, Section 6.7.11
5. Set upright. Pull two Outer Ladder Units away from each other until the
sections are fully spread into the A-frame position. Connection is correctly
made when second Outer Ladder Unit is slightly lower and seated against
the plastic rung bracket of the first Outer Ladder Unit as shown in Fig. K5.
Incorrect alignment will prevent fully spreading ladder units and may result
in ladder damage (See Fig. K6).
Position plank on ladder sections to avoid slippage or movement.
Reverse steps to reassemble and fold ladder.
DANGER
INSERT
LOCK
COMPLETELY
INTO HOLE
BEFORE USING
DANGER
INSERT
LOCK
COMPLETELY
INTO HOLE
BEFORE USING
Fig. K5
Rung
Bracket

L. Labels:
13 14
ARTICULATED LADDER
FOR YOUR SAFETY
READ CAREFULLY
Follow all instructions and
labels on this ladder.
PROPER SELECTION
1. Select a ladder of proper length to
reach working height.
2. IMPORTANT: Ladders are ONLY
designed to support one person plus
materials and tools per side in 2-man
stepladder positions, or only one
person plus materials and tools in all
other positions. Do not exceed the
working load for this ladder.
3. Select ladders within the following:
DUTY
WORKING
TYPE RATING LOAD
–––––––––––––––––––––––––––––––––––––––––––
IAA Special Duty 375 lbs.
IA Industrial-Extra Heavy 300 lbs.
I Industrial-Heavy 250 lbs.
II Commercial-Medium 225 lbs.
III Household-Light 200 lbs.
INSPECTION
1. Inspect upon receipt and before each
use. Never climb a damaged, bent or
broken ladder. All parts must be in good
working order.
2. Make sure all rivets, joints, nuts and
bolts are tight; feet, steps and rungs
are secure; all hinges function
properly.
3. Keep ladder clean, free from grease,
oil, mud, snow, wet paint, and other
slippery materials. Keep your shoes
clean; leather soles should not be used.
4. Never make temporary repairs of
damaged or missing parts.
5. Destroy ladder if broken, worn or if
exposed to fire or chemical corrosion.
PROPER SET-UP
1. DANGER! METAL CONDUCTS
ELECTRICITY! Do not let ladders of any
material come into contact with live
electric wires.
2. Upon receipt lubricate all hinges with
light machine oil or similar substance
and again at least once a year depending
on use.
3. Securely engage all ladder locks before
climbing. Always lay ladder flat on
ground before adjusting height.
4. NOTE: FOR LADDERS HAVING
HINGES EQUIPPED WITH LOCKS: It may
be difficult to unlock hinges if there is
pressure on the locks. To relieve the
pressure, simply jiggle one half of the
ladder until the lock can be moved
without force.
5. Adjust all hinges before climbing or
using the ladder. Never release the
locks or attempt to adjust the ladder
position while standing on the ladder.
6. Place ladder on firm level surface with
a secure footing. Do not use on
slippery surfaces, on ice, in mud, etc.
Do not place on boxes, unstable bases
or scaffolds to gain additional height.
Do not place in front of door that
opens toward ladder.
7. When possible, use a second person to
hold the ladder.
8. When used as a step, single, extension,
stairway, or wall flush ladder, always
use at least one flare rail on the ground
end or the climbing side of the ladder
to increase stability.
PROPER CLIMBING AND USE
1. DO NOT USE LADDERS if you tire easily,
or are subject to fainting spells, or are
using medicine or alcohol, or are
physically impaired.
2. To protect children, do not leave ladder
set up and unattended.
3. Make sure all locks are engaged
before
climbing. Ensure that the top and bottom
ends of the ladder are firmly supported.
Make sure the ladder is fully open.
4. Face ladder when climbing up or down;
keep body centered between the side rails.
5. Maintain a firm grip; use both hands
while climbing.
6 Do not climb onto a ladder from the
side unless ladder is secured against
side-wise motion, or climb from one
ladder to another.
7. Do not use ladder in high whinds or storms.
8. Do not release the locks or operate
hinges while standing on the ladder.
9. Cover up hinges during messy work.
Obstacles or grime in the hinges will
affect their function.
10. Do not over-reach; the ladder may fall
and cause death or injury. Move
ladder when needed.
11. Do not try to “walk” or “shift” the
ladder to a new position while
standing on it. Always get down from
the ladder and move it while standing
on the ground.
12. Do not exceed the ladder’s
recommended working load.
13. Be careful not to pinch fingers when
opening or folding ladder or when
adjusting height.
14. Keep ladder close to work; avoid push-
ing or pulling off the side of ladder.
15. Never use ladder as a platform, plank
or hoist. Never drop or apply an
impact load to ladder.
AS A STEP LADDER
1. Do not stand, sit or climb higher than
the 2nd step from the ladder top.
AS A SINGLE
OR EXTENSION LADDER
1. Set single or extension ladder at proper
angle (approx. 75 degrees) by placing
ladder base a distance equal to 1/4
total working length of ladder away
from base of vertical support.
2. Do not stand closer than 3 ft. from
the top. Never climb above the top
support point.
3. Extend the ladder so that approx-
imately 3 ft. extends above roof line or
working surface: tie top at support
points.
AS A SCAFFOLD
1. CAUTION: A 2”x12” scaffold grade
lumber plank that is not over
10 ft. long, must be used in all
approved horizontal positions. Scaffold
supports must be close enough
together so plank, etc. extends 2” on
each side. Plank must go through both
sets of rungs, at same level.
2. Do not place plank on top rungs.
3. Secure plank to ladders before each use.
4. On unhinged flared support, make sure
tread on rungs is to the outside and
climb carefully onto scaffold only from
this ladder section.
AS A STAIRWAY LADDER
1. Always place short side of ladder on
stair step and long side on floor or
large landing area to prevent ladder
from slipping from step.
2. Short side of ladder must be all the way
to the back of teh stair step to avoid
slippage. NOTE: do not use on backless
(open) steps. Use only the long side for
climbing.
AS WALL FLUSH LADDER
1. Working side of ladder should only be
extended one rung longer than wall
side of ladder.
PROPER CARE AND STORAGE
1. Store ladder in safe and dry place.
2. Properly secure ladder while in transit.
3. Never store materials on ladder.
4. Keep ladder clean and free of all
foreign materials.
4359-4214C
SAFETY
FIRST
ESCALERA ARTICULADA
PARA SU SEGURIDAD
LEA CUIDADOSAMENTE
Preste atención a todas las
instrucciones y etiquetas de
esta escalera.
SELECCIÓN CORRECTA
1.
Seleccione la escalera que tenga la
longitud correcta para que usted pueda
alcanzar la altura de trabajo necesaria.
2. IMPORTANTE: Las escaleras han sido
SÓLO diseñadas para sostener una
persona además de los materiales y
herramientas por cada uno de los
laterales en la posición de escalera de
tijera para dos hombres, o sólo una
persona más los materiales y
herramientas en todas las otras
posiciones. No exceda la carga de
trabajo para esta escalera
3. Seleccione las escaleras dentro de lo
siguiente:
TIPO GRADO CAPACIDAD
DEL DEBER DE CARGA
IAA Clasificación industrial 170 kg
especial
IA Clasificación para trabajo 136 kg
industrial extra-pesado
I Clasificación para trabajo 113 kg
industrial pesado
II Clasificación para trabajo 102 kg
comercial medio
III Clasificación para trabajo 91 kg
ligero en el hogar
INSPECCIÓN
1. Revise la escalera apenas la reciba y
antes de cada uso. Nunca escale una
escalera dañada, doblada, o rota. Todas
partes deben estar en orden.
2. Asegúrese de que todos los remaches,
juntas, tuercas, y tornillos estén
ajustados; que los pies, peldaños y
escalones estén seguros que todas las
bisagras funcionen correctemente.
3. Mantenga la escalera limpia, libre de
grasitud, aceite, barro, nieve, pintura, y
otros materiales resbaladizos. Mantenga
su calzado limpio; no debe usar suela
de cuero
.
4.
Nunca realice reparaciones temporarias
de partes dañadas o faltantes
.
5. Destruya la escalera si estuviera rota,
gastada o hubiese estado expuesta al
fuego o la corrosión.
INSTALACIÓN CORRECTA
1. ¡PELIGRO! ¡EL METAL CONDUCE LA
ELECTRICIDAD! No permita que escaleras
de ningún tipo de material entren en
contacto con cables de electricidad
activos.
2.
Apenas reciba su escalera, lubrique
todas las bisagras con aceite para
maquinaria liviana o una sustancia
similar, y repítalo una vez al año por lo
menos, dependiendo del uso.
3. Asegure todas las trabas de la escalera
antes de escalarla. Siempre coloque la
escalera en posición plana sobre el piso
antes de ajustar la altura.
4.
PARA ESCALERAS QUE TIENEN BISAGRAS
EQUIPADAS CON TRABAS: NOTA:
Puede
ser difícil destrabar las bisagras si
hubiera presión en las trabas. Para
liberar la presión, simplemente menee
la mitad de la escalera hasta que la
traba pueda moverse sin esfuerzo.
5. Ajuste todas las bisagras antes de
escalar o usar la escalera. Nunca afloje
las trabas o intente ajustar la posición
de la escalera mientras se encuentre
parado sobre ella.
6.
Coloque la escalera sobre una superficie
firme y nivelada, con los pies bien
seguros. No la utilice en superficies
resbaladizas, sobre hielo, barro, etc. No
la coloque sobre cajas o bases inestables
o sobre andamios para lograr altura
adiocional. No la ubique delante de
puertas que se abran hacia el lado en
que se encuentra la escalera.
7. Cuando le sea posible, emplee otra
persona para que lo ayude a sostener
la escalera.
8. Cuando sea usada como escalera
extensible o para apoyar sobre la pared
asegúrese siempre de que el ala del lado
de ascenso esté apoyada firmemente
sobre el piso y con el ángulo de
inclinación correcto.
ESCALADO Y USO CORRECTO
1.
NO USE ESCALERAS si se cansa rápido o
es susceptible a tener desmayos, o se
encuentra tomando medicamentos o
alcohol, o se encuentra físicamente
discapacitado.
2.
Para proteger a los niños no desatienda
la escalera montada.
3.
Asegúrese de que todas las trabas se
encuentren engranadas antes de escalar.
A
segúrese de que los extremos
superiores e inferiores se encuentren
firmemente ajustados.
4. Mire hacia la escalera cuando suba o
baje; mantenga el cuerpo centrado
entre los dos postes laterales.
5. Sosténgase firmemente. Use ambas
manos para asirse de los postes
laterales cuando esté escalando.
6. Nunca se suba a una escalera desde
los costados, o se pase de una escalera
a otra.
7.
No utilice la escalera en presencia de
vientos fuertes o tormentas.
8. No afloje las trabas ú opere las bisagras
mientras se encuentre parado sobre la
escalera.
9. Cubra las bisagras en caso de realizar
un trabajo sucio. La presencia de
obstáculos o suciedad en las bisagras
puede afectar su funcionamiento.
10.
No se estire más de allá de su capacidad
de extensión normal; la escalera
puede caerse y lastimarlo o causarle
la muerte.
11. No intente hacer "caminar" a la
escalera hasta otra posición mientras
se encuentre parado sobre ella. Bájese
siempre primero y una vez apoyado
sobre el piso firme muévala hasta la
otra posición.
12.
No exceda la carga máxima de trabajo
recomendada para la escalera.
13. Tenga cuidado de no pellizcarse los
d
edos cuando esté abriendo o plegando
la escalera o cuando esté ajustando
la altura.
14. Mantenga la escalera cerca del trabajo;
evite empujarla o tirar de los lados de
la escalera.
15. Nunca utilice la escalera como
plataforma, plancha o para levantar
pesos. Nunca deje caer o aplique una
carga de impacto a la escalera.
COMO ESCALERA DE TIJERA
1. No se pare, siente o escale más alto
que el 2ndo escalón comenzando desde
la parte superior de la escalera.
LA SEGURIDAD
PRIMERO
COMO ESCALERA INDIVIDUAL
O EXTENSIBLE
1. Coloque la escalera individual o
extensible con el ángulo correcto
(Aproximadamente en un ángulo de
75º) situando la base de la escalera a
una distancia igual a 1/4 de la longitud
total de trabajo de la escalera alejada
de la base de soporte vertical.
2. No se pare más arriba de 91,5 cm por
encima del límite superior de la escalera.
3. Extienda la escalera entre 30 cm y
91,5 cm por encima del punto de
soporte superior. Ate o asegure la
escalera en el punto de soporte superior.
COMO ANDAMIO
1.
CUIDADO: Un tablón de madera de un
tamaño de 5 cm x 30 cm de aplicación
para la andamio o mejor calidad,
deberá ser usado en todas las posiciones
horizontales aprobadas. Los soportes
del andamio deberán estar lo
suficientemente cerca como para que
el tablón, etc. se extienda al menos 5
cm hacia afuera en cada lado. El tablón
deberá atravesar ambos conjuntos de
escalones, en el mismo nivel.
2.
No coloque el tablón en los escalones
de arriba de todo.
3.
Asegure el tablón a los escalones antes
de cada uso.
4.
Sobre un soporte sin bisagras, asegúrese
de que el tablón se coloque sobre la
parte antideslizante del escalón.
COMO ESCALA SOBRE ESCALERA
1. Siempre coloque el lado más corto de
la escalera sobre el escalón de la otra
escalera y el lado más largo sobre el
piso, o sobre un área de apoyo amplio
para evitar que la escalera se resbale
del escalón.
2.
El lado corto de la escalera deberá estar
todo el tiempo hacia atrás del escalón
de la escalera para evitar resbalones.
NOTA: no use sobre escalones abiertos,
sin soporte posterior. Use sólo el lado
largo para escalar.
COMO ESCALERA PARA APOYAR
SOBRE LA PARED
1.
El lado de trabajo de la escalera deberá
extenderse sólo un escalón por encima
del lado de la pared.
CORRECTO ALMACENAMIENTO
Y CUIDADO
1. Guarde la escalera en un lugar seco.
2. Asegúrela correctamente mientras la
transporta.
3. Nunca guarde materiales en la escalera.
4. Mantenga la escalera limpie y libre de
materiales ajenos.
4359-5105C
ALL LOCKING MECHANISMS
MUST BE ENGAGED BEFORE
USING LADDER.
TODOS LOS MECANISMOS DE
SEGURIDAD TIENEN QUE SER
AJUSTADOS ANTES
DE USAR LA ESCALERA.
DANGER
PELIGRO
To Lock
Seguros
Rail Locks- With folded ladder
laying flat, adjust rail to desired
height so hole and lock line up
on both sides. Insert both rail
locks into the holes, making sure
the locks slide all the way in.
Repeat for other side if required.
Seguros de los pasamanos -
Con la escalera plegadiza de
postura plana, ajuste el
pasamanos a la altura deseada y
asegure de ambos lados, inserte
ambos seguros del pasamanos
en los orificios, asegurandose de
que estos se encuentren en el
lugar correcto. Repita el procedi-
miento del otro lado si lo requiere.
Hinge Locks- Pull two rail
sections away from each other
until the hinge locks click
automatically into place. Make
sure both locks are fully
engaged before use.
Seguros de las bisagras - Jale
Hacia afuera las dos secciones
del pasamanos hasta que las
bisagras encajen en su lugar
automaticamente. Asegurese de
que ambos seguros se encuentren
perfectamente ensamblados
antes de usar la escalera.
To Unlock
Para quitar los seguros
Rail Locks- With ladder laying
flat, pull both rail locks
to release
them and turn the locks
to the
side. The rail should slide freely
with the locks disengaged.
Seguros del pasamanos - Con
la escalera plegadiza de postura
plana, Jale ambos seguros de
los pasamanos para liberarlos y
de vuelta hacia un lado. El
pasamanos debe deslizarse
facilmente con los seguros
desenganchados.
Hinge Locks- With ladder laying
flat, push both hinge locks in
until they click into place. The
ladder rails should be able to
fold with the locks disengaged.
Seguros de las Bisagras - Con
la escalera plegadiza de postura
plana. Presione y de vuelta a los
seguros de las bisagras hasta
que se enganchen en su lugar.
Los psamanos de la escalera
deben ser aptos para doblarse
facilmente con los seguros
desenganchados.
4359-5106D
Lock/Traba
To Close: 1. Push, 2. Turn, 3. Open
Para Cerrar: 1. Presione,
2. dé Vuelta, 3. Cierre
To Open: 1. Push, 2. Turn, 3. Open
Para Abrir: 1. Presione,
2. dé Vuelta, 3. Abra
CAUTION
PRECAUCIÓN
CAUTION
PRECAUCIÓN
SET UP LADDER PROPERLY TO REDUCE
SLIP AND OVERLOAD HAZARDS.
FOLLOW ALL INSTRUCTIONS.
KEEP BODY CENTERED BETWEEN
SIDE RAILS. DO NOT OVER-REACH.
COLOQUE LA ESCALERA CORRECTA-
MENTE PARA REDUCIR EL RIESGO DE
DESLIZAMIENTO Y SOBRECARGA. SIGA
TODAS LAS INSTRUCCIONES.
MANTENGA SU CUERPO CENTRADO
ENTRE LOS RIELES LATERALES. NO
TRATE DE SOBRE-ALCANZAR
DO NOT
STAND ABOVE
THIS RUNG
NO SUBA MAS
ALTO DE ESTE
TRAVESAÑO.
LOCK ALL
HINGES
ASEGÚRESE DE
QUE TODAS LAS
BISAGRAS
ESTÉN
ACOPLADAS
AT LEAST ONE FLARE RAIL MUST BE
USED IN STEP LADDER, STAIRCASE
AND EXTENSION LADDER POSITIONS
TO INCREASE STABILITY.
SET ALL FEET ON FIRM
LEVEL SURFACE.
WEAR SLIP-RESISTANT SHOES.
PARA INCREMENTAR LA ESTABILIDAD
AL MENOS UN POSTE CON EXTREMO
CURVEADO HACIA FUERA DEBE SER
UTILIZADO CUANDO UTILICE LA
ESCALERA EN LAS POSICIONES DE
ESCALERA DE 2-PERSONAS, ESCALERA
SOBRE ESCALERA, O DE EXTENSIÓN.
TODAS LAS PATAS DEBEN SER
COLOCADAS EN UNA
SUPERFICIE FIRME Y PLANA.
USAR ZAPATOS
ANTIDESLIZANTES.
SECURE LOCKS
ASEGURE
LAS CERRADURAS
75
˚
(approx.)
75
˚
(aprox.)
PLACE TOES AGAINST BOTTOM
OF LADDER SIDE RAILS.
STAND ERECT.
EXTEND ARMS STRAIGHT OUT.
PALMS OF HANDS SHOULD TOUCH
TOP OF RUNG AT SHOULDER LEVEL.
EXTEND LADDER ONE TO THREE
FEET ABOVE TOP SUPPORT.
COLOQUE LOS DEDOS DE LOS PIES
CONTRA LA BASE DE LOS RIELES
LATERALES DE LA ESCALERA.
MANTENGA SU POSTURA ERGUIDA.
EXTIENDA LOS BRAZOS HACIA AFUERA.
LAS PALMAS DE LAS MANOS DEBEN
TOCAR LA PARTE SUPERIOR DEL
TRAVESAÑO A LA ALTURA DEL HOMBRO.
AMPLIAR LA ESCALERA DE 30,48 CM
A 91,44 CM SOBRE EL SUPERIOR
SOPORTE.
4359-4215A
CLIMB FROM
THIS SIDE
ONLY
ESCALE
SOLO DE
ESTE LADO
CAUTION
PRECAUCIÓN
4359-5107A
CLIMB FROM
THIS SIDE
ONLY
ESCALE
SOLO DE
ESTE LADO
CAUTION
PRECAUCIÓN
4359-5108A
Do Not Stand Above This
Rung When Used As A
Step Ladder YOU CAN
LOSE YOUR BALANCE
No Suba Más Allá de
este Escalón Cuando la
Utilice como Escalera
de Tijera
USTED PUEDE PERDER
EL EQUILIBRIO.
4359-5103
DANGER
PELIGRO
Do Not Stand
Above This Rung
When Used As An
Extension Ladder
YOU CAN LOSE
YOUR BALANCE
No Suba Más Allá
de este Escalón
Cuando la Utilice
como Escalera de
Extensión
USTED PUEDE
PERDER EL
EQUILIBRIO.
ELECTROCUTION HAZARD
RIESGO DE ELECTROCUCIÓN
DANGER
PELIGRO
THIS LADDER
CONDUCTS
ELECTRICITY
ESTA ESCALERA
CONDUCE
ELECTRICIDAD
WATCH FOR WIRES
CUIDADO CON
LOS CABLES
4359-7483

15
Questions? Problems? Something not right or missing?
Do not return this unit to the place of purchase. Call the Consumer Relations Department
at 1-800-544-1108 from 7 a.m. to 6:00 p.m. EST Monday through Thursday, and
7 a.m. to 4:30 p.m. EST on Friday or fax 1-800-207-8182 (24 hours a day),
or visit our web site at www.coscoproducts.com and click on “contact us”.
Cosco Home and Office Products
Consumer Relations
P.O. Box 2609
Columbus, IN 47202-2609 USA
Model Number: __________________________________________________
Date of Manufacture: ______________________________________________
SS-E-01-01
Cosco Home and Office Products, A Division of Dorel
Juvenile Group, Inc. (Cosco) warrants this product to the
original retail purchaser as follows:
1- YEAR LIMITED WARRANTY. This product is
warranted against defective materials or workmanship
for 1 year from the date of original purchase. Proof of
purchase is required. Your exclusive remedy for this
Warranty is that Cosco will, at its option, provide repair or
replacement parts for this product or refund the original
purchase price of the product. Cosco reserves the right
to discontinue or change fabrics, parts, models or
products, or to make substitutions.
To make a claim under this Warranty, you must
contact Cosco's Consumer Relations Department, 2525
State Street, Columbus, IN 47201, or call Cosco at
1-888-208-2219. Proof of Purchase is required.
Transportation charges are the responsibility of the
consumer.
WARRANTY LIMITATIONS. This Warranty does not
include damages which arise from misuse or abuse of
this product.
LIMITATION OF DAMAGES. The Warranty and
remedies as set forth are exclusive and in lieu of all
others, oral or written, express or implied. In no event
will Cosco or the dealer selling this product be liable to
you for any damages, including incidental or
consequential damages, arising out of the use or inability
to use this product.
LIMITATION OF WARRANTIES AND OTHER WARRANTY
TERMS AND STATE LAW RIGHTS. Any implied warranties,
including implied warranties of merchantability and
fitness for a particular purpose, shall be limited to the
duration and terms of the express written warranty.
Some states do not allow limitations on how long an
implied warranty lasts or the exclusion or limitation of
incidental or consequential damages, so the above
limitations may not apply to you. This warranty gives you
specific legal rights, and you may have other rights
which vary from state to state. Neither Cosco nor the
dealer selling this product authorizes any person to
create for it any other warranty, obligation, or liability in
connection with this product.
1-YEAR LIMITED WARRANTY
M. Warranty/Model/Contact Information:
15
Tiene alguna pregunta? Algún problema? Le hace falta alguna parte o algo no está bien?
No devuelva este producto al lugar donde lo compró. Comuníquese con el Departamento
de Relaciones con el Consumidor al 1-800-544-1108 entre las 7:00 a.m. y las 6:00 p.m.
de Lunes a Jueves y los viernes de 7:00 a.m. a 4:30 p.m. (hora oficial del este) o por fax
al 1-800-207-8182 (las 24 horas del día) o visite nuestra página en Internet en
www.coscoproducts.com y haga click en “contact us”
Cosco Home and Office Products
Consumer Relations
P.O. Box 2609
Columbus, IN 47202-2609 USA
Número de modelo: ________________________________________________
Fecha de Manufactura:
______________________________________________
Cosco Home and Office Products, una división de
Dorel Juvenile Group, Inc. (Cosco) garantiza este producto
al comprador minorista original de la siguiente forma:
GARANTIA LIMITADA POR UN AÑO. Este producto está
garantizado contra defectos de materiales y fabricación
durante 1 año a partir de la fecha original de compra. Un
comprobante de compra es requerido. Su único recurso
bajo esta garantía consiste en que Cosco a su entera
discreción proporcione la reparación o las piezas de
repuesto para este producto o le devuelva el precio
original de compra del producto. Cosco se reserva el
derecho de descontinuar o cambiar las telas, piezas,
modelos productos o de efectuar sustituciones.
Para efectuar un reclamo bajo esta garantía, usted
debe contactar al departamento de consumidor de Cosco
a la siguiente dirección, 2525 State Street, Columbus, In
47201, o llame a Cosco al 1-888-208-2219. Un
comprobante de compra es requerido. Los costos de
transporte corren por cuenta del consumidor.
LIMITACIONES DE LA GARANTIA. Esta garantía no
incluye daños que sean consecuencia de la mala
utilización o del uso indebido de este producto.
LIMITACION DE LOS DAÑOS. La garantía y los
recursos establecidos aquí, tienen un carácter exclusivo
y reemplazan a cualquier otra garantía bien sea verbal o
escrita, explícita o implícita. En ningún caso, Cosco o el
comerciante que vende este producto serán
responsables ante usted por cualquier daño, incluyendo
los daños incidentales ó consecuentes que sean el
resultado del uso o la incapacidad de usar este producto.
LIMITACION DE GARANTIA Y OTROS TERMINOS DE
GARANTIA Y DERECHOS ESTABLECIDOS EN LAS LEYES
ESTATALES.
Cualquier garantía implícita entre las que se
incluyen las garantías implícitas de comercialización y de
idoneidad para un propósito particular, estará limitada a la
duración y los términos de la garantía escrita expresa.
Algunos estados no permiten limitar la duración de una
garantía implícita ni limitar o excluir de la garantía los daños
incidentales o consecuentes; por esa razón es posible que
las limitaciones indicadas arriba no puedan aplicarse a su
caso. Esta granita le concede derechos legales específicos y
usted puede tener otros derechos que varían de estado a
estado. Ni Cosco ni el comerciante que vende este producto
autorizan a ninguna persona a crear ninguna otra garantía,
obligación o responsabilidad relacionada con este producto.
GARANTÍA LIMITADA POR UN AÑO
M. Garantía/ Modelo/ Información de contacto:

L. Etiquetas:
13 14
ALL LOCKING MECHANISMS
MUST BE ENGAGED BEFORE
USING LADDER.
TODOS LOS MECANISMOS DE
SEGURIDAD TIENEN QUE SER
AJUSTADOS ANTES
DE USAR LA ESCALERA.
DANGER
CUIDADO
To Lock
Seguros
Rail Locks- With folded ladder
laying flat, adjust rail to desired
height so hole and lock line up
on both sides. Insert both rail
locks into the holes, making sure
the locks slide all the way in.
Repeat for other side if required.
Seguros de los pasamanos -
Con la escalera plegadiza de
postura plana, ajuste el
pasamanos a la altura deseada y
asegure de ambos lados, inserte
ambos seguros del pasamanos
en los orificios, asegurandose de
que estos se encuentren en el
lugar correcto. Repita el procedi-
miento del otro lado si lo requiere.
Hinge Locks- Pull two rail
sections away from each other
until the hinge locks click
automatically into place. Make
sure both locks are fully
engaged before use.
Seguros de las bisagras - Jale
Hacia afuera las dos secciones
del pasamanos hasta que las
bisagras encajen en su lugar
automaticamente. Asegurese de
que ambos seguros se encuentren
perfectamente ensamblados
antes de usar la escalera.
To Unlock
Para quitar los seguros
Rail Locks- With ladder laying
flat, pull both rail locks
to release
them and turn the locks
to the
side. The rail should slide freely
with the locks disengaged.
Seguros del pasamanos - Con
la escalera plegadiza de postura
plana, Jale ambos seguros de
los pasamanos para liberarlos y
de vuelta hacia un lado. El
pasamanos debe deslizarse
facilmente con los seguros
desenganchados.
Hinge Locks- With ladder laying
flat, push both hinge locks in
until they click into place. The
ladder rails should be able to
fold with the locks disengaged.
Seguros de las Bisagras - Con
la escalera plegadiza de postura
plana. Presione y de vuelta a los
seguros de las bisagras hasta
que se enganchen en su lugar.
Los psamanos de la escalera
deben ser aptos para doblarse
facilmente con los seguros
desenganchados.
4359-5106B
Lock/Traba
To Close: 1. Push, 2. Turn, 3. Open
Para Cerrar: 1. Presione,
2. dé Vuelta, 3. Cierre
To Open: 1. Push, 2. Turn, 3. Open
Para Abrir: 1. Presione,
2. dé Vuelta, 3. Abra
ARTICULATED LADDER
FOR YOUR SAFETY
READ CAREFULLY
Follow all instructions and
labels on this ladder.
PROPER SELECTION
1. Select a ladder of proper length to
reach working height.
2. IMPORTANT: Ladders are ONLY
designed to support one person plus
materials and tools per side in 2-man
stepladder positions, or only one
person plus materials and tools in all
other positions. Do not exceed the
working load for this ladder.
3. Select ladders within the following:
DUTY
WORKING
TYPE RATING LOAD
–––––––––––––––––––––––––––––––––––––––––––
IAA Special Duty 375 lbs.
IA Industrial-Extra Heavy 300 lbs.
I Industrial-Heavy 250 lbs.
II Commercial-Medium 225 lbs.
III Household-Light 200 lbs.
INSPECTION
1. Inspect upon receipt and before each
use. Never climb a damaged, bent or
broken ladder. All parts must be in good
working order.
2. Make sure all rivets, joints, nuts and
bolts are tight; feet, steps and rungs
are secure; all hinges function
properly.
3. Keep ladder clean, free from grease,
oil, mud, snow, wet paint, and other
slippery materials. Keep your shoes
clean; leather soles should not be used.
4. Never make temporary repairs of
damaged or missing parts.
5. Destroy ladder if broken, worn or if
exposed to fire or chemical corrosion.
PROPER SET-UP
1. DANGER! METAL CONDUCTS
ELECTRICITY! Do not let ladders of any
material come into contact with live
electric wires.
2. Upon receipt lubricate all hinges with
light machine oil or similar substance
and again at least once a year depending
on use.
3. Securely engage all ladder locks before
climbing. Always lay ladder flat on
ground before adjusting height.
4. NOTE: FOR LADDERS HAVING
HINGES EQUIPPED WITH LOCKS: It may
be difficult to unlock hinges if there is
pressure on the locks. To relieve the
pressure, simply jiggle one half of the
ladder until the lock can be moved
without force.
5. Adjust all hinges before climbing or
using the ladder. Never release the
locks or attempt to adjust the ladder
position while standing on the ladder.
6. Place ladder on firm level surface with
a secure footing. Do not use on
slippery surfaces, on ice, in mud, etc.
Do not place on boxes, unstable bases
or scaffolds to gain additional height.
Do not place in front of door that
opens toward ladder.
7. When possible, use a second person to
hold the ladder.
8. When used as a step, single, extension,
stairway, or wall flush ladder, always
use at least one flare rail on the ground
end or the climbing side of the ladder
to increase stability.
PROPER CLIMBING AND USE
1. DO NOT USE LADDERS if you tire easily,
or are subject to fainting spells, or are
using medicine or alcohol, or are
physically impaired.
2. To protect children, do not leave ladder
set up and unattended.
3. Make sure all locks are engaged
before
climbing. Ensure that the top and bottom
ends of the ladder are firmly supported.
Make sure the ladder is fully open.
4. Face ladder when climbing up or down;
keep body centered between the side rails.
5. Maintain a firm grip; use both hands
while climbing.
6 Do not climb onto a ladder from the
side unless ladder is secured against
side-wise motion, or climb from one
ladder to another.
7. Do not use ladder in high whinds or storms.
8. Do not release the locks or operate
hinges while standing on the ladder.
9. Cover up hinges during messy work.
Obstacles or grime in the hinges will
affect their function.
10. Do not over-reach; the ladder may fall
and cause death or injury. Move
ladder when needed.
11. Do not try to “walk” or “shift” the
ladder to a new position while
standing on it. Always get down from
the ladder and move it while standing
on the ground.
12. Do not exceed the ladder’s
recommended working load.
13. Be careful not to pinch fingers when
opening or folding ladder or when
adjusting height.
14. Keep ladder close to work; avoid push-
ing or pulling off the side of ladder.
15. Never use ladder as a platform, plank
or hoist. Never drop or apply an
impact load to ladder.
AS A STEP LADDER
1. Do not stand, sit or climb higher than
the 2nd step from the ladder top.
AS A SINGLE
OR EXTENSION LADDER
1. Set single or extension ladder at proper
angle (approx. 75 degrees) by placing
ladder base a distance equal to 1/4
total working length of ladder away
from base of vertical support.
2. Do not stand closer than 3 ft. from
the top. Never climb above the top
support point.
3. Extend the ladder so that approx-
imately 3 ft. extends above roof line or
working surface: tie top at support
points.
AS A SCAFFOLD
1. CAUTION: A 2”x12” scaffold grade
lumber plank that is not over
10 ft. long, must be used in all
approved horizontal positions. Scaffold
supports must be close enough
together so plank, etc. extends 2” on
each side. Plank must go through both
sets of rungs, at same level.
2. Do not place plank on top rungs.
3. Secure plank to ladders before each use.
4. On unhinged flared support, make sure
tread on rungs is to the outside and
climb carefully onto scaffold only from
this ladder section.
AS A STAIRWAY LADDER
1. Always place short side of ladder on
stair step and long side on floor or
large landing area to prevent ladder
from slipping from step.
2. Short side of ladder must be all the way
to the back of teh stair step to avoid
slippage. NOTE: do not use on backless
(open) steps. Use only the long side for
climbing.
AS WALL FLUSH LADDER
1. Working side of ladder should only be
extended one rung longer than wall
side of ladder.
PROPER CARE AND STORAGE
1. Store ladder in safe and dry place.
2. Properly secure ladder while in transit.
3. Never store materials on ladder.
4. Keep ladder clean and free of all
foreign materials.
4359-4214C
SAFETY
FIRST
ESCALERA ARTICULADA
PARA SU SEGURIDAD
LEA CUIDADOSAMENTE
Preste atención a todas las
instrucciones y etiquetas de
esta escalera.
SELECCIÓN CORRECTA
1.
Seleccione la escalera que tenga la
longitud correcta para que usted pueda
alcanzar la altura de trabajo necesaria.
2. IMPORTANTE: Las escaleras han sido
SÓLO diseñadas para sostener una
persona además de los materiales y
herramientas por cada uno de los
laterales en la posición de escalera de
tijera para dos hombres, o sólo una
persona más los materiales y
herramientas en todas las otras
posiciones. No exceda la carga de
trabajo para esta escalera
3. Seleccione las escaleras dentro de lo
siguiente:
TIPO GRADO CAPACIDAD
DEL DEBER DE CARGA
IAA Clasificación industrial 170 kg
especial
IA Clasificación para trabajo 136 kg
industrial extra-pesado
I Clasificación para trabajo 113 kg
industrial pesado
II Clasificación para trabajo 102 kg
comercial medio
III Clasificación para trabajo 91 kg
ligero en el hogar
INSPECCIÓN
1. Revise la escalera apenas la reciba y
antes de cada uso. Nunca escale una
escalera dañada, doblada, o rota. Todas
partes deben estar en orden.
2. Asegúrese de que todos los remaches,
juntas, tuercas, y tornillos estén
ajustados; que los pies, peldaños y
escalones estén seguros que todas las
bisagras funcionen correctemente.
3. Mantenga la escalera limpia, libre de
grasitud, aceite, barro, nieve, pintura, y
otros materiales resbaladizos. Mantenga
su calzado limpio; no debe usar suela
de cuero
.
4.
Nunca realice reparaciones temporarias
de partes dañadas o faltantes
.
5. Destruya la escalera si estuviera rota,
gastada o hubiese estado expuesta al
fuego o la corrosión.
INSTALACIÓN CORRECTA
1. ¡PELIGRO! ¡EL METAL CONDUCE LA
ELECTRICIDAD! No permita que escaleras
de ningún tipo de material entren en
contacto con cables de electricidad
activos.
2.
Apenas reciba su escalera, lubrique
todas las bisagras con aceite para
maquinaria liviana o una sustancia
similar, y repítalo una vez al año por lo
menos, dependiendo del uso.
3. Asegure todas las trabas de la escalera
antes de escalarla. Siempre coloque la
escalera en posición plana sobre el piso
antes de ajustar la altura.
4.
PARA ESCALERAS QUE TIENEN BISAGRAS
EQUIPADAS CON TRABAS: NOTA:
Puede
ser difícil destrabar las bisagras si
hubiera presión en las trabas. Para
liberar la presión, simplemente menee
la mitad de la escalera hasta que la
traba pueda moverse sin esfuerzo.
5. Ajuste todas las bisagras antes de
escalar o usar la escalera. Nunca afloje
las trabas o intente ajustar la posición
de la escalera mientras se encuentre
parado sobre ella.
6.
Coloque la escalera sobre una superficie
firme y nivelada, con los pies bien
seguros. No la utilice en superficies
resbaladizas, sobre hielo, barro, etc. No
la coloque sobre cajas o bases inestables
o sobre andamios para lograr altura
adiocional. No la ubique delante de
puertas que se abran hacia el lado en
que se encuentra la escalera.
7. Cuando le sea posible, emplee otra
persona para que lo ayude a sostener
la escalera.
8. Cuando sea usada como escalera
extensible o para apoyar sobre la pared
asegúrese siempre de que el ala del lado
de ascenso esté apoyada firmemente
sobre el piso y con el ángulo de
inclinación correcto.
ESCALADO Y USO CORRECTO
1.
NO USE ESCALERAS si se cansa rápido o
es susceptible a tener desmayos, o se
encuentra tomando medicamentos o
alcohol, o se encuentra físicamente
discapacitado.
2.
Para proteger a los niños no desatienda
la escalera montada.
3.
Asegúrese de que todas las trabas se
encuentren engranadas antes de escalar.
A
segúrese de que los extremos
superiores e inferiores se encuentren
firmemente ajustados.
4. Mire hacia la escalera cuando suba o
baje; mantenga el cuerpo centrado
entre los dos postes laterales.
5. Sosténgase firmemente. Use ambas
manos para asirse de los postes
laterales cuando esté escalando.
6. Nunca se suba a una escalera desde
los costados, o se pase de una escalera
a otra.
7.
No utilice la escalera en presencia de
vientos fuertes o tormentas.
8. No afloje las trabas ú opere las bisagras
mientras se encuentre parado sobre la
escalera.
9. Cubra las bisagras en caso de realizar
un trabajo sucio. La presencia de
obstáculos o suciedad en las bisagras
puede afectar su funcionamiento.
10.
No se estire más de allá de su capacidad
de extensión normal; la escalera
puede caerse y lastimarlo o causarle
la muerte.
11. No intente hacer "caminar" a la
escalera hasta otra posición mientras
se encuentre parado sobre ella. Bájese
siempre primero y una vez apoyado
sobre el piso firme muévala hasta la
otra posición.
12.
No exceda la carga máxima de trabajo
recomendada para la escalera.
13. Tenga cuidado de no pellizcarse los
d
edos cuando esté abriendo o plegando
la escalera o cuando esté ajustando
la altura.
14. Mantenga la escalera cerca del trabajo;
evite empujarla o tirar de los lados de
la escalera.
15. Nunca utilice la escalera como
plataforma, plancha o para levantar
pesos. Nunca deje caer o aplique una
carga de impacto a la escalera.
COMO ESCALERA DE TIJERA
1. No se pare, siente o escale más alto
que el 2ndo escalón comenzando desde
la parte superior de la escalera.
LA SEGURIDAD
PRIMERO
COMO ESCALERA INDIVIDUAL
O EXTENSIBLE
1. Coloque la escalera individual o
extensible con el ángulo correcto
(Aproximadamente en un ángulo de
75º) situando la base de la escalera a
una distancia igual a 1/4 de la longitud
total de trabajo de la escalera alejada
de la base de soporte vertical.
2. No se pare más arriba de 91,5 cm por
encima del límite superior de la escalera.
3. Extienda la escalera entre 30 cm y
91,5 cm por encima del punto de
soporte superior. Ate o asegure la
escalera en el punto de soporte superior.
COMO ANDAMIO
1.
CUIDADO: Un tablón de madera de un
tamaño de 5 cm x 30 cm de aplicación
para la andamio o mejor calidad,
deberá ser usado en todas las posiciones
horizontales aprobadas. Los soportes
del andamio deberán estar lo
suficientemente cerca como para que
el tablón, etc. se extienda al menos 5
cm hacia afuera en cada lado. El tablón
deberá atravesar ambos conjuntos de
escalones, en el mismo nivel.
2.
No coloque el tablón en los escalones
de arriba de todo.
3.
Asegure el tablón a los escalones antes
de cada uso.
4.
Sobre un soporte sin bisagras, asegúrese
de que el tablón se coloque sobre la
parte antideslizante del escalón.
COMO ESCALA SOBRE ESCALERA
1. Siempre coloque el lado más corto de
la escalera sobre el escalón de la otra
escalera y el lado más largo sobre el
piso, o sobre un área de apoyo amplio
para evitar que la escalera se resbale
del escalón.
2.
El lado corto de la escalera deberá estar
todo el tiempo hacia atrás del escalón
de la escalera para evitar resbalones.
NOTA: no use sobre escalones abiertos,
sin soporte posterior. Use sólo el lado
largo para escalar.
COMO ESCALERA PARA APOYAR
SOBRE LA PARED
1.
El lado de trabajo de la escalera deberá
extenderse sólo un escalón por encima
del lado de la pared.
CORRECTO ALMACENAMIENTO
Y CUIDADO
1. Guarde la escalera en un lugar seco.
2. Asegúrela correctamente mientras la
transporta.
3. Nunca guarde materiales en la escalera.
4. Mantenga la escalera limpie y libre de
materiales ajenos.
4359-5105C
/