READ THIS FIRST:
This heater must be installed in accordance with
the Building Regulations. These may be obtained
from OPSI or viewed and downloaded from www.
communities.gov.uk following the link for Building
Regulations.
This heater is designed for wall mounting and
must be used with the warm air vent facing
downwards. This heater should not be used in any
other orientation and should not be used as a free
standing portable appliance.
ADVISORY: This heater must be installed at least
1.8m above the oor.
This heater must be installed so that switches and
other controls (except the pull cord) cannot be
touched by a person in the bath or shower.
The mounting position should allow the free
movement of air around the heater. Obstructing the
air ow could result in overheating.
This product is not intended to be used by children
and persons with sensory, physical and/or mental
impairments that would prevent them from using it
safely.
Small children should be supervised to ensure that
they do not play with this appliance.
Switch o the mains before commencing installation
and remove the appropriate circuit fuse.
Suitable for indoor use only.
This product is suitable for installation on surfaces
with normal ammability e.g. wood, plasterboard,
masonry. It is not suitable for use on highly
ammable surfaces (e.g. polystyrene, textiles).
Before making xing hole(s), check that there are no
obstructions hidden beneath the mounting surface
such as pipes or cables.
The chosen location of your new heater should allow
for the product to be securely mounted (e.g. to a rm
wall) and safely connected to the mains supply.
Do not site the heater directly beneath a mains
outlet socket.
If the location of your new heater requires the
provision of a new electrical supply, the supply
must conform with the requirements of the Building
Regulations.
This product is designed for permanent connection
to xed wiring: this should be to a suitable ring
circuit (protected with a 10 Amp MCB or fuse)
or a fused spur (with a 10 Amp fuse) via a fused
connection unit. The supply must incorporate a
switch or other means of disconnection.
This product is not suitable for mounting within
bathroom zones 0, 1 or 2 – it can be installed
outside of zones where the permanent connection
to the mains supply is made in accordance with the
requirements of building and wiring regulations.
If installed in a bathroom, the supply circuit must be
protected by a 30mA RCD.
Make connections to the electrical supply in
accordance with the following code:
Live - Brown or Red • Neutral - Blue or Black
This product is double insulated, do not connect
any part to Earth.
WARNING - To avoid overheating,
do not cover the heater.
Never leave the heater
unattended when it is in use.
The heater is tted with 2 stage over-temperature
protection for protection against brief excess of
temperature, the heater has a resetting thermostatic
device; for longer periods of excess temperature or
higher excess temperatures, the heater is tted with
a one-shot thermal fuse which cannot be reset.
As you are making a xed connection to the mains,
you are advised at every stage of your installation to
double-check any electrical connections you have
made. After you have completed your installation
there are electrical tests that should be carried out:
these tests are specied in the Wiring Regulations
(BS7671) referred to in the Building Regulations.
INSTALLATION:
01. Choose the location for your new heater giving
consideration to all of the points above.
02. Loosen the two screws at the top of the front of
the heater and lift o the front cover.
03. Using the guide diagram above, mark the
position of the top two xing holes.
04. Use a spirit level to check holes are level.
05. Make the top two xing holes using a suitable
drill bit.
06. Insert the plastic plugs and screws leaving
approximately 3mm of the shank protruding.
07. Hang the heater on the screws. If the xings
supplied are not suitable for your mounting
surface, select suitable alternatives.
08. Mark the position of the third xing hole using
the heater as a template.
09. Remove the heater, make the xing hole and
insert the plastic plug.
10. Replace the heater adjusting the top two screws
to make as tight a t as possible.
11. Secure using the third xing through the hole
indicated opposite.
12. Remove the cable clamp from inside the heater.
13. Thread the supply cable through the hole in the
rear of the case.
14. Make connections to the supply terminals
according to the colour code (left). Ensure that
there are no strands or whiskers protruding from
the terminals.
15. Secure the cable under the cable clamp. Ensure
that the cable is gripped rmly but take care not
to over-tighten the screws.
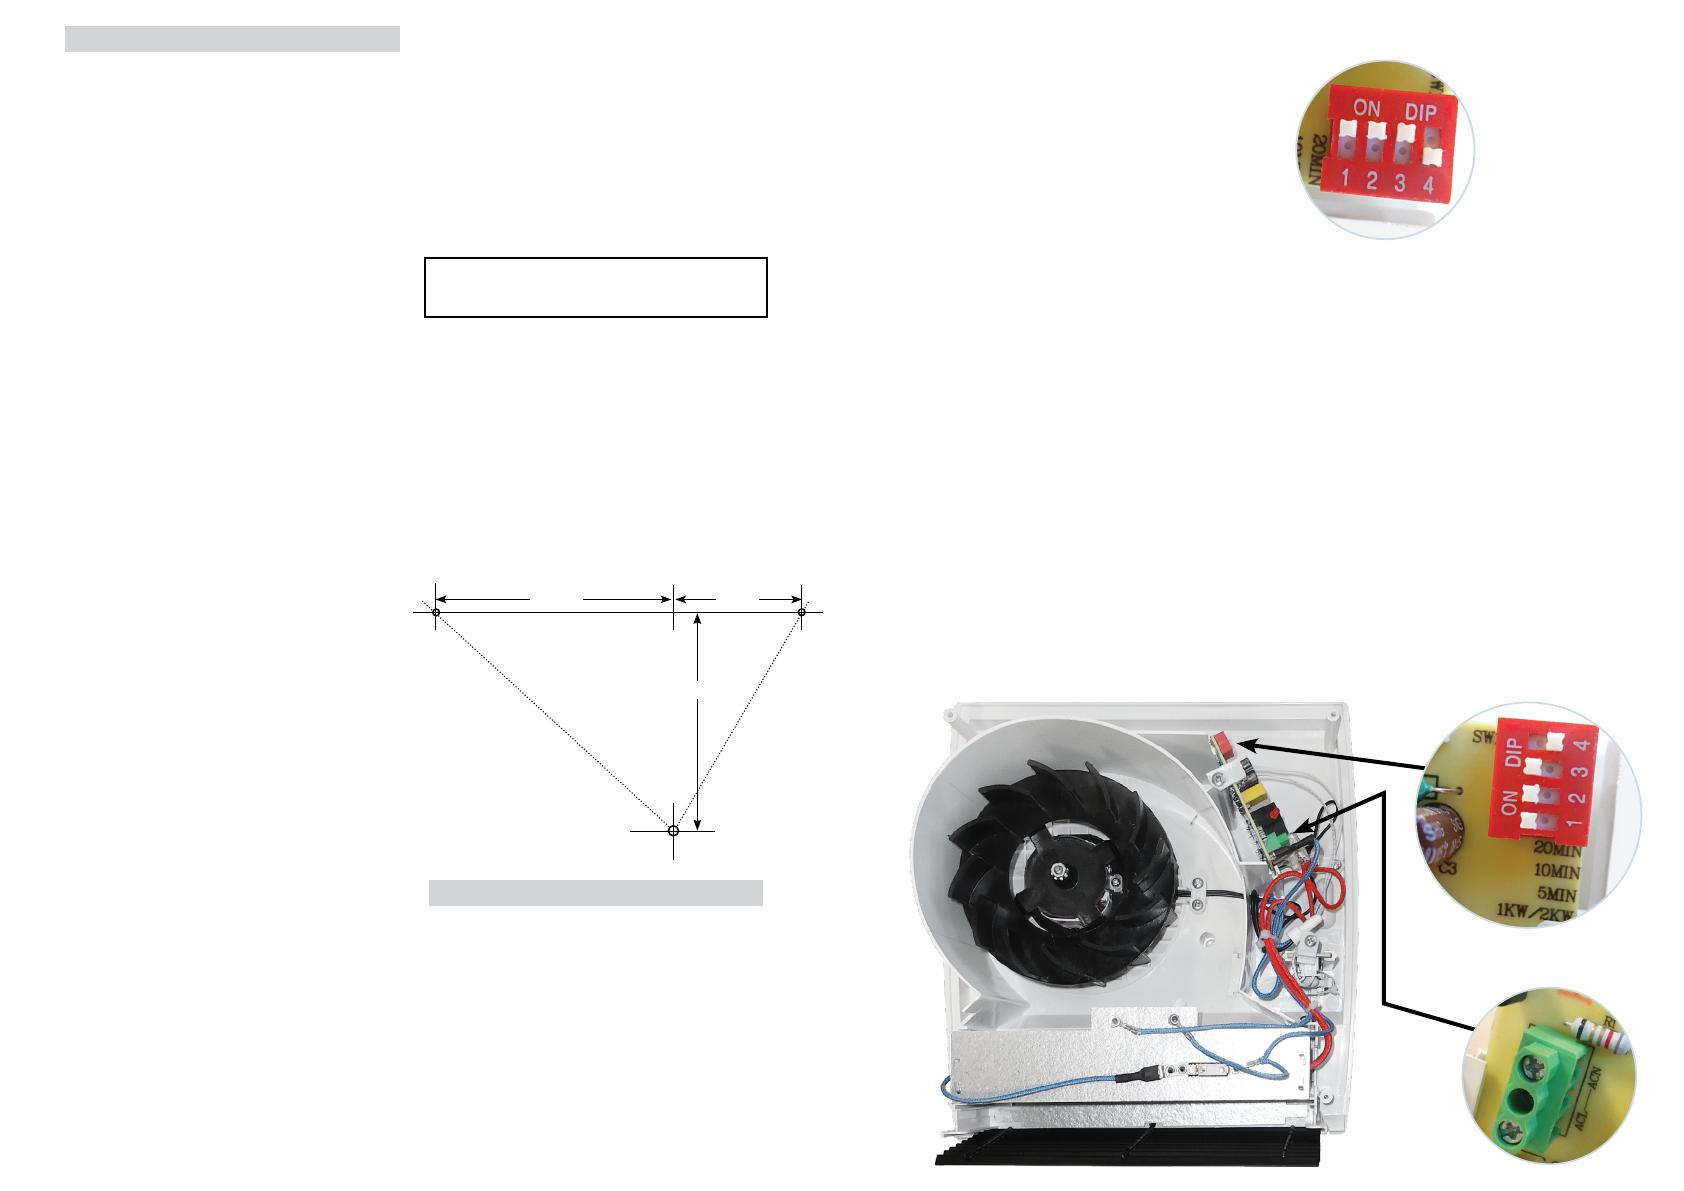
16. This tting is factory pre-set at 1kW operation
and 30 minute run back timer. If a dierent
output /time is required this can be set upon
installation.
Select desired mode of operation using the dip
switches*
1 - On position 1kW / O position 2kW
2 - On position 5 minutes
3 - On position 10 minutes
4 - On position 20 minutes
*You can have multiple time dip switches selected at
one time, this allows you to add the times together
e.g dip switch 2 and 3 on = 15 minutes
A time selection must be made for the runback timer
to operate. If a time selection is not made, the heater
will run but it will not switch o automatically.
17. Close and secure the front cover.
18. Restore the power and switch on.
19. Pull the switch cord to turn the heater on and it
will automatically switch o when the selected
Runback time has elapsed. The heater can then
be restarted by pulling the switch cord twice,
once to turn o the red indicator and a second
time to restart the heater.
The heater can be turned o at any time before the
Runback time has elapsed by pulling the switch cord
and the red indicator will automatically turn o.
Fixing Hole
Positions
124mm 67mm
114mm
Terminal block
ACL (Live) • ACN (Neutral)
Dip
switches
Fixing Hole


