READ THIS FIRST:
Check the pack and make sure you have all of the parts
listed on the front of this booklet. If not, contact the
outlet where you bought this product.
This product must be installed by a competent person
in accordance with the current building and IEE wiring
regulations.
As the buyer, installer and/or user of this product it is
your own responsibility to ensure that this tting is t
for the purpose for which you have intended it. Eterna
Lighting cannot accept any liability for loss, damage or
premature failure resulting from inappropriate use.
This product is designed and constructed according
to the principles of the appropriate British Standard
and is intended for normal domestic service. Using
this tting in any other environments may result in
a shortened working life, for example where there is
prolonged periods of use or higher than normal ambient
temperatures such as lighting public or shared spaces or
in nursing /care home facilities.
Switch o the mains before commencing installation
and remove the appropriate circuit fuse or lock o MCB.
WARNING: There are two mains feed. Disconnect both
before removing cover.
The batteries supplied with this tting are consumable
parts and therefore may be outside of any warranty
oered.
This unit is suitable for indoor or outdoor use.
Ensure that the tting will be accessible after installation
for maintenance and self testing.
This product is suitable for use in living areas, Bathroom
Zone 2 and outsides of zones.
If being tted in a bathroom a 30mA RCD must be
used.
This product is designed for permanent connection to
xed wiring: this must be a suitable circuit (protected
with the appropriate MCB or fuse).
This product is suitable for installation on surfaces
with normal ammability e.g. wood, plasterboard and
masonry. It is not suitable for use on highly ammable
surfaces (e.g. polystyrene, textiles).
Before making xing hole(s), check that there are no
obstructions hidden beneath the mounting surface such
as pipes or cables.
The chosen location of your new tting should allow
for the product to be securely mounted (e.g. to a ceiling
joist) and safely connected to the mains supply (lighting
circuit).
When making connections ensure that the terminals are
tightened securely and that no strands of wire protrude.
Check that the terminals are tightened onto the bared
conductors and not onto any insulation.
This product must be connected to earth
termination.
This product is not intended to be used by children
and persons with sensory, physical and/or mental
impairments that would prevent them from using it
safely.
You are advised at every stage of your installation to
double-check any electrical connections you have made.
After you have completed your installation there are
electrical tests that should be carried out, these tests
are specied in the current IEE wiring and building
regulations.
INSTALLATION:
Isolate mains and lock o.
Choose the location of your new tting giving
consideration to all of the points listed above.
01. Remove the diuser by turning anti-clockwise
and lifting o.
02. Drill holes in the back of your tting for your
xing screws, take care and drill gently to
ensure a clean hole through. Use a drill bit sized
appropriately to your xing screws (not supplied).
03. Using the back of your tting as a template,
mark the position of your xing holes on your
mounting surface.
04. Prepare the holes in your mounting surface as
appropriate for your xings.
05. Pierce the rubber grommet in the back of your
tting making a hole just large enough to make a
tight t around the incoming mains cable.
06. Thread the cable through the grommet and oer
the tting to the ceiling / wall.
07. Secure the tting in place. Note if protection
against ingress of moisture is required, the heads
of screws must be covered with a silicone or
similar sealant.
08. Check that the grommet is still correctly tted in
the cable entry hole and around the incoming
cable.
09. Remove the terminal block cover and make the
electrical connections to the gear tray according
to the symbols, adjacent to the connector block
as shown below:
225cm
60cm240cm
60cm
radius
from tap
ZONE 1
ZONE 0
ZONE 2
ZONE 2
Bathroom Zones Diagram
10. Replace the terminal block cover.
11. Mark the current date on the battery pack.
12. Connect the battery plug to the socket on the
driver.
13. Adjust microwave to desired settings.
14. Replace the diuser and tighten securely making
sure the gasket is correctly tted in place.
15. Restore the power and check tting is working
correctly. A green LED light should always be
present indicating the tting is charging.
NOTE: For non-maintained operation, remove
link wire from SL and PL.
For switched operation, remove link wire and
make a switched supply into SL.
OPERATION CHECKS:
Periodic testing should be carried out to ensure
emergency lighting is operating correctly.
Interruption of the supply, causing the tting to be
energised from the battery, should be carried out by
the operation of a local keyswitch or other isolation
device. During this period all ttings should be
examined visually to ensure that they are functioning
correctly. At the end of the test period the supply
shall be restored and all indicator lamps or devices
checked to ensure that the normal supply has been
restored.
DAILY:
Visual inspection of the battery charge LED.
EACH MONTH:
Isolate the power supply for a period sucient to
ensure that each lamp is illuminated. Endorse the test
record form supplied.
ONCE EACH YEAR:
Isolate the power supply and check that the light is
still illuminated after 3 hours. Endorse the test record
form.
Because of the possibility of a failure of the normal
lighting supply occurring shortly after a period of
testing of the emergency lighting system or during
the subsequent recharge period, all full duration
tests shall wherever possible be undertaken
preceding time of low risk to allow for battery
recharge.
NOTE: please keep this instruction booklet and
the test record in a safe place. A re ocer or
other authorised person may want to see your
record of inspection and testing.
UNDERSTANDING THE CONTROLS:
REFER TO MICROWAVE SENSOR PICTURE ON
FRONT PAGE
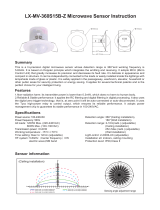
The sensor is an active motion detector: it emits a
high frequency electromagnetic wave 5.8GHz and
receives its echo. The sensor detects the change
in echo from movement in its detection zone. A
microprocessor then triggers the switch light ON
command. Detection is possible through doors,
panels of glass and thin walls.
DETECTION RANGE:
This determines the eective range of the motion
detector and is set up by DIP switches at the
sensor itself, refer to gure. Note that reducing the
sensitivity will also narrow the detection range.
The following settings
are available:
I - Detection Range 100%
II - Detection Range 75%
III - Detection Range 50%
IV - Detection Range 10%
HOLD TIME:
This determines the time the tting remains at
100% level on motion detection and is set with DIP
switches at the sensor itself, refer to gure. The walk
test setting is useful when installing the tting to
establish correct operation and range.
The following settings
are available:
I - Walk test mode 5s
II - 90s
III - 5 minutes
IV - 15 minutes
DAYLIGHT SENSOR:
This setting holds o the 100% light output should
there be sucient daylight and is set using DIP
switches at the sensor, refer to gure.
The following settings are available:
I - Photocell disabled
II - 50 lux twilight operation
III - 10 lux twilight operation
IV - 2 lux darkness operation only
* In daylight setting the
lamp(s) will always be on
with motion detected
and operate at 100% light
output, even in bright
daylight.
DETECTION AREA
1 2
I 100%
II 75%
III 50%
IV 10%
KEY: ON: OFF:
DAYLIGHT SENSOR
5 6
I Disable
II 50 Lux
III 10 Lux
IV 2 Lux
KEY: ON: OFF:
HOLD TIME
3 4
I 5s
II 90s
III 5min
IV 15min
KEY: ON: OFF:
RED DIRECTIVE Eterna Lighting Ltd
Microwave Occupancy Sensor
Full declaration available at www.eterna-lighting.co.uk
Earth
Yellow/Green
Neutral
Blue
Perm. Live
Black/Brown
Switch. Live
Brown
NSL PL