
Refer to the included full instruction manual “Use and Care Guide” for installation, safety, and additional information.
Installation
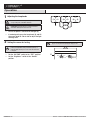
1 Removing the mounting base
NOTE: This xture comes with a mounting base. It is
pre-assembled on the light xture for shipping.
□Press the tab (1) on the top of the xture toward the
lamp heads (A).
□Slide the light xture (B) up and out of the mounting
base (D).
UP/Haut/Arriba
Hi
Med Eco
Default
20S 1Min
Wired: 5min
Solar: OFF
Battery: OFF
Test
Brightness On Time
Lo
Hi
Med Eco
Default
20S 1Min
Wired: 5min
Solar: OFF
Battery: OFF
Test
Brightness On Time
Lo
2 Installing the mounting bracket
WARNING: Turn the power off at the circuit breaker or
fuse. Place tape over the circuit breaker switch and verify
power is off at the light xture.
□Remove the existing light xture.
□Connect the ground wire on the mounting
bracket(EE) to the house ground wire using a wire
connector (AA).
□Install the mounting bracket (EE) with the stamped
word “FRONT” facing away from the junction box.
Use the mounting bracket screws(BB or CC) that
best t the junction box. If necessary, use the
screws that were removed from the existing light
xture.
□Firmly pull on the mounting bracket (EE) to verify it
is securely mounted to the junction box.
FRONT
FRONT
3 Wiring the mounting base
WARNING: Turn the power off at the circuit breaker or
fuse. Place tape over the circuit breaker switch and verify
power is off at the light xture.
NOTE: If necessary, strip 3/8 in. of insulation from
junction box wires.
□Hold down the “paddle” on the top of the pre-
installed quick connect (2) located on the back of
the mounting base (D).
□Insert the junction box wires (3) into the quick
connect (2). Ensure the white (N – Neutral) wire is
across from the pre-installed white wire and the
black (L – Line) wire is across from the pre-installed
black wire.
□Release the “paddle” and gently tug on the wires (2)
to ensure that they are securely connected.
3/8"
FRONT
UP/Haut/Arriba
Quick Start Guide
MOTION SECURITY LIGHT
D2
3
1D
B
BB or CC
EE
A
AA
Item # 1007129533
1007129477
Model # DFI-8853-BZ-G
DFI-8853-WH-G

HOMEDEPOT.com Please contact 1-866-308-3976 for further assistance.
Installation (continued)
4 Installing the mounting base
□Place the mounting base (D) against the junction
box. Ensure the wires are pushed up into the
junction box.
□When mounting to a wall, the “UP” arrow must
point upward.
□When mounting to an eave, the “UP” arrow
must point toward the building.
□Insert the mounting bolt (DD) through the mounting
base (D) hole and thread it into the center hole of
the mounting bracket (EE). Tighten the bolt (DD)
securely.
FRONT
UP/Haut/Arriba
FRONT
UP/Haut/Arriba
5 Attaching the light fixture
Wall Mount
Near
Far
NOTICE: The light xture must fully snap into place for the light to
operate properly.
□Using the alignment marks (4), align the two slots (5)
on each side of the light xture’s control module (6)
with the pins (7) inside the mounting base (D).
□Press the light xture (B) into the mounting base(D).
Slide the light xture (B) into the mounting base (D)
until it snaps into place.
UP/Haut/Arriba
Hi
Med Eco
Default
20S 1Min
Wired: 5min
Solar: OFF
Battery: OFF
Test
Brightness On Time
Lo
Hi
Med Eco
Default
20S 1Min
Test
Brightness On Time
Lo
Wired: 5min
Solar: OFF
Battery: OFF
4
6
B
7D
5
D
DD
EE

HOMEDEPOT.com Please contact 1-866-308-3976 for further assistance.
Installation (continued)
Eave Mount
IMPORTANT: The light xture and control module will only rotate
one direction. Do NOT FORCE the control module if it does not turn.
NOTICE: The light xture must fully snap into place for the light to
operate properly.
□While holding the light xture (B) in both hands,
carefully twist the light xture’s control module(6) 180
degrees as shown.
□Using the alignment marks (4), align the two slots (5)
on each side of the light xture’s control module (6)
with the pins (7) inside the mounting base (D).
□Press the light xture (B) into the mounting base(D).
Slide the light xture (B) into the mounting base (D)
until it snaps into place.
Hi
Med Eco
Default
20S 1Min
Wired: 5min
Solar: OFF
Battery: OFF
Test
Brightness
On Time
Lo
UP/Haut/Arriba
Far
Near
Med
Lo
Far
Near
Med
UP/Haut/Arriba
Lo
Med
Lo
Far
Near
6 Caulking around the light fixture
CAUTION: Failure to completely caulk around the light
xture’s mounting base could result in water seepage into
the light xture and/or junction box.
□Once the light (B) is operating correctly, caulk
around the mounting base (D) and mounting surface
with silicone sealant (not included).
Near
Far
D
6
B
6
D
7
B
5
4
180°

HOMEDEPOT.com Please contact 1-866-308-3976 for further assistance.
Operation
1 Adjusting the lamp heads
WARNING: Risk of re. Keep the lamp heads at least
2in. (51mm) from combustible materials.
CAUTION: Keep lamp heads 30° below horizontal to
avoid water damage and electrical shock.
□Ensure the power is turned on for the light (B).
□If needed, gently grasp the lamp heads (A) and tilt
them up or down or side to side to adjust the light
coverage area.
Near
Far
2 Setting the sensor for testing
NOTE: When the “ON-TIME” switch is set to the “TEST”
position, the light xture will operate during the day or
night. The light will stay on for 8 seconds after all motion
is stopped.
□Set the “ON-TIME” switch to the “TEST” position.
□Set the “Brightness” switch to the “Default”
position.
NOTE: The motion sensor will need to completely warm
up (60 seconds) before beginning the setup process.
Brightness
Med
Lo
Eco
Test
20S 1Min
Wired: 5min
Solar: OFF
Battery: OFF
Default
Hi
On Time
6
A

HOMEDEPOT.com Please contact 1-866-308-3976 for further assistance.
6
C
C
C
Operation (continued)
3 Adjusting the motion sensor detection zone
□Perform a “walk test”: walk in an arc across the
front of the motion sensor (C).
□Watch the light. The light will come on indicating
motion has been detected.
□Stop, wait for the light to turn off, and then begin
walking again.
□Continue this process until the detection zone has
been established.
NEARNEAR
FARFAR
□If needed, gently grasp the motion sensor (C) and
move it from side to side or up and down to adjust
the detection zone.
□Note: Moving the motion sensor (C) “UP”
increases the distance of the detection
zone. Moving the motion sensor (C) “DOWN”
decreases the distance of the detection zone.
There are built-in stops in the motion sensor (C). Do not
rotate the motion sensor past these stops.
NEAR FAR
Near
Far
NEAR FAR
50 ft.
4 Adjusting the ON-TIME switch
NOTE: The “ON-TIME” switch determines the amount of
time the light will stay on full bright after all motion has
stopped.
□When the “On-Time” switch is set to the “20S”
(seconds), “1Min” (minute), or “5Min” (minute)
position, the light will function as a motion sensing
light.
□Do NOT leave the ON-TIME switch in the
“TEST” position.
Brightness
Med
Lo
Eco
Test
20S 1Min
Default
Hi
On Time
Wired: 5min
Solar: OFF
Battery: OFF
5 Adjusting the brightness switch
This light xture (B) has an adjustable light level (lumen)
setting. The higher the lumen number, the brighter the light
output. Use the chart below to select the brightness level
desired.
Brightness Setting Lumen Output
Hi (High) 3000
Med (Medium) 2250
Lo (Low) 1500
Eco 600
Default 3000
C

HOMEDEPOT.com Please contact 1-866-308-3976 for further assistance.
This device complies with Part 15 of the FCC Rules. Operation is subject to the following two conditions: (1) this device may not cause harmful interference, and (2)
this device must accept any interference received, including interference that may cause undesired operation.
Warning: Changes or modications to this unit not expressly approved by the party responsible for compliance could void the user’s authority to operate the
equipment.
Note: This equipment has been tested and found to comply with the limits for aClass B digital device, pursuant to part 15 of the FCC Rules. These limits are designed to
provide reasonable protection againstharmful interferencein a residential installation. This equipment generates, uses and can radiateradio frequency energyand, if not
installed and used in accordance with the instructions, may causeharmful interferenceto radio communications. However, there is no guarantee that interference will not
occur in a particular installation. If this equipment does causeharmful interferenceto radio or television reception, which can be determined by turning the equipment off
and on, the user is encouraged to try to correct the interference by one or more of the following measures:
- Reorient or relocate the receiving antenna.
- Increase the separation between the equipment and receiver.
- Connect the equipment into an outlet on a circuit different from that to which the receiver is connected.
- Consult the dealer or an experienced radio/TV technician for help.
FCC Responsible Party Name: HeathCo LLC
Address: 2445 Nashville Road, Bowling Green, KY 42101 U.S.A.
Telephone Number: 800-858-8501
CAN ICES-005 (B)/NMB-005 (B)
Troubleshooting
Problem Possible Cause Solution
The light will not come
on.
□The light xture is not properly attached to the
mounting base, if this is a new installation.
□Re-install the light xture to the
base.
□Daylight turn-off (photocell) is in effect. □Recheck after dark.
□The motion sensor is aimed in the wrong
direction.
□Re-aim the motion sensor to cover
the desired area.
The light comes on
during the day.
The motion sensor may be installed in a relatively
dark location.
The light xture is operating normally
under these circumstances.
The light comes on for
no apparent reason.
The light xture is wired through a dimmer or timer. Do not use a dimmer or timer to control
the light xture. Replace the dimmer
or timer with a standard on/off wall
switch.
The lights stay on
continuously.
□The motion sensor may be picking up a heat
source, such as an air vent, dryer vent, or
brightly painted, heat-reective surface.
□Reposition the motion sensor.
□The motion sensor is in manual mode. □Switch the motion sensor to auto.
See Using manual mode in the
included Use and Care Guide for
additional information.
□The light xture is wired through a dimmer or
timer.
□Do not use a dimmer or timer to
control the light xture. Replace the
dimmer or timer with a standard
on/off wall switch.
□The light xture is on the same circuit as a
motor, transformer, or uorescent bulb.
□Install the light xture on a circuit
without motors, transformers, or
uorescent bulbs.
211510-02
-
 1
1
-
 2
2
-
 3
3
-
 4
4
-
 5
5
-
 6
6


Defiant DFI-8853-WH User guide
- Type
- User guide
- This manual is also suitable for
Ask a question and I''ll find the answer in the document
Finding information in a document is now easier with AI
Related papers
-
Defiant DFI-7167-WH User manual
-
Defiant DFI-8800-WH Operating instructions
-
-
-
-
-
-
Defiant DFI-5852-WH Operating instructions
-
-

