Mazda MX-5 Quick Tips

Category
Cars
Type
Quick Tips

Mazda MX-5: Experience the thrill of driving with a blend of style, performance, and innovation. This exhilarating roadster offers a captivating driving experience with its responsive handling and sleek design. Immerse yourself in the joy of open-top motoring with the power-retractable hardtop, or enjoy the comfort and convenience of keyless entry and advanced keyless start system. Discover the perfect harmony of technology and driving pleasure with Mazda MX-5.

Mazda MX-5: Experience the thrill of driving with a blend of style, performance, and innovation. This exhilarating roadster offers a captivating driving experience with its responsive handling and sleek design. Immerse yourself in the joy of open-top motoring with the power-retractable hardtop, or enjoy the comfort and convenience of keyless entry and advanced keyless start system. Discover the perfect harmony of technology and driving pleasure with Mazda MX-5.

This Quick Tips® guide is provided by
Mazda North American Operations
to make your Mazda ownership
experience more convenient.
For complete details and operating
instructions, see your Owner’s Manual.
If you have any questions about your
vehicle, you are invited to contact
your local dealer. Or if you need
additional help, feel free to call our
Customer Assistance Center
at 1-800-222-5500
Monday through Friday,
8 a.m.-4:45 p.m., Pacific
9 a.m.-5:45 p.m., Eastern/Central
Mazda Roadside Assistance
Exhilaration, liberation and inspiration,
are great reasons to drive a
Mazda car, truck or SUV. In addition
to all the other great standard
features, you also get peace of mind
with our basic warranty period
Emergency Roadside Assistance
Plan, it’s just a phone call away,
24 hours a day, 365 days a year,
call 1-800-866-1998.
Mazda ‘bumper-to-bumper”
Limited Warranty and
Powertrain Warranty
Engineers design and build every
Mazda to give you driving pleasure
now and far down the road. We’re
so confident in our quality that we
cover the entire vehicle against defects
in materials and workmanship for
36 months/36,000 miles, whichever
comes first, plus we provide a
powertrain warranty for 60 months/
60,000 miles, whichever comes first.
Lower Octane Fuel Usage
If 91 octane fuel is not available,
fuel as low as 87 octane
can be used temporarily for
emergency purposes. Use
of fuel lower than 91 octane
can decrease performance
and deteriorate shift quality.
Refueling vehicle with correct
octane fuel a couple of
times will restore vehicle
performance and shift quality.
ROADSIDE ASSISTANCE/WARRANTY
Unleaded
Gasoline
91-octane
recommended
12.7-gallon/
48-liter tank
www.mazdausa.com
©2007 Calcar, Quick Tips
®
is a trademark
of Calcar, made in USA 5/07 25.471M DOT
Mazda North American Operations reserves
the right to change product specifications
at any time without incurring obligations.
9999-95-031C-08QT
Quick Tips
®
Reference
Guide for
Controls and
Functions
MAZD A MX-5
DRIVER’S VIEW
1. Power door locks*,
see Locks
2. Power outside mirror
switch, see Switches/
Interior Lights
3. Manual door locks,
see Locks
4. Passenger air bag
deactivation switch,
see Getting Started
5. DSC Traction Control
System*,
see Instrument Cluster
6. Air vents
Move vents to direct airflow.
7. Audio control switches*,
see Getting Started
8. Turn signal/lighting
control lever,
see Getting Started
9. Horn
10. Air bag
11. Wiper/washer lever,
see Getting Started
12. Cruise control*,
see Getting Started
13. Audio system,
see Audio Systems
14. Hazard warning switch
Press on/off
15. Passenger air bag off
indicator, see Getting Started
16. Climate control system,
see Climate Controls
17. Bottle holder
CAUTION: Use plastic bottles
with caps, cups may spill
when door is closed.
18. Glove compartment
19. Gearshift lever,
see Transmission
20. Parking brake lever
21. Cup holders
22. Power window
switches,
see Switches/Interior Lights
23. Accessory socket
24. Steering shift
switches (A/T only)*,
see Transmission
25. Tilt steering-wheel lever,
see Getting Started
26. Hood release handle
Pull to open partially.
27. Remote trunk-lid
release
Press button to open trunk.
28. Fuse panel
29. Power retractable hardtop
operation indicator*,
see Convertible
30. Power retractable hardtop
switches*, see Convertible
31. Seat warmer*
Press on/off.
Driver’s
View
3 6 5 4 6 6 14 13 16 6 10
28
17
21
22
20
18
23
26 27
30303 1 1 2
E
F
x1000r/min
P
8
0
20
40
60
80
100
120
140
0
2
3
4
5
6
7
1
R
N
D
M
17
8 9 7 11 10 12
25 24 24
19
31
15 29
*Denotes optional equipment
Always check the Owner’s Manual for more operating information and safety features
GETTING STARTED
Always check the Owner’s Manual for more operating information and safety features
Getting Started
Mazda MX-5 Miata Quick
Tips
®
are designed to quickly
familiarize you with some
important features of your
Mazda MX-5 Miata.
The Driver’s View tab is your
index to the Quick Tips
®
, locate
the item you would like to
learn more about and then
turn to the listed tab.
This Getting Started section
contains important operating
tips about your Mazda
MX-5 Miata.
Items identified in blue text
call out unique features.
Tire Pressure Monitoring
System (TPMS)
Warning light illuminates on
instrument cluster for a few
seconds with ignition on.
If tire pressure is low, warning
light illuminates with audible
beep sound, adjust tire pressure
to correct specifications, perform
tire pressure adjustment before
driving, a digital tire pressure
gauge is recommended.
Flashing warning light may
indicate malfunction, dealer
inspection required.
Passenger air bag
deactivation indicator light
Front air bag deactivation indicator
light (2) provides current status
of front passenger air bag and
pretensioner system.
If total seated weight on front
passenger seat is less than
approximately 66 lb., front
passenger air bag deactivation
indicator light illuminates,
air bag/pretensioner will not
deploy/activate in an accident.
If the total seated weight
is greater than approximately
93 lb., light does not illuminate,
and the air bag/pretensioner will
deploy/activate in an appropriate
accident, see Owner’s Manual.
WARNINGS: Even with advanced
air bags, when using a rear-facing
infant-safety seat always set the
passenger seat air bag deactivation
switch to OFF position.
An infant is in serious danger
of being injured or killed if front
passenger air bag is deployed.
If you must install a forward-
facing child-safety seat in the
front seating position, move
vehicle seat as far back as possible
and set air bag deactivation
switch to OFF position.
Getting
Started
Getting
Started
*Denotes optional equipment
For other rare circumstances when
passenger air bag can be shut off,
refer to NHTSA guidelines
Passenger’s seat air bag
deactivation switch
Deactivate passenger’s seat air bag
when using a child-safety seat.
To deactivate/activate: Insert
ignition key or auxiliary key
(Advanced keyless entry*) in
switch (1), rotate to OFF/ON,
remove key.
Passenger air bag off indicator
illuminates when air bag is
deactivated and ignition is on.
Remote fuel filler release
lever
Located in rear compartment
between seats.
Pull remote fuel-filler lid release
lever (1) to open fuel-filler lid.
Behind seat storage
(Soft top only)
Move seatbacks forward to access
additional storage compartments,
see Seats.
1
E
F
2
3
4
1
PAS S
AIRBAG
PAS S
AIRBAG
Always “ON”
Except
CRS used
ON OFF
1
2
P
A
S
S
E
N
G
E
R
A
I
R
B
A
G
O
F
F
GETTING STARTED
Always check the Owner’s Manual for more operating information and safety features
Advanced
keyless entry/
start system*
Advanced key
must be carried
by driver to
operate properly.
Advanced keyless
system customization
Your authorized Mazda Dealer can
customize your system if desired
with features such as auto-lock,
which can be programmed to
automatically lock vehicle after
driving and exiting vehicle.
For additional information,
see Owner’s Manual.
WARNING: Never leave a child
alone in vehicle and never
leave any key where a child can
find it, particularly advanced
keys which give easier access
to a curious child.
Trunk request switch: Press (7) on
trunk lid, only trunk will open,
doors do not lock/unlock.
Tip: Trunk will not open if
power retractable hardtop*
latch is released or top is not in
complete raised/lowered position.
Advanced key transmitter:
Press button (2) for driver’s
door; press again within a 3
seconds to unlock passenger’s
door, press and hold to lower
driver’s and passenger windows.
Press and hold button (3)
for more than 1 second to
open trunk.
Activating panic alarm
Panic alarm: Press and hold
button (4) for more than 1 second;
horn sounds, hazard warning
lights flash; to stop, press any
remote button.
may not start or warnings
may activate.
Turning off engine
Turn start knob to ACC position
to turn engine off, push in and
turn start knob to LOCK position.
Tip: Vehicle battery may be
discharged and vehicle security
compromised if start knob is
left in ACC position.
Always put vehicle in Park (P), set
parking brake and turn start knob to
LOCK position when exiting vehicle.
System operation warnings
KEY indicator light flashes (green)
indicates advanced key transmitter
battery power is low.
KEY indicator light illuminated
continuously (red) with warning
beep indicates system malfunction,
and auxiliary key should be used, have
vehicle inspected at an Authorized
Mazda Dealer as soon as possible.
Tip: When using advanced
keyless system, unless
reprogrammed by dealer,
system will beep as confirmation
of lock/unlock requests, system
will also beep if start knob is
left in ACC position, advanced
key has been left in vehicle or
if advanced key is removed from
vehicle while vehicle is running.
For additional system operation
warnings, see Owner’s Manual.
Replacing battery
See Owner’s Manual
Cautions on use
To avoid damage to advanced
key, do not allow any severe
impacts or contact with liquids,
do not place heavy objects on
advanced key and do not leave
advanced key exposed to direct
sunlight or high temperatures,
see Owner’s Manual for all
cautions and warnings.
Getting
Started
Getting
Started
1
2
4
5
3
Starting engine
Press start knob
(8); when KEY
indicator (green)
illuminates on
instrument
cluster; turn start knob (8) to
START position to start engine.
Auxiliary key operation
If advanced key cannot be used
due to a malfunction or dead
advanced key battery, use auxiliary
key (5) to lock/unlock doors,
trunk and to start vehicle.
To start vehicle: Remove start
knob cover (8) by pressing both
side release buttons (9) while
pulling; insert auxiliary key into
key cylinder and turn to start engine.
Tip: Do not place advanced key
on or around dashboard, storage
compartments such as glove
box or in open trunk, engine
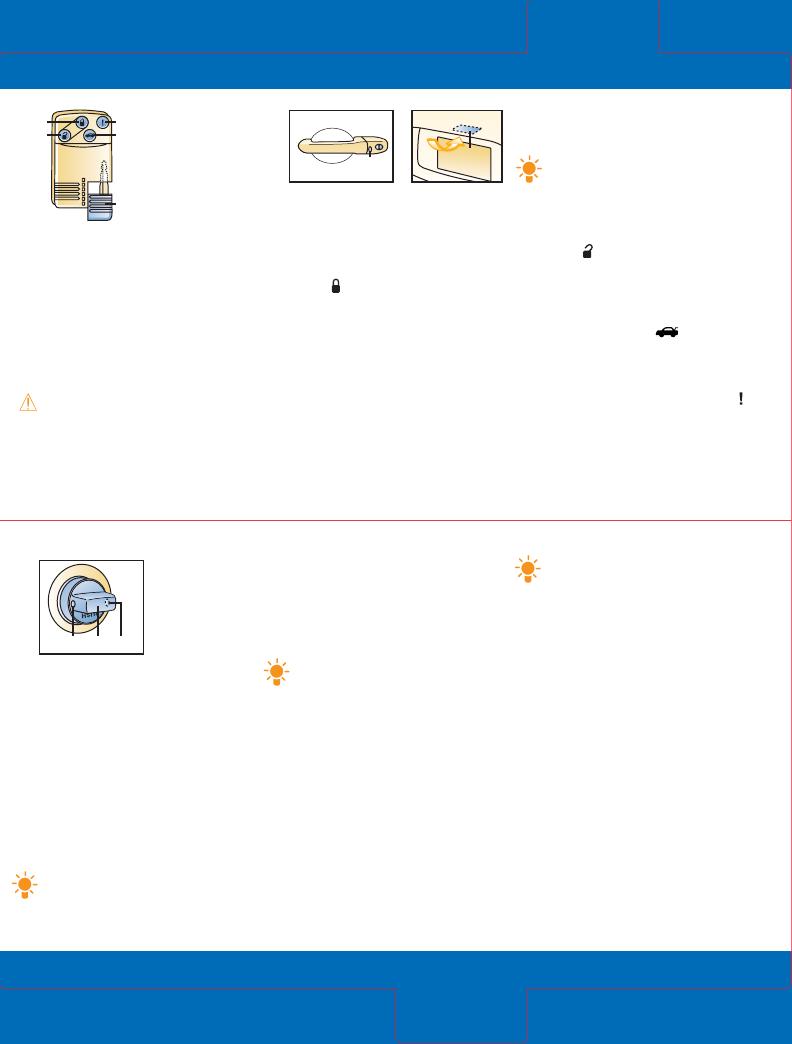
Locking doors
Driver’s/passenger’s door request
switch: Press (6) once on either
door to lock both doors.
Advanced key transmitter:
Press button (1); pressing again
within a few seconds causes doors
to relock and horn to beep.
Unlocking doors/
opening trunk
Driver’s door request switch:
Press (6) to unlock driver’s door;
press again within 3 seconds to
unlock both doors.
Passenger’s door request switch:
Press (6) on passenger’s door;
both doors unlock simultaneously.
L
O
C
K
A
C
C
O
N
S
T
A
R
T
PUSH
9 8 9
6
7
*Denotes optional equipment
GETTING STARTED
Always check the Owner’s Manual for more operating information and safety features
Getting
Started
Getting
Started
Steering-wheel audio
controls*
To increase/decrease volume:
Push up/press down switch (1).
Press (2) to mute.
Press (3) to select AM, FM1,
FM2, CD, SIRIUS* radio mode.
Push up/press down (4) to
seek next/previous preset radio
station/CD track.
Press and hold up/down (4)
to seek radio stations in AM,
FM1, FM2.
Tilt steering-wheel lever
Pull lever (8) down to
unlock column, adjust angle
of column.
WARNING: Do not adjust
steering-wheel while driving.
Turn signal/lighting
control lever
OFF = Lights off
= Tail, parking and
dashboard lights on: Rotate
knob (1) to first notch
= Tail, parking, dashboard
and headlights on; rotate
knob (1) to second notch
High beams on/off: Push lever
(2) forward/pull lever back to
original position.
To flash high beams: Pull back
lever (2) slightly and release.
= Fog lights* on: Rotate (3);
functions only with headlight
low beams on
Turn signals right/left: move
lever up/down.
1 32
4
Windshield wiper/
washer lever
Intermittent wiper: One click down.
Normal wiper speed: Two
clicks down.
Fast wiper speed: Three clicks down.
Single wipe: Push lever up.
Wash and wipe: Pull lever (4)
toward you and hold; washer
and wipers will be activated
until lever is released.
Cruise control*
Operates above 19 mph.
Press ON/OFF switch (5) to
enable/disable.
To set speed: Press switch (6)
down and release.
To increase set speed: Push switch
(6) up and release at desired speed.
To decrease set speed: Press
switch (6) down and release at
desired speed.
To cancel: Tap brake or clutch
pedal (manual transmission)
or press CANCEL switch (7).
*Denotes optional equipment
8
2 3
VOL+
MODE
1 4
75
ON OFF CANCEL
RES/
+
SET/–
6
INSTRUMENT CLUSTER
Always check the Owner’s Manual for more operating information and safety features
Instrument
Cluster
Instrument
Cluster
C
H
E
F
LF
A
0.0
8
7 8 10 11
4
3 3
1
6
x1000r/min
P
8
0
1
2
3
4
5
6
7
R
N
D
M
9
2
0
20
40
60
80
100
120
140
24080
60
40
20
0
220100
200120
180140
160
km/h
mph
5
DSC
OFF
AT
KEY
FLAT
TIRE
GAUGES AND CONTROLS
1. Dashboard illumination
control, Rotate to dim/brighten.
2. Tachometer
Avoid red zone.
3. Turn signal/hazard
warning on
4. Engine oil pressure gauge
If outside normal range,
stop vehicle safely and turn
off engine, check oil level.
See Owner’s Manual for
scheduled maintenance.
Tip: Needle fluctuates with
engine RPM, this is normal.
5. Speedometer
6. Odometer/trip odometer
selector
Press to select odometer or trip
odometer A/B; press and hold
to reset selected trip odometer.
• Cruise control* on
Amber light: Cruise control
system activated
Green light: Cruising speed set;
see Getting Started
High beams on,
see Getting Started
Immobilizer system on,
see Locks
• Check engine
Dealer inspection required
Air bag readiness
If light flashes or stays on, the
air bags may not operate in an
accident; dealer inspection required
Brake system
Parking brake on/low brake fluid
AT Automatic transmission
warning light*
• Charging system
Possible alternator or charging
system malfunction, dealer
inspection required
• Anti-lock Brake
System (ABS)
Indicates ABS malfunction,
dealer inspection required
• Door ajar
• Dynamic Stability
Control* off
• Tire pressure
monitoring system,
see Getting Started
Always fasten seat belts
DSC
OFF
*Denotes optional equipment
WARNING LIGHTS
7. Coolant temperature
gauge
If above normal range, stop
vehicle safely and turn off
engine; check coolant level
when safe.
8. Odometer/trip
odometer display
9. Shift/gear position
indicators*
10. Low fuel indicator
11. Fuel gauge
12.7-gallon/48-liter tank
Flat tire warning light
Flat tire or system malfunction,
dealer inspection required
KEY*,
see Getting Started
TCS/DSC indicator light*
Flashes when traction control
or stability control is functioning,
steady light indicates malfunction
Enhances traction and safety
by regulating engine and
brake torque
TCS/DSC light may occasionally
flash while driving, this indicates
that the TCS/DSC was performing
a correction to help maintain
your best vehicle control, if
TCS/DSC light remains on,
see your Mazda Dealer
FLAT
TIRE
OFF ON
TRUNK OPENER
LOCKS
Always check the Owner’s Manual for more operating information and safety features
Locks
Locks
Key
Operates ignition and all locks.
Tip: Use key number plate
to purchase a new key;
store in a safe place
separate from vehicle.
Advanced keyless entry/
start system/auxiliary key*
See Getting Started
Immobilizer system
Prevents engine from running
unless coded key is used,
see Owner’s Manual.
WARNING: Never leave a child
alone in vehicle and never
leave any key where a child can
find it, particularly advanced
keys which give easier access
to a curious child.
*Denotes optional equipment
1
Remote keyless
entry system*
Functions only
with ignition in
OFF position.
To lock doors:
Press button (2);
pressing again within a few
seconds causes doors to relock
and horn to beep.
To unlock: Press button (3) for
driver’s door; press again within 3
seconds to unlock passenger’s door.
Press and hold button (4) for
more than 1 second to open trunk.
Tip: Trunk will not open if
power retractable hardtop*
latch is released or top is not in
complete raised/lowered position.
Panic alarm: Press and hold
button (5) for more than 1 second;
horn sounds, hazard warning lights
flash; to stop, press any remote button.
Power door locks*
Both doors can be locked/unlocked
using power door lock switch (2)
or by using key in driver’s door.
To unlock driver’s door: Turn key
toward the front of vehicle.
To unlock both doors: Turn key
and hold in unlock position for
more than 1 second.
To lock both doors: Turn key
toward the back of vehicle.
Remote trunk-lid
release lock-out
Switch in ON position, remote
trunk release functions normal;
OFF position disables system;
switch located in trunk,
see Trunk.
1
LOCK
2
LR
Manual door locks
To lock/unlock: Push button (1)
into handle/pull toward you.
Retractable key*
To fold/unfold: Press release
button (1).
Auxiliary key*
See Getting Started
SWITCHES/INTERIOR LIGHTS
Always check the Owner’s Manual for more operating information and safety features
Switches/
Interior Lights
Transmission
Power windows
Operate only with ignition on.
To open/close: Push down/pull
up front of switch.
Auto down function is available on
driver’s window only, identified by
AUTO on switch (1) or both driver
and passenger windows, switches
are blank (2) depending on model.
Auto down function: Press desired
switch down completely and release.
Tip: On models with auto
down function on both
windows, windows can be
opened using keyless entry
transmitter by pressing and
holding unlock button.
Dome light
ON = Light always on
OFF = Light always off
DOOR = Light on when
a door is open
*Denotes optional equipment
Dual power mirrors
Operates in accessory mode
or with ignition on.
To adjust left/ right mirror: Push
selector switch (3) left/right,
press switch (4) in direction
of desired movement.
M (Sport A/T
manual shift
mode)*
Move shifter from
D to M to engage
manual shift mode,
M will be illuminated
on shift position
indicator located in the
instrument panel.
Manual shifting of transmission
is achieved by moving shifter
back to upshift and forward to
downshift, move shifter from
M to D to engage automatic
shift mode.
Tip: You can also shift using
steering shift switches.
To upshift: Tap either up
switch toward you.
To downshift: Tap either
down switch away from you.
Automatic
transmission*
P = Park
To move
gearshift from
Park: Press firmly
on brake pedal,
then move
gearshift to
gear selection.
R = Reverse
N = Neutral No gear engaged.
D (Overdrive)
For normal driving: Shifts through
all forward gears automatically.
Gear indicator
(A/T only)*
Illuminated numeral of
gear indicator located in
the instrument panel
displays current gear in
Automatic and Manual
shift modes.
P
R
N
D
M
5-speed
6-speed*
AUTO
1
2 2
LR
4
3
O
N
O
F
F
DO
OR
1
P
1
R
N
D
M
Manual transmission
Depress clutch pedal to start
engine and change gears.
5-Speed: Put shifter in neutral
before selecting reverse.
6-Speed: Push shifter (1) downward
and over to select reverse gear.
Tip: With power retractable
hardtop*, if beep sounds when
vehicle is placed into gear, verify
hardtop latch is closed, if power
top does not operate when in the
open position, verify vehicle is
not in gear or trunk is not open.
SEATS
Always check the Owner’s Manual for more operating information and safety features
Seats
Child Seats
Manual controls
1. Fore-aft adjustment
Lift lever and hold, slide seat,
release lever.
2. Seat belt buckle
3. Seatback angle
To adjust: Lift and hold lever,
lean forward or backward,
release lever.
4. Height adjustment*
(Driver’s seat only)
Pull/push lever and release.
Tip: Move seatbacks
forward to access
additional storage
compartments
(Soft top only).
Seat warmer*
Located below climate
controls, see Driver’s View.
Seat belt emergency
locking mode
Belts lock only on hard
acceleration, braking, cornering
or impacts of about 5 mph
or more.
Automatic locking mode
(front passenger seat
belt only)
Must be used when installing
child-safety seat.
To activate: Pull belt fully out
of retractor, connect buckle and
allow belt to retract until click
is heard; belt will only tighten.
To disengage: Unbuckle belt
and allow belt to retract fully.
Tip: Side-impact air bags
deploy from outboard
side of driver and front
passenger seatbacks.
WARNINGS: Do not adjust
seats while driving.
Seat belts must always
be worn when vehicle is
in motion.
All air bags are supplemental
and do not replace seat
belt usage.
Properly secure children
and even with advanced
air bags, set passenger side
air bag deactivation switch
to OFF position.
WARNINGS: Even with
advanced air bags, when
using a rear-facing infant-
safety seat always set the
passenger seat air bag
deactivation switch to
OFF position.
An infant is in serious
danger of being injured or
killed if front passenger
air bag is deployed.
If you must install a
forward-facing child-safety
seat in the front seating
position, move vehicle seat
as far back as possible and
set air bag deactivation
switch to OFF position.
Child-safety seat
To install in passenger seat: Use key
to disable passenger air bag, then
move seat as far back as possible;
use dual locking mode retractor
seat belt; see Owner’s Manual
for proper installation of child seat
and LATCH system instructions.
WARNING: Use age
appropriate child restraints,
see Owner’s Manual and
state or province laws.
2
3
4
1
*Denotes optional equipment
AM/FM STEREO/CD/MP3
Always check the Owner’s Manual for more operating information and safety features
Audio
Systems
Audio
Systems
1. Power/Volume
Press to turn on/off; rotate
to increase/decrease volume.
2. LOAD
CD: When LOAD button is
pressed, CD will load and play
even if CD eject button has
been previously pressed.
CD changer*: To load multiple
discs: Press and hold LOAD (2)
until beep sound is heard; insert
CD when “In” is displayed.
To eject disc: Press Eject (8).
To eject specific disc: Press and
hold Eject (8) until beep sound is
heard; within five seconds press
the desired tray number 1-6 (10).
3. FM/AM
Press to turn radio on and
select between FM1/FM2/AM
station preset buttons (10).
4. CD slot
5. SAT*, Satellite ready capability.
11. Reverse /Fast forward
Press to reverse/fast forward
through a track.
12. Auto-Memory
Press and hold until a beep
sound is heard; system auto-
matically scans and temporarily
stores six strong stations in each
band; press again to switch to
another preset station.
13. Scan
Radio: Press to sample strong
stations, press again to stop at
current station.
CD/MP3: Press to play first few
seconds of each selection, press
again to stop at current selection.
14. Random*
Press to play CD/MP3 selections
in random order.
15. RPT
Press to replay current
CD/MP3 selection.
1 DISC 2 DISC 3 RPT 4 PROG/RDM 5 6
SEEK
TRACK
APC
CLOCK
DISP
ESN
AUTO-M
SCAN
FM/AM MEDIASAT CD
V
O
L
P
U
S
H
P
O
W
E
R
T
U
N
E
P
U
S
H
A
U
D
I
O
C
O
N
T
.
T
E
X
T
1
19
9
10
1217 1415 1318 1116
3 5 6
LOAD
2
8
4 7
6. CD
Press to play CD.
7. Display
8. CD eject button
9. Tune/Audio/Text Control
Radio: Rotate counter-
clockwise/clockwise for lower/
higher frequency.
Audio: Press to select ALC or
AudioPLT*/BASS/TREB/FADE/
BAL/BEEP.
Rotate right/left to adjust
selected feature.
Text*(MP3): Rotate right/left
to display titles.
Tip: Automatic Level Control
(ALC) automatically adjusts
audio volume depending
on vehicle speed.
10. Memory preset buttons
To set: Tune to station, press and
hold until beep sound is heard.
16. DISP
CD/MP3: Press repeatedly
to scroll through displays.
17. Clock
To set: With ignition
in ACC or ON position,
press top of switch (17) until
beeper sounds and time flashes;
press top of switch (18) to set
hour, press bottom of switch
(18) to set minutes, press top
of switch (17) to start clock.
18. SEEK/TRACK/APC
Radio: Press to
automatically seek higher/
lower frequency.
CD/MP3: Press to
select next track/beginning
of current track.
19. Disc *
Press to skip to next/previous CD.
/
/
*Denotes optional equipment
Tip: Insert single CD into slot, auto-loading function will
set CD and begin play without pressing LOAD button.
CLIMATE CONTROLS
Always check the Owner’s Manual for more operating information and safety features
Climate
Controls
Driving Tips
6. Fan control
Rotate knob counterclockwise/
clockwise to decrease/increase
fan speed, turn to OFF to shut
system off.
1. Airflow selector
= air to dash/waist, open mode
= air to dash/waist/floor,
open mode
= air to waist/floor, open mode
= air to dash
= air to floor
= air to windshield and floor
A/C compressor is on
= defrost, air to windshield
A/C compressor is on
Tip: Select OPEN MODE
position when lowering
convertible top for
best comfort.
WARNING: When using
position always set
temperature control to
hot or warm to prevent
glass fogging.
2. Temperature control
Rotate knob counterclockwise/
clockwise for cooler/warmer.
3. Rear window
defogger
Press to activate/deactivate.
4. A/C Air conditioning*
Press to turn on/off.
Tip: Use A/C to dehumidify air.
5. Air intake control
Press to select fresh air (indicator
light off)/recirculated air
(indicator light on).
WARNING: Do not use
recirculated air mode
in cold or wet weather;
windows could fog and
hamper vision.
Control positions for
maximum defrost
Fan to maximum, temperature
to maximum hot, airflow
selector knob to .
Tip: When selected, air
is dried by A/C compressor
operation when outside
temperature is above 39°F.
Tips: To help prevent
windshield fogging in
humid weather, select .
To prevent moisture buildup,
never drive with system off
with convertible top up.
Tip: Use only genuine Mazda
tire chains; install only on rear
tires; install as tightly as possible
and retighten periodically.
Anti-lock Brake System (ABS)
ABS automatically reduces
hydraulic pressure to any wheel
on the verge of locking up.
You may feel a slight pulsing of the
brake pedal and hear a clicking noise;
this tells you the ABS is functioning
properly; increase pressure on pedal
for maximum braking.
Tips: Maintain constant
pressure on the brake pedal.
Do not pump the brakes.
Tire economy and tips
Check pressure at least monthly
when tires are cold.
Maintain correct 4-wheel alignment
and tire balance.
Rotate tires at 5,000 or 7,500 mile
intervals; see Owner’s Manual for
rotation chart.
Tire pressure
Decal on the edge of the driver’s door
jamb provides tire pressure information.
Tire chains*
Tire chains can damage aluminum
wheels; use on steel wheels only.
Tip: Never exceed 30 mph
with tire chains.
ABS self test
A self-diagnostic test is performed
when vehicle starts to move; you
may feel some brake pedal
pulsation and hear some noise,
this is normal.
Gas cap
After filling vehicle with gasoline,
fully reinstall gas cap by turning
clockwise until a clicking sound is
heard, if gas cap is not fully installed,
Check Engine light may come on.
For more information on Check
Engine light, see Owner’s Manual.
*Denotes optional equipment
See Owner’s Manual
O
P
E
N
M
O
D
E
MODE
CH
OFF
A/C
465231
CONVERTIBLE
Always check the Owner’s Manual for more operating information and safety features
Convertible
Convertible
Tip: Hardtop should be stored
in a dry area and covered
with a soft blanket for added
protection.
Tip: Always stop vehicle in a
safe place and park on a level
surface; set parking brake;
lower side windows; remove
items from rear storage area
before operating the top.
Manual convertible top
To lower: Push unlock button (1)
while pulling top latch (2) rearward,
continue to pull top latch back
completely; pull front of top rearward
to release from windshield header.
If lowering top from inside vehicle,
use either handle (3) to lower.
If lowering top from outside vehicle,
grasp side of top, near windshield
header (4) to lower.
Fold back top and press firmly
on front of top to securely lock
in lowered position.
Raise wind blocker (6) if desired.
Detachable hardtop*
To remove: Push unlock button (1)
while pulling top latch (2) rearward,
continue to pull top latch back
completely; pull front of top rearward
to release from windshield header.
Remove seat belts from belt
guides; slide seats/fold seatbacks
forward; release side latches (8)
and disconnect rear window
defroster coupler (7); slide top
rearward while pressing down
on rear deck latches (9); lift
hardtop straight off body.
To install: Align rear deck latches
(9) with rear deck studs (10); slide
hard top forward while pressing
down on rear deck latches (9);
securely lock top latch (2) and
side latches (8); reconnect rear
window defroster coupler (7).
For complete details, see
Owner’s Manual.
Tip: Detachable hardtop
removal/installation is easier
with two people.
Tip: If manual soft top is hard
to lower; raise top slightly;
then slowly lower it while
pressing upper part of rear
glass with your hand.
To raise: Lower wind blocker (6);
pull unlock lever (5) to release top
from lowered position.
If raising top from inside vehicle,
grasp either handle (3) to raise.
If raising top from outside vehicle,
grasp side of top near windshield
header (4) to raise.
Push lever on top latch up until
lock button (1) clicks and top
latch is securely locked.
WARNING: If red indicator is
visible on unlock button (1),
top is not securely latched.
*Denotes optional equipment
9
7
8
8
10
10
9
3
3
1
2
4
6
5
CONVERTIBLE
Always check the Owner’s Manual for more operating information and safety features
Convertible
Trunk
When lowering top: Windows
automatically lower if closed or
partially opened; deck raises; top
lowers, deck lowers; beep sounds
to confirm operation is complete.
To raise: Press and hold close
button (2) until top is fully raised,
beep sounds to confirm operation
is complete, secure latch (4), if
top latch is not securely latched,
indicator (1) will remain illuminated
and beep sounds when vehicle is
placed into gear.
Power retractable hardtop*
Will only operate when manual
transmission is in Neutral, or when
automatic transmission is either in
Park or Neutral, ensure vehicle is
stopped and set parking brake
before operating the top.
To lower: Push unlock button
(5) while pulling latch (4) rearward;
then press and hold open button
(3) until beep is heard and top is
fully lowered.
*Denotes optional equipment
5. Instant Mobility System
emergency flat tire
repair kit (IMS)*
Your Mazda MX-5 Miata is
not equipped with a spare tire,
if tire repair is required, have
vehicle transported via a flatbed
towing service to a tire repair
center, if tire repair service is
not available, repair tire with
emergency flat tire repair kit, see
Owner’s Manual for instructions.
Tip: Check expiration date
annually on tire sealant
container located in flat
tire repair kit, replace
if necessary.
If equipped with optional run-
flat tire, see Owner’s Manual.
Tip: Run-flat tire is indicated
by ”RFT” on tire.
6. Remote trunk-lid release
lock-out, see Locks
7. Trunk release lever
Allows you to escape should
you become locked in trunk.
To open: Slide lever in
direction of arrow, lever will
glow if it has been exposed
to light.
Tip: Trunk can be opened using
remote keyless entry system.
Trunk
1. Lock
To lock/unlock: Insert key and
turn counterclockwise/clockwise.
2. Trunk light
3. Tool bag
Contains lug wrench, tow
hooks and jack handle.
4. Jack
To remove: Turn knob
counterclockwise, open cover,
turn wing bolt counterclockwise,
remove jack.
7
4162 5 3
213
5
4
Tips: If open/close button is
released during lowering/raising
operation, a beep will sound.
If trunk is open, a beep
sounds when pressing open/
close buttons and top will not
lower/raise until trunk is closed.
In case of a power loss the
tools for manually operating
the power retractable hardtop
are located in the glove
compartment, see Owner’s
Manual for manual operating
instructions.
If beep sounds when vehicle
is placed into gear, verify that
power retractable hardtop
latch is closed, if power top
does not operate when in the
open position, verify that
vehicle is not in gear or
trunk is not open.
UNDER HOOD
Always check the Owner’s Manual for more operating information and safety features
Under
Hood
Tip: Check all fluids with vehicle
parked on a level surface.
1. Windshield washer
fluid reservoir
Refill with windshield
washer fluid.
2. Battery
3. Engine oil filler cap,
SAE 5W-20
4. Engine oil dipstick
Check with engine off and
at operating temperature
Engine oil should be between
FULL and LOW marks on dipstick.
5. Brake/clutch* fluid
reservoir
If brake/clutch* fluid level
is low, have your vehicle
inspected by your nearest
Mazda dealer.
6. Fuse block
7. Hood support rod
8. Air filter
9. Hood latch
Push to right to release hood.
10. Power steering fluid
reservoir
Check with engine off and
at operating temperature
Level should be between
MIN and MAX.
11. Cooling system cap
Do not remove if engine
is running or hot.
12. Engine coolant reservoir
Check when engine is cold;
fluid level should be between
the FULL and LOW marks
on reservoir.
WARNING: Never remove
coolant reservoir cap while
engine is running or hot;
remove only when
system is cool.
5431 2
912 711 8 610
Maintenance notes:
Rotate tires every 7,500
miles or sooner if needed.
Clean air filter every 15,000 miles.
Inspect engine valve clearance
every 75,000 miles.
Replace spark plugs every
75,000 miles.
Replace (FL22)* engine
coolant at 120,000 miles.
WARNING: Using coolant other
than FL22 requires more frequent
maintenance intervals.
Tip: For severe driving
conditions, Owner’s Manual
recommends changing oil
and filter at 5,000
miles.
Break-in period
First 600 miles: Avoid heavy
braking and acceleration; drive
at varying road and engine speeds.
A. Change: Engine oil/replace filter
Lubricate: Locks and hinges
B. Inspect: Fuel lines and hoses,
brake lines and hoses, steering
operation and linkages, front
suspension ball joints, driveshaft
dust boots, chassis and
body bolts
C. Inspect: Drive belts (tension)
Replace: Air filter
D. Inspect: Hoses and tubes for
emission system
Replace: Engine coolant (other
than FL22), manual transmission
oil, rear differential oil
E. Inspect: Exhaust system and
heat shields
F. Inspect: Disc brakes
2.0-liter 4-cylinder
7,500 miles
15,000 miles
22,500 miles
30,000 miles
37,500 miles
45,000 miles
52,500 miles
60,000 miles
67,500 miles
75,000 miles
82,500 miles
90,000 miles
A B E F
A
A
C F
A
A B D F
A
A
EF
A C
A B F
A
A
F
A
*Denotes optional equipment
See Owner’s Manual
This Quick Tips® guide is provided by
Mazda North American Operations
to make your Mazda ownership
experience more convenient.
For complete details and operating
instructions, see your Owner’s Manual.
If you have any questions about your
vehicle, you are invited to contact
your local dealer. Or if you need
additional help, feel free to call our
Customer Assistance Center
at 1-800-222-5500
Monday through Friday,
8 a.m.-4:45 p.m., Pacific
9 a.m.-5:45 p.m., Eastern/Central
Mazda Roadside Assistance
Exhilaration, liberation and inspiration,
are great reasons to drive a
Mazda car, truck or SUV. In addition
to all the other great standard
features, you also get peace of mind
with our basic warranty period
Emergency Roadside Assistance
Plan, it’s just a phone call away,
24 hours a day, 365 days a year,
call 1-800-866-1998.
Mazda ‘bumper-to-bumper”
Limited Warranty and
Powertrain Warranty
Engineers design and build every
Mazda to give you driving pleasure
now and far down the road. We’re
so confident in our quality that we
cover the entire vehicle against defects
in materials and workmanship for
36 months/36,000 miles, whichever
comes first, plus we provide a
powertrain warranty for 60 months/
60,000 miles, whichever comes first.
Lower Octane Fuel Usage
If 91 octane fuel is not available,
fuel as low as 87 octane
can be used temporarily for
emergency purposes. Use
of fuel lower than 91 octane
can decrease performance
and deteriorate shift quality.
Refueling vehicle with correct
octane fuel a couple of
times will restore vehicle
performance and shift quality.
ROADSIDE ASSISTANCE/WARRANTY
Unleaded
Gasoline
91-octane
recommended
12.7-gallon/
48-liter tank
www.mazdausa.com
©2007 Calcar, Quick Tips
®
is a trademark
of Calcar, made in USA 5/07 25.471M DOT
Mazda North American Operations reserves
the right to change product specifications
at any time without incurring obligations.
9999-95-031C-08QT
Quick Tips
®
Reference
Guide for
Controls and
Functions
MAZD A MX-5
  • Page 1 1
  • Page 2 2
  • Page 3 3
  • Page 4 4
  • Page 5 5
  • Page 6 6
  • Page 7 7
  • Page 8 8
  • Page 9 9
  • Page 10 10
  • Page 11 11
  • Page 12 12
  • Page 13 13
  • Page 14 14
  • Page 15 15

Mazda MX-5 Quick Tips

Category
Cars
Type
Quick Tips

Mazda MX-5: Experience the thrill of driving with a blend of style, performance, and innovation. This exhilarating roadster offers a captivating driving experience with its responsive handling and sleek design. Immerse yourself in the joy of open-top motoring with the power-retractable hardtop, or enjoy the comfort and convenience of keyless entry and advanced keyless start system. Discover the perfect harmony of technology and driving pleasure with Mazda MX-5.

Ask a question and I''ll find the answer in the document

Finding information in a document is now easier with AI