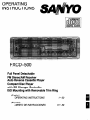
Sanyo FXCD-500 offers a wide range of capabilities for your car audio system. With its full panel detachable design, you can easily remove the front panel for anti-theft purposes and carry it with you. Enjoy your favorite FM or AM radio stations, and take advantage of the automatic music select system (AMSS) to find the perfect song. The auto travel preset (ATP) feature allows you to easily access your favorite presets while on the road. Play cassettes with its auto reverse cassette player, or listen to your CD collection with the CD player.
Sanyo FXCD-500 offers a wide range of capabilities for your car audio system. With its full panel detachable design, you can easily remove the front panel for anti-theft purposes and carry it with you. Enjoy your favorite FM or AM radio stations, and take advantage of the automatic music select system (AMSS) to find the perfect song. The auto travel preset (ATP) feature allows you to easily access your favorite presets while on the road. Play cassettes with its auto reverse cassette player, or listen to your CD collection with the CD player.


-
 1
1
-
 2
2
-
 3
3
-
 4
4
-
 5
5
-
 6
6
-
 7
7
-
 8
8
-
 9
9
-
 10
10
-
 11
11
-
 12
12
-
 13
13
-
 14
14
-
 15
15
-
 16
16
-
 17
17
-
 18
18
-
 19
19
-
 20
20
-
 21
21
-
 22
22
-
 23
23
-
 24
24
-
 25
25
-
 26
26
-
 27
27
-
 28
28
-
 29
29
-
 30
30
-
 31
31


Sanyo FXCD-500 offers a wide range of capabilities for your car audio system. With its full panel detachable design, you can easily remove the front panel for anti-theft purposes and carry it with you. Enjoy your favorite FM or AM radio stations, and take advantage of the automatic music select system (AMSS) to find the perfect song. The auto travel preset (ATP) feature allows you to easily access your favorite presets while on the road. Play cassettes with its auto reverse cassette player, or listen to your CD collection with the CD player.
Ask a question and I''ll find the answer in the document
Finding information in a document is now easier with AI
Related papers
-
Sanyo EXCD-1000 Operating Instructions Manual
-
-
-
-
-
-
-
-
-
Other documents
-
Audiovox 1285314 Owner's manual
-
Audiovox 1285400 Owner's manual
-
-
-
Prestige P-78 Ooowner's Wner's Wner's Ma Ma Manual
-
-
-
-
Legacy LCDCS94 User manual
-