Page is loading ...

2
IMPORTANT SAFEGUARDS
When using electrical appliances, basic safety precautions should always be followed to reduce the risk of fire, electric shock, and/or injury
to persons, including the following:
1. Read all instructions.
2. This appliance is not intended for use by persons with reduced
physical, sensory, or mental capabilities, or lack of experience
and knowledge, unless they are closely supervised and instructed
concerning use of the appliance by a person responsible for their
safety.
3. This appliance shall not be used by children. Keep the appliance
and its cord out of reach of children.
4. Close supervision is necessary when any appliance is used near
children. Children should be supervised to ensure that they do
not play with the appliance.
5. To protect against risk of electrical shock, do not put cord, plug,
or mixer body in water or other liquid.
6. Turn the appliance OFF ( ); then unplug from the outlet when not
in use, before putting on or taking off parts, and before cleaning.
To unplug, grasp the plug and pull from the outlet. Never pull
from the power cord.
7. Avoid contacting moving parts. Keep hands, hair, and clothing,
as well as spatulas and other utensils, away from beaters during
operation to reduce risk of injury to persons and/or damage to
mixer.
8. Remove beaters from mixer before washing.
9. Do not let cord hang over edge of table or counter or touch hot
surfaces, including stove.
10. Do not operate any appliance with a damaged supply cord or
plug, or after the appliance malfunctions or has been dropped
or damaged in any manner. Supply cord replacement and
repairs must be conducted by the manufacturer, its service
agent, or similarly qualified persons in order to avoid a hazard.
Call the provided customer service number for information on
examination, repair, or adjustment.
11. The use of attachments not recommended or sold by the
appliance manufacturer for use with this model may cause fire,
electric shock, or injury.
12. Do not use outdoors.
13. Do not place on or near a hot gas or electric burner, or in a
heated oven.
14. Check that the appliance is OFF ( ) before plugging cord into
wall outlet. To disconnect, turn control to OFF ( ) and then
remove plug from wall outlet. To unplug, grasp the plug and pull
from the outlet. Never pull from the power cord.
15. Do not use appliance for other than intended purpose.
16. CAUTION! In order to avoid a hazard due to inadvertent resetting
of the thermal cut-out, this appliance must not be supplied
through an external switching device, such as a timer, or
connected to a circuit that is regularly switched on and off by the
utility.
SAVE THESE INSTRUCTIONS

3
Other Consumer Safety Information
This appliance is intended for household use only.
w WARNING
Electrical Shock Hazard: This appliance is
provided with a polarized plug (one wide blade) to reduce the risk
of electric shock. The plug fits only one way into a polarized
outlet. Do not defeat the safety purpose of the plug by modifying
the plug in any way or by using an adapter. If the plug does not fit
fully into the outlet, reverse the plug. If it still does not fit, have an
electrician replace the outlet.
The length of the cord used on this appliance was selected to
reduce the hazards of becoming tangled in or tripping over a
longer cord. If a longer cord is necessary, an approved extension
cord may be used. The electrical rating of the extension cord
must be equal to or greater than the rating of the appliance. Care
must be taken to arrange the extension cord so that it will not
drape over the countertop or tabletop where it can be pulled on
by children or accidentally tripped over.
w CAUTION
Moving Parts Hazard. To reduce the risk of
personal injury, always unplug mixer before inserting or removing
attachments.
Wattage/Peak Power Information
The marked rating of the stand mixer is defined by agency safety
standards as the maximum stabilized power consumption of the
stand mixer at high speed under a loaded condition.
Peak power is an average of the maximum wattage a stand mixer
may consume during initial operation at high speed.

4
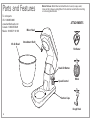
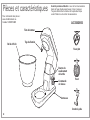
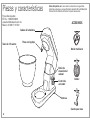
Parts and Features
Mixer Head
Dough Hook
ATTACHMENTS
Attachment Shaft
3.5-Qt. Bowl
Head Lift Button
Speed Control
Suction Cups
Whisk
Flat Beater
Before first use: Wash Bowl and attachments in warm, soapy water;
rinse and dry. Always unplug Mixer from electrical outlet before inserting
or removing attachments.
To order parts:
US: 1.800.851.8900
www.hamiltonbeach.com
Canada: 1.800.267.2826
Mexico:
01 800 71 16 100

5
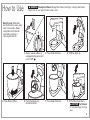
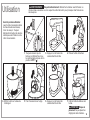
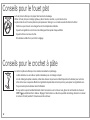
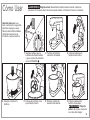
How to Use
Before first use: Wash Bowl
and attachments in warm, sudsy
water; rinse and dry. Always
unplug Mixer from electrical
outlet before inserting or
removing attachments.
1. Always make sure Mixer is
unplugged and speed control
is set to OFF ( ).
2. Press Head Lift Button. 3. Tilt Mixer Head up.
4. Place Bowl on Mixer. 5. Push attachment onto
Attachment Shaft.
6. Press Head Lift Button. 7. Tilt the Mixer Head down.
w CAUTION
Pinch Hazard.
Do not place fingers in hinge
area.
w WARNING
Entanglement Hazard. Unplug Mixer before insterting or removing attachments.
Failure to do so can result in broken bones or cuts.

6
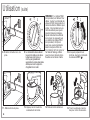
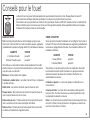
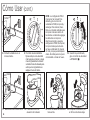
How to Use (cont.)
8. Plug into outlet.
9. Speed Control should always
be set on the lowest speed for
starting, then gradually moved
to desired higher speed to
avoid splashing ingredients
out of bowl.
NOTE: FOLD setting is manual.
To use, turn speed control to
FOLD and hold. To stop, release.
Folding is a method used to
incorporate more air into the
mixtures. Slowly add food to
be folded in while pulsing the
FOLD setting on and off. Fold
just until mixture is combined.
Do not overmix, since that would
dispel the air. Used for folding in
whipped cream or egg whites.
10. When finished, turn Speed
Control to OFF ( ).
11. Unplug Mixer from outlet.
12. Press Head Lift button.
13. Tilt Mixer Head up.
14. To remove attachment, pull
straight down.

7
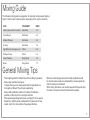
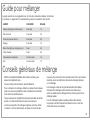
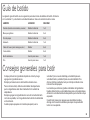
Mixing Guide
The following mixing guide is a suggestion for selecting mixing speeds. Begin on
Speed 1 and increase to desired speed, depending on the recipe consistency.
• Place liquid ingredients in Bowl first and then add dry ingredients.
• Always stay near Mixer during use.
• To begin mixing, use the lower speeds until the ingredients are
thoroughly combined. This will reduce splattering.
• Always add ingredients as close to the sides of the Bowl as
possible, not directly into the moving attachment.
• When preparing packaged cake mixes, use Speed 1 for low speed,
Speed 4 for medium speed, and Speed 6 for high speed. For best
results, mix for the time stated on the package directions.
• Mixtures containing large amounts of liquid ingredients should
be mixed at lower speeds to avoid splashing. Increase speed only
after the mixture has thickened.
• When mixing thin batters, use medium speeds and frequently stop
the mixer to scrape the sides of the Bowl with a spatula.
General Mixing Tips
FOOD ATTACHMENT SPEED
Cakes (mixes and from scratch) Flat Beater 1-3
Cookie Dough Flat Beater 2-4
Mashed Potatoes Flat Beater 2-4
Frosting Flat Beater 1-6
Egg Whites (for meringues, etc.) Whisk 5-6
Whipped Cream Whisk 5-6
Instant Pudding Dough Hook 1-6
Bread Dough Hook 1-2

8
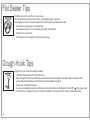
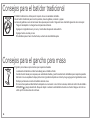
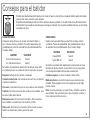
Flat Beater Tips
Dough Hook Tips
Flat Beater is used for most of your mixing needs.
Use the Flat Beater attachment to mix cakes, cookie dough, fudge, or potatoes.
Cookie dough is one of the thickest doughs to mix. Make it easier by following these tips:
• Have butter or margarine at room temperature.
• Add ingredients one at a time, thoroughly mixing after each addition.
• Add flour one cup at a time.
• If the Mixer seems to struggle, increase the speed setting.
Dough Hook is for recipes that require kneading.
• The Mixer Head locks down for thorough mixing.
• When mixing thin batters, use medium speeds and frequently stop the Mixer to scrape the sides of the Bowl with a
spatula. Place liquid ingredients in the Bowl first and then add dry ingredients.
• Always stay near Mixer during use.
• If a spoon is accidentally caught in an attachment or the motor stalls, turn the Speed Control to OFF ( ), then unplug. Clear
the obstruction or reduce the amount of mixture in the Bowl. Let the motor cool for 5 minutes before continuing.

9
• The Whisk is designed to whip liquids, such as egg whites and cream. Do not use the Whisk for mixing thick mixtures,
such as dough, fudge, or mashed potatoes.
• Your Mixer is designed to whisk a minimum of 2 large egg whites or 1 cup (240 ml) of cream. Mixer performance
is enhanced as the tip of the Whisk is immersed into the liquid. If smaller quantities are needed, a hand mixer is
recommended.
Whisk Tips
EGG WHITES
Place egg whites in a clean, dry mixing bowl. Attach Bowl and Whisk.
To avoid splashing, gradually turn Speed Control to desired speed.
See chart below.
AMOUNT SPEED
2 to 4 egg whites up to 6
6 or more egg whites up to 5
Your Stand Mixer whips egg whites quickly. Watch carefully to avoid
overwhipping. Here is what to expect:
Frothy: Large, uneven air bubbles.
Begins to hold shape: Air bubbles are fine and compact; product
is white.
Soft peak: Tips of peaks fall over when Whisk is removed.
Almost stiff: Sharp peaks form when Whisk is removed, but
whites are still soft.
Stiff but not dry: Sharp, stiff peaks form when Whisk is removed.
Whites are uniform in color and glisten.
Stiff and dry: Sharp, stiff peaks form when Whisk is removed.
Whites are speckled and dull in appearance.
WHIPPED CREAM
Pour cold whipping cream into chilled bowl. Attach Bowl and Whisk.
To avoid splashing, gradually turn to designated speed and whip to
desired stage. See chart below.
AMOUNT SPEED
1 cup
(240 ml)
up to 6
1 pint (568 ml) up to 5
Your Stand Mixer whips cream very quickly. Watch cream closely
during whipping because there are just a few seconds between
whipping stages. Look for these characteristics:
Begins to thicken: Cream is thick and custard-like.
Holds its shape: Cream forms soft peaks when Whisk is removed. Can
be folded into other ingredients when making desserts and sauces.
Stiff: Cream stands in stiff, sharp peaks when Whisk is removed.
Use for topping on cakes or desserts, or filling for cream puffs.

10
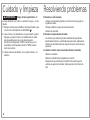
Care and Cleaning
1. Unplug unit and make sure Speed Control is set to
OFF ( ).
2. Wash Bowl and attachments in hot, soapy water. Rinse and
dry. Bowl and attachments are dishwasher-safe in the top
rack only.
DO NOT use the “SANI” setting when washing in the
dishwasher. “SANI” cycle temperatures could damage your
product.
3. Wipe base of Stand Mixer with a damp, nonabrasive cloth.
w WARNING
Electrical Shock Hazard. Disconnect power
before cleaning. Do not immerse cord, plug, or base in water
or any liquid.
Troubleshooting
Food is not mixed.
• Place liquid ingredients in Bowl before adding dry ingredients.
• Stop Mixer and scrape sides of Bowl.
• Increase speed.
Food splatters during mixing.
• Mixtures containing large amounts of liquid ingredients should be
mixed at low speeds to avoid splashing. Increase speed only after
the mixture has thickened.
Mixer “walks” on counter during mixing.
• Reduce speed.
• Reduce quantity of ingredients in Bowl.
• Make sure countertop is clean. This allows the suction cups to
grip countertop and reduce Mixer movement.

11
Recipes
Chocolate Velvet Layer Cake
2 cups (500 ml) cake flour
1/2 cup (125 ml) unsweetened baking cocoa
2 teaspoons (10 ml) baking soda
1/4 teaspoon (1.25 ml) salt
10 tablespoons (150 ml) butter, room temperature
2 cups (500 ml) light brown sugar, packed
2 large eggs
1 teaspoon (5 ml) vanilla extract
3/4 cup (175 ml) sour cream
3/4 cup (175 ml) cold brewed coffee
Preheat oven to 350°F (180°C). In a small bowl, stir
together flour, cocoa, baking soda, and salt. Set aside.
Using Flat Beater attachment, cream butter and sugar
on setting 4. Add large eggs, one at a time, beating well
after each addition. Add vanilla extract. Reduce speed to
setting 2. Add half of flour mixture, then all of sour cream.
Add remaining flour mixture; then slowly pour in coffee.
Mix on setting 2 for about 30 seconds. Turn off mixer and
scrape sides and bottom of bowl. Turn mixer on to setting
4 and mix until thoroughly blended. Divide batter between
2 greased and wax paper-lined 9-inch (23 x 3-cm) round
cake pans. Bake 30 to 35 minutes or until cake tests done.
Cool in pans for 5 minutes; then remove from pans and
cool on racks. Frost with Bittersweet Chocolate Frosting.
Makes one 2-layer cake.
Bittersweet Chocolate Frosting
1/3 cup (80 ml) butter, room temperature
2 1/2 cups (625 ml) confectioners’ sugar
3/4 cup (175 ml) unsweetened baking cocoa
1/4 cup (60 ml) milk
1 to 2 tablespoons (15 to 30 ml) cold brewed coffee
1 teaspoon (5 ml) vanilla extract
Using Flat Beater attachment, beat butter on setting 4 until
smooth. Add confectioners’ sugar and cocoa alternately
with milk and coffee and continue beating until smooth.
Add vanilla extract and beat until smooth and blended.

12
Recipes (cont.)
Best Ever Sugar Cookies
2 1/2 cups (625 ml) all-purpose flour
1 teaspoon (5 ml) baking powder
1/2 teaspoon (2.5 ml) baking soda
1/4 teaspoon (1.25 ml) salt
1/4 teaspoon (1.25 ml) nutmeg
3/4 cup (175 ml) butter, softened
3/4 cup (175 ml) sugar
1 large egg
1 teaspoon (5 ml) vanilla extract
1/4 cup (60 ml) milk
Preheat oven to 375°F (190°C). Mix together flour, baking
powder, baking soda, salt and nutmeg and set aside. Using
Flat Beater, cream butter on high speed until light and
fluffy. Reduce speed to lowest setting. Add sugar, large
egg and vanilla extract, mixing thoroughly. Gradually add
dry ingredients and milk; continue mixing until thoroughly
mixed. Form cookie dough into 1 1/2-inch (3.5 cm) diameter
balls and arrange balls on ungreased baking sheets. Flatten
balls slightly with the bottom of a drinking glass. Bake
in oven for 6 to 7 minutes or until lightly golden around
edges. Cool on wire racks.
Makes about 4 dozen cookies.
Magic Cookies
1 cup (250 ml) butter
1 cup (250 ml) granulated sugar
1 cup (250 ml) light brown sugar
1 tablespoon (15 ml) vanilla extract
2 large eggs
2 cups (500 ml) flour
1 teaspoon (5 ml) baking soda
1/2 teaspoon (2.5 ml) baking powder
1/2 teaspoon (2.5 ml) salt
2 cups (500 ml) oatmeal
12 ounces (350 g) chocolate chips
1 1/2 cups (375 ml) coconut
Preheat oven to 350°F (180°C). With Flat Beater attachment,
cream together butter, granulated sugar and brown sugar at a
medium setting until well blended. Mix in vanilla extract and
eggs. Reduce speed and gradually add flour, baking soda,
baking powder and salt. Mix until smooth. On a low setting,
mix in oatmeal, chocolate chips and coconut until well mixed.
Drop rounded spoonfuls onto ungreased cookie sheet. Bake
on middle rack of oven for 12 to 14 minutes. Cool on wire
racks.
Makes 3 dozen cookies.

13
Recipes (cont.)
Sour Cream Coffee Cake
Crumb Topping
1 1/2 cups (375 ml) all-purpose flour
1 1/2 sticks (3/4 cup [175 ml]) unsalted butter, softened
1/3 cup (80 ml) packed light brown sugar
1/3 cup (80 ml) granulated sugar
1 1/4 teaspoons (6.25 ml) ground cinnamon
1 cup (250 ml) pecans, chopped
Streusel
1/3 cup (80 ml) all-purpose flour
1/2 cup (125 ml) packed light brown sugar, divided
3/4 teaspoon (3.75 ml) ground cinnamon
3 tablespoons (45 ml) cold butter
Cake
1 1/2 sticks (3/4 cup [175 ml]) unsalted butter, softened
1 1/4 cups (310 ml) sugar
1 tablespoon (15 ml) baking powder
3/4 teaspoon (3.75 ml) baking soda
3/4 teaspoon (3.75 ml) salt
4 large eggs
1 tablespoon (15 ml) vanilla extract
1 1/2 cups (375 ml) sour cream
2 1/4 cups (560 ml) all-purpose flour
Crumb Topping: In a small bowl, combine flour, butter,
brown sugar, granulated sugar and cinnamon; mix with
fork until large crumbs are formed. Add pecans and mix
to incorporate.
Streusel: In another small bowl, combine flour, brown
sugar, cinnamon and butter. Mix with fork until large
crumbs are formed.
Cake: Lower oven rack to lowest position. Preheat oven
350°F (180°C). Grease 10-inch (26-cm) bundt pan with
butter.
Using the Flat Beater attachment, cream butter on medium
speed until smooth. Add sugar, baking powder, baking
soda and salt. Beat on medium speed for 3 minutes. With
Mixer on low speed, add in eggs, one at a time, until well
blended. Mix in vanilla extract and sour cream. Gradually
add flour. Continue to mix until well blended.
Spread about 2 cups (500 ml) of batter into the bottom of
prepared pan. Sprinkle evenly with half of streusel mixture.
Repeat. Spread remaining batter over and top with crumb
topping.
Bake 50 to 60 minutes or until a toothpick inserted into
the center of the cake comes out clean. Cool on wire rack
30 minutes. Invert cake onto plate and then flip on wire
rack with topping side up. Cool completely.
Makes one cake.

14
Recipes (cont.)
Simple Yeast Rolls
1 cup (250 ml) warm water, 100° to 110°F (38° to 43°C)
.25-ounce (8-g) package active dry yeast
1/4 cup (60 ml) butter, melted and cooled
3 tablespoons (45 ml) sugar
1 teaspoon (5 ml) salt
1 large egg
3 to 3 1/2 cups (750 to 875 ml) flour
Pour water into Bowl. Add yeast and let dissolve for 5
minutes. Add butter, sugar, salt and egg. Using Dough Hook,
mix on speed 2 for about 30 seconds. Add 3 cups (750 ml)
of the flour and mix on speed 4 for about 2 minutes. Add
additional flour, if necessary, to make a soft dough. Cover
and let rise in a warm place for about 1 hour.
Preheat oven to 350°F (180°C). Stir down the dough and dump
onto lightly floured surface. Divide the dough into 4 equal
portions; then divide each portion into 4 golf ball- sized balls.
Place the 16 balls in a greased 9 x 13-inch (23 x 33 x 5 cm)
baking pan. Let rise in a warm place for about 30 minutes.
Bake 25 to 30 minutes.
Makes 16 rolls.

15
Limited Warranty
This warranty applies to products purchased and used in the U.S. and Canada. This is the only express warranty for this product and is in lieu of any
other warranty or condition.
This product is warranted to be free from defects in material and workmanship for a period of five (5) years from the date of original purchase in
Canada and one (1) year from the date of original purchase in the U.S. During this period, your exclusive remedy is repair or replacement of this
product or any component found to be defective, at our option; however, you are responsible for all costs associated with returning the product to us
and our returning a product or component under this warranty to you. If the product or component is no longer available, we will replace with a similar
one of equal or greater value.
This warranty does not cover glass, filters, wear from normal use, use not in conformity with the printed directions, or damage to the product resulting
from accident, alteration, abuse, or misuse. This warranty extends only to the original consumer purchaser or gift recipient. Keep the original sales
receipt, as proof of purchase is required to make a warranty claim. This warranty is void if the product is used for other than single-family household
use or subjected to any voltage and waveform other than as specified on the rating label (e.g., 120 V ~ 60 Hz).
We exclude all claims for special, incidental, and consequential damages caused by breach of express or implied warranty. All liability is limited to the
amount of the purchase price. Every implied warranty, including any statutory warranty or condition of merchantability or fitness for a particular
purpose, is disclaimed except to the extent prohibited by law, in which case such warranty or condition is limited to the duration of this written
warranty. This warranty gives you specific legal rights. You may have other legal rights that vary depending on where you live. Some states or
provinces do not allow limitations on implied warranties or special, incidental, or consequential damages, so the foregoing limitations may not apply to
you.
To make a warranty claim, do not return this appliance to the store. Please call 1.800.851.8900 in the U.S. or 1.800.267.2826 in Canada or visit
hamiltonbeach.com in the U.S. or hamiltonbeach.ca in Canada. For faster service, locate the model, type, and series numbers on your appliance.
Page is loading ...
Page is loading ...
Page is loading ...
Page is loading ...
Page is loading ...
Page is loading ...
Page is loading ...
Page is loading ...
Page is loading ...
Page is loading ...
Page is loading ...
Page is loading ...
Page is loading ...
Page is loading ...
Page is loading ...
Page is loading ...
Page is loading ...
Page is loading ...
Page is loading ...
Page is loading ...
Page is loading ...
Page is loading ...
Page is loading ...
Page is loading ...
Page is loading ...
Page is loading ...
Page is loading ...
Page is loading ...
Page is loading ...
-
 1
1
-
 2
2
-
 3
3
-
 4
4
-
 5
5
-
 6
6
-
 7
7
-
 8
8
-
 9
9
-
 10
10
-
 11
11
-
 12
12
-
 13
13
-
 14
14
-
 15
15
-
 16
16
-
 17
17
-
 18
18
-
 19
19
-
 20
20
-
 21
21
-
 22
22
-
 23
23
-
 24
24
-
 25
25
-
 26
26
-
 27
27
-
 28
28
-
 29
29
-
 30
30
-
 31
31
-
 32
32
-
 33
33
-
 34
34
-
 35
35
-
 36
36
-
 37
37
-
 38
38
-
 39
39
-
 40
40
-
 41
41
-
 42
42
-
 43
43
-
 44
44


Hamilton Beach 63325 User guide
- Category
- Mixers
- Type
- User guide
Ask a question and I''ll find the answer in the document
Finding information in a document is now easier with AI
in other languages
- français: Hamilton Beach 63325 Mode d'emploi
- español: Hamilton Beach 63325 Guía del usuario
Related papers
-
Hamilton Beach 63222CH User manual
-
-
Hamilton Beach 63390 User manual
-
Hamilton Beach 63327 User manual
-
-
-
-
-
Hamilton Beach 63394 User guide
-
Other documents
-
Wolfgang Puck WPPSM050C User manual
-
Cuisinart HM70 User manual
-
-
-
Cuisinart HTM-7L - SmartPower Electronic LED Hand Mixer User manual
-
-
Breville the Scraper Mixer Pro User manual
-
-
-
Sunbeam MX7900W User manual