Page is loading ...

Installation & Operating Instructions
334051
VFS DBX cover
This is an unvented gas-red heater. It uses air
(oxygen) from the room in which it is installed.
Provisions for adequate combustion and
ventilation air must be provided. Refer to
33D4047 7/11 Rev. 8

DFX & DBX Series Vent Free Fireplaces
Gas Pressures .......................................................... 5
Gas Specications .................................................... 5
Ignition Controls ....................................................... 5
Pilot .......................................................................... 5
Thermal Generator ................................................... 5
Fireplace and Framing Dimensions .......................... 6
What You Will Need .................................................. 7
General Fireplace Installation ................................... 7
Fireplace Location .................................................... 8
Clearances ............................................................... 9
Fireplace Installation .............................................. 10
Secure Heater to Floor or Hearth ........................... 11
Manual Control ....................................................... 13
Thermostat Control ................................................. 13
Millivolt Control ....................................................... 13
Connect Optional Wall Switch ................................ 14
Connect Remote Receiver ..................................... 15
Check System Operation ....................................... 15
Screen Removal ..................................................... 16
Canopy Installation ................................................. 16
Log Placement ....................................................... 17
Rock Wool Placement ............................................ 18
Pilot Flame ............................................................. 19
Burner Flame Appearance ..................................... 0
For Your Safety Read Before Lighting .................... 1
Thermostatic Control Lighting Instructions .............
Millivolt Control Lighting Instructions ...................... 3
Match Lighting Instructions ..................................... 4
Cleaning and Servicing .......................................... 4
Firebox ................................................................... 6
DFX4C Millivolt & Manual Control Burner ........... 7
DFX3C Millivolt Burner ......................................... 8
DBX4C T-Stat Burner ........................................... 9
Forced Air Kit .......................................................... 30
Optional Brick ......................................................... 31
Optional Trim .......................................................... 31
Trim Installation ...................................................... 3

3
DFX & DBX Series Vent Free Fireplaces
Please leave these instructions with the appliance.
Please retain these instructions for future reference
.
1. Due to high temperatures, the appliance should be
located out of trafc and away from furniture and
draperies.
. Children and adults should be alerted to the hazard
of high surface temperature and should stay away
to avoid burns or clothing ignition.
3. Young children should be carefully supervised when
they are in the same room with the appliance.
4. Do not place clothing or other ammable material
on or near the appliance.
5. Any safety screen or guard removed for servicing
an appliance, must be replaced prior to operating
the heater.
6. Installation and repair should be done by a qualied
service person.
7. To prevent malfunction and/or sooting, an unvented
gas heater should be cleaned before use and at
least annually by a professional service person.
More frequent cleaning may be required due to
excessive lint from carpeting, bedding materials,
etc. It is imperative that control compartments,
burners and circulating air passageways be kept
clean.
8. Early signs of
carbon monoxide poisoning are similar to the u with
headaches, dizziness and/or nausea. If you have these
signs, obtain fresh air immediately. Have the heater
serviced as it may not be operating properly.
9. The installation must conform with local codes or, in
the absence of local codes, with the
10. Do not install the DFX model in a bathroom or bedroom.
The DBX model may be installed in a bedroom, but
not in a bathroom.
11. Correct installation of the ceramic ber logs, proper
location of the heater, and annual cleaning are neces-
sary to avoid potential problems with sooting. Sooting,
resulting from improper installation or operation, can
settle on surfaces outside the replace. Refer to log
placement instructions for proper installation.
1. Avoid any drafts that alter burner ame patterns. Do not
allow fans to blow directly into replace. Do not place
a blower inside burn area of rebox. Ceiling fans may
create drafts that alter burner ame patterns. Sooting
and improper burning will occur.
13. Candles, incense, oil lamps, etc. produce
combustion byproducts including soot. Vent-free appli-
ances will not lter or clean soot produced by these
types of products. In addition, the smoke and/or aro-
matics (scents) may be reburnt in the vent-free appli-
ance which can produce odors. It is recommended to
minimize the use of candles, incense, etc. while the
vent-free appliance is in operation.
14. This is an unvented gas-fired heater. It uses air
(oxygen) from the room in which it is installed. Provi-
sions for adequate combustion and ventilation air must
be provided. Refer to
15. This heater shall not be installed in a room or space
unless the required volume of indoor combustion air is
provided by the method described in the
, the
or applicable local codes.
16. Keep room area clear and free from combustible
materials, gasoline and other ammable vapors and
liquids.
17. Unvented gas heaters are a supplemental zone heater.
They are not intended to be the primary heating appli-
ance.
18. Unvented gas heaters emit moisture into the living
area. In most homes of average construction, this
does not pose a problem. In houses of extremely
tight construction, additional mechanical ventilation is
recommended.
19. During manufacturing, fabricating and shipping, various
components of this appliance are treated with certain
oils, lms or bonding agents. These chemicals are not
harmful but may produce annoying smoke and smells
as they are burned off during the initial operation of the
appliance; possibly causing headaches or eye or lung
irritation. This is a normal and temporary occurrence.

4
DFX & DBX Series Vent Free Fireplaces
The initial break-in operation should last two to three
hours with the burner at the highest setting. Provide
maximum ventilation by opening windows or doors to
allow odors to dissipate. Any odors remaining after this
initial break-in period will be slight and will disappear
with continued use.
0. Input ratings are shown in BTU per hour and are for
elevations up to ,000 feet. For elevations above ,000
feet, input ratings should be reduced 4 percent for each
1,000 feet above sea level. Refer to the National Fuel
Gas Code.
1. The appliance and its appliance main gas valve must
be disconnected from the gas supply piping system
during any pressure testing of that system at test pres-
sures in excess of 1/ psig (3.5 kPa).
. The appliance must be isolated from gas supply piping
system by closing its equipment shutoff valve during
any pressure testing of the gas supply piping system
at test pressures equal to or less than 1/ psig (3.5
kPa).
3. Do not use this room heater if any part has been under
water. Immediately call a qualied service technician
to inspect the room heater and to replace any part of
the control system and any gas control which has been
under water.
4. Never burn solid fuels in a replace where a unvented
room heater is installed.
5. Always have a replace screen in place when the
appliance is in operation and, unless other provisions
for combustion air are provided, the screen must have
an opening(s) for induction of combustion air.
Adhere to all local codes or, in their absence, the latest
edition of THE NATIONAL FUEL GAS CODE ANSI Z3.1
or NFPA54 which can be obtained from:
1430 Broadway
New York, NY 10018
or
Batterymarch Park
Quincy, MA 069

5
DFX & DBX Series Vent Free Fireplaces
This vent-free replace must be mounted on the oor or
on the optional replace hearth.
This unvented gas heater requires no outside venting and
burns cleanly with high heating efciency.
This zero-clearance unvented gas heater can be installed
against (or recessed into) any wall that is accessible to a
gas line.
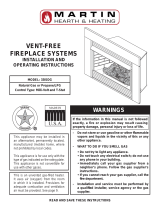
FP2507
VFS DBX controls
Piezo Ignition
Fireplace
Screen
Control Knobs
Figure 1 -
Unvented Gas Heater
(Control Access Door Shown Open)
On/Off Switch
FP407
Regulator Pressure Nat. 4.0” w.c. 3.5” w.c.
Pilot Regulator Nat. n/a 3.5” w.c.
Max. Inlet Pressure Nat. 10.5” w.c. 10.5” w.c.
Min. Inlet Pressure Nat. 5.0” w.c. 5.0” w.c.
Regulator Pressure LP 10.0” w.c. 10.0” w.c.
Max. Inlet Pressure LP 13.0” w.c. 13.0” w.c.
Min. Inlet Pressure LP 11.0” w.c. 11.0” w.c.
DFX4NVC Nat. Millivolt ,000 17,000
DFX4PVC LP Millivolt ,000 17,000
DFX3NVC Nat. Millivolt 6,000 0,000
DFX3PVC LP Millivolt 6,000 0,000
DBX4NTC Nat. T-Stat 10,000 --
DBX4PTC LP T-Stat 10,000 --
For LP models an external regulator is required
to reduce supply pressure to a maximum of 13" w.c.
Piezo ignitor allows ignition of the pilot without the use of
matches or batteries.
- All gas to the gas logs is shut off at the
valve.
- Valve position to light/maintain a standing
pilot.
- Variable position corresponding to desired
temperature.
The gas log heater is tted with a specially designed safety
pilot light which senses the amount of oxygen available in
the room and shuts the gas log heater off if the oxygen level
begins to drop below a satisfactory level. The pilot can only
be relit when adequate fresh air is available.
The millivolt gas log pilot is tted with a millivolt generator
to provide power for remote activation.

6
DFX & DBX Series Vent Free Fireplaces
O - Min. Rough Opening Width
Min. Rough
Opening
Depth
1/2”
or 5/8”
Min. Rough
Opening
Height
L
334051
VFS DBX dims
A
B
C
D
H
E
F
G
J
P
S
R
Q
S
I
N
M
K
Figure 2 -
Fireplace and Framing Dimensions
A 4Z\x" (6 mm) 3" (813 mm)
B Z\x" (57 mm) 8C\v" (730 mm)
C 6Z\x" (673 mm) 30" (76 mm)
D 14" (356 mm) 1C\v" (553 mm)
E 17" (43 mm) 0Z\v" (514 mm)
F 4B\," (118 mm) 4C\v" (11 mm)
G 4M\," (14 mm) 5" (17 mm)
H 11M\," (30 mm) 13C\," (340 mm)
I 1" (5 mm) 1B\," (41 mm)
J 10Z\x" (67 mm) 1" (305 mm)
K 9" (9 mm) 10B\," (70 mm)
L 13Z\," (333 mm) 17Z\x" (445 mm)
M 1" (533 mm) 7" (686 mm)
N 6C\v" (680 mm) 30Z\v" (768 mm)
O 4C\v" (69 mm) 3Z\x" (86 mm)
P 10Z\x" (67 mm) 1Z\v" (311 mm)
Q 4Z\x" (1080 mm) 53C\v" (136 mm)
R 1" (533 mm) 6C\v" (680 mm)
S 30" (76 mm) 38" (965 mm)

7
DFX & DBX Series Vent Free Fireplaces
Make sure you have received all parts:
Check your packing list to verify that all listed parts have
been received. You should have the following:
• Unvented gas heater • Trim kit
• Two () 90°-angle brackets • Ceramic ber logs
• Installation/operating instructions
• Canopy and three (3) screws
• Two () anchoring screws • Four (4) black screws
Millivolt controlled heater designed to be operated with
optional devices for ON/OFF functions.
• Hand held Remote with receiver
• Wall T-stat with 0' wire
• Wall switch with 0' wire
• Hand held Thermostat Remote w/receiver
Carefully inspect the contents for shipping damage. If any
parts are missing or damaged, immediately inform the
dealer from whom you purchased the appliance.
What you will need for installation:
You must have the following items available before pro-
ceeding with installation:
• External regulator (for propane/LPG only)
• Manual shutoff valve
• Piping which complies with local codes
• Sediment trap
• Phillips head screwdriver
• Tee joint.
• Pipe sealant approved for use with propane/LPG
• Pipe wrench
(Resistant to sulfur compounds)
In planning the installation for the replace it is necessary
to determine where the unit is to be installed and whether
optional accessories are desired. Gas supply piping should
also be planned. The following steps represent the normal
sequence of installation. Each installation is unique, how-
ever, and might require a different sequence.
1. Position replace in desired location. Refer to the
and and
, and sections found in this
manual.
Be sure all packing material has been removed
from underside the unit.
. Install canopy and logs per instructions found in this
manual. The canopy MUST be installed for safe opera-
tion of the unit.
3. Field wire main power supply to units with fan kit. Refer
to the found in this manual. (Electrical
connections should only be performed by an experi-
enced, licensed certied tradesman).
4. Install optional ON/OFF kit on units with millivolt control.
Refer to the installation instructions included with the
kit and also refer to the section found
in this manual.
5. Plumb gas line. Refer to the sec-
tion found in this
manual. (Gas connections should only be performed
by an experienced,
licensed/certied tradesman).
6. Complete nish wall material and/or surround.
National
Fuel Gas Code, ANSI Z223.1/NFPA 54
International Fuel Gas Code

8
DFX & DBX Series Vent Free Fireplaces
Carefully select the best location for installation of your unvented replace. The following factors
should be taken into consideration.
• Clearance to side wall, ceiling, woodwork and window or other combustibles. Refer to “Clear-
ances” section on . Minimum clearances to combustibles
• Location must not be affected by drafts caused by kitchen exhaust fans, ceiling fans, return
air registers for forced air furnaces / air conditioners, windows or doors.
• Installation must provide adequate ventilation and combustion air.
•
• Location should be out of high trafc areas and away from furniture and draperies due to
heat from rebox.
• Never obstruct the front opening of the unvented replace or restrict the ow of combustion
and ventilation air.
• Minimize modications to existing construction. below for location sugges-
tions.
• Do not install in the vicinity where gasoline or other ammable liquids may be stored. The
unvented rebox must be kept clear and free from the combustible materials.
FP2440
fireplace locations
Figure 3 -
Possible Fireplace Locations
FP440

9
DFX & DBX Series Vent Free Fireplaces
Ensure that minimum clearances shown in are maintained. Left and right clearances
are determined when facing the front of the rebox.
Follow these instructions carefully to ensure safe installation. Failure to follow these requirements
may create a re hazard.
— The clearance from the inside of the appliance to any combustible adjacent
wall should not be less than 9" for the DBX4C/DFX4C and DFX3C.
— The ceiling must be at least 4" from the top of the rebox opening.
— The appliance may be placed against a combustible back wall.
— The replace may be installed directly on a combustible oor or a raised platform
of an appropriate height. Do not place replace on carpeting, vinyl, tile or other soft oor coverings. It
may, however, be placed on at wood, plywood, particle board or other hard surfaces. Be sure replace
rests on a solid continuous oor or platform with appropriate framing for support and so that no cold
air can enter from under the rebox.
— The canopy supplied with the unit must be installed. If a combustible mantel
is installed. It must meet the clearance requirements detailed in
The MHSC Barrington Cabinet Mantel Model series BWC300, BWC400 and BWC500 are
specially designed to comply with all mantel temperature requirements. Any custom-built mantel must
comply with all clearance requirements shown in this instruction manual.
9"
Minimum
9"
Minimum
42" Minimum
FP2441
sidewall clg clear
FP441
Figure 4 -
Sidewall and Ceiling Clearances
256O”
12”
10”
19”
FP2508
VFS DBX mantel clearances
Canopy
FP508
Figure 5 -
Mantel Clearances
Figures 4 and 5

10
DFX & DBX Series Vent Free Fireplaces
If unit is to be “built in”, replace framing can be built before
or after the appliance is set in place.
Construct replace framing following
for replace dimensions. The framing
headers may rest directly on top of the rebox.
The replace may be installed directly on a combustible
oor or a raised platform of an appropriate height. Do
not place replace on carpeting, vinyl, tile or other soft
oor coverings. It may, however, be placed on at wood,
plywood, particle board or other hard surfaces. Be sure
replace rests on a solid continuous oor or platform with
appropriate framing for support and so that no cold air can
enter from under the rebox.
Anchor replace to the side framing members using nail-
ing anges.
K
J
FP2445
opening size
J 6C\v" 6C\v" 31Z\v"
(680 mm) (680 mm) (800 mm)
K 5" 5" 3ZC\zn"
(635 mm) (635 mm) (833 mm)
FP445
Figure 6 -
Custom Cabinet
When finishing a custom cabinet, mantel or other built-in
enclosure, the opening size to accommodate the replace with
trim installed is as follows:
1. Bend out the nailing anges located on each side of the
rebox.
. Slide the rebox into prepared framing or position rebox
in its nal position and frame later.
3. Level the rebox by checking the top edge of the rebox.
Shim if necessary.
4. Anchor rebox to the side framing members using 8d
nails or other suitable fasteners.
5. The canopy must be installed for safe operation of
the heater. for canopy installation
details.
FP2509
nailing flanges
Nail Sides
Through Nailing
Flanges
FP509
Figure 7 -
Nailing Flanges

11
DFX & DBX Series Vent Free Fireplaces
Clearance requirements as detailed in
section on of this manual, must be met before securing the heater in place.
To prevent movement, the heater must be secured to the oor or hearth.
1. Open the control access door and remove the screen.
. Remove carton containing the four-log set.
3. To remove the grate and base assembly, take out two () screws as shown in .
4. Lift grate and base assembly out of the rebox.
5. Secure the rebox with two anchoring screws (3/16" x 1Z\v" length) supplied with the replace
system.
If the unit is mounted on carpeting, tile or combustible material without the hearth, a metal
or wooden base covering the entire width and depth of the base must be installed.
FP2515
remove grate
Screws
Grate
FP515
Figure 8 -
Remove Grate
FP2516
secure base
Anchor Screws
3/16" x 1Z\v"
FP516
Figure 9 -
Secure Heater to Floor or Hearth

1
DFX & DBX Series Vent Free Fireplaces
A qualied gas appliance installer must connect the heater to the gas supply.
Consult all local codes.
Figure 9
Figure 10
FP2447
gas connection
3” Min.
To Fireplace
Pipe Coupling
Stainless
Flexible Tube
Pipe
Locations Pressure Tapping
Point Installation
Manual Shutoff
Valve
Gas Supply
Inlet
FP447
Figure 10 -
Gas Connection
Tee Joint
Pipe Nipple
Cap
Sediment
Trap
Loosen the pipe adapter on the ex tube before installing to the system
piping.
Always use an external regulator for all propane/LPG heaters only, to reduce the supply
tank pressure to a maximum of 13" w.c. This is in addition to the internal regulator in the
heater valve.

13
DFX & DBX Series Vent Free Fireplaces
When tightening the joint to the valve, hold the valve securely to prevent movement.
Test all gas joints from the gas meter to the heater valve for leaks using a gas analyzer or soap
and water solution after completing connection.
Check the gas pressure with the appliance burning and the control set to .
Open control access door at bottom front of unit to nd valve and regulator referred to below.
The pressure regulator is preset and locked to discourage
tampering. If the pressure is not as specied, replace the
regulator with the correct part from the parts list in this
manual.
Remove 1/8" NPT plug, located on side of regulator body.
Install tting and tubing to pressure gauge. After taking
pressure reading, reinstall test plug. Check for gas leaks.
FP2499
manual valve
NPT Test Plug
FP499
Figure 11 -
Pressure Test Point Location
- Manual Control
FP2510
thermostat control
Test Points
FP510
Figure 12 -
Alternate Test Point Location for
Thermostat control Units
Turn captured screw counter clockwise two or three turns
and then place tubing to pressure gauge over test point
(Use test point closest to control knob). After taking pres-
sure reading, be sure and turn captured screw clockwise
rmly to reseal. Do not over torque. Check for gas leaks.
The valve regulator controls the burner pressure which
should be checked at the pressure test point.
FP2511
millivolt test point
Test Port
'A'
FP511
Figure 13 -
Pressure Test Point Location - Millivolt Valve
Turn captured screw counter clockwise two or three turns
and then place tubing to pressure gauge over test point.
(Use test point “A” closest to gas inlet). After taking pressure
reading, be sure and turn captured screw clockwise rmly
to reseal. Do not over torque. Check for gas leaks.

14
DFX & DBX Series Vent Free Fireplaces
Figure 14 -
Wiring Diagram
1. Use 18 awg, two-wire cable, 15 feet maximum length.
. At one end of the cable, connect both wires to the wall switch or thermostat. At the other end,
connect one wire to TP/TH and one wire to TH. The color of the wires does not matter.
FP2112a
wiring diagram
8/09
Field Installed Optional
Wall Switch or
Remote Receiver
Switch
On/Off
Switch
On/Off
Switch
ODS Pilot
Valve
ODS
Pilot
Spade
Terminal
FP11a
TH = 3
TP = 1
TP/TH =

15
DFX & DBX Series Vent Free Fireplaces
THESE INSTRUCTIONS SUPERCEDE THE SECTION
ENTITLED “HEARTH MOUNT” IN THE
HAND-HELD REMOTE INSTRUCTIONS SUPPLIED
WITH THE REMOTE.
1. Remove bottom louvre door.
. Connect the remote connectors located in the unit.
3. Stick Velcro• pads with self-adhesive backing to bottom
of remote receiver and to oor of compartment behind
access panel.
4. Attach remote receiver to rebox with Velcro• pads.
Control switch must face forward.
Do not place remote in combustion chamber.
SKYTECH
OFF
ON
REMOT
E
FIREPLACE
REMOTE
FP2512
install remote rcvr
Velcro•
Remote
Receiver
Velcro•
FP51
Figure 15 -
Install Remote Receiver
The millivolt system and individual components may be checked with a millivolt meter having
a 0-1000 mV range. Conduct each check shown in chart below by connection meter test leads
to terminals as indicated.
a. If the reading is more than 100 millivolts and the automatic valve still does not come on,
replace the control.
b. If the closed circuit reading (“A” reading) is less than 100 millivolts, determine cause for
low reading, proceed to Section B below.
1. Check gas pressure to the unit. If gas pressure is within minimum and maximum on data
plate, then check pilot voltage, 35 millivolts minimum. If the minimum millivolt reading is
not obtainable, replace pilot.
A Complete & 3 Closed Closed
System
B Thermopile 1 & Open Open

16
DFX & DBX Series Vent Free Fireplaces
1. Remove bottom louver.
Removing replace screen frame panel by pushing
screen frame panel up and out.
Fireplace screen must be removed to access log
box and to install canopy.
FP2513
remove screen
Fireplace
Screen
Louvre
FP513
Figure 16 -
Remove Fireplace Screen Panel
Canopy
1. Push louvers up and out to remove top louver assem-
bly.
. Align the black canopy with the holes in the top frame
assembly.
3. Install the three (3) screws (in owner’s manual packag-
ing) which attach the canopy to the top frame assem-
bly.
4. Tighten all screws. Make sure the canopy is level and
secure. Install top louver assembly.
FP2514
install canopy
Screws
Canopy
FP514
Figure 17 -
Install Canopy

17
DFX & DBX Series Vent Free Fireplaces
— This unit is supplied with six (6) ceramic ber logs. Do not handle
these logs with your bare hands.
After handling the logs, wash your hands gently with soap and water to
remove any traces of bers.
Figure 18
1. Install the rear log (#3) on back of burner.
. Install the right log (#1) on burner pins on right side of
burner.
3. Install the left log (#) on burner pins on left side of
burner.
LG699
24VFSC logs
Left Log
#
Right Log #1
Rear Log #3
LG699
Figure 18 -
DFX24C Log Placement
Burner
Pins
Burner
Pins

18
DFX & DBX Series Vent Free Fireplaces
Install one-piece log on two burner pins.
Figure 19
1. Install front right log (#1) on two pins on right side of
burner.
. Install left front log (#) on two pins on left side of
burner.
3. Install back log (#3) on back of burner.
4. Install right middle log (#4) on two pins on burner. Rest
right end of right middle log on the right front log.
5. Install left middle log (#5) on two pins on burner. Rest
left end of left middle log on left front log.
Pins
LG700
32VFSC logs
Pins
Left Front
Log #
Left Middle
Log #5
Right Front
Log #1
Right
Middle
Log #4
Rear Log
#3
Pins
Pins
LG700
Figure 19 -
DFX32C Log Placement
LG701
24BDXC logs
One-piece Log
Burner
Pin
Burner Pin
LG701
Figure 20 -
24BDXC Log Placement
After installing logs, pull apart dime-size pieces of rock
wool. Sprinkle rock wool evenly over burner ports. Wash
hands after installing rock wool.
Itching may occur.
LG702
VFS DBX rockwool
Dime Sized
Rockwool
Pieces
Figure 21 -
Place Rockwool DFX24C/DFX32C

19
DFX & DBX Series Vent Free Fireplaces
FP2501
manual pilot flame
FP2273
pilot bad flame
FP2272
pilot correct flame
In addition, periodically check the ames visually during operation.
It should just
touch the top of the thermocouple tip for natural. for correct pilot
ame.
If the pilot ame does not touch the thermocouple, then the main burner cannot function
reliably. for incorrect shape of pilot ame.
Figure 22 -
Millivolt Control Pilot Flame Appearance
Thermocouple
for Natural Gas
Thermocouple
for LP
FP7
Thermocouple
for Natural Gas
Thermocouple
for LP
FP73
Thermocouple
for Natural Gas
Thermocouple
for LP
Thermocouple
for Natural Gas
Thermocouple
for LP
FP50
Figure 23 -
Hi/Lo Control Pilot Flame Appearance

0
DFX & DBX Series Vent Free Fireplaces
In normal operation at full rate after 15 minutes, the follow-
ing ame appearances should be observed:
Burner will have a random pattern of yellow ames.
There should be glowing embers in front
of burner.
Innormal operation at full rate after 15 minutes, the follow-
ing ame appearances should be observed:
The ames inside the one-piece log may be yellow. The
ames should extend approximately " - 4" above the log.
The front ames and embers will be an opaque
orange color during the burn off time.
LG703
24VFSC log flames
LG703
Figure 24 -
DFX24C Log Flame Appearance
LG704
32VFSC log flames
LG704
Figure 25 -
DFX32C Log Flame Appearance
2” - 4”
LG705
24DBXC log flames
LG705
Figure 26 -
DBX24C Log Flame Appearance
Do not allow fans to blow directly into
the replace. Do not place a blower inside the burn area of the rebox. Ceiling fans may
create drafts that alter ame patterns. Sooting and improper burning will result.
During manufacturing, fabricating and shipping, various components of this appliance are
treated with certain oils, lms or bonding agents. These chemicals are not harmful, but may
produce annoying smoke and smells as they are burned off during the initial operation of
the appliance, possibly causing headaches or eye or lung irritation.
The initial break-in operation should last two to three hours with the burner at the highest
setting. Provide maximum ventilation by opening windows or doors to allow odors to dis-
sipate. Any odors remaining after this initial break-in will be slight and will disappear with
continued use.
This appliance must not be used with glass doors in the closed position. This can lead to
pilot outages and severe sooting outside the replace.
/