Page is loading ...
r
EM-15 OR
Oriental Creative Keyboard
English/Français/Arabic ( )
Thank you for choosing a Roland EM-15 OR Oriental Creative
Keyboard, the perfect arranger instrument for countless hours
of pure, unadulterated fun.
To get the most out of the EM-15 OR and to ensure many
years of trouble-free service, we urge you to read through this
Owner’s Manual thoroughly.
To avoid confusion, let’s agree to use the word “button” for all
keys on the front panel, and only use “key” when referring to
the EM-15 OR’s keyboard.
Before using this instrument, carefully read the sections enti-
tled “Important Safety Instructions” and “Important notes”.
They provide important information concerning the proper
operation of the EM-15 OR. Be sure to keep this manual in a
safe place for future reference.
Copyright © 2001 ROLAND EUROPE. All rights reserved. No part of this publication
may be reproduced in any form without the written permission of Roland Europe
s.p.a.
Merci d’avoir choisi le clavier Roland EM-15 OR Oriental Crea-
tive Keyboard, la référence en matière de clavier arrangeur et
qui vous procurera d’innombrables heures de pur plaisir musi-
cal!
Pour tirer parti des nombreuses fonctions de votre EM-15 OR
et lui assurer de nombreuses années de bons et loyaux servi-
ces, lisez entièrement le présent Manuel d’utilisation.
Pour éviter toute confusion, convenons d’emblée d’utiliser le
mot “bouton” pour désigner les commandes en face avant et
de réserver le mot “touche” au clavier de l’EM-15 OR.
Avant d’utiliser cet instrument, lisez attentivement les sec-
tions “Important Safety Instructions” et “Remarques impor-
tantes”. Elles contiennent des informations vitales pour l’utili-
sation correcte de l’EM-15 OR. Rangez ce manuel en lieu sûr
car il vous sera utile lors de références ultérieures.
Copyright © 2001 ROLAND EUROPE. Tous droits réservés. Toute reproduction intégrale
ou partielle de ce manuel est interdite sans l’autorisation de Roland Europe s.p.a.
EM-15orGB_F_Ar.book Page 1 Wednesday, July 25, 2001 6:34 PM

r
EM-15 OR
2
Style Morphing and Orchestrator functions
Style Morphing allows you to “create” new Music Styles
(accompaniments) on the fly by replacing selected
accompaniment parts of one Style with the parts from
another Style.
The Orchestrator function, on the other hand, allows you
to simplify, add, or leave out accompaniment parts of the
selected Music Style. This intuitive way of controlling the
arrangements of your accompaniments is a wonderful
assistant for creating just the right atmosphere for the
music you play.
Graphic display
Your EM-15 OR is equipped with a backlit display that
keeps you posted about the current status of your instru-
ment. Most functions are represented by means of
straightforward icons that provide massive at-a-glance
information without confusing you.
8 User Programs
User Programs are memories where you can save your
own panel settings. These include the currently selected
Style, Tone (sound), tempo, as well as a lot of other
parameters. At the press of a maximum of two buttons,
you can thus completely reconfigure your instrument.
248 Tones and 10 Drum Sets
The EM-15 OR comes with 226 excellent western instru-
ment sounds and 22 oriental ones taken from Roland’s
acclaimed sound library. In most instances, there will be
several Tones to choose from for the song you are about
to play.
The EM-15 OR’s sound source conforms to General MIDI
System Level 1 (GM for short) as well as Roland’s GS For-
mat.
Features
Fonctions Style Morphing et Orchestrator
Style Morphing est une fonction qui vous permet de
“créer” de nouveaux styles musicaux (accompagnements)
sur le vif en remplaçant les parties choisies d’un style par
celles d’un autre style.
La fonction Orchestrator permet elle de simplifier, d’ajou-
ter ou de retirer des parties d’accompagnement dans le
style musical (“Music Style”) choisi. Ce pilotage très sim-
ple des arrangements de vos accompagnements est un
allié en or qui vous permettra de toujours planter le décor
musical parfait pour vos morceaux.
Ecran graphique
Votre EM-15 OR est muni d’un écran rétroéclairé qui affi-
che en permanence le statut de l’instrument. La plupart
des fonctions sont représentées à l’aide d’icônes “parlan-
tes” qui permettent de vérifier une foule de paramètres
d’un coup d’œil et sans y perdre son latin.
8 programmes utilisateur
Les programmes utilisateur (User) désignent des
mémoires destinées à recueillir vos propres réglages. Ces
programmes comprennent ainsi le style en vigueur, le son
(“Tone”), le tempo ainsi qu’une foule d’autres paramètres.
Il vous suffit ainsi d’enfoncer deux boutons pour reconfi-
gurer entièrement l’instrument.
248 sons et 10 Drum Sets
L’EM-15 OR est fourni avec 226 sons (ou “Tones”) occi-
dentaux super-léchés et 22 sons orientaux issus de la
célébrissime bibliothèque de sons Roland. Pour chacun de
vos morceaux, vous aurez donc toujours plusieurs Tones
dans votre manche.
Le générateur de sons de l’EM-15 OR est compatible avec
la norme General MIDI System Level 1 (aussi désignée par
l’abréviation GM) ainsi qu’avec le format GS de Roland.
Caractéristiques
EM-15orGB_F_Ar.book Page 2 Wednesday, July 25, 2001 6:34 PM

EM-15 OR
3
64 Music Styles
The EM-15 OR contains 64 Music Styles that will supply a
perfect accompaniment for your solo playing. Each Music
Style includes several “Divisions” that allow you to vary
the accompaniment. Coupled with the Style Morphing
and Orchestrator functions, the total number of accom-
paniment patterns adds up to far more than 64.
Four modes
For enhanced operation, the EM-15 OR provides an M.
Drums, Organ, Arranger, and a Piano mode. Pressing one
of these button will immediately reconfigure your Orien-
tal Creative Keyboard.
64 styles musicaux
L’EM-15 OR vous propose 64 styles musicaux (alias
“Music Styles”) qui vous fourniront de superbes accompa-
gnements pour toutes vos parties solo. Chaque style
musical comprend plusieurs “divisions” qui permettent de
varier l’accompagnement. Si on y ajoute les fonctions
Style Morphing et Orchestrator, le nombre total de motifs
d’accompagnement s’élève bien au-delà de 64.
Quatre modes
L’EM-15 OR propose un mode M. Drums, Organ, Arranger
et Piano assurant une grande polyvalence. Il suffit
d’appuyer sur un de ces boutons pour reconfigurer
instantanément votre Oriental Creative Keyboard.
EM-15orGB_F_Ar.book Page 3 Wednesday, July 25, 2001 6:34 PM

r
EM-15 OR
4
Features . . . . . . . . . . . . . . . . . . . . . . . . . . . . . . . . . . . . . . . .2
1. Important notes . . . . . . . . . . . . . . . . . . . . . . . . . . . . . . .5
2. Panel descriptions . . . . . . . . . . . . . . . . . . . . . . . . . . . . . .7
3. Setting up . . . . . . . . . . . . . . . . . . . . . . . . . . . . . . . . . . .12
4. Demo songs . . . . . . . . . . . . . . . . . . . . . . . . . . . . . . . . . .12
5. Game function . . . . . . . . . . . . . . . . . . . . . . . . . . . . . . .14
6. Playing with accompaniment . . . . . . . . . . . . . . . . . . .20
7. Splitting the keyboard (Organ) . . . . . . . . . . . . . . . . . .24
8. Playing one sound (Piano) . . . . . . . . . . . . . . . . . . . . . .25
Using oriental tunings. . . . . . . . . . . . . . . . . . . . . . . . . . . . . . 26
9. Drumming on the keyboard. . . . . . . . . . . . . . . . . . . . .30
10. Recording your music. . . . . . . . . . . . . . . . . . . . . . . . .31
11. Additional Music Style functions . . . . . . . . . . . . . . .35
One Touch . . . . . . . . . . . . . . . . . . . . . . . . . . . . . . . . . . . . . . . . 35
Melody Intelligence (INT) . . . . . . . . . . . . . . . . . . . . . . . . . . . 36
Orchestrator . . . . . . . . . . . . . . . . . . . . . . . . . . . . . . . . . . . . . . 37
Style Morphing. . . . . . . . . . . . . . . . . . . . . . . . . . . . . . . . . . . . 38
12. More Keyboard part functions . . . . . . . . . . . . . . . . .41
Using two Upper parts (Layer) . . . . . . . . . . . . . . . . . . . . . . . 41
Selecting Tone Variations . . . . . . . . . . . . . . . . . . . . . . . . . . . 42
Balance . . . . . . . . . . . . . . . . . . . . . . . . . . . . . . . . . . . . . . . . . . 43
Transpose. . . . . . . . . . . . . . . . . . . . . . . . . . . . . . . . . . . . . . . . . 44
13. Recorder functions . . . . . . . . . . . . . . . . . . . . . . . . . . .46
Playback functions. . . . . . . . . . . . . . . . . . . . . . . . . . . . . . . . . 46
Other recording modes . . . . . . . . . . . . . . . . . . . . . . . . . . . . . 48
14. Function menu . . . . . . . . . . . . . . . . . . . . . . . . . . . . . .55
Editing parameters (general procedure). . . . . . . . . . . . . . . 55
General Function parameters. . . . . . . . . . . . . . . . . . . . . . . . 56
15. Working with User Programs. . . . . . . . . . . . . . . . . . .64
16. MIDI functions . . . . . . . . . . . . . . . . . . . . . . . . . . . . . .68
17. Using the outputs and an optional pedal . . . . . . . .73
18. Miscellaneous . . . . . . . . . . . . . . . . . . . . . . . . . . . . . . .75
Specifications. . . . . . . . . . . . . . . . . . . . . . . . . . . . . . . .78
Tone List . . . . . . . . . . . . . . . . . . . . . . . . . . . . . . . . . . . .79
Music Style list. . . . . . . . . . . . . . . . . . . . . . . . . . . . . . .81
Drum Sets. . . . . . . . . . . . . . . . . . . . . . . . . . . . . . . . . . .82
Contents
Caractéristiques . . . . . . . . . . . . . . . . . . . . . . . . . . . . . . . . . 2
1. Remarques importantes . . . . . . . . . . . . . . . . . . . . . . . . 5
2. Description des panneaux. . . . . . . . . . . . . . . . . . . . . . . 7
3. Branchements . . . . . . . . . . . . . . . . . . . . . . . . . . . . . . . 12
4. Morceaux de démo . . . . . . . . . . . . . . . . . . . . . . . . . . . 12
5. Jeux musicaux . . . . . . . . . . . . . . . . . . . . . . . . . . . . . . . 14
6. Jeu avec accompagnement. . . . . . . . . . . . . . . . . . . . . 20
7. Partage de clavier (Organ) . . . . . . . . . . . . . . . . . . . . . 24
8. Jeu avec un son (Piano). . . . . . . . . . . . . . . . . . . . . . . . 25
Utilisation d’accords orientaux. . . . . . . . . . . . . . . . . . . . . . .26
9. Jouer de la batterie sur le clavier. . . . . . . . . . . . . . . . 30
10. Enregistrer votre jeu . . . . . . . . . . . . . . . . . . . . . . . . . 31
11. Fonctions Music Style supplémentaires. . . . . . . . . . 35
One Touch . . . . . . . . . . . . . . . . . . . . . . . . . . . . . . . . . . . . . . . .35
Melody Intelligence (INT). . . . . . . . . . . . . . . . . . . . . . . . . . . .36
Orchestrator. . . . . . . . . . . . . . . . . . . . . . . . . . . . . . . . . . . . . . .37
Style Morphing . . . . . . . . . . . . . . . . . . . . . . . . . . . . . . . . . . . .38
12. Autres fonctions de parties Keyboard . . . . . . . . . . . 41
Utiliser deux parties Upper (Layer). . . . . . . . . . . . . . . . . . . .41
Choix de variations de sons. . . . . . . . . . . . . . . . . . . . . . . . . .42
Balance . . . . . . . . . . . . . . . . . . . . . . . . . . . . . . . . . . . . . . . . . . .43
Transpose . . . . . . . . . . . . . . . . . . . . . . . . . . . . . . . . . . . . . . . . .44
13. Fonctions Recorder . . . . . . . . . . . . . . . . . . . . . . . . . . 46
Fonctions de reproduction . . . . . . . . . . . . . . . . . . . . . . . . . .46
Autres modes d’enregistrement . . . . . . . . . . . . . . . . . . . . . .48
14. Menu Function. . . . . . . . . . . . . . . . . . . . . . . . . . . . . . 55
Edition de paramètres (procédure générale) . . . . . . . . . . .55
Paramètres Function généraux. . . . . . . . . . . . . . . . . . . . . . .56
15. Tirer parti des programmes utilisateur . . . . . . . . . . 64
16. Fonctions MIDI. . . . . . . . . . . . . . . . . . . . . . . . . . . . . . 68
17. Utilisation des sorties et d’une pédale en option. . 73
18. Divers . . . . . . . . . . . . . . . . . . . . . . . . . . . . . . . . . . . . . 75
Fiche technique . . . . . . . . . . . . . . . . . . . . . . . . . . . . . 78
Liste de sons . . . . . . . . . . . . . . . . . . . . . . . . . . . . . . . . 79
Liste des styles musicaux . . . . . . . . . . . . . . . . . . . . . . 81
Kits de batterie (Drum Sets) . . . . . . . . . . . . . . . . . . . 82
Sommaire
EM-15orGB_F_Ar.book Page 4 Wednesday, July 25, 2001 6:34 PM
EM-15 OR
5
In addition to the items listed under “Important Safety
Instructions”, please read and observe the following:
Power supply
• Do not use this instrument on the same power circuit with any
device that will generate line noise (such as an electric motor or
variable lighting system).
• Be sure to only use the supplied adapter. The use of other adapters
may damaged your EM-15 OR.
• Before connecting the EM-15 OR to other devices, turn off the
power to all units. This will help prevent malfunctions and/or dam-
age to speakers or other devices.
Placement
• Using the EM-15 OR near power amplifiers (or other equipment
containing large power transformers) may induce hum. To alleviate
the problem, change the orientation of this instrument or move it
farther away from the source of interference.
• This instrument may interfere with radio and television reception.
Do not use it in the vicinity of such receivers.
• Do not expose the EM-15 OR to direct sunlight, place it near devices
that radiate heat, leave it inside an enclosed vehicle, or otherwise
subject it to temperature extremes. Excessive heat can deform or
discolor the instrument.
Maintenance
• For everyday cleaning wipe the EM-15 OR with a soft, dry cloth or
one that has been slightly dampened with water. To remove stub-
born dirt, use a mild, non-abrasive detergent. Afterwards, be sure to
wipe the instrument thoroughly with a soft, dry cloth.
• Never use benzene, thinner, alcohol or solvents of any kind, to avoid
the possibility of discoloration and/or deformation.
Repairs and data
• Please be aware that all data contained in the instrument’s memory
may be lost when it is sent for repairs. In certain cases (such as when
circuitry related to memory itself is out of order), we regret that it
may not be possible to restore the data. Roland assumes no liability
concerning such loss of data.
1. Important notes
Outre les informations de la section “Important Safety
Instructions”, veuillez lire et suivre les conseils suivants:
Alimentation
• Ne vous servez pas de cet instrument sur le même circuit qu’un
appareil générateur de parasites (tel qu'un moteur électrique ou un
système variateur de lumière).
• Veillez à utiliser uniquement l’adaptateur secteur fourni. L’utilisation
de tout autre adaptateur pourrait endommager votre EM-15 OR.
• Avant de brancher l’EM-15 OR à d’autres appareils, mettez tous les
appareils hors tension. Le non-respect de cette précaution pourrait
entraîner des dysfonctionnements et/ou l’endommagement de vos
enceintes ou d’autres appareils.
Emplacement
• L’usage de l’EM-15 OR à proximité d’amplificateurs (ou de tout autre
matériel contenant de grands transformateurs électriques) peut être
source de bruit. Pour résoudre le problème, changez l’orientation de
l’instrument ou éloignez-le de la source d’interférence.
• Cet instrument peut causer des interférences lors de la réception
radio ou télévisée. Ne vous en servez pas à proximité de tels
récepteurs.
• N'exposez pas l’EM-15 OR directement au soleil, ne le laissez pas
près d'appareils irradiant de la chaleur, dans un véhicule fermé ou
dans un endroit le soumettant à des températures extrêmes. Une
chaleur excessive peut déformer ou décolorer l’instrument.
Entretien
• Pour nettoyer l’EM-15 OR, utilisez un chiffon sec et doux ou à la
rigueur légèrement humidifié avec de l’eau. Pour enlever des saletés
plus tenaces, servez-vous d’un détergent doux. Ensuite, essuyez soi-
gneusement l’instrument avec un chiffon doux et sec.
• N’utilisez jamais d’essence, de diluant, de solvant ou d’alcool
d’aucune sorte pour éviter le risque de décoloration et/ou de défor-
mation.
Réparations et données
• N’oubliez pas que toutes les données contenues dans l’instrument
seront perdues s’il doit subir une réparation. Dans certains cas
(notamment lorsque les circuits touchant à la mémoire elle-même
sont endommagés), il peut s’avérer impossible de récupérer des don-
nées. Roland n’endosse aucune responsabilité concernant la perte de
ces données.
1. Remarques importantes
EM-15orGB_F_Ar.book Page 5 Wednesday, July 25, 2001 6:34 PM

r
EM-15 OR
6
Précautions supplémentaires
• N’oubliez jamais que le contenu de la mémoire peut être irrémédia-
blement perdu suite à un mauvais fonctionnement ou un mauvais
maniement de l’instrument.
• Maniez les boutons, les autres commandes et les jacks et prises avec
un minimum d’attention. Un maniement trop brutal peut les
endommager et entraîner des dysfonctionnements.
• Evitez les coups ou les pressions trop fortes sur l’écran.
• Lorsque vous branchez/débranchez des câbles, prenez la fiche en
main — jamais le câble. Vous éviterez ainsi d’endommager le câble
ou de provoquer des court-circuits.
• L’instrument dégage une faible quantité de chaleur durant son fonc-
tionnement. C’est normal.
• Pour ne pas déranger vos voisins, maintenez le volume à un niveau
raisonnable. Il peut parfois être préférable d’utiliser le casque (sur-
tout quand vous jouez la nuit).
• Si vous souhaitez transporter l’instrument, emballez-le dans la boîte
(et les protections de polystyrène) d’origine ou servez-vous d’un boî-
tier de protection dur ou souple.
Additional precautions
• Please be aware that the memory contents can be irretrievably lost
as a result of a malfunction, or the improper operation of the instru-
ment.
• Use a reasonable amount of care when using the instrument’s but-
tons, other controls, and jacks/connectors. Rough handling can lead
to malfunctions.
• Never strike or apply strong pressure to the display.
• When connecting/disconnecting cables, grasp the connector itself—
never pull on the cable. This way you will avoid causing shorts, or
damage to the cable’s internal elements.
• A small amount of heat will radiate from the instrument during nor-
mal operation. This is perfectly normal.
• To avoid disturbing your neighbors, try to keep the instrument’s vol-
ume at reasonable levels. You may prefer to use headphones, so you
do not need to be concerned about those around you (especially late
at night).
• When you need to transport the instrument, package it in the box
(including padding) that it came in. Otherwise, you will need to use
equivalent packaging materials, or a flightcase.
EM-15orGB_F_Ar.book Page 6 Wednesday, July 25, 2001 6:34 PM
EM-15 OR
7
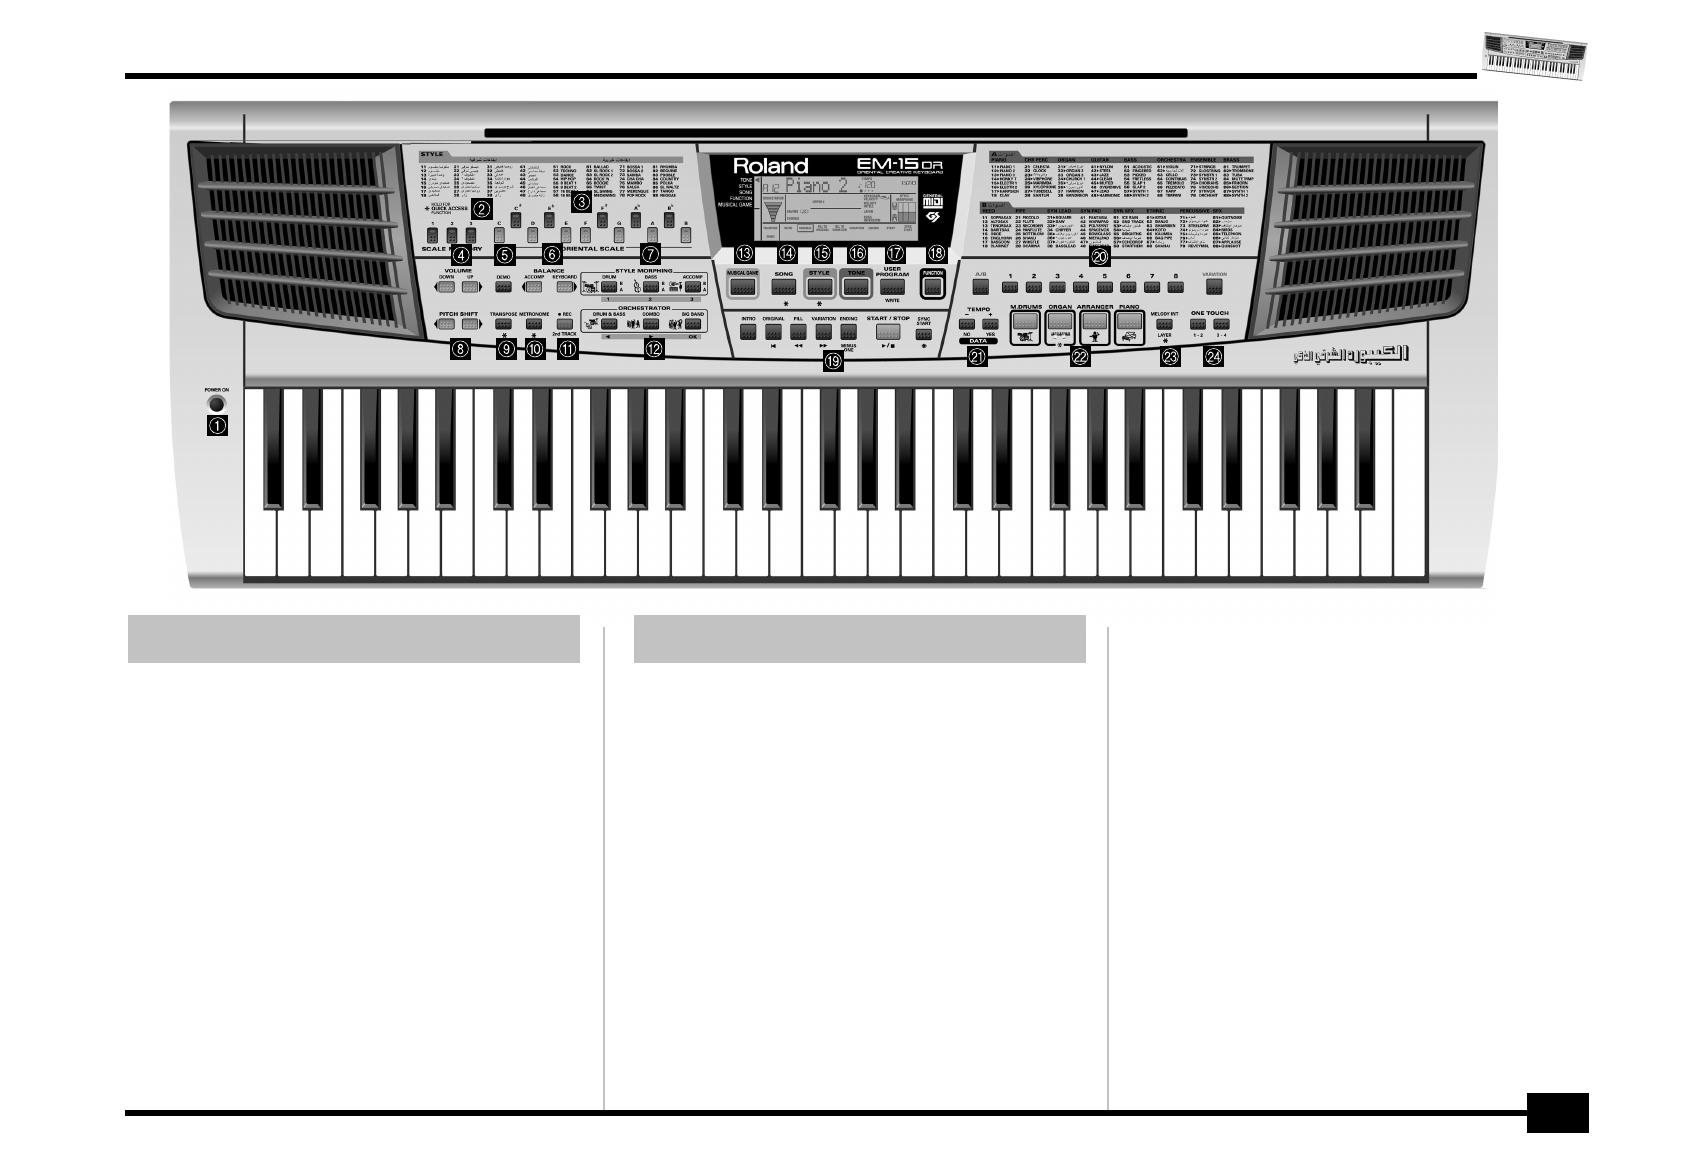
A
POWER button
Press this button to switch the EM-15 OR on and off.
B
SCALE MEMORY buttons
These three buttons allow you to save and recall the tun-
ing settings carried out with the ORIENTAL SCALE but-
tons. When the EM-15 OR is shipped, these memories
already contain useful settings (that will be recalled
whenever you initialize your EM-15 OR).
C
ORIENTAL SCALE buttons
These buttons allow you to change the tuning of each
note of the scale. By default, pressing one of these but-
tons will lower the corresponding notes in all octaves by a
quarter tone (–50 cents). Other tunings can also be
selected and saved to one of the three scale memories
(see above).
2. Panel descriptions
A
Bouton POWER
Appuyez sur ce bouton pour mettre l’EM-15 OR sous ten-
sion et hors tension.
B
Boutons SCALE MEMORY
Ces trois boutons permettent de sauvegarder et de char-
ger les réglages d’accord effectués avec les boutons
ORIENTAL SCALE. A la livraison, l’EM-15 OR contient déjà
des réglages utiles (qui sont en outre rétablis lorsque vous
initialisez votre EM-15 OR).
C
Boutons ORIENTAL SCALE
Ces boutons permettent de modifier l’accord de chacune
des notes de l’octave. Par défaut, une pression sur un de
ces boutons diminue la hauteur de la note en question
d’un quart de ton (–50 cents). D’autres accords peuvent
également être sélectionnés et sauvegardés dans l’une
des trois mémoires Scale (voyez ci-dessus).
2. Description des panneaux
EM-15orGB_F_Ar.book Page 7 Wednesday, July 25, 2001 6:34 PM

r
EM-15 OR
8
D
Boutons VOLUME
√ ®
Ces boutons servent à régler le volume général de votre
EM-15 OR.
E
Bouton DEMO
Appuyez sur ce bouton pour écouter les morceaux de
démonstration de l’EM-15 OR (voyez p. 12).
F
Boutons BALANCE [
√
ACCOMP] [KEYBOARD
®
]
Servez-vous des boutons BALANCE pour changer le
volume de la section correspondante (accompagnement/
morceau ou les parties que vous jouez sur le clavier).
G
Boutons STYLE MORPHING
Ces trois boutons servent à créer un nouveau Style avec
deux styles existants. Pour en savoir plus, voyez page 38.
H
Boutons PITCH SHIFT
è
Ces boutons permettent de momentanément modifier la
hauteur des notes de mélodie que vous jouez.
I
Bouton TRANSPOSE
Appuyez sur ce bouton pour transposer le clavier (voyez
p. 44). Comme tous les autres boutons repérés par “*”,
vous pouvez l’enfoncer pendant plus d’une seconde pour
activer un paramètre FUNCTION réglable.
J
Bouton METRONOME
Ce bouton sert à activer et à couper le métronome.
Comme tous les autres boutons repérés par “*”, vous pou-
vez l’enfoncer pendant plus d’une seconde pour activer
un paramètre FUNCTION réglable.
K
Bouton REC/2nd TRACK
Active la fonction d’enregistreur de l’EM-15 OR. Parfois il
sert à activer la fonction 2nd TRACK pour réenregistrer les
parties Keyboard. Voyez les détails page 33.
L
Boutons ORCHESTRATOR
Appuyez sur un de ces boutons afin de choisir le type
d’orchestration voulue pour le style musical en question.
Voyez page 37.
M
Bouton MUSICAL GAME
Appuyez sur ce bouton pour en apprendre un peu plus sur
les bases musicales élémentaires – ou tout simplement
pour vous amuser avec votre EM-15 OR.
D
VOLUME
√ ®
buttons
Use these buttons to set the global volume of your
EM-15 OR.
E
DEMO button
Press this button whenever you want to listen to the
EM-15 OR’s demo songs (see p. 12).
F
BALANCE [
√
ACCOMP] [KEYBOARD
®
] buttons
Use the BALANCE buttons to change the volume of the
corresponding section (accompaniment/song, or the parts
you play on the keyboard).
G
STYLE MORPHING buttons
Use these three button to create a new Style from two
existing ones. See page 38 for details.
H
PITCH SHIFT
è
buttons
These buttons allow you to temporarily change the pitch
of the melody notes your are playing.
I
TRANSPOSE button
Press this button to transpose the keyboard (see p. 44).
Like all other buttons marked with “*”, holding it for more
than one second calls up a FUNCTION parameter you can
set.
J
METRONOME button
This button is used to switch the metronome on and off.
Like all other buttons marked with “*”, holding it for more
than one second calls up a FUNCTION parameter you can
set.
K
REC/2nd TRACK button
This button allows you to engage the EM-15 OR’s record
function. In some cases, you can use it to activate the 2nd
TRACK function for re-recording the Keyboard parts. See
page 33 for details.
L
ORCHESTRATOR buttons
Press one of these buttons to choose the desired orches-
tration for the selected Music Style. See page 37.
M
MUSICAL GAME button
Press this button if you want to learn more about the
“nuts and bolts” of music – or just to have some fun with
your EM-15 OR.
EM-15orGB_F_Ar.book Page 8 Wednesday, July 25, 2001 6:34 PM
EM-15 OR
9
N
SONG button
This button allows you to select the EM-15 OR’s Song
mode, and to specify that the [INTRO], [ORIGINAL], etc.,
buttons should be used to operate the on-board Recorder.
O
STYLE button
Press this button if you want to select Music Styles. By
activating this button, you also specify that the [INTRO],
[ORIGINAL], etc., buttons are used for selecting a Style
Division, while the [1]~[8] buttons can be used to select
the desired Style memory (11~88).
P
TONE button
Press this button if you want to use the [A/B] and [1]~[8]
buttons for assigning a sound (“Tone”) to the selected
Keyboard part. See p. 23.
Q
USER PROGRAM/WRITE button
Press this button whenever you want to select a User Pro-
gram (a set of registrations). Press and hold it to save the
current panel and parameter settings to a User Program.
See page 64.
R
FUNCTION button
This button provides access to the FUNCTION menu. This
menu contains parameters you probably only need occa-
sionally.
S
Style/Song control buttons
(INTRO, ORIGINAL, FILL, etc.) These buttons allow you to
select the Music Style division (after pressing the [STYLE]
button) or to control the EM-15 OR’s Recorder (after
pressing [SONG]).
T
A/B buttons, numeric keypad, VARIATION button
Use [A/B] to select the Tone bank (there are two banks of
64 Tones each). The keypad is used for selecting Tones
(sounds) for the Keyboard parts, Music Styles, and User
Programs. The function of these buttons depends on
which button you pressed last: the [STYLE], [TONE], or
[USER PROGRAM] button.
N
Bouton SONG
Ce bouton sert à choisir le mode Song de l’EM-15 OR et à
affecter les boutons [INTRO], [ORIGINAL], etc. au pilotage
de la fonction d’enregistreur (Recorder) incorporée.
O
Bouton STYLE
Sert à choisir les styles musicaux (Music Styles). En acti-
vant ce bouton, vous affectez les boutons [INTRO],
[ORIGINAL], etc. au choix d’une division de style (Style
Division), tandis que les boutons [1]~[8] peuvent servir à
sélectionner la mémoire de style voulue (11~88).
P
Bouton TONE
Appuyez sur ce bouton si vous voulez utiliser les boutons
[A/B] et [1]~[8] pour assigner un son (“Tone”) à la partie
Keyboard choisie. Voyez p. 23.
Q
Bouton USER PROGRAM/WRITE
Ce bouton sert à choisir un programme utilisateur (alias
User, désignant un ensemble de réglages). Maintenez-le
enfoncé pour mémoriser les réglages en face avant et les
réglages de paramètres dans un programme utilisateur.
Voyez page 64.
R
Bouton FUNCTION
Donne l’accès au menu FUNCTION. Ce menu contient des
paramètres dont vous n’aurez probablement besoin que
de manière occasionnelle.
S
Boutons de Style/de pilotage de morceau
(INTRO, ORIGINAL, FILL, etc.) Ces boutons permettent de
choisir la division de style musical (après avoir appuyé sur
[STYLE]) ou de piloter la fonction Recorder de l’EM-15 OR
(après avoir appuyé sur [SONG]).
T
Boutons A/B, pavé numérique, bouton VARIATION
Choisissez la banque de sons avec [A/B] (vous disposez de
deux banques de 64 Tones chacune). Le pavé numérique
sert au choix des sons (“Tones”), des parties Keyboard, des
styles musicaux et des programmes utilisateur. La fonc-
tion de ces boutons dépend du dernier bouton enfoncé:
[STYLE], [TONE] ou [USER PROGRAM].
EM-15orGB_F_Ar.book Page 9 Wednesday, July 25, 2001 6:34 PM

r
EM-15 OR
10
U
Boutons TEMPO –/+, DATA, YES/NO
Utilisez ces boutons pour augmenter ou diminuer le
tempo de l’Arranger ou du Recorder, pour régler la valeur
voulue (après avoir enfoncé [FUNCTION]) ou pour annuler
(NO) ou confirmer (YES) une question ou une opération.
V
Boutons M.DRUMS, ORGAN, ARRANGER, PIANO
Avec ces boutons, vous définissez la manière dont vous
voulez utiliser votre EM-15 OR:
W
Bouton MELODY INT/LAYER
Appuyez sur ce bouton pour ajouter une voix d’harmonie
automatique à votre mélodie (MELODY INT) ou pour ajou-
ter un deuxième son à la mélodie jouée de la main droite
(LAYER).
X
Boutons ONE TOUCH (1–2, 3–4)
Appuyez sur un de ces boutons pour choisir la mémoire
One Touch voulue. Pour sélectionner la mémoire “2” ou
“4”, appuyez deux fois sur le bouton correspondant. Les
mémoires One Touch contiennent un nombre de réglages
qui sont complémentaires au style musical en question.
Voyez p. 35.
Bouton Fonction
M.DRUMS Vous pouvez jouer de la batterie sur le clavier.
ORGAN Le clavier permet de jouer deux sons (mode
Split ou de partage).
ARRANGER Les accords que vous jouez de la main gauche
servent à transposer l’accompagnement auto-
matique en temps réel. Vous pouvez donc jouer
des solos de la main droite.
PIANO Un son de piano est assigné au clavier entier.
(Seule la batterie de l’Arranger est disponible.)
U
TEMPO –/+, DATA, YES/NO buttons
Use these buttons to lower or increase the Arranger or
Recorder tempo, to set the desired value (after pressing
[FUNCTION]), or to cancel (NO) or confirm (YES) a ques-
tion or command.
V
M.DRUMS, ORGAN, ARRANGER, PIANO buttons
These buttons allow you to specify how you want to use
your EM-15 OR:
W
MELODY INT/LAYER button
Press this button to add an automatic harmony voice to
your melody (MELODY INT), or to add a second Tone to
your right-hand melody playing (LAYER).
X
ONE TOUCH buttons (1–2, 3–4)
Press one of these buttons to select the desired One
Touch memory. To select memory “2” or “4”, you need to
press the corresponding button twice. One Touch memo-
ries contain a number of settings that complement the
currently selected Music Style. See p. 35.
Button Function
M.DRUMS You can drum on the keyboard.
ORGAN You can play two sounds via the keyboard
(Split mode).
ARRANGER The chords you play with your left hand are
used to transpose the automatic accompani-
ment in realtime. With your right hand, you
can play solos.
PIANO A piano sound is assigned to the entire key-
board. (Only the Arranger drums are available.)
EM-15orGB_F_Ar.book Page 10 Wednesday, July 25, 2001 6:34 PM

EM-15 OR
11
Y
MIDI OUT/IN sockets
Connect the MIDI OUT socket to the MIDI IN jack of your
computer (or MIDI instrument) to transfer MIDI data from
the EM-15 OR to the computer or external MIDI instru-
ment. Connect the MIDI IN socket of the EM-15 OR to the
computer’s MIDI OUT jack to receive data from the com-
puter.
Z
SUSTAIN FOOTSWITCH socket
This is where you can connect an optional DP-2, DP-6, or
BOSS FS-5U footswitch that allows you to hold (“sustain”)
the notes you play with your right hand.
a
DC 12V IN socket
This is where you need to connect the supplied adapter
(ACO or ACN).
Note: Be sure to only use the supplied adapter supplied with
your EM-15 OR. Other adapters may damage your Oriental Cre-
ative Keyboard.
b
OUTPUT/PHONES 1 socket
This socket serves two purposes: using a special “Y” cable
(stereo jack to 2x mono), you can connect it to your HiFi
amplifier, a mixer, a cassette deck, etc.
You, can, however, also connect optional stereo head-
phones (Roland RH series) to this jack.
c
PHONES 2 socket
This is where you can connect second pair of optional
headphones. If you wish to listen to your EM-15 OR via
headphones, while recording your music with an MD
recorder, cassette deck, etc., consider connecting the
headphones to PHONES 2, and the MD recorder, etc. to
the OUTPUT/PHONES 1 socket.
Y
Prises MIDI OUT/IN
Branchez la prise MIDI OUT à la prise MIDI IN de votre
ordinateur (ou instrument MIDI) pour transférer des don-
nées MIDI de l’EM-15 OR à l’ordinateur ou à l’instrument
MIDI externe. Pour recevoir des données transmises par
l’ordinateur, branchez la prise MIDI IN de l’EM-15 OR à la
prise MIDI OUT de l‘ordinateur.
Z
Prise SUSTAIN FOOTSWITCH
Cette prise sert à brancher un commutateur au pied DP-
2, DP-6 ou BOSS FS-5U en option; vous pouvez l’utiliser
pour maintenir (effet “sustain”) les notes jouées de la
main droite.
a
Prise DC 12V IN
C’est ici que vous branchez l’adaptateur secteur fourni
(ACO ou ACN).
Remarque: Veillez bien à utiliser exclusivement l’adaptateur
secteur fourni avec votre EM-15 OR. L’utilisation de tout autre
adaptateur pourrait endommager votre Oriental Creative Key-
board.
b
Prise OUTPUT/PHONES 1
Cette prise joue deux rôles: vous pouvez la brancher à
votre amplificateur hi-fi, à un mélangeur, une platine à
cassettes, etc. à l’aide d’un câble spécial en “Y” (stéréo
d’un côté et 2x mono de l’autre).
Vous pouvez en outre aussi y brancher un casque stéréo
en option (de la série Roland RH).
c
Prise PHONES 2
Vous pouvez brancher un deuxième casque en option à
cette prise. Si vous voulez écouter le son de votre
EM-15 OR avec un casque d’écoute tout en enregistrant
votre jeu sur une platine à cassettes, MD, etc., branchez le
casque à la prise PHONES 2 et l’enregistreur MD, etc. à la
prise OUTPUT/PHONES 1.
Y Z a b c
EM-15orGB_F_Ar.book Page 11 Wednesday, July 25, 2001 6:34 PM
r
EM-15 OR
12
3. Setting up 3. Branchements
The first thing you need to do is connect the
adapter to a suitable wall outlet.
(1) Unpack the EM-15 OR and place it on a
stable surface.
(2) Connect the small end of the adapter
cable to the EM-15 OR’s DC IN jack, and
the other end to a suitable wall outlet.
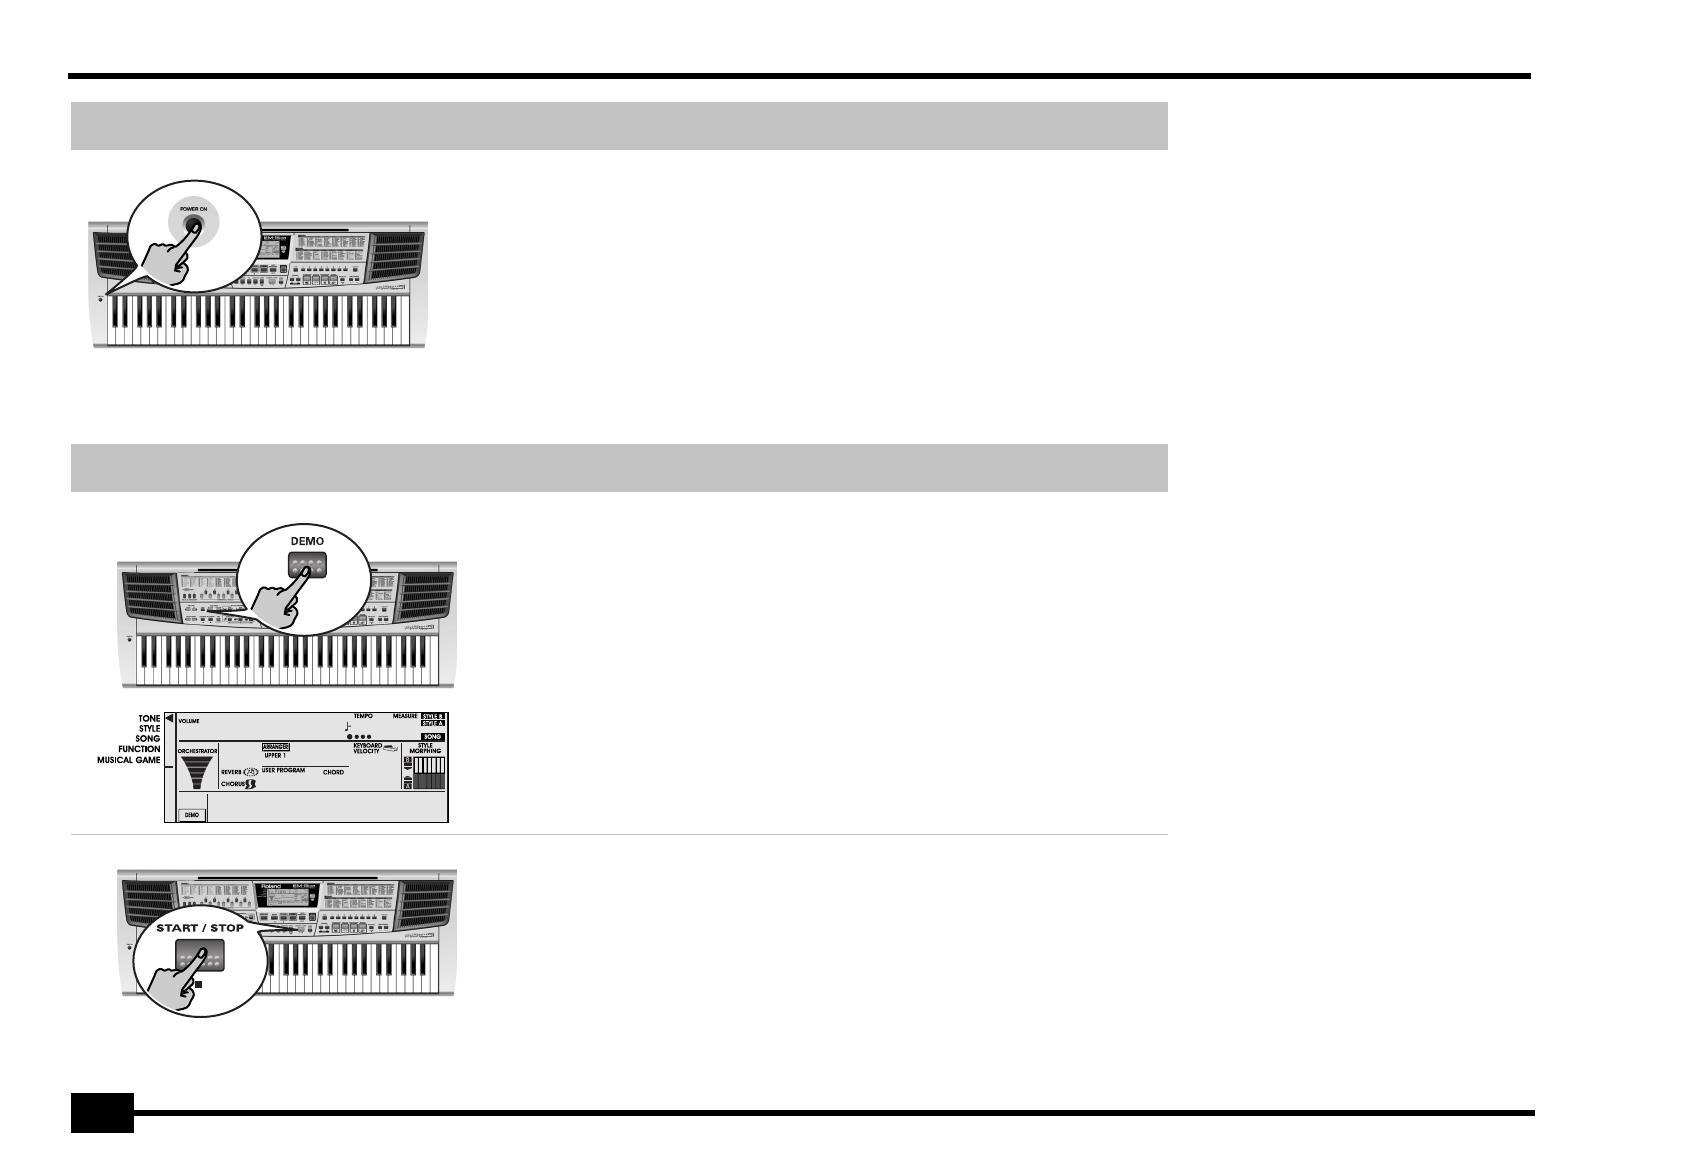
(3) Press the [POWER] button to switch on
the EM-15 OR.
La première chose à faire, c’est de brancher
l’adaptateur à une prise de courant ad hoc.
(1) Déballez l’EM-15 OR et posez-le sur une
surface stable.
(2) Branchez la plus petite extrémité du
câble de l’adaptateur à la prise DC IN de
l’EM-15 OR et l’autre bout à une prise de
courant de tension appropriée.
(3) Appuyez sur le bouton [POWER] pour
mettre l’EM-15 OR sous tension.
4. Demo songs 4. Morceaux de démo
Your EM-15 OR comes with 8 Tone demos, 6
Style demos, and 2 Song demos.
• Tone demos show off the EM-15 OR’s
amazing sound quality.
• Style demos give you an impression of
the quality of the on-board Music Styles.
• Song demos provide excellent samples of
Arabic music you can play with the
EM-15 OR.
(1) Press the [DEMO] button.
The [DEMO] icon in the lower left of the
display is highlighted.
Votre EM-15 OR est accompagné de 8 démos
de sons, 6 démos de styles et 2 démos de
morceaux.
• Les démos de sons mettent en exergue
le son superbe de l’EM-15 OR.
• Les démos de styles donnent une idée
de l’extraordinaire qualité des styles musi-
caux (“Music Styles”) de l’instrument.
• Les démos de morceaux vous donnent
un excellent aperçu de la musique arabe
pouvant être jouée avec l’EM-15 OR.
(1) Appuyez sur le bouton [DEMO].
L’icône [DEMO] est affichée dans la partie
inférieure gauche de l’écran.
Playback of all demo songs:
Press the [START/STOP] button. This will start
playback of a Tone demo song, followed by a
Style demo song, then again a Tone demo
song, etc.
Note: You need to press [START/STOP] after every
demo song.
Jeu de tous les morceaux de démo:
Appuyez sur le bouton [START/STOP]. L’instru-
ment lance le jeu d’un morceau de démo de
sons, suivi d’un morceau de démo de styles,
puis à nouveau d’une démo de sons, etc.
Remarque: Vous devez appuyer sur le bouton
[START/STOP] après chaque morceau de démonstra-
tion.
120
Demo All
1
001
EM-15orGB_F_Ar.book Page 12 Wednesday, July 25, 2001 6:34 PM

EM-15 OR
13
Playback of a Tone demo song:
• Press the [DEMO] button. This is only nec-
essary if you haven’t already done so.
• Press the [TONE] button.
• Press a numeric button [1]~[8]. Each but-
ton selects a different Tone demo song.
• Press the [START/STOP] button to start
playback of the selected song. Press it
again to stop playback.
Reproduiction d’une démo de sons:
• Appuyez sur le bouton [DEMO]. Si c’est
déjà fait, passez à l’étape suivante.
• Appuyez sur le bouton [TONE].
• Appuyez sur un bouton [1]~[8] du pavé
numérique. Chaque bouton permet de
choisir un autre morceau de démonstra-
tion de sons.
• Appuyez sur le bouton [START/STOP] pour
lancer la reproduction du morceau choisi.
Appuyez à nouveau sur ce bouton pour
arrêter la reproduction.
Playback of a Style demo song:
• Press the [DEMO] button. This is only nec-
essary if you haven’t already done so.
• Press the [STYLE] button.
• Press a numeric button [1]~[8]. Each but-
ton selects a different Style demo song.
([1] & [2] select the Song demos, [3]~8]
select the Style demos.)
Reproduction d’une démo de styles:
• Appuyez sur le bouton [DEMO]. Si c’est
déjà fait, passez à l’étape suivante.
• Appuyez sur le bouton [STYLE].
• Appuyez sur un bouton [1]~[8] du pavé
numérique. Chaque bouton permet de
choisir un autre morceau de démonstra-
tion de styles. ([1] & [2] donnent accès
aux démos de morceaux, [3]~[8] aux
démos de styles.)
• Press the [START/STOP] button to start
playback of the selected song.
• Appuyez sur le bouton [START/STOP] pour
lancer la reproduction du morceau choisi.
® For teachers: You can deactivate the [DEMO]
button: hold down [DEMO] while switching the
EM-15 OR on. It is now no longer possible to play
back demo songs. Repeat this to activate the
[DEMO] button once again.
® Avis aux professeurs: Vous pouvez désactiver
le bouton [DEMO]: maintenez [DEMO] enfoncé
tout en mettant l’EM-15 OR sous tension. Les
morceaux de démonstration ne sont alors plus dis-
ponibles. Répétez cette procédure pour activer à
nouveau le bouton [DEMO].
120
DemoTne1
1
001
EM-15orGB_F_Ar.book Page 13 Wednesday, July 25, 2001 6:34 PM
r
EM-15 OR
14
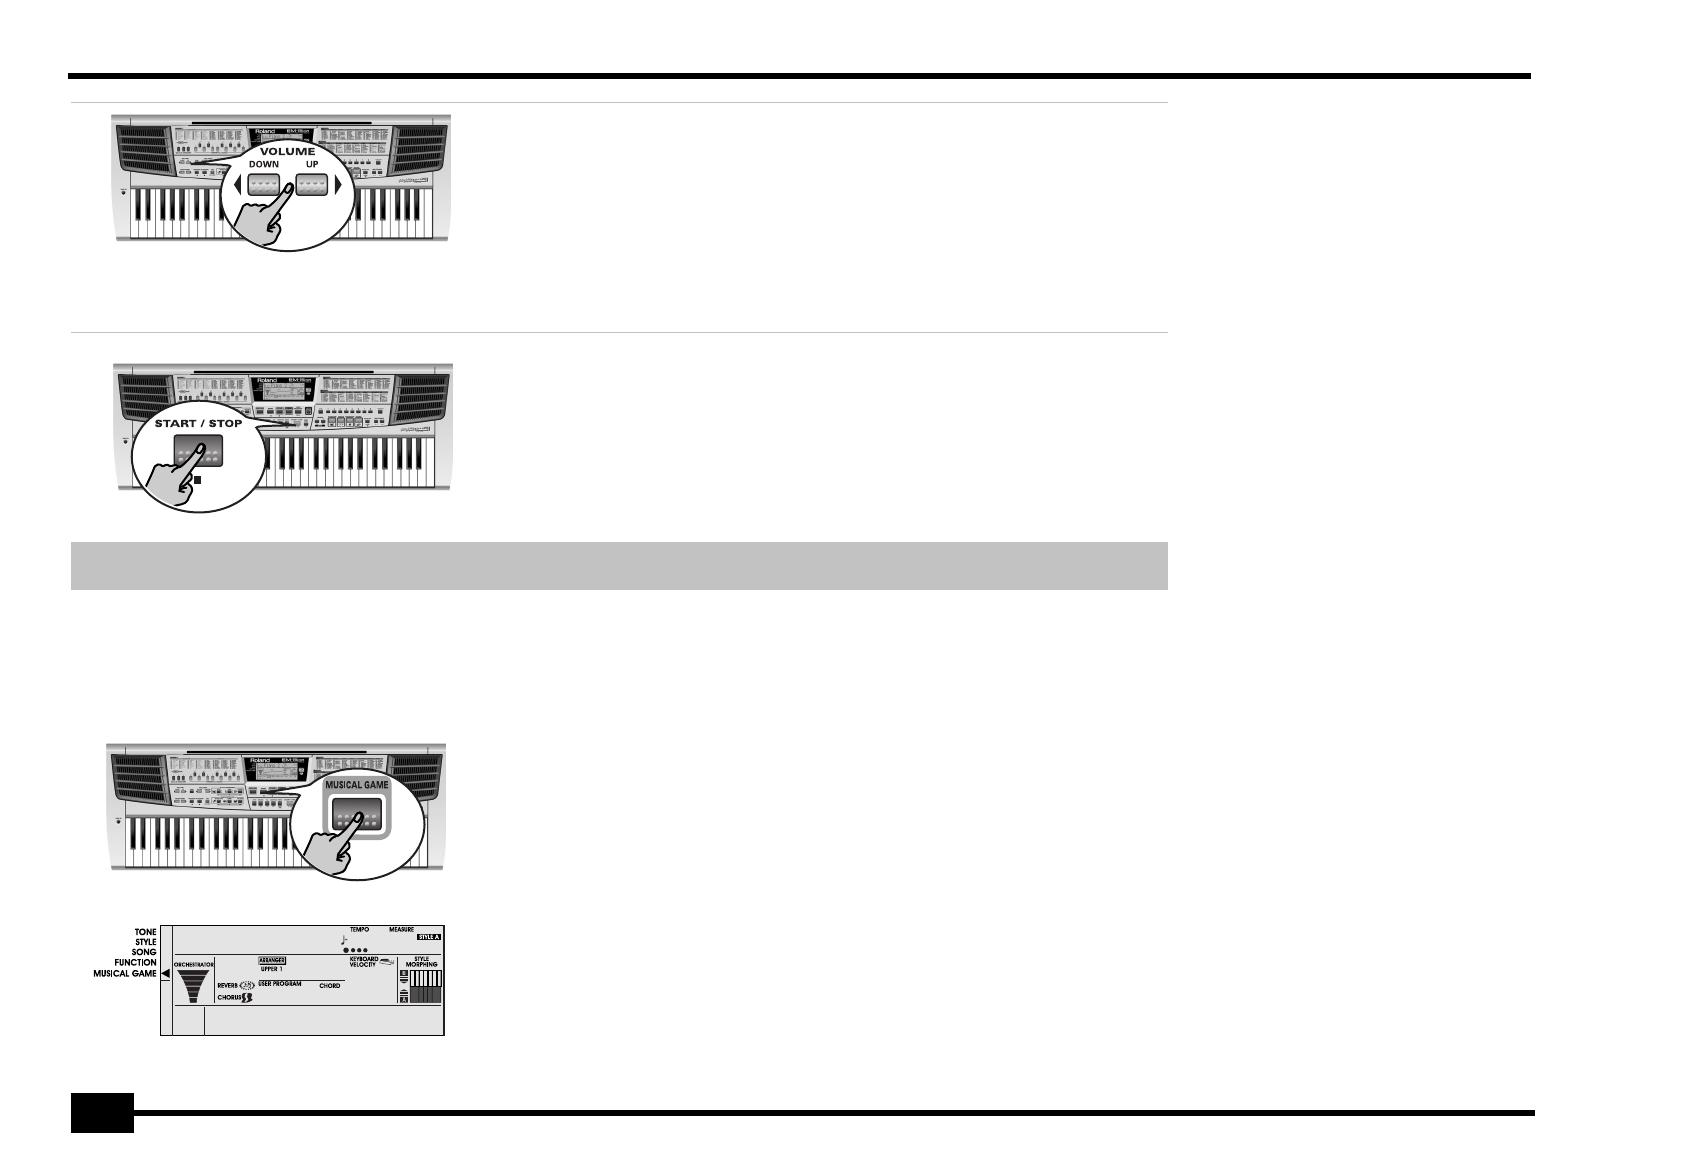
Setting the volume
• If necessary, adjust the EM-15 OR’s volume
with its VOLUME √ ® buttons.
Press VOLUME [√ DOWN] to decrease the
volume. Press VOLUME [UP ®] to increase
it. (The setting range is 0~127. This value is
briefly displayed.)
Réglage du volume
• Si nécessaire, réglez le volume de
l’EM-15 OR avec ses boutons VOLUME
√ ®.
Appuyez sur VOLUME [√ DOWN] pour
diminuer le volume. Pour l’augmenter,
enfoncez VOLUME [UP ®]. (La plage de
réglage s’étend de 0~127. Cette valeur
s’affiche brièvement.)
Stopping demo song playback
(1) Press the [START/STOP] button.
(2) Press the [DEMO] button again to switch
off the EM-15 OR’s demo function.
If the display now reads “DemoAll”, you
need to press the [DEMO] button once more.
Arrêter le jeu du morceau de démo
(1) Appuyez sur le bouton [START/STOP].
(2) Enfoncez à nouveau [DEMO] pour couper
la fonction de démo de l’EM-15 OR.
Si l’écran affiche alors “DemoAll”, appuyez
encore une fois sur le bouton [DEMO].
5. Game function 5. Jeux musicaux
Your EM-15 OR contains several musical
games you may want to play at times. These
games will help you master some basic musi-
cal concepts. They are called:
• Guess the Tone: find out if you can name
the sound you hear.
• Guess the Style: see if you know what
musical genre the EM-15 OR is playing. This
will help you find the right Music Styles for
playing your own music.
• Chord Finder: This game will help you find
out how to play chords you may come
across in written music. This is a wonderful
way of learning new chords.
L’EM-15 OR se propose de vous divertir avec
plusieurs jeux musicaux. Ces jeux vous aide-
ront aussi à acquérir certaines bases musicales.
Vous trouverez les jeux suivants:
• Guess the Tone: ce jeu vous invite à recon-
naître le son joué.
• Guess the Style: dans ce jeu, l’instrument
vous défie d’identifier le style musical joué.
Le but est de vous aider à trouver rapide-
ment le style qui “colle” à votre musique.
• Chord Finder: l’objectif est de vous aider à
jouer les accords que vous rencontrerez au
fil des partitions. Une manière superbement
musicale d’apprendre de nouveaux accords!
(1) Press the [MUSICAL GAME] button.
The arrow (√) to the left of the display
jumps to “MUSICAL GAME” and flashes.
Note:
(1) Appuyez sur le bouton [MUSICAL GAME].
La flèche (√) à gauche de l’écran passe à
“MUSICAL GAME” et se met à clignoter.
Remarque: Les entrées “DISK” ne sont pas dispo-
nibles sur l’EM-15.
120
GuessTne
1
001
EM-15orGB_F_Ar.book Page 14 Wednesday, July 25, 2001 6:34 PM
EM-15 OR
15
Bouton Fonction
DRUM Beginner (le plus facile)
BASS Advanced (intermédiaire)
ACCOMP Expert (le plus difficile)
(2) Press [MUSICAL GAME] again to select
the desired game (“GuessTne”, “GuessStl”
or “ChordFnd”).
(2) Appuyez à nouveau sur [MUSICAL GAME]
pour choisir le jeu voulu (“GuessTne”,
“GuessStl” ou “ChordFnd”).
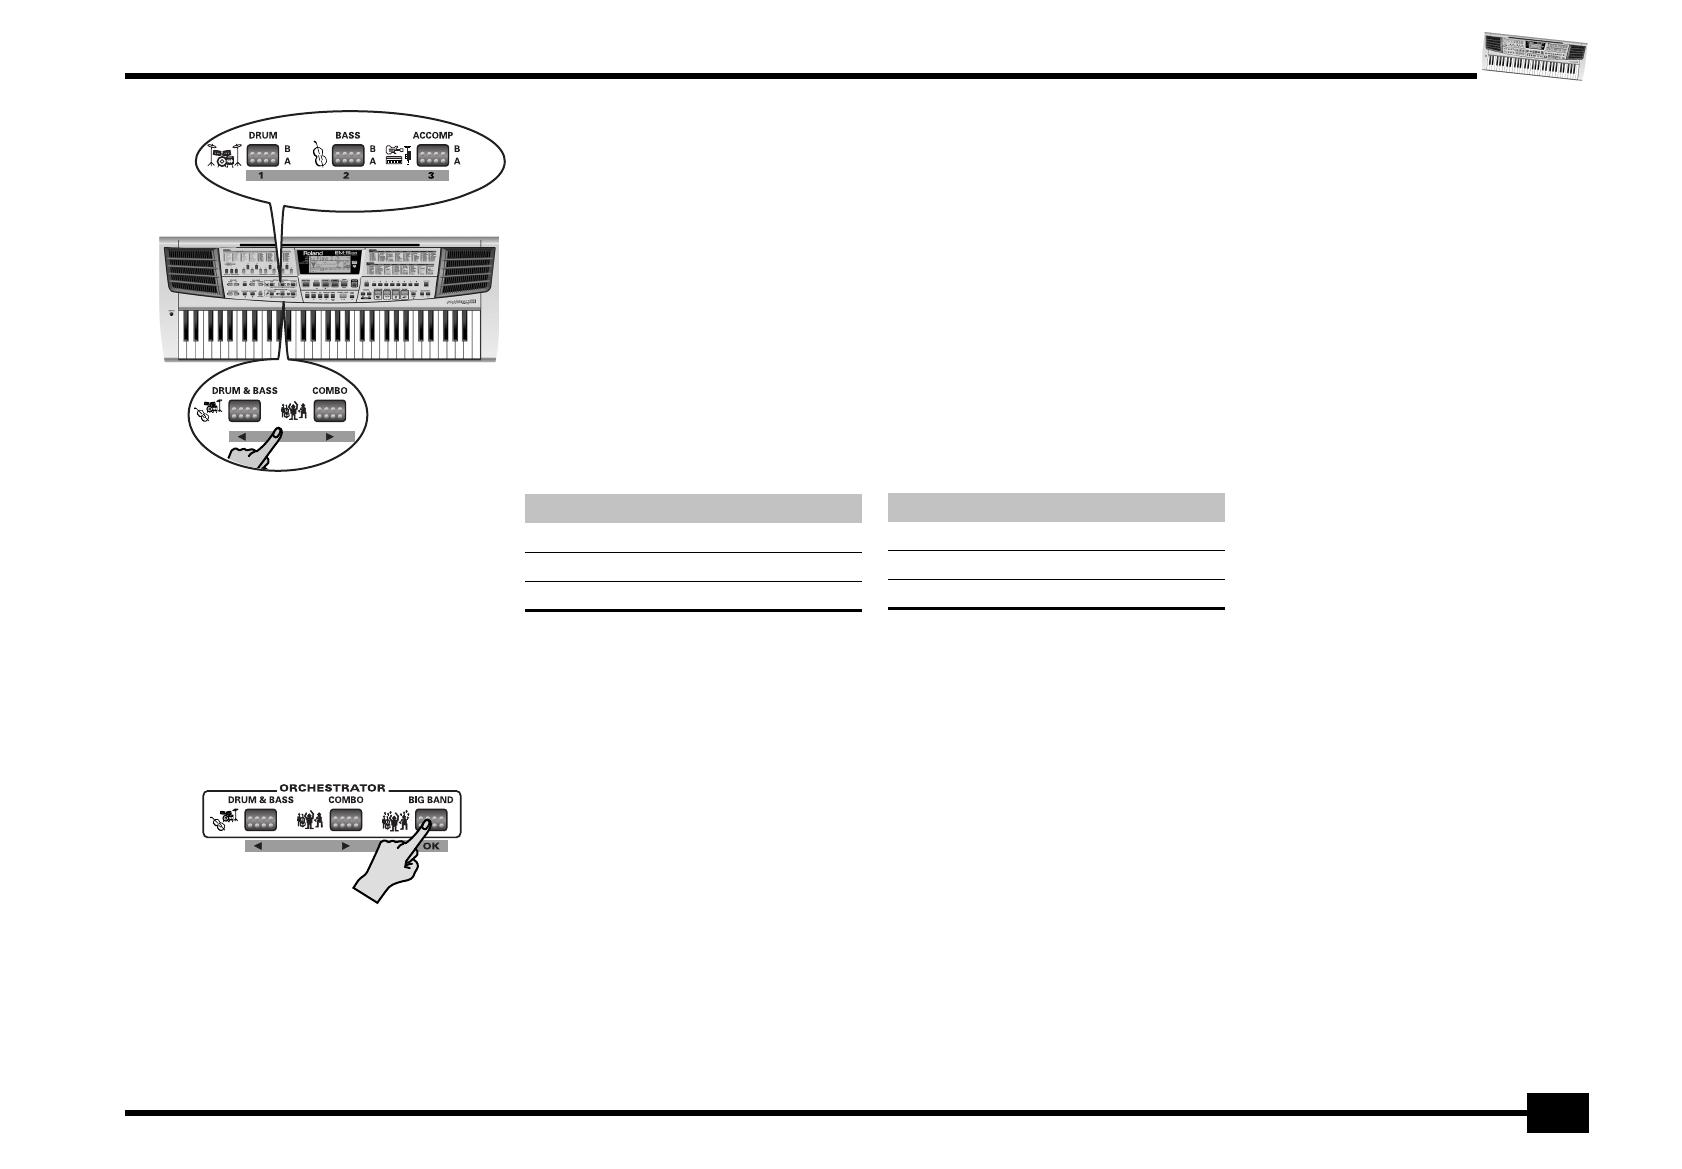
You can also press ORCHESTRATOR [DRUM
& BASS] or [COMBO] to select the game.
The arrow next to “MUSICAL GAME” stops
flashing.
(3) Use the STYLE MORPHING [DRUM],
[BASS], and [ACCOMP] buttons to select
the level (only for “Guess Tone” and
“Guess Style”).
Vous pouvez aussi choisir le jeu en appuyant
sur ORCHESTRATOR [DRUM & BASS] ou
[COMBO].
La flèche en face de “MUSICAL GAME”
s’arrête de clignoter.
(3) Utilisez les boutons STYLE MORPHING
[DRUM], [BASS] et [ACCOMP] pour choisir
votre niveau (uniquement pour les jeux
“Guess Tone” et “Guess Style”).
Button Function
DRUM Beginner (easiest)
BASS Advanced (intermediary)
ACCOMP Expert (most difficult)
Example: to select the “Advanced” level of the
“GuessTne” game:
• Press [MUSICAL GAME].
• Press [MUSICAL GAME] again (or ORCHES-
TRATOR [COMBO]) twice.
• Press STYLE MORPHING [BASS].
Exemple: pour choisir le niveau “Advanced” du
jeu “GuessTne”:
• Appuyez sur [MUSICAL GAME].
• Appuyez à nouveau deux fois sur [MUSICAL
GAME] (ou sur ORCHESTRATOR [COMBO]).
• Appuyez sur STYLE MORPHING [BASS].
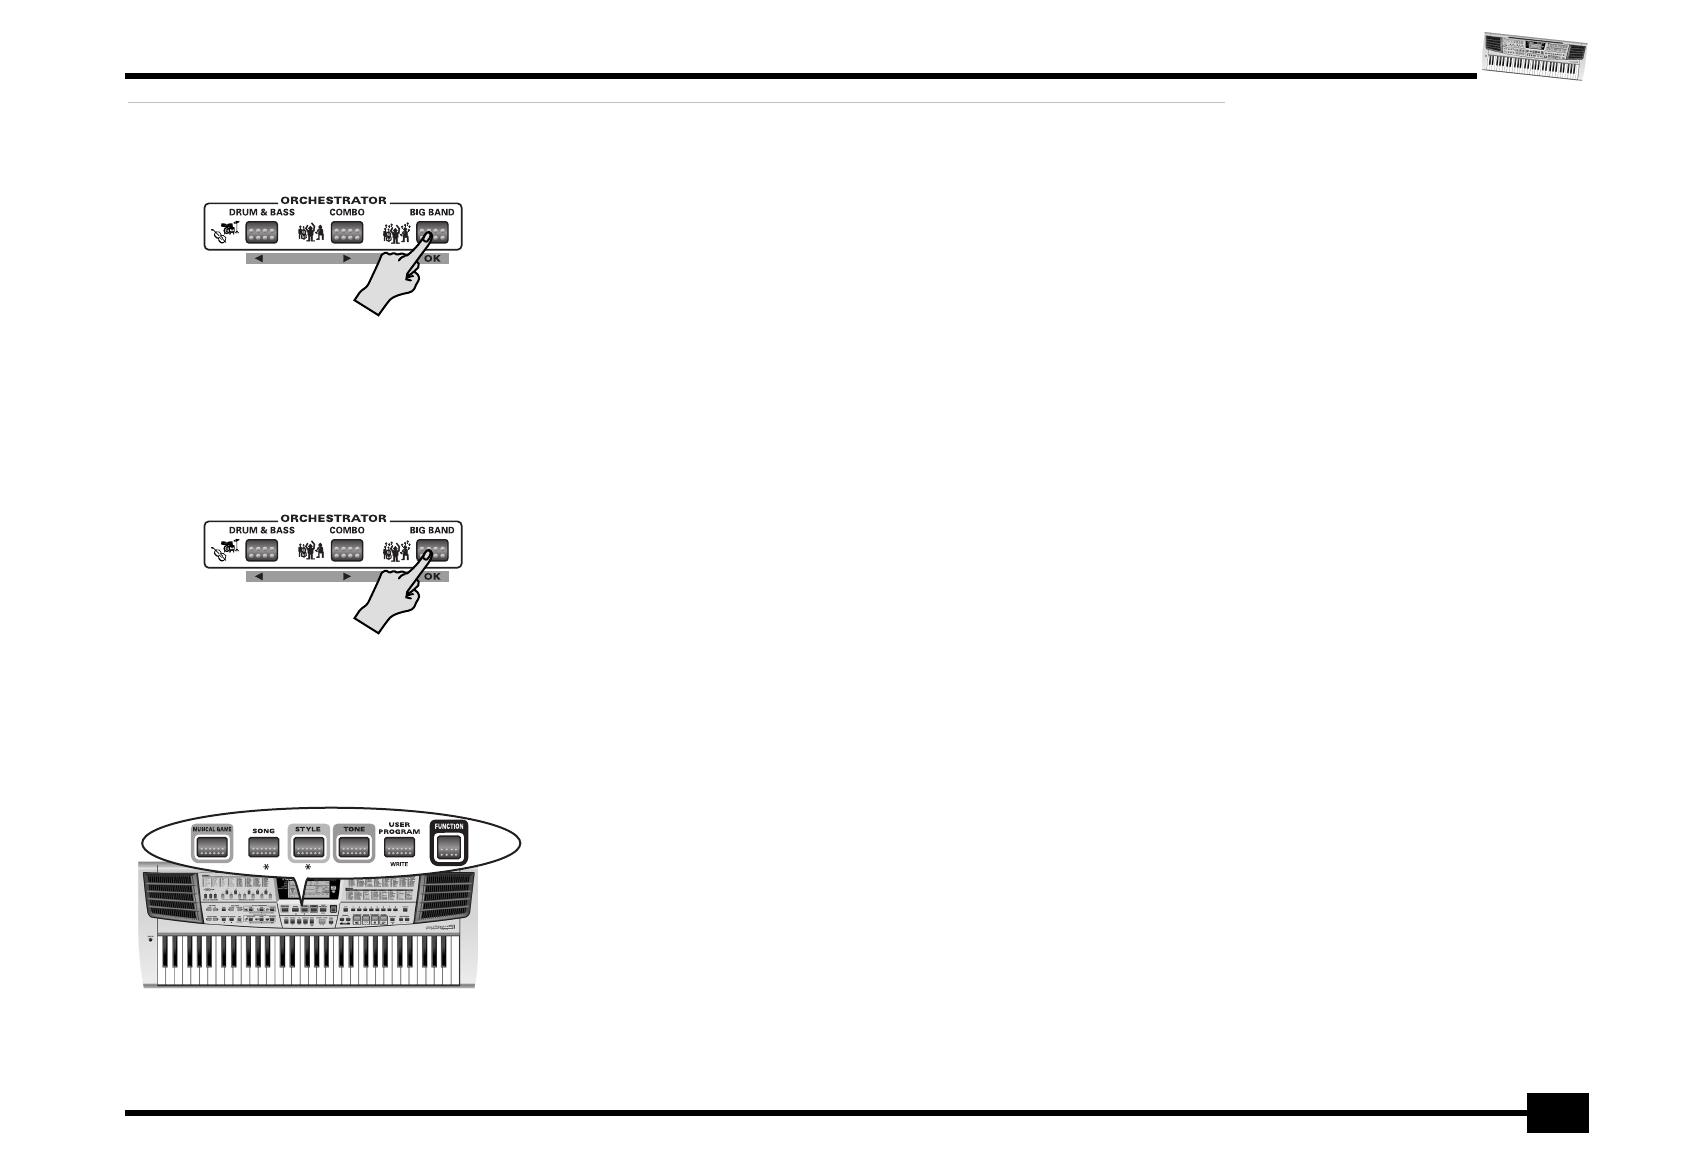
(4) Press ORCHESTRATOR [BIG BAND] to
confirm your choice (“OK”).
(4) Appuyez sur ORCHESTRATOR [BIG BAND]
pour confirmer votre choix (“OK”).
Beginner Advanced Expert
EM-15orGB_F_Ar.book Page 15 Wednesday, July 25, 2001 6:34 PM
r
EM-15 OR
16
Guess Tone
After pressing OK (see step (4) above), the
EM-15 OR plays a sound, while the display
shows “Listen”.
Next, a Tone name is displayed (“Piano?”, for
example).
(5) Use the “1”, “2”, “3” buttons (or √ ®) to
select the name of the correct sound.
(6) Press ORCHESTRATOR [BIG BAND] to
confirm your choice (“OK”).
Guess Tone (deviner le son)
Une fois que vous avez appuyé sur OK (voyez
l’étape (4) ci-dessus), l’EM-15 OR joue un son
et affiche “Listen” à l’écran.
L’écran affiche ensuite un nom de son
(“Piano?”, par exemple).
(5) Utilisez les boutons “1”, ‘2”, “3” (ou
√ ®) pour choisir le nom du son correct.
(6) Appuyez sur ORCHESTRATOR [BIG BAND]
pour confirmer votre choix (“OK”).
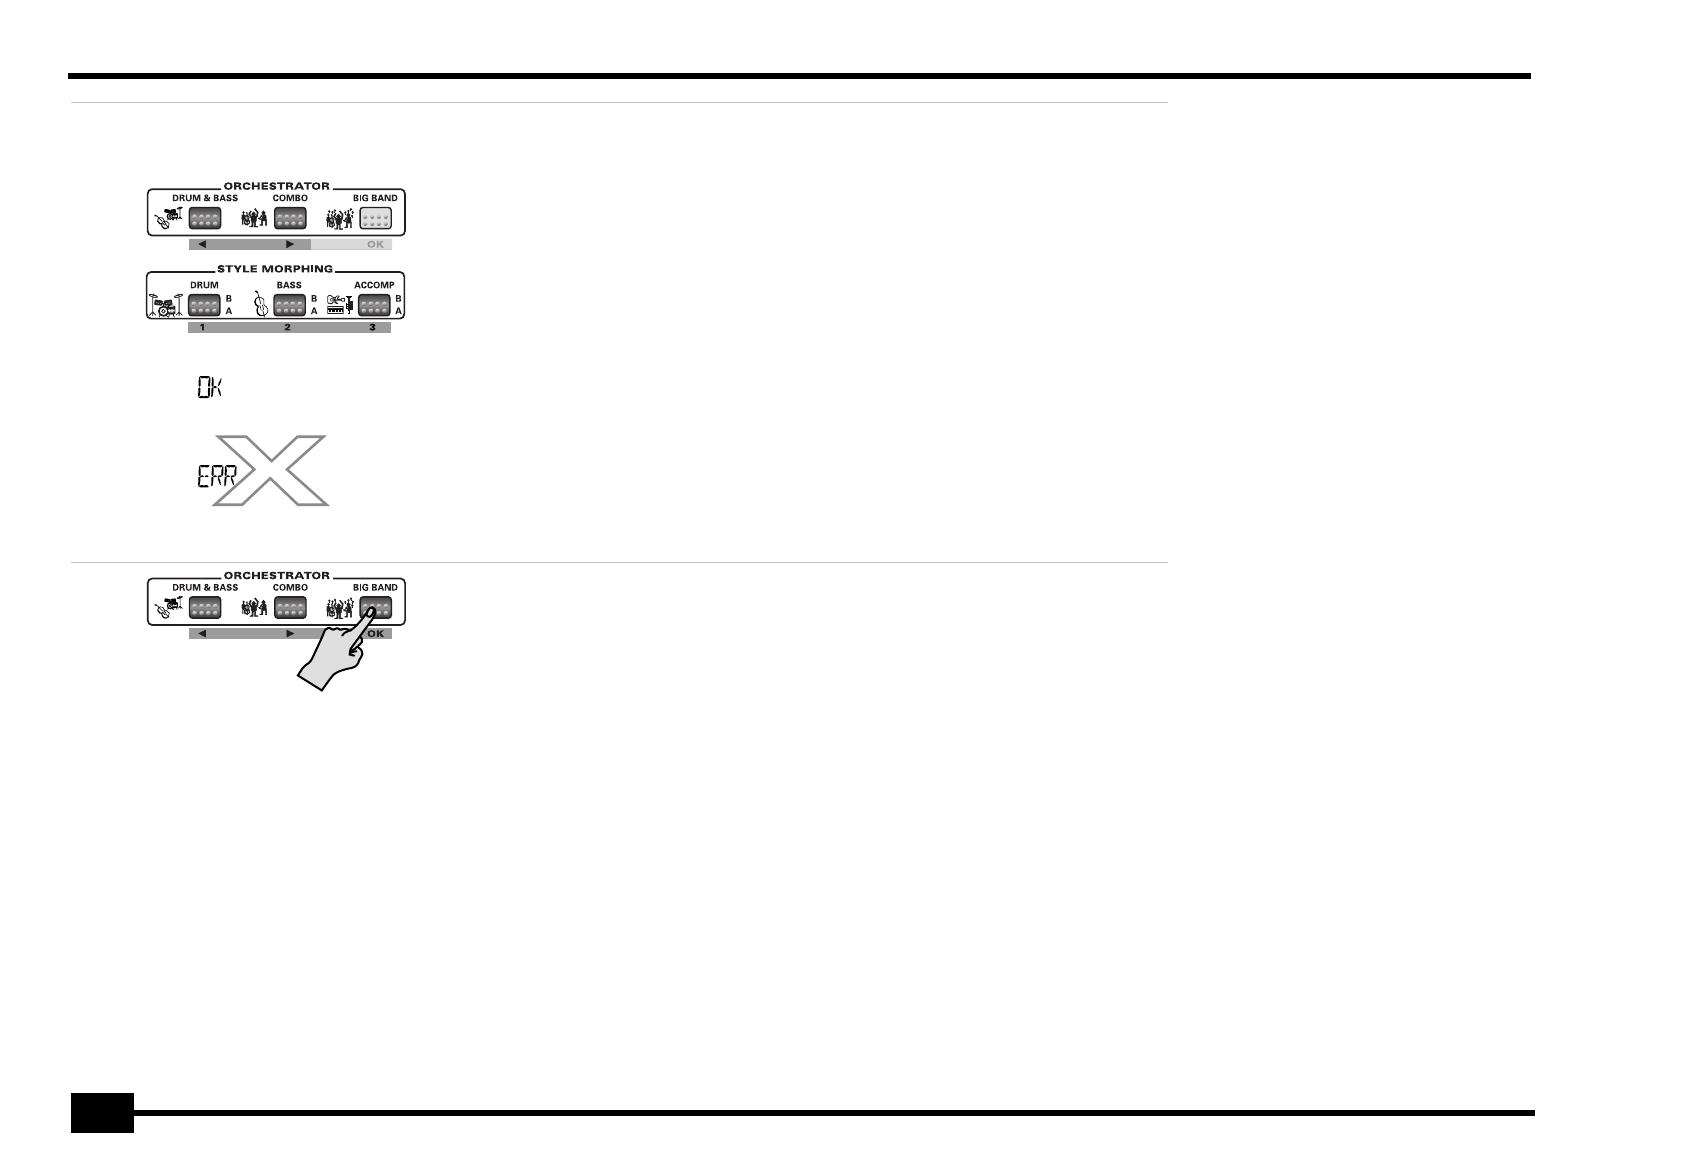
If your choice was correct, the display indi-
cates “OK”, and you will get a standing ova-
tion from your EM-15 OR.
If your choice was wrong, the display shows
“ERR”, and the EM-15 OR plays a “crashing”
sound.
Next, the display indicates the correct
sound, and returns to the level indication.
Si vous avez fait le bon choix, l’écran indi-
que “OK” et vous recevez des tonnerres
d’applaudissements de votre EM-15 OR.
Si vous avez mal choisi, l’écran indique
“ERR” et l’EM-15 OR joue un son de “crash”.
L’écran affiche ensuite le nom du son cor-
rect et retourne à l’affichage du niveau.
(7) Press “OK” to have the EM-15 OR sound
another Tone.
Use the √ ® or “1”, “2”, “3” buttons if you
wish to select another level. Then confirm
by pressing “OK”.
(8) Indicate which sound it is (see step (5)
above) and press “OK”.
After applauding (or playing the crashing
sound), the EM-15 OR returns to the level
indication. Repeat steps (7) and (8), if you
like, or press [MUSICAL GAME] to select
another game.
(7) Appuyez sur “OK” si vous voulez poursui-
vre le jeu et deviner un autre son.
Pour changer de niveau, utilisez les boutons
√ ® ou “1”, “2”, “3”. Confirmez ensuite
votre choix en appuyant sur “OK”.
(8) Identifiez le son (voyez l’étape (5) ci-des-
sus) et appuyez sur “OK”.
Après vous avoir applaudi (ou joué le son de
crash), l’EM-15 OR retourne à l’affichage de
niveau. Si vous le voulez, répétez les étapes
(7) et (8) ou appuyez sur
[MUSICAL GAME] pour choisir un autre jeu.
Oboe
Piano
EM-15orGB_F_Ar.book Page 16 Wednesday, July 25, 2001 6:34 PM
EM-15 OR
17
Guess Style
After pressing OK (see step (4) on p. 15), the
EM-15 OR plays a given type of accompani-
ment, while the display shows a Style name
(“TWIST?”, for example).
(5) Use the “1”, “2”, “3” buttons (or √ ®) to
select the name of the correct style.
(6) Press ORCHESTRATOR [BIG BAND] to
confirm your choice (“OK”).
Guess Style (deviner le style)
Une fois que vous avez appuyé sur OK (voyez
l’étape (4) à la p. 15), l’EM-15 OR joue un type
d’accompagnement donné tout en affichant
un nom de style (“TWIST?”, par exemple).
(5) Utilisez les boutons “1”, “2”, “3” (ou
√ ®) pour choisir le nom du style cor-
rect.
(6) Appuyez sur ORCHESTRATOR [BIG BAND]
pour confirmer votre choix (“OK”).
If your choice was correct, the display indi-
cates “OK”, and you will get a standing ovation
from your EM-15 OR. If your choice was
wrong, the display shows “ERR”, and the
EM-15 OR plays a crashing sound. Next, the
display indicates the correct Style, and returns
to the level indication.
Si vous avez fait le bon choix, l’écran indique
“OK” et vous recevez des tonnerres d’applau-
dissements de votre EM-15 OR. Si votre choix
était erroné, l’écran indique “ERR” et
l’EM-15 OR joue un son de crash. L’écran affi-
che ensuite le nom du style correct et retourne
à l’affichage du niveau.
(7) Press “OK” to have the EM-15 OR play
another Style.
Use the √ ® or “1”, “2”, “3” buttons if you
wish to select another level. Then confirm
by pressing “OK”.
(8) Indicate which Style it is (see step (5)
above) and press “OK”.
After applauding you (or playing the crash-
ing sound), the EM-15 OR once again
returns to the level indication. Repeat steps
(7) and (8), or press [MUSICAL GAME] to
select another game.
(7) Appuyez sur “OK” si vous voulez que
l’EM-15 OR joue un autre style.
Pour changer de niveau, utilisez les boutons
√ ® ou “1”, “2”, “3”. Confirmez ensuite
votre choix en appuyant sur “OK”.
(8) Identifiez le style (voyez l’étape (5) ci-
dessus) et appuyez sur “OK”.
Après vous avoir applaudi (ou joué le son de
crash), l’EM-15 OR retourne à l’affichage de
niveau. Répétez les étapes (7) et (8) ou
appuyez sur [MUSICAL GAME] pour choisir
un autre jeu.
(9) Press [SONG], [STYLE], [TONE], [USER
PROGRAM] or [FUNCTION] to leave this
function.
(9) Appuyez sur [SONG], [STYLE], [TONE],
[USER PROGRAM] ou [FUNCTION] pour
quitter cette fonction.
EM-15orGB_F_Ar.book Page 17 Wednesday, July 25, 2001 6:34 PM

r
EM-15 OR
18
Chord Finder
Apart from being a fun game, the Chord Finder
is also useful for learning how to play certain
chords you are unfamiliar with. Here is how to
play this game:
(1) Press the [MUSICAL GAME] button.
See p. 14 for a detailed discussion.
(2) Press [MUSICAL GAME] again to select
“ChordFnd”.
Press “3” [ACCOMP] to select it directly.
Chord Finder
Outre un jeu très amusant, Chord Finder est
aussi un outil utile pour assimiler certains
accords avec lesquels vous n’êtes pas familier.
Voici comment jouer avec Chord Finder:
(1) Appuyez sur le bouton [MUSICAL GAME].
Pour en savoir plus, voyez p. 14.
(2) Appuyez à nouveau sur [MUSICAL GAME]
pour choisir “ChordFnd”.
Vous pouvez appuyer sur “3” [ACCOMP]
pour choisir directement le jeu.
(3) Use the “1” or “2” button to select the
entry you wish to specify:
(3) Choisissez l’élément que vous voulez
définir avec le bouton “1” ou “2”:
Root Type
Button Function
“1” Root (i.e. the “name” of the chord).
“2” Type (major, minor, etc.)
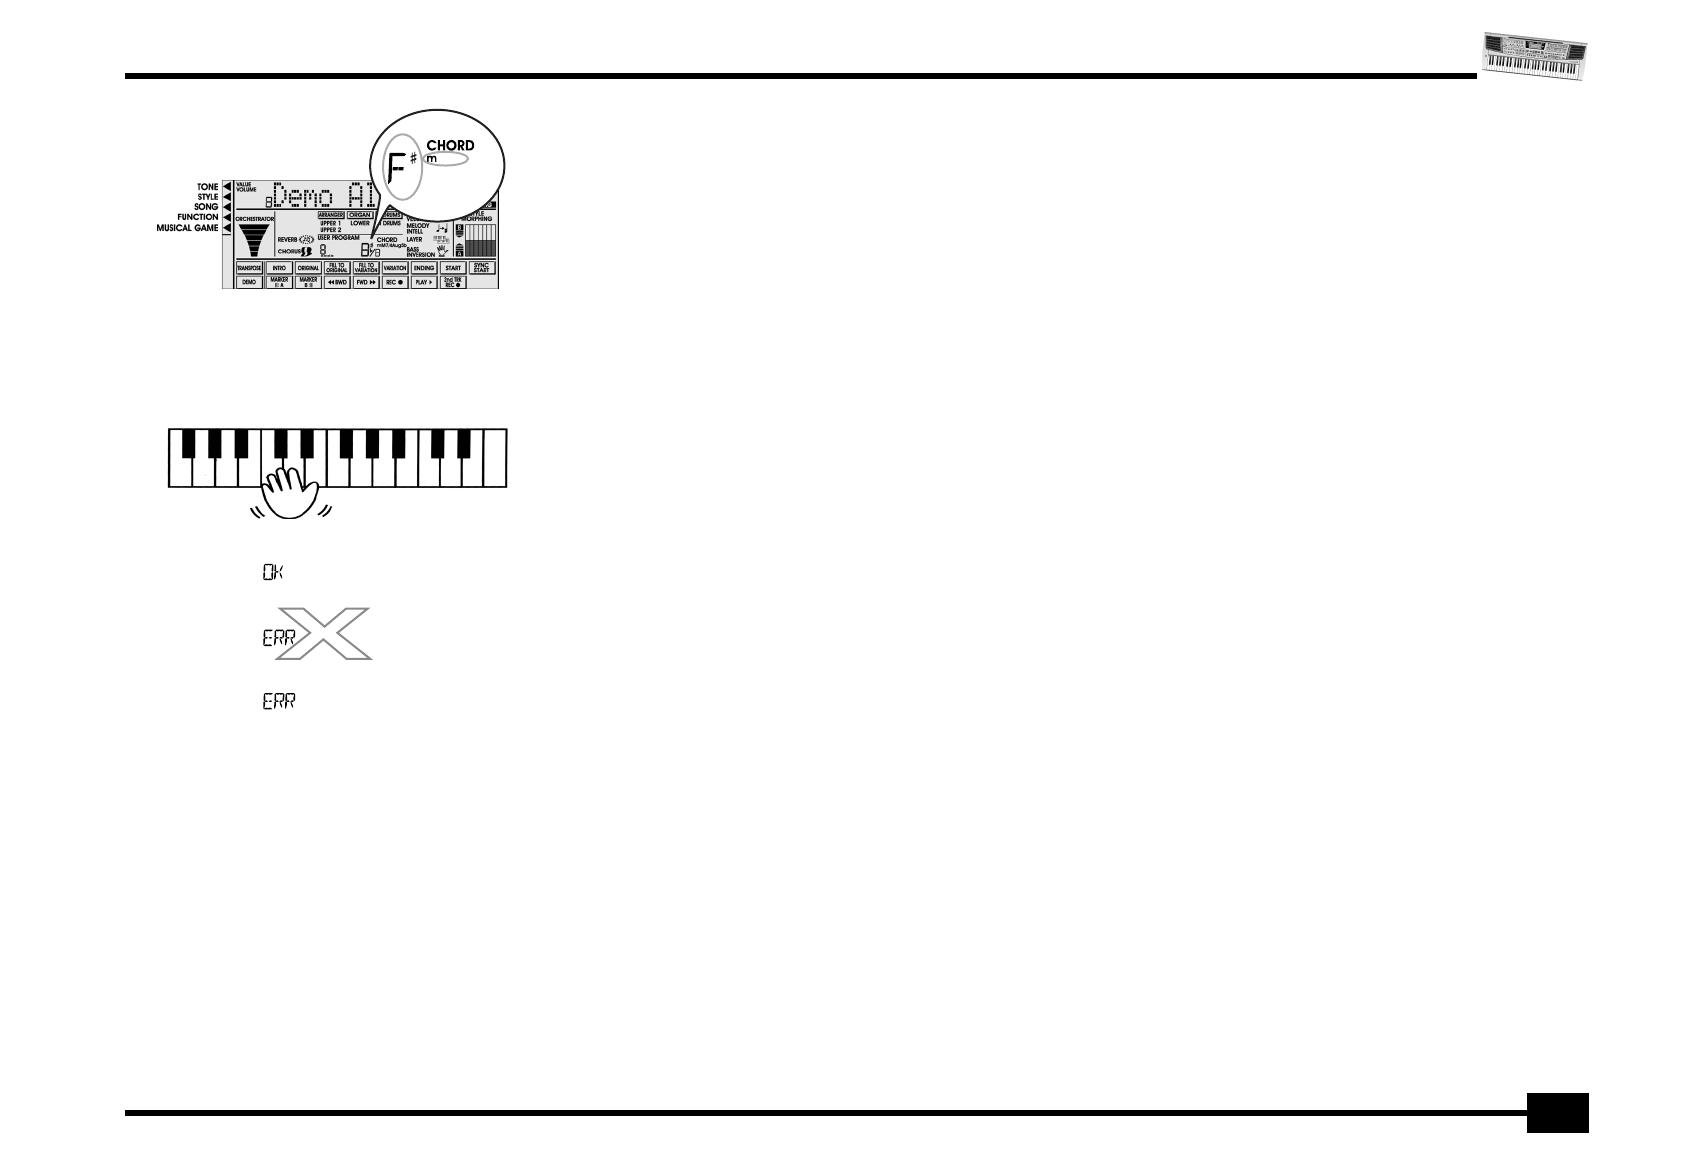
To specify the Root:
• Press “1”. The display now shows the mes-
sage “1 Root”.
• Use the √ ® buttons to select the root
(“F#”, for example). The name of this chord
appears in the CHORD field of the display (1,
see below).
Pour spécifier la tonique (Root):
• Appuyez sur “1”. L’écran affiche alors le mes-
sage “1 Root”.
• Spécifiez la tonique avec les boutons √ ®
(“F#”, par exemple). Le nom de cet accord
apparaît dans la zone CHORD de l’écran (1,
voyez à droite).
Bouton Fonction
“1” Root (c.-à-d. le “nom” de l’accord).
“2” Type (majeur, mineur, etc.)
EM-15orGB_F_Ar.book Page 18 Wednesday, July 25, 2001 6:34 PM
EM-15 OR
19
To specify the Type:
• Press the “2” button. The display now shows
the message “2 Type”.
• Use the √ ® buttons to select the chord
type (“m”, for example). The complete name
of this chord appears in the CHORD field of
the display (2).
(4) Press ORCHESTRATOR [BIG BAND] to
confirm your choice (“OK”).
The display now indicates the constituent
notes of the selected chord (here “F#
minor”).
Pour spécifier le type:
• Appuyez sur le bouton “2”. L’écran affiche
alors le message “2 Type”.
• Utilisez les boutons √ ® pour choisir le
type d’accord (“m”, par exemple). Le nom
complet de l’accord s’affiche dans la zone
CHORD de l’écran (2).
(4) Appuyez sur ORCHESTRATOR [BIG BAND]
pour confirmer votre choix (“OK”).
L’écran affiche maintenant les notes com-
posant l’accord choisi (dans ce cas, “F#
mineur”).
(5) Play the indicated notes in the left half
of the keyboard and press “OK” again.
(5) Jouez les notes indiquées dans la moitié
gauche du clavier et appuyez à nouveau
sur “OK”.
If your chord was correct, the display indi-
cates “OK”, and you will be treated to a
standing ovation.
If the chord was wrong, the display indi-
cated “ERR” and the EM-15 OR plays a roar-
ing “crash” sound. The wrong note(s) now
flash(es) in the display.
Play the chord again and press “OK”.
(6) Repeat steps (3)~(5) to practise other
chords.
Si vous avez joué le bon accord, l’écran affi-
che “OK” et vous êtes salué par des applau-
dissements.
Si vous avez joué un accord incorrect,
l’écran indique “ERR” et l’EM-15 OR joue un
son de “crash”. La ou les mauvaises notes cli-
gnotent alors à l’écran.
Jouez à nouveau l’accord et appuyez sur
“OK”.
(6) Répétez les étapes (3)~(5) pour vous
entraîner à jouer d’autres accords.
(7) Press [SONG], [STYLE], [TONE], [USER
PROGRAM] or [FUNCTION] to leave this
function.
(7) Appuyez sur [SONG], [STYLE], [TONE],
[USER PROGRAM] ou [FUNCTION] pour
quitter cette fonction.
(1)
(2)
F#A C#
¶¶
F#A C#
F#A#C#
F#A#C#
EM-15orGB_F_Ar.book Page 19 Wednesday, July 25, 2001 6:34 PM

r
EM-15 OR
20
6. Playing with accom-
paniment
6. Jeu avec accompa-
gnement
Let us now take advantage of the EM-15 OR’s
accompaniment function. This function is
called “Arranger”.
Voyons à présent comment exploiter la fonc-
tion d’accompagnement de l’EM-15 OR. Cette
fonction est appelée “Arranger”.
(1) Press the [ARRANGER] button.
The [ARRANGER] icon is displayed and the
keyboard is split into two halves. The keys
you press in the left half are used to specify
the key of the accompaniment. The right
half of the keyboard allows you to play a
tune to the accompaniment.
At power-on, the EM-15 OR automatically
selects the “15 SaidiMdn” Style.
(1) Appuyez sur le bouton [ARRANGER].
L’icône [ARRANGER] s’affiche et le clavier
est divisé en deux moitiés. Les touches que
vous enfoncez dans la partie gauche per-
mettent de spécifier la tonalité de l’accom-
pagnement. La moitié droite du clavier
permet de jouer une mélodie sur l’accom-
pagnement.
A la mise sous tension, l’EM-15 OR choisit
automatiquement le style “15 SaidiMdn”.
(2) Press the [START/STOP] button to start
Arranger playback.
(2) Appuyez sur le bouton [START/STOP]
pour lancer le jeu de l’Arranger.
(3) Play a chord (or just one note) with your
left hand.
(4) Play another chord (or note) to change
the Arranger’s key.
(3) Jouez un accord (ou une seule note) de la
main gauche.
(4) Jouez un autre accord (ou une autre
note) pour changer la tonalité de l’Arran-
ger.
(5) Press the following buttons to use other
patterns of the currently selected Music
Style:
(5) Appuyez sur les boutons ci-dessous pour
utiliser d’autres motifs (“Pattern”) du style
musical en vigueur:
EM-15orGB_F_Ar.book Page 20 Wednesday, July 25, 2001 6:34 PM
/