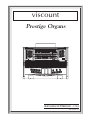
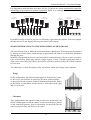
Viscount Prestige 50 User manual
- Category
- Musical Instruments
- Type
- User manual
This manual is also suitable for

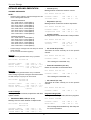
AFC
viscount
HR
HR
HR
HR
HR
REVERB
YAMAHA
S
123
12
12
534 6
53 4 6 III
456 12 534 6
A.P
C
T78910
M.SOLO
ENC
O.SOLO
III
M.SOLO
123456
M.SOLO
P
P
P
I
MEM- MEM+
MAN.I ORCHESTRAPEDAL ORCHESTRA
CANCEL
AMPLIFICATION
MAN.II ORCHESTRA MAN.III ORCHESTRA
Console
On
Antiphonal
On
Main
On
Reed Mixtur Cello Ac.Bass Piano Harspich.Harp Chimes Oboe
Celesta
TrumpetStrings2 Strings1Tuba
65 6766 6968 70 7271 73 7574 76
77 78 79 80 81
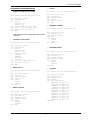
TEMPERAMENT
EQUAL
MEANTONE
CHAUMONT
WERKMEISTER
KIRNBERGER
PYTHAGOREAN
VALLOTTI
KELLNER
M. BANK TRANSPOSER CRESCENDOMAN. I MAN. III
I/ II KEYB. INV.
II/PDPIST.COMB.
II/P
III
/P
I/P
III/II
I/II
III / I
1
2
3
4
5
M
E
M
-
CRESCENDO MAN. I MAN. III
MIDI
SUSTAIN
MIDI
REVERS.
TUTTI
MEM +
6
7
8
9
10
THRU OUT
MIDI
IN
L(MONO)
INPUT
RL(MONO)
OUTPUT
R
HEADPHONES
/
‘
1
3
5
/
‘
2
2
3
/
‘
1
3
5
MAN. IMAN. III
51
50
52
55
58
61
64
66
Gamba
Oktave
Prinzipal
8'
8'
Prinzipal
4'
4'
2'
Blockflöte
Sifflöte
1'
Tremulant
Zimbel
3f.
Nasard
16'
Gedackt
8'
gedackt
Rohr-
4'
8'
Vox
Celeste
Rohrflöte
Terz
Coupler
III/I
Tremulant
4f.
Mixtur
4'
Offenflöte
8'
Flöte
Prinzipal
8'
Terz
8'
8'
4'
Klarine
Vox
Humana
8'
Oboe
Trompete
8'
Spanishe
Trompete
Sesquialter
2'
/
‘
1
1
3
Larigot
8'
Krumm-
horn
Doublette
2'
Regal
16'
16'
Contra
Trompete
4'
/
‘
1
1
3
POWER
34
Bombarde
Schalmey
PEDAL
4'
8'
16'
1
Trompete
MAN. II
8'
Trompete
16'
Fagott
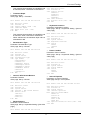
4
7
10
13
16
17
Contra
Bombarde
32'
Contra
Bourdon
III/P
Prinzipal-
bass
Super-
oktave
Gedackt
2'
Prinzipal
32'
16'
16'
Subbass
8'
4'
bass
Flöte
Oktav-
Mixtur
4f.
Coupler
Coupler
Coupler
I/P II/P
Tremulant
III/II
Coupler Coupler
I/II
Mixtur
6f.
2'
Waldflöte
Oktave Larigot
Spiztflöte
4'
8'
16'
Dulciana
8'
Hohlflöte
Celeste
8'
Flöte
Prinzipal
8'
Gedackt
8'
16'
/
‘
2
2
3
Quinte
Choral-
bass
4'
16'
Violon
Prestige 100
viscount
Advanced Manual - USA
Ver. USA - 1.1
Prestige Organs


1
Advanced Manual - Viscount
Prestige
CONTENTS
1. Important notes ........................................................................................................................... 3
1.1 Looking after the product ....................................................................................................... 3
1.2 Notes on floppy disks ............................................................................................................. 3
1.3 Notes about the manual .......................................................................................................... 4
2. Control central unit .................................................................................................................... 5
3. Switching on and Main video page ........................................................................................... 7
4. Functions for controlling the organ’s voices ............................................................................ 8
4.1 Regulating the voice volumes ................................................................................................8
4.2 Regulating the sound generation parameters ......................................................................... 9
4.3 Selecting and regulating the Orchestra voices ..................................................................... 14
Selecting the voice ......................................................................................................................................... 14
Setting the parameters ................................................................................................................................... 14
Saving voices and parameters in the memories ............................................................................................. 15
5. Organ general settings .............................................................................................................. 16
5.1 Setting the tremolos .............................................................................................................. 17
5.2 Selecting the type of reverb .................................................................................................. 18
Organ version equipped with AFC reverb unit.............................................................................................. 19
5.3 Keyboards general settings................................................................................................... 20
5.4 Setting the equalizer ............................................................................................................. 21
5.5 How the memories work ...................................................................................................... 22
5.6 Setting the Antiphonal outputs ............................................................................................. 23
Antiphonal output connection examples ....................................................................................................... 25
6. Setting up the MIDI interface and audio outputs ................................................................. 27
6.1 Regulating the display contrast ............................................................................................ 27
6.2 Setting the audio signals on the rear outputs ....................................................................... 27
Volumes ......................................................................................................................................................... 28
Delay times .................................................................................................................................................... 29
Equalizers ...................................................................................................................................................... 30
6.3 MIDI functions ..................................................................................................................... 31
What MIDI is ................................................................................................................................................. 31
The Prestige MIDI settings............................................................................................................................ 32
Selecting the channels ................................................................................................................................... 33
Setting the filters ........................................................................................................................................... 35
Program Change message transmission ........................................................................................................ 36
Setting the MIDI velocity .............................................................................................................................. 37
MIDI note code transposition ........................................................................................................................ 38
6.4 Setting the rear audio outputs ............................................................................................... 38
Short introduction to the wind-chests of pipe organs .................................................................................... 39
Simulating wind-chests with the Prestige ..................................................................................................... 41

2
Viscount - Advanced Manual
Prestige
7. Floppy disk and file management functions .......................................................................... 44
7.1 Displaying the contents of floppy disks ............................................................................... 45
7.2 Copying whole floppy disks ................................................................................................. 45
7.3 Formatting floppy disks ........................................................................................................ 47
7.4 Displaying floppy disk general parameters .........................................................................47
7.5 Saving the organ’s memories and settings on disk .............................................................. 48
7.6 Loading the organ’s memories and settings saved on disk.................................................. 50
7.7 Copying individual files ....................................................................................................... 51
7.8 Renaming files ...................................................................................................................... 53
7.9 Deleting files ......................................................................................................................... 54
7.10 File information .................................................................................................................. 55
7.11 Error messages - Disk menu ............................................................................................... 56
8. Sequencer ................................................................................................................................... 58
8.1 Recording a performance .....................................................................................................58
First recording ............................................................................................................................................... 58
Multidubbing recording ................................................................................................................................. 60
8.2 Playing back a performance ................................................................................................. 62
8.3 Switching on and setting the metronome .............................................................................63
8.4 Error messages - Sequencer section .....................................................................................63
9. Appendix .................................................................................................................................... 65
9.1 Voice Local Off ..................................................................................................................... 65
9.2 Factory Setting ...................................................................................................................... 65
9.3 Updating the firmwares ........................................................................................................66
Updating the Operating System firmware ..................................................................................................... 66
Updating the Sound Driver firmware ............................................................................................................ 67
Error messages - Firmware upgrade .............................................................................................................. 68
9.4 Checking the releases of the firmware packages installed in the organ.............................. 69
Detailed MIDI Implementation ................................................................................................... 70
MIDI Implementation Chart .......................................................................................................77

3
Advanced Manual - Viscount
Prestige
1. IMPORTANT NOTES
1.1 LOOKING AFTER THE PRODUCT
• Do not apply excessive force to the organ’s structures or the controls (knobs, stops, push-
buttons, etc.).
• When possible, do not place the instrument close to units which generate strong interference,
such as radios, TVs, computer videos, etc.
• Do not place the organ close to heat sources, in damp or dusty places or in the vicinity of strong
magnetic fields.
• Do not expose the instrument to direct sunlight.
• Never insert foreign bodies inside the instrument or pour liquids of any kind into it.
• For cleaning, use only a soft brush or compressed air; never use detergents, solvents or alcohol.
• Always use good quality screened cables for connection to amplification or diffusion systems.
When disconnecting cables from sockets, always take hold of the connector and not the cable
itself; when winding cables, do not knot or twist them.
• Before making the connections ensure that the other units (especially amplification and diffusion
systems) you are about to connect are switched off. This will prevent noisy or even dangerous
signal peaks.
• If the organ is to be out of use for lengthy periods, disconnect the plug from the power socket.
1.2 NOTES ON FLOPPY DISKS
• Use only good quality floppy disks.
• Do not extract the floppy disk when reading or writing operations are in progress (when the
LED on the drive is on); this may damage the head and the magnetic medium.
• Use only 3.5" DD and HD (720Kbyte and 1.44Mbyte) floppy disks formatted to the MS-DOS
standard.
• Take good care of your floppy disks and do not place them close to heat sources or magnetic
fields (computer videos, loudspeakers, etc.), or in damp or dusty places.
• The manufacturer does not accept any liability for damage to the floppy disk drive in case of
use of damaged floppy disks.

4
Viscount - Advanced Manual
Prestige
1.3 NOTES ABOUT THE MANUAL
• Take good care of this manual.
• This manual is an integral part of the instrument. The descriptions and illustrations in this
publication are not binding.
• While the instrument’s essential characteristics remain the same, the manufacturer reserves the
right to make any modifications to parts, details or accessories considered appropriate to improve
the product or for requirements of a constructional or commercial nature, at any time and without
undertaking to update this publication immediately.
• All rights reserved; the reproduction of any part of this manual, in any form, without the
manufacturer’s specific written permission is forbidden.
• All the trademarks referred to in this manual are the property of the respective manufacturers.
• Please read all the information carefully, sothat you obtain the best performance and will from
your instrument.
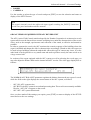
• The codes or numbers in square brackets ([]) indicate the names of the buttons, sliders, trimmers
and connectors on the instrument. For example, [ENTER] refers to the ENTER button.
• The illustrations and display pages are purely guideline and may differ from those actually
shown on the display.

5
Advanced Manual - Viscount
Prestige
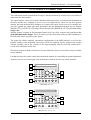
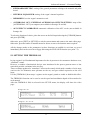
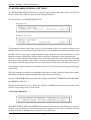
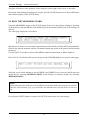
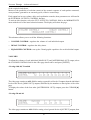
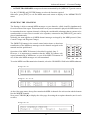
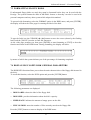
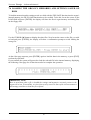
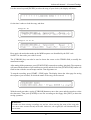
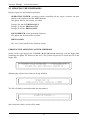
2. CONTROL CENTRAL UNIT
The central unit which controls all the Prestige’s internal functions is located in the concealed box
underneath the first manual.
The organ features a large set of control functions allowing the user to customise the instrument in
the most suitable way, adapting it to his or her own requirements. These are not mere general
settings, but setup functions that configure every part of the organ: for the voices, for example, the
user can regulate the sound generation parameters and the distribution through the rear outputs
[MAIN OUT] ([OUTPUT] on Prestige 50 and 40) and [ANTIPHONAL OUT], and this for every
single voice.
Another feature is setting of the transmitted signal level, any delay required and equalisation for
each individual audio output. This is in order to provide the most accurate possible simulation of
the real wind-chests of genuine pipe organs.
The organ also allows complete, unrestricted configuration of the MIDI interface, as well as the
familiar settings of the tremulant and reverb effects, the manuals and the pedal board, and the
internal equalizer, and in the versions of the organ equipped with the powerful Yamaha AFC
©
reverb unit, calibration of this unit.
Divisional controls of all the volumes are also provided in the form of convenient, easily accessible
rotary trimmers.
Last but not least, the central control unit contains the buttons for controlling the internal multitrack
sequencer used to record and play back performances with no need to use remote modules.
CURSORVALUE
START - STOP
GENERALREVERBORCH.
MIDI TO
SWELLGREATCHOIR
PEDAL
ENTER
EXIT
METRONOMERECORD
PLAY
DISK
VOICES
MIDI & UTILITY
SET - UP
MENU SEQUENCER
A
A
AB
B
B
BA
SWELL
CHOIR
PEDAL
GREAT
VOLUMES
1
2
3
4
PRESTIGE 100 - 80
5
6
CURSORVALUE
START - STOP
GENERALREVERBORCH.
MIDI TO
SWELLGREAT
PEDAL
ENTER
EXIT
METRONOMERECORD
PLAY
DISK
VOICES
MIDI & UTILITY
SET - UP
MENU SEQUENCER
A
AB
B
BA GREAT
PEDAL
SWELL
VOLUMES
1
2
3
4
PRESTIGE 70 - 60 - 50 - 40
5
6

6
Viscount - Advanced Manual
Prestige
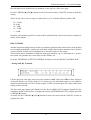
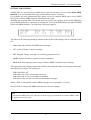
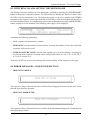
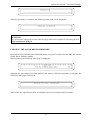
1. Display: display of 40 characters on two lines for display of all the video pages relating to the
organ’s functions.
2. Menu selection buttons: these buttons allow you to select the four display function menus, as
follows:
o [VOICES] (chap. 4): voice adjustment parameters.
o [SET-UP] (chap. 5): organ general settings (tremulant and reverb effects, equalizer, etc.)
o [MIDI & UTILITY] (chap. 6): settings relating to the MIDI interface and rear outputs.
o [DISK] (chap. 7): functions for the management of floppy disks and the files saved on
them.
3. MIDI TO Section: this section contains the buttons used to activate the transmission of MIDI
note codes on the A and B channels of each manual and the pedal board. The LED of each
button displays the status of transmission on the relative MIDI channel as follows:
o LED on: note code transmission enabled
o LED off: note code transmission disabled
4. VOLUMES Section: these controls allow you to adjust the organ’s individual volumes, as
follows:
o [PEDAL]: pedal board volume.
o [CHOIR]: Choir volume (in 3-manuals versions only)
o [GREAT]: Great volume
o [SWELL]: Swell volume
o [ORCH.]: volume of the Orchestra voices
o [REVERB]: reverb effect level
o [GENERAL]: the organ’s general volume
5. Sequencer: this section contains the buttons for control of the multitrack sequencer incorporated
in the Prestige.
o [PLAY]: this button allows playback of the MIDI sequences recorded.
o [RECORD]: button for starting a recording session.
o [METRONOME]: press quickly to activate the audio metronome; press for a few moments
to recall the metronome setting video page.
o [START-STOP]: starts / stops recording or playback of the MIDI sequence.
See chap. 8 for a complete description of sequencer functions.
6. Display function control buttons: these buttons allow you to move the cursor (identified by
the flashing display field), set values, select video pages and confirm or reject prompts from the
system.
o [VALUE]: rotary encoder for setting parameters.
o CURSOR [], [], [], []: buttons used to move the cursor around within the display
video pages. The [] and [] buttons have LEDs which come on to indicate the availability
of a video page before and/or after the one displayed, respectively. Press the relative button
to display the video page you require.
o [ENTER]: button for displaying the content of functions or confirming any system prompts.
o [EXIT]: button for exiting the current video page or rejecting any system prompts.

7
Advanced Manual - Viscount
Prestige
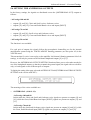
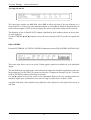
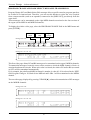
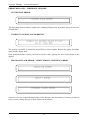
3. SWITCHING ON and MAIN VIDEO PAGE
When the organ is switched on using the [POWER] switch on the rear panel, the instrument becomes
operational after a few seconds, during which all the amplification circuits are activated and the
internal systems are configured.
After the switch-on procedure is complete, the main video page will be displayed:
ENSEMBLE:2 TEMPERAMENT:Equal
TUNING:0
containing the following parameters:
o ENSEMBLE: this parameter can be used to set eight levels of natural tiny differences in pitch
between one organ pipe and another, in order to simulate the tuning error that occurs in the
organ’s pipes due to wear over time and variations in temperature.
The values range from – (pipes perfectly tuned) to 8 (maximum pitch instability).
o TEMPERAMENT: this parameter allows the selection of a series of historic temperaments of
different eras and national origins.
You can choose from EQUAL, a temperament with perfect tuning, and the classical
MEANTONE, CHAUMONT, WERCKMEISTER, KIRNBERGER, PYTHAGOREAN,
VALLOTTI and KELLNER temperaments.
o TUNING: allows adjustment of the fine tuning of the instrument within a range of +/- 1 semitone,
with setting by hundredths of a semitone.
N.B.
The organ should not be switched off and back on in rapid succession as this may damage the
internal systems, especially the power supply and amplification circuits.
After the instrument is switched off, it is best to wait at least 15 seconds before switching it
back on.
Furthermore when leaving the Menu’s VOICES, SET-UP and MIDI&UTILITY, pay attention
not to switch off the organ till the new video page appears on the display.

8
Viscount - Advanced Manual
Prestige
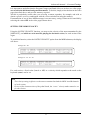
4. FUNCTIONS FOR CONTROLLING
THE ORGAN’S VOICES
The menu containing the functions for controlling the instrument’s church organ voices can be
recalled by pressing the [VOICES] button. The video page displayed is as follows:
[VOICES VOLUME] [VOICES ADJUST]
allowing you to recall the following functions:
o VOICES VOLUME: regulates the volume of each individual voice.
o VOICES ADJUST: regulates the sound generation parameters for each individual voice.
To recall a function, place the cursor on the field required using the [CURSOR] keys and press
[ENTER].
Otherwise, press the [VOICES] or [EXIT] buttons to return to the main video page. You can also
display another menu immediately by pressing the relative button in the MENU section of the
central control unit.
4.1 REGULATING THE VOICE VOLUMES
The VOICES VOLUME function allows you to adjust the volume of each individual voice in a
range from –12 dB to +6 dB. Each modification is saved immediately and is audible in real time,
making it easier for the user to obtain the setting required.
The volume settings (of all the voices) can also be saved on a floppy disk using the FILE SAVE
function (see point 7.5) to allow them to be reloaded as required.
To recall this function, select the VOICES VOLUME option from the VOICES menu; the display
will show:
ADJUST VOLUME Please select section:
[PEDAL] [CHOIR] [GREAT] [SWELL]
ADJUST VOLUME Please select section:
[PEDAL] [GREAT] [SWELL]
Prestige 100 - 80:
Prestige 70 - 60 - 50 - 40:

9
Advanced Manual - Viscount
Prestige
Now use the CURSOR [] and [] keys to move the cursor and [ENTER] to confirm in order to
select the manual or pedal board containing the voice(s) the volume of which you wish to regulate.
The display shows the first six voices and their current volumes:
Princip16:+2 DbDiap.32:0 CtBomb.32:+3
ChBass4 :0 Bombard16:-2 Subbass16:0
To set the new value (expressed in dB on the display), locate the cursor on the voice required using
the [CURSOR] buttons or its draw-stop or register on the panel, and use the [VALUE] encoder to
make the setting.
Once you have made all the changes you require, press [EXIT] to return to display of the VOICES
menu.
4.2 REGULATING THE SOUND GENERATION PARAMETERS
One of the Prestige organ’s most interesting characteristics is the capability for modifying the
sound generation parameters of every single voice provided in the organ.
As for all the other VOICES menu functions, all the changes made to the setting parameters are
audible in real time, are saved immediately and can be saved on a floppy disk using the FILE SAVE
function (see point 7.5).
To recall this function, use the [CURSOR] and [ENTER] buttons to select the VOICES ADJUST
field in the VOICES menu; the display will show:
Now use the [CURSOR] and [ENTER] buttons again to select the section of the organ containing
the voice you wish to modify.
Princip16 Attack:2 ReleaseDetune:3
Color:-3 Panning:C->R C#->L
VOICES ADJUST Please select section:
[PEDAL] [CHOIR] [GREAT] [SWELL]
VOICES ADJUST Please select section:
[PEDAL] [GREAT] [SWELL]
Prestige 100 - 80:
Prestige 70 - 60 - 50 - 40:

10
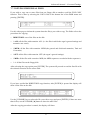
Viscount - Advanced Manual
Prestige
- 90% on left channel
- 10% on right channel
Solo Left:
Le
f
t
C
hannel Right
C
hanne
l
90% 90%90% 10% 10%10%
- 10% on left channel
- 90% on right channel
Solo Right:
As you can see, the first voice of the chosen manual or the pedal board appears in the top left-hand
corner of the screen. The field is pre-selected, so you can move the [VALUE] encoder to scroll
through all the section’s voices. The voice can also be recalled using its draw-stop or register on the
panel.
Together with the selected voice, the screen shows the first four parameters for modification, which
are:
o ATTACK: adjusts the voice’s attack time, i.e. the time it takes to reach the maximum volume
value, on a scale of 8 values. Set 0 for the minimum attack time and 8 for the maximum time.
Note that the scale of 8 values cannot be associated to fixed time values, since this parameter
depends on the type of voice being modified (the Plenum, for example, has a shorter attack
time than a Flute 8’) and the Time Tracking of the keyboard, which means that attack times are
shorter in the upper than in the lower part.
o RELEASE DETUNE: adjusts the variation in tuning when the note is released compared to
the value with the note pressed, on a scale of 8 values. Here again, fixed values of hundredths
of a semitone cannot be associated to the values shown on the screen, since the modification
depends on the voice and the part of the keyboard being played.
Set 0 for the minimum change in tuning and 8 for the maximum change.
o COLOR: sets the voice’s brilliance in a range of values from -8 (maximum enhancement of
the low components, maximum attenuation of the high components) to +8 (maximum attenuation
of the low components, maximum enhancement of the high frequencies).
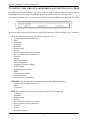
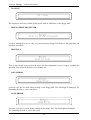
o PANNING: adjusts the voice’s stereophonic distribution over the Left and Right channels of
the organ’s internal amplification system by means of the following settings:
Le
f
t
C
hannel Right
C
hanne
l
90% 90%90% 10% 10%10%

11
Advanced Manual - Viscount
Prestige
Le
f
t
C
hannel Right
C
hanne
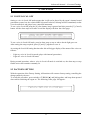
l
100%
50% 50%
100% 100%
- 50% on left channel
- 50% on right channel
Left&Right:
- 90% on left channel, 10% on right channel in the low part of the keyboard.
- 10% on left channel, 90% on right channel in the central part of the keyboard.
- 90% on left channel, 10% on right channel in the high part of the keyboard.
LeftRightLeft:
- 10% on left channel, 90% on right channel in the low part of the keyboard.
- 90% on left channel, 10% on right channel in the central part of the keyboard.
- 10% on left channel, 90% on right channel in the high part of the keyboard.
Right LeftRight:
Le
f
t
C
hannel Right
C
hanne
l
90%10% 10% 90% 90%10%
Le
f
t
C
hannel Right
C
hanne
l
90% 10% 10%90% 90%10%

12
Viscount - Advanced Manual
Prestige
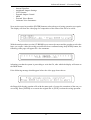
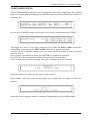
- 90% on left channel, 10% on right channel in the low part of the keyboard.
- 10% on left channel, 90% on right channel in the high part of the keyboard.
LeftRight:
Left Channel Right Channel
90%10% 10
%
100%
50% 50%
90%
- 10% on left channel, 90% on right channel in the low part of the keyboard.
- 90% on left channel, 10% on right channel in the high part of the keyboard.
Right Left:
- 90% on left channel 10% on right channel for
the notes C, D, E, F#, G#, A#
- 10% on left channel, 90% on right channel for
the notes C#, D#, F, G, A, B
CLeft, C#Right:
Left Channel Right Channel
90% 10% 10%100%
50% 50%
90
%
Le
f
t
C
hannel Right
C
hannel
90%
10%
C#3C3 D3 D#3 E3 F3 F#3 G3B2A#2A2G#2G2F#2
on the whole keyboard extension
on the whole
keyboard extension

13
Advanced Manual - Viscount
Prestige
- 10% on left channel 90% on right channel for
the notes C, D, E, F#, G#, A#
- 90% on left channel, 10% on right channel for
the notes C#, D#, F, G, A, B
CRight, C#Left:
N.B.
The PANNING parameter settings also affect the distribution of the signals on the
[ANTIPHONAL OUT] outputs since, as explained in point 5.5, in these outputs the audio
signal corresponds to the internal stereophonic panorama.
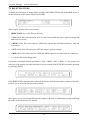
Now the CURSOR [] button can be pressed to display the parameters relating to the KEYBOARD
SCALING:
KEYB.SCALING Low:0
Princip16
÷÷÷÷÷÷÷÷ High:0÷
This parameter allows you to set the volume scaling, for the selected voice, throughout the keyboard
range. The setting parameters are the following:
o LOW: regulates the attenuation
(negative values) or increase
(positive values) of the volume
in the low part of the keyboard.
o HIGH: regulates the
attenuation (negative values) or
increase (positive values) of the
volume in the high part of the
keyboard.
Finally, press [EXIT] to exit the function and save the settings made.
Volume
Low KS=0
Low KS=-4
Low KS=+4
Low KS=+8
Low KS=-8
High KS=0
High KS=-4
High KS=+4
High KS=+8
High KS=-8
Le
f
t
C
hannel Right
C
hannel
90%
10%
C#3C3 D3 D#3 E3 F3 F#3 G3B2A#2A2G#2G2F#2
on the whole keyboard extension
on the whole
keyboard extension

14
Viscount - Advanced Manual
Prestige
4.3 SELECTING AND REGULATING THE ORCHESTRA VOICES
SELECTING THE VOICE
Each Orchestra voice can be selected at will from the 128 available in the GM standard.
To make the selection, keep the bottom of the Orchestra register you wish to replace pressed for a
few moments; the first video page, for selecting the group of instruments, is displayed:
String
PEDAL
72
PIANO CHR.PERC. ORGAN GUITAR
BASS STRINGS ENSEMBLE BRASS
use the ([], [], [] and []) cursor keys to select the group you require and press [ENTER] to
display the voices it comprises:
AcGrPiano BrAcPiano ElGrPiano HoToPiano
ElPiano1 ElPiano2 Harpsich. Clavi
use the cursor keys again and press [ENTER] to activate the voice.
SETTING THE PARAMETERS
To set the parameters dedicated to the Orchestra voices, keep the top part of the register of the
Orchestra voice you wish to adjust pressed for a few moments:
PEDAL
72
String
Volume:+2 Brilliance:-3
Octave Shift:0 Key Range:C1 - B4
containing the following parameters:
o VOLUME: reduces (negative values) or increases (positive values) the volume of the voice.
o BRILLIANCE: reduces (negative values) or increases (positive values) the brilliance of the
voice.
o OCTAVE SHIFT: transposes the notes played with the voice up or down one octave.

15
Advanced Manual - Viscount
Prestige
o KEY RANGE: sets the section of the manual on which the voice will be played.
The first value on the left is the bottom note of the section of the manual, and the second value
the highest note.
Here again, after making the settings you require, press [EXIT] to save all the settings and return to
display of the previous video page.
SAVING VOICES AND PARAMETERS IN THE MEMORIES
As we have already seen, a given sound can be assigned to each Orchestra register, and this sound
can be further customised using the relative setting parameters.
The general and dedicated memories are able to save the sound and the settings for each register, so
that different Orchestra registers can be set for each memory.
For example, in one memory the first pedal voice may be an acoustic bass transposed by one
octave, while in another memory the first Orchestra voice may be a cello, not transposed but a bit
brighter than the standard setup.
To program memories with different Orchestra voices, simply select the sound required and/or
adjust the parameters using the functions already described and save the memory of your choice.
If you wish to set a different Orchestra voice in another memory but on the same register, select the
sound, adjust the parameters as required and save all the settings in another memory.
N.B.:
- Orchestra sounds and parameters cannot be stored in the Tutti or the Crescendo, which
only save the status (on-off) of the voices.
- At switch-on, the voice of a given Orchestra register will be the one set with the organ in
HR before the last switch-off.

16
Viscount - Advanced Manual
Prestige
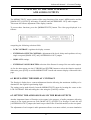
5. ORGAN GENERAL SETTINGS
Press the [SET-UP] button in the MENU section of the central control unit to access the organ’s
general settings. The video page displayed is as follows:
[TREMOLO] [REVERB] [KEYBOARDS SETTING]
[INT.EQUALIZER] [ANTIPH.OUT] [MEMORIES]
[TREMOLO] [REVERB] [KEYBOARDS SETTING]
[INTERNAL EQUALIZER] [MEMORIES]
Prestige 100 - 80 - 70 - 60:
Prestige 50 - 40:
In versions of the organ equipped with the Yamaha AFC reverb, the SET-UP menu consists of two
video pages:
[TREMOLO] [REVERB] [KEYBOARDS SETTING]
[INTERNAL EQUALIZER] [MEMORIES]
[EXTERNAL ANTIPHONAL OUTPUTS SETTING]
[AFC EFFECT CALIBRATION]
Prestige 100 - 80 - 70 - 60:
[TREMOLO] [REVERB] [KEYBOARDS SETTING]
[INTERNAL EQUALIZER] [MEMORIES]
[AFC EFFECT CALIBRATION]
Prestige 50:
The selection fields are as follows:
o TREMOLO: setting of the Tremolos for each manual.
o REVERB: selection of the type of reverb required. Balancing between internal and AFC reverb
(in versions equipped with AFC reverb only).

17
Advanced Manual - Viscount
Prestige
TREMOLO: Choir Great Swell
Depth/Speed 16/16 16/16 16/16
Prestige 100 - 80:
o KEYBOARDS SETTING: setting of the general parameters relating to the manuals and pedal
board.
o INTERNAL EQUALIZER: setting of the organ’s internal equalizer.
o MEMORIES: how the organ’s memories work.
o ANTIPHONAL OUT / EXTERNAL ANTIPHONAL OUTPUTS SETTING: setup of the
[ANTIPHONAL OUT] rear outputs (not available in Prestige 50 and 40).
o AFC EFFECT CALIBRATION: automatic calibration of the AFC reverb (not available in
Prestige 40).
To select the function of choice, place the cursor on the field required using the [CURSOR] buttons
and press [ENTER].
Otherwise, press [EXIT] or [SET-UP] to exit the current menu and return to the main video page.
Otherwise, press the button of another menu for direct access to the function menu required.
All the changes made to the parameters in these functions are audible in real time, are saved
immediately and can be saved on a floppy disk using the FILE SAVE function (see point 7.5).
5.1 SETTING THE TREMOLOS
In pipe organs it is of fundamental importance for the air pressure to be constant to obtain an even,
“sustained” sound.
However, a number of mechanical devices were introduced in the past to generate more or less
noticeable periodic variations in the air flow.
These variations produced a “tremulous” effect on the sound, which made a number of solo stops
(such as the Vox Humana) more pleasant on the ear, and gave added expression to the reed
stops.
Use the [TREMOLO] draw-stops / registers on the organ’s panels to enable or disable this effect.
The TREMOLO function can be used to set the speed and modulation depth of the tremolos for
each manual.
After the TREMOLO field is selected in the SET-UP menu, the display will show the video
page:
TREMOLO: Great Swell
Depth/Speed 16/16 16/16
Prestige 70 - 60 - 50 - 40:

18
Viscount - Advanced Manual
Prestige
containing the current values of the Depth (modulation depth) and Speed (modulation speed)
parameters of the tremolo of the manual specified on the top line.
As the display indicates, the number on the left of the “/” symbol is the Depth and the number on
the right the Speed.
To set the values use the [CURSOR] buttons to move the cursor and the [VALUE] encoder.
Once you have made all the settings you require, press [EXIT] to return to display of the SET-UP
menu and save the new settings.
N.B.
The Depth and Speed parameters can be saved with different values in each general and
divisional memory, in the Tutti, and in each step of the Crescendo. To do this, saving must be
enabled using the Keyboards Setting function described in point 5.5.
5.2 SELECTING THE TYPE OF REVERB
Reverberation is the result of a series of sound reflections propagated inside an enclosed environment.
The order and value of each reflection depend to a very great extent on an a large number of factors
which come into play within any one room, such as the size of the room in which the phenomenon
takes place, the nature of the materials of which it is made and the objects it contains, the listener’s
position, etc.
The digital signal processors incorporated in the Prestige organs are able to artificially re-create the
complex reverberations that naturally occur in the types of building where pipe organs are normally
installed, and thus generate the right reverb effect to complete the instruments’ excellent timbre
qualities.
The purpose of the REVERBERATION TYPE function in the SET-UP menu is to allow you to
select the type of reverb effect, ranging from a large church with strong reverb and many reflections
to a small room with very short, muffled reverb.
You may use this function to select eight different types of reverb effect. You can then use the
[REVERB] trimmer in the central control section to regulate the level of reverb effect required.
To select the reverb required, select the REVERB field in the SET-UP menu and press [ENTER]:
REVERBERATION type:Cathedral
The possible selections are:
O CATHEDRAL
O BASILICA
O GOTHIC CHURCH
O BAROQUE CHURCH
O ROMANIC CHURCH
O MODERN CHURCH
Page is loading ...
Page is loading ...
Page is loading ...
Page is loading ...
Page is loading ...
Page is loading ...
Page is loading ...
Page is loading ...
Page is loading ...
Page is loading ...
Page is loading ...
Page is loading ...
Page is loading ...
Page is loading ...
Page is loading ...
Page is loading ...
Page is loading ...
Page is loading ...
Page is loading ...
Page is loading ...
Page is loading ...
Page is loading ...
Page is loading ...
Page is loading ...
Page is loading ...
Page is loading ...
Page is loading ...
Page is loading ...
Page is loading ...
Page is loading ...
Page is loading ...
Page is loading ...
Page is loading ...
Page is loading ...
Page is loading ...
Page is loading ...
Page is loading ...
Page is loading ...
Page is loading ...
Page is loading ...
Page is loading ...
Page is loading ...
Page is loading ...
Page is loading ...
Page is loading ...
Page is loading ...
Page is loading ...
Page is loading ...
Page is loading ...
Page is loading ...
Page is loading ...
Page is loading ...
Page is loading ...
Page is loading ...
Page is loading ...
Page is loading ...
Page is loading ...
Page is loading ...
Page is loading ...
Page is loading ...
-
 1
1
-
 2
2
-
 3
3
-
 4
4
-
 5
5
-
 6
6
-
 7
7
-
 8
8
-
 9
9
-
 10
10
-
 11
11
-
 12
12
-
 13
13
-
 14
14
-
 15
15
-
 16
16
-
 17
17
-
 18
18
-
 19
19
-
 20
20
-
 21
21
-
 22
22
-
 23
23
-
 24
24
-
 25
25
-
 26
26
-
 27
27
-
 28
28
-
 29
29
-
 30
30
-
 31
31
-
 32
32
-
 33
33
-
 34
34
-
 35
35
-
 36
36
-
 37
37
-
 38
38
-
 39
39
-
 40
40
-
 41
41
-
 42
42
-
 43
43
-
 44
44
-
 45
45
-
 46
46
-
 47
47
-
 48
48
-
 49
49
-
 50
50
-
 51
51
-
 52
52
-
 53
53
-
 54
54
-
 55
55
-
 56
56
-
 57
57
-
 58
58
-
 59
59
-
 60
60
-
 61
61
-
 62
62
-
 63
63
-
 64
64
-
 65
65
-
 66
66
-
 67
67
-
 68
68
-
 69
69
-
 70
70
-
 71
71
-
 72
72
-
 73
73
-
 74
74
-
 75
75
-
 76
76
-
 77
77
-
 78
78
-
 79
79
-
 80
80


Viscount Prestige 50 User manual
- Category
- Musical Instruments
- Type
- User manual
- This manual is also suitable for
Ask a question and I''ll find the answer in the document
Finding information in a document is now easier with AI
Related papers
-
Viscount Prestige 60 Advanced Manual
-
-
-
-
-
-
Viscount Unico CLV8 User manual
-
-
-
Viscount Choir Master User manual
Other documents
-
Yamaha F-400 Owner's manual
-
Johannus Positief 350 User manual
-
Fatar ST-90 Plus User manual
-
-
-
Roland C-330 User manual
-
Rodgers 595 Owner's manual
-
 SOLID STATE MultiSystem II Operating instructions
-
Rogers 585 Owner's manual
-
