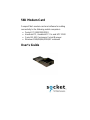
SOCKET BE-300 - Cassiopeia Pocket Manager User manual
- Category
- Bridge cameras
- Type
- User manual
This manual is also suitable for

56K Modem Card
CompactFlash modem card and software for adding
connectivity to the following mobile computers:
• Pocket PC 2000/2002/2003
• Handheld PC, Handheld PC Pro and HPC 2000
• Casio BE-300 Cassiopeia Pocket Manager
• Windows 950B/98/Me/2000/XP notebook
User’s Guide

2 |
Table of Contents
CHAPTER 1 INTRODUCTION 4
Overview 4
Package Contents 5
Hardware Features 5
CHAPTER 2 SETUP FOR WINDOWS CE 6
Installation Steps Summary 6
STEP 1: Register Your Card 6
STEP 2: Prepare Dial-up Information 6
STEP 3: Install the Software 7
STEP 4: Insert the Card 9
STEP 5: Set up the Dial-up Connection 9
STEP 6: Connect to a Telephone Line 24
STEP 7: Dial and Connect! 24
OPTIONAL: Set up the Card for Your Country 32
OPTIONAL: Check Connection Time 33
CHAPTER 3 SETUP FOR CASIO BE-300 34
Installation Steps Summary 34
STEP 1: Register Your Card 34
STEP 2: Prepare Dial-up Information 34
STEP 3: Install the Software 35
STEP 4: Insert the Card 37
STEP 5: Set up the Dial-up Connection 38
STEP 6: Connect to a Telephone Line 39
STEP 7: Dial and Connect! 39
OPTIONAL: Set up the Card for Your Country 41
OPTIONAL: Check Connection Time 42
OPTIONAL: Set up Advanced Networking 42
CHAPTER 4 SETUP FOR WINDOWS
95/98/ME/2000/XP 43
Installation Steps Summary 43
STEP 1: Register Your Card 43
STEP 2: Prepare Dial-up Information 43
STEP 3: Insert the Card 44
STEP 4: Install the Drivers 45
STEP 5: Set up Your Dial-up Connection 46
STEP 6: Connect to a Telephone Line 47
STEP 7: Dial and Connect! 47
OPTIONAL: Set up Advanced Networking 48

3
APPENDIX A SPECIFICATIONS 50
APPENDIX B NETWORK INFORMATION 51
APPENDIX C SUPPORT RESOURCES 52
Technical Support 52
Users’ Forum 53
Limited Warranty 54
Copyright Notice 56

4 | CHAPTER 1: INTRODUCTION
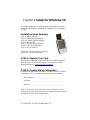
Chapter 1 Introduction
Overview
Thank you for purchasing the Socket 56K Modem Card.
The Socket 56K Modem Card allows you to transform your
mobile computer into a portable data communications tool.
Now you can check email, fax, and browse the web
wherever there is an available analog telephone line.
You can use the 56K Modem Card with these mobile
computers:
• Pocket PC 2000/2002/2003
• Handheld PC, Handheld PC Pro and Handheld PC 2000
(based on Windows CE v2.11 or v3.0)
• Casio BE-300 Cassiopeia Pocket Manager
• Windows 95/98/Me/2000/XP notebook with a 3.3V Cardbus slot
*
The Socket 56K Modem comes with WhereAreYou? software
for Windows CE. This optional software makes it easy to
monitor the modem’s connection activities and connection time.
Plus, you can program the modem card to work in whatever
country you choose, so you can stay connected wherever you go.
The Socket 56K Modem Card works with any Windows
95/98/Me/2000/XP notebook computer with a 3.3V CardBus slot. This
means you can use the card with virtually any notebook computer built in
the last several years. For notebook computers, no software installation is
necessary.
This User’s Guide describes how to set up and use the 56K Modem Card.
For advanced users, it also contains tips on setting up a connection to a
RAS server.
For information on using the 56K Modem Card with a Sharp Zaurus
handheld computer, visit: www.socketcom.com/ZaurusSharp.asp
For software updates, visit: www.socketcom.com/support/support_56k.asp
Register the product online at www.socketcom.com/prodreg
*
Windows 95 v4.00.950B; Windows 98; Windows 98 Second Edition

CHAPTER 1: INTRODUCTION | 5
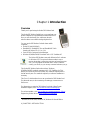
Package Contents
The Socket 56K Modem Card package includes the following items:
• Socket 56K Modem Card
• Socket 56K Modem Installation CD
• Software installation guide with warranty and copyright information
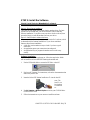
Hardware Features
Link Status LED
Indicates that the modem card is either dialing or connected to a network.
Power Status LED
Indicates that the modem card is using power.
Data Status LED
Indicates data transmission via the modem card.
.

6 | CHAPTER 2: SETUP FOR WINDOWS CE
Chapter 2 Setup for Windows CE
This chapter explains how to install and use the 56K Modem Card with a
Pocket PC 2000/2002/2003, Handheld PC, Handheld PC Pro or Handheld
PC 2000.
Installation Steps Summary
STEP 1: Register your card.
STEP 2: Prepare dial-up information.
STEP 3: If desired, install the software.
STEP 4: Insert the card.
STEP 5: Set up the dial-up connection.
STEP 6: Connect to a telephone line.
STEP 7: Dial and connect!
OPTIONAL: Set up the card for your country.
OPTIONAL: Check connection time.
STEP 1: Register Your Card
Socket highly recommends that all users register their product. Registered
users receive priority for technical support. You can register your 56K
Modem Card online at: www.socketcom.com/prodreg
STEP 2: Prepare Dial-up Information
Find out the following dial-up information. If needed, contact your network
administrator or ISP. You need this information to set up a connection.
Dial-up number: (_____) _______________________________
User name: __________________________________________
Password: ___________________________________________
Note: For most users, only the information above is necessary. If you are
an advanced user and want to perform a more detailed setup, then complete
the Network Information Form in Appendix B.

CHAPTER 2: SETUP FOR WINDOWS CE | 7
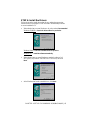
STEP 3: Install the Software
Should I install Socket’s WhereAreYou? software?
You have two options for software installation:
Option 1: Skip software installation.
Windows CE-based mobile computers come with a generic built-in modem
driver. For basic operation of the modem card, you can use the built-in
driver and skip software installation. If you plan to use your device’s built-
in drivers, then proceed to Step 4 to insert the modem card into your device.
Option 2: Install Socket’s enhanced software.
You can use the modem card with Socket’s WhereAreYou? software, which
is enhanced with the features listed below. If you do not need these
features, skip software installation.
• A task tray icon that makes it easy to check if you have a good
connection
• An applet that reports your connection time
• An applet that lets you program the modem card to work in any
country
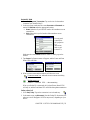
Software Installation
If you have not installed the software yet, follow the steps below. Make
sure to install the software BEFORE inserting the modem card.
1. Make an active connection between the mobile computer and a host PC.
An active connection exists if data can move between the host PC and
mobile computer via a serial/USB/Ethernet connection cable or cradle.
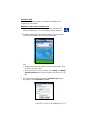
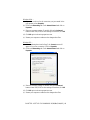
2. Insert the Socket 56K Modem Installation CD into the host PC.
3. Use My Computer or Windows Explorer to access your CD-ROM drive.
Click on SETUP.EXE.
N
ote: The host
P
C can be a
desktop or
notebook PC.

8 | CHAPTER 2: SETUP FOR WINDOWS CE
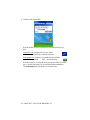
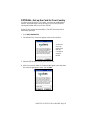
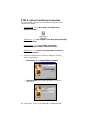
4. The Setup Center will appear in your browser. Follow the instructions
on your screen to install the software for Windows CE.
5. When the File Download screen appears, click Open.
Do NOT click Save!
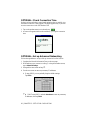
6. The Setup program for WhereAreYou? Software will appear. Follow the
instructions on your screen until installation is complete.
7. When installation is complete, disconnect the mobile computer from the
host PC. Soft reset the mobile computer by pressing the reset button.
Important! Make sure you soft reset your mobile computer by pressing
the reset button!
Pocket PC 2003 only: Do not soft reset the device when a Socket card is
inserted, or application errors may occur. If errors occur, remove the
card and soft reset the device. Wait for the device reset to finish before
you re-insert the card.

CHAPTER 2: SETUP FOR WINDOWS CE | 9
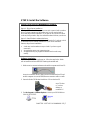
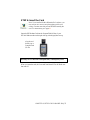
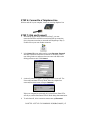
STEP 4: Insert the Card
Note: If you installed Socket’s WhereAreYou? software, you
may want to use it now to set up the modem card for your
country. You must start this process BEFORE inserting the
card. For instructions, go to page 32.
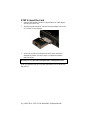
Insert the 56K Modem Card into your mobile computer, with the gray label
on top. If using a PC Card slot, first plug the card into a CompactFlash-to-
PC Card adapter.
Warning! Do NOT insert the card upside down, or damage may occur!
When you insert the card, the Power and Data Status LEDs will blink then
turn off.
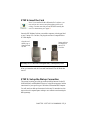
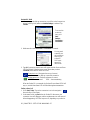
STEP 5: Set up the Dial-up Connection
The process for setting up a dial-up connection differs between Pocket PC
2000/2002/2003, and Handheld PC devices. In the following pages, find the
instructions for your specific type of Windows CE-based mobile computer.
You will need your dial-up information for this step. For most devices, this
step involves two separate parts: making a new connection and entering the
dialing settings.
P
lug the card
directly into a
CompactFlash
I
/O slot.
OR
I
nsert card into
an adapter for
use in a PC
Card slot.

10 | CHAPTER 2: SETUP FOR WINDOWS CE
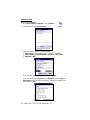
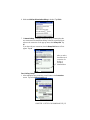
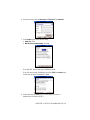
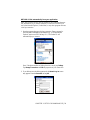
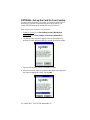
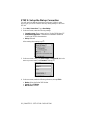
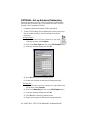
Pocket PC 2000
Make a New Connection
1. Go to Start | Settings | Connections. Tap on Modem.
2. In the next screen, tap New Connection…
3. In the next screen, enter the following settings.
1. Enter a name…: Enter a name, such as “My 56K Connection.”
2. Select a modem: Socket 56K Modem or Socket-CF+_ 56K_Modem.
3. Baud Rate: 57600
If you DO NOT need to enter any IP addresses, tap Next.
If you DO need to enter IP addresses, tap Advanced. Use the TCP/IP and
Name Servers screens to enter the necessary IP addresses. Tap ok. In the
next screen, tap Next.

CHAPTER 2: SETUP FOR WINDOWS CE | 11
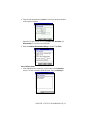
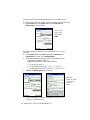
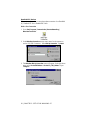
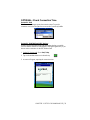
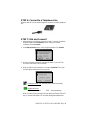
4. Enter the dial-up number and tap Next. You can enter the phone number
without spaces or dashes.
Important! Be sure to enter the correct Country code, Area code, and
Phone number! Do not leave any field blank!
5. Make sure Wait for dial tone before dialing is checked. Tap Finish.
Enter Dialing Settings
1. After making the new connection, you will return to the Connections
screen. Your new connection should be listed. Tap on the Dialing tab.

12 | CHAPTER 2: SETUP FOR WINDOWS CE
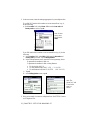
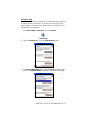
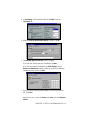
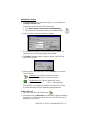
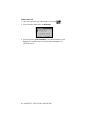
2. In the next screen, enter the settings appropriate for your telephone line:
If you DO NOT need to dial a number to use an external line (e.g., 9),
do the following:
a) In the Location: field, select Home. Make sure the Area code and
Country code are correct. Tap ok.
If you DO need to dial a number to use an external line (e.g., 9), do the
following:
a) In the Location: field, select Work. Make sure the Area code and
Country code are correct. Tap on Dialing Patterns.
b) In the Dialing Patterns screen, enter the following settings, where:
X represents the number for dial-out
Y represents the number for dial-out long distance
• For local calls, dial: X,G
• For long distance calls, dial: Y,1,FG (“1” for U.S.)
• For international calls, dial: Y,011,EFG (“011” for U.S.)
c) Tap ok.
d) In the Dialing Options screen, tap ok.
3. Now you are ready to connect to a telephone line. See STEP 6: Connect
to a Telephone Line.
N
ote: In most
cases, users
should select
Home.
N
ote: The
values for X and
Y may be the
same, as
shown..

CHAPTER 2: SETUP FOR WINDOWS CE | 13
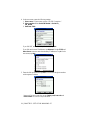
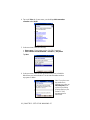
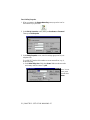
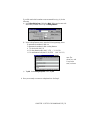
Pocket PC 2002
Make a New Connection
1. Go to Start | Settings | Connections. Tap on Connections.
2. In the next screen, in the top field, select Internet Settings. Tap Modify…
3. In the next screen, tap New…

14 | CHAPTER 2: SETUP FOR WINDOWS CE
4. In the next screen, enter the following settings.
1. Enter a name…: Enter a name, such as “My 56K Connection.”
2. Select a modem: Select Socket 56K Modem or Socket-CF+_
56K_Modem.
3. Baud Rate: 57600
If you DO NOT need to enter any IP addresses, tap Next.
If you DO need to enter IP addresses, tap Advanced. Use the TCP/IP and
Name Servers screens to enter the necessary IP addresses. Tap ok. In the
next screen, tap Next.
5. Enter the dial-up number and tap Next. You can enter the phone number
without spaces or dashes.
Important! Be sure to enter the correct Country code, Area code and
Phone number! Do not leave any field blank!

CHAPTER 2: SETUP FOR WINDOWS CE | 15
6. Make sure Wait for dial tone before dialing is checked. Tap Finish.
7. In Internet Settings, if multiple connections exist, you must select the
new connection to be used when dialing. In the list, tap and hold your
stylus on the connection. In the pop-up menu, select Always Dial. Tap
ok.
If you have only one connection, then the Always Dial feature will not
appear. Tap ok.
Enter Dialing Settings
1. After making the new connection, you will return to the Connections
screen. Tap on the Dialing Locations tab.
A
fter you select
the modem card
connection for
dialing, it
should be
identified here.

16 | CHAPTER 2: SETUP FOR WINDOWS CE
In the next screen, enter the settings appropriate for your telephone line.
If you DO NOT need to dial a number to use an external line, do the following:
a) In the Location: field, select Home. Make sure the Area code and
Country code are correct. Tap ok.
If you DO need to dial a number to use an external line (e.g., 9), do the
following:
a) In the Location: field, select Work. Make sure the Area code and
Country code are correct. Tap on Dialing Patterns.
b) In the Dialing Patterns screen, enter the following settings, where:
X represents the number for dial-out
Y represents the number for dial-out long distance
• For local calls, dial: X,G
• For long distance calls, dial: Y,1,FG (“1” for U.S.)
• For international calls, dial: Y,011,EFG (“011” for U.S.)
c) Tap ok. In the Dialing Options screen, tap ok.
2. Now you are ready to connect to a telephone line. See STEP 6:
Connect to a Telephone Line.
N
ote: In most
cases, users
should select
Home.
N
ote: The
values for X and
Y may be the
same, as
shown..

CHAPTER 2: SETUP FOR WINDOWS CE | 17
Pocket PC 2003
Note: These instructions are for setting up a standard dial-up connection to
an Internet Service Provider (ISP). If you want to connect to your work
network and/or a VPN/proxy server, please refer to your Pocket PC 2003
documentation for instructions.
1. Go to Start | Settings | Connections. Tap on Connections.
2. Tap on the Advanced tab. Tap on the Select Networks button.
3. In the Network Management screen, make sure My ISP is selected in the
top field, and My Work Network is selected in the bottom field. Tap ok.

18 | CHAPTER 2: SETUP FOR WINDOWS CE
4. Tap on the Tasks tab. In most cases, you should tap Add a new modem
connection under My ISP.
5. In the next screen, enter the following:
• Enter a name…: Enter a name, such as “My 56K Connection”
• Select a modem: Socket 56K Modem or Socket-CF+_ 56K_Modem.
Tap Next.
6. In the next screen, enter the dial-up number exactly how it should be
dialed from your current location. You can enter the number without
any spaces or dashes.
Note: If you plan to use
the connection in
different area codes, tap
use dialing rules to set
up the correct dialing
locations. Refer to your
Pocket PC 2003
documentation for
instructions.

CHAPTER 2: SETUP FOR WINDOWS CE | 19
6. In the next screen, enter the User name and Password. Tap Advanced.
7. In the General screen, select the following:
• Baud rate: 57600.
• Wait for dial tone before dialing: Checked.
If you DO NOT need to enter any IP addresses, tap ok.
If you DO need to enter IP addresses, tap on the TCP/IP and Servers tabs
to enter any necessary IP addresses. Tap ok.
8. In the last screen, tap Finish. Now you are ready to connect to a
telephone line. Proceed to STEP 6.

20 | CHAPTER 2: SETUP FOR WINDOWS CE
Handheld PC Devices
This section explains how to set up the modem connection for a Handheld
PC, Handheld PC Pro or Handheld PC 2000.
Make a New Connection
1. Go to Start | Programs | Communication | Remote Networking |
Make New Connection.
2. In the Make New Connection screen, enter a name for the connection,
such as “My 56K Connection.” Select Dial-Up Connection. Tap Next>.
3. The Make New Dial-Up Connection screen will appear. In the drop-down
menu, select Socket 56K Modem or Socket-CF+_ 56K_Modem. Tap on
Configure…
Page is loading ...
Page is loading ...
Page is loading ...
Page is loading ...
Page is loading ...
Page is loading ...
Page is loading ...
Page is loading ...
Page is loading ...
Page is loading ...
Page is loading ...
Page is loading ...
Page is loading ...
Page is loading ...
Page is loading ...
Page is loading ...
Page is loading ...
Page is loading ...
Page is loading ...
Page is loading ...
Page is loading ...
Page is loading ...
Page is loading ...
Page is loading ...
Page is loading ...
Page is loading ...
Page is loading ...
Page is loading ...
Page is loading ...
Page is loading ...
Page is loading ...
Page is loading ...
Page is loading ...
Page is loading ...
Page is loading ...
Page is loading ...
Page is loading ...
-
 1
1
-
 2
2
-
 3
3
-
 4
4
-
 5
5
-
 6
6
-
 7
7
-
 8
8
-
 9
9
-
 10
10
-
 11
11
-
 12
12
-
 13
13
-
 14
14
-
 15
15
-
 16
16
-
 17
17
-
 18
18
-
 19
19
-
 20
20
-
 21
21
-
 22
22
-
 23
23
-
 24
24
-
 25
25
-
 26
26
-
 27
27
-
 28
28
-
 29
29
-
 30
30
-
 31
31
-
 32
32
-
 33
33
-
 34
34
-
 35
35
-
 36
36
-
 37
37
-
 38
38
-
 39
39
-
 40
40
-
 41
41
-
 42
42
-
 43
43
-
 44
44
-
 45
45
-
 46
46
-
 47
47
-
 48
48
-
 49
49
-
 50
50
-
 51
51
-
 52
52
-
 53
53
-
 54
54
-
 55
55
-
 56
56
-
 57
57


SOCKET BE-300 - Cassiopeia Pocket Manager User manual
- Category
- Bridge cameras
- Type
- User manual
- This manual is also suitable for
Ask a question and I''ll find the answer in the document
Finding information in a document is now easier with AI