Page is loading ...

OWNER’S MANUAL
Your Tracker II is an advanced technology Metal Detector. If you
are new to the hobby or have never used a metal detector before,
we recommend that you:
1) Do Not Use Indoors. Household appliances generate
electromagnetic fields, which can interfere with the detector.
If demonstrating indoors, turn the sensitivity down and keep the
search coil away from floors, walls, and metal objects.
2) Turn SENSITIVITY knob to a low setting in the event of false
signals or chatter. A little practice is required to understand
when and how to position the sensitivity at or near 100%.
3) Use 9-volt ALKALINE batteries only.
4) Please read this manual.

2
TABLE OF CONTENTS
TERMINOLOGY . . . . . . . . . . . . . . . . . . . . . . . . . . . . . .3
ASSEMBLY . . . . . . . . . . . . . . . . . . . . . . . . . . . . . . . . . .4
QUICK-START DEMO . . . . . . . . . . . . . . . . . . . . . . . . . .5
OPERATION–Getting started in the Field . . . . . . . . . . . .6
OPERATING MODES AND CONTROLS . . . . . . . . . . . . .7
GROUND BALANCING . . . . . . . . . . . . . . . . . . . . . . . . .8
IN THE FIELD TECHNIQUES . . . . . . . . . . . . . .9 ,10, 11
APPLICATIONS . . . . . . . . . . . . . . . . . . . . . . . . . . . . .12
TROUBLESHOOTING . . . . . . . . . . . . . . . . . . . . . . . . .13
CARE AND MAINTENANCE . . . . . . . . . . . . . . . . . . . .14
ACCESSORIES . . . . . . . . . . . . . . . . . . . . . . . . . . . . . .15
CODE OF ETHICS . . . . . . . . . . . . . . . . . . . . . . . . . . .16
WARRANTY . . . . . . . . . . . . . . . . . . . . . . . . . . . . . . . .16

TERMINOLOGY
The following terms are used throughout the manual, and are standard terminology
among detectorists.
ELIMINATION
Reference to a metal being "eliminated" means that the detector will not emit a tone
when a specified object passes through the coil’s detection field.
DISCRIMINATION
When the detector emits different tones for different types of metals, and when the
detector "eliminates" certain metals, we refer to this as the detector "discriminating"
among different types of metals. Discrimination is a fixed-start-point elimination system.
RELIC
A relic is an object of interest by reason of its age or its association with the past.
Many relics are made of iron, but can also be made of bronze or precious metals.
IRON
Iron is a common, low-grade metal that is often an undesirable target in certain metal
detecting applications. Examples of undesirable iron objects are old cans, pipes,
bolts, and nails.
Sometimes, the desired target is made of iron. Property markers, for instance,
contain iron. Valuable relics can also be composed of iron; cannon balls, old
armaments, and parts of old structures and vehicles can also be composed of iron.
FERROUS
Metals which are made of, or contain, iron.
PINPOINTING
Pinpointing is the process of finding the exact location of a buried object.
Long-buried metals can appear exactly like the surrounding earth, and can
therefore be very hard to isolate.
PULL-TABS
Discarded pull-tabs from beverage containers are the most bothersome
trash items for treasure hunters. They come in many different shapes and
sizes. We have incorporated special features into the detector to let you
eliminate, or be alerted to the presence of, the most common types. Since
there are many different types, some cannot be 100% differentiated from
other types of metals. For example, newer pull-tabs can possess the same
magnetic signature as a nickel.
GROUND BALANCE
Ground Balancing is the ability of the detector to ignore, or "see through," the earth’s
naturally occurring minerals, and only sound a tone when a metal object is detected.
WATERPROOF
The search coil can be submerged in water. The control housing must stay dry.
COINSHOOTING
Finding buried coins is the most popular metal detecting application. The most valuable
are very old; take care in unearthing them to avoid damage.
CACHE
Pronounced “cash”. A cache is a buried or hidden valuable stored inside a case, strong
box, or bag.
3

4
ASSEMBLY
No tools are required. Follow these
steps:
1
Unpack your detector and find
the following parts:
•Detector body, attached to
S-rod handle and search coil.
•Lower stem (short metal
tube with plastic extension
and silver button).
• (2) Coil knobs. One with a
shaft attached, one without.
2
Depress the button on the lower
stem and push the lower stem
into the upper stem.
3
Wind the search coil cable
around the two-piece stem.
4
Leave some slack in the cable
as you reach the end of the
lower stem.
5
Attach the coil to the stem using
the coil knobs.
6
Install two (2) 9-volt ALKALINE
batteries (not included).
There are two battery doors on
the back of the detector body.

I. SUPPLIES NEEDED
• A Nail • a Nickel
• A large screwdriver or other large metal object • a Dime
• A newer zinc penny (dated after 1982) • a Quarter
II. POSITION THE DETECTOR
a. Have a friend hold the detector, with the
coil raised up off the ground. If
testing alone, place the detector
on a table, with the search coil
hanging over the edge.
b. Keep the search coil away from
walls, floors, and metal objects.
c. Remove watches, rings, jewelry and all
metal objects from hands and wrists.
d. Position search coil parallel to the ground.
III. POWER UP
a. Click the MODE control on to the ALL-METALS
position.
b. Turn the SENSITIVITY control to the 2:00 position.
c. Keep the GROUND control at NORMAL.
d. Turn DISCRIMINATION knob to low.
IV. SWEEP OBJECTS OVER THE SEARCH COIL
a. Sweep all objects over the search coil.
b. Sweep coins with flat surface parallel to coil.
This is usually how you will find them buried in the ground.
c. Notice that all objects induce the same tone.
All metals are detected.
d. Objects must be in motion
over the coil to be detected.
V. TONE MODE
a. Click the MODE control to TONE.
b. Turn the DISCRIMINATION knob to the 3:00 position.
c. Sweep all objects over the search coil.
1. Notice the different tones for different objects.
2. Notice no tone for ferrous objects
VI. DISCRIMINATION MODE
a. Click the MODE control to DISC.
b. Sweep all objects over the search coil.
c. Move the DISCRIMINATION knob to
different positions for each object.
Move between low and high.
d. Notice the different tones for different objects.
e. Notice that some objects can be
completely eliminated with the
DISCRIMINATION control knob. 5
QUICK-START DEMO

66
OPERATION–Getting Started in the Field
STANCE
•Stand with your arm extended in
front of your body. Hold the search
coil off the ground, about 1/2 inch
above the surface.
•Position the search coil parallel to the
ground.
SWEEP
•Swing the coil slowly, from side to
side. The coil must be in motion to
detect metal.
•Maintain the coil parallel to the
ground. Do not raise the coil at the
end of each sweep.
•Move slowly and overlap
each sweep as you move
forward, sweeping the
coil in half-circle
movements.
•The coil must
be in motion to
detect metal.
Your Tracker II
incorporates
motion detection
technology. A
motionless search
coil will not detect
buried objects.
TARGET RESPONSE
Most desirable targets will induce
repeatable tones. When the detector
emits a tone, pass the coil over the
same spot again, and listen for a
consistent repeatable tone each time
the coil passes over the target zone.
Broken tones and non-
repeatable tones usually indicate the
presence of trash or irregularly
shaped objects. Electromagnetic
interference (EMI) can cause false, or
non-repeatable, signals. EMI is
emitted by power lines (overhead or
buried), other detectors (keep 2
detectors 20 feet apart), or by
machinery and motors.
STARTING CONTROL SETTINGS
The easiest way to get started is with
the control settings as follows:
MODE – at Disc
GROUND – at Normal
SENSITIVITY – at 3:00 position
DISCRIMINATION – at 12:00
CORRECT
WRONG

7
OPERATING MODES AND CONTROLS
The Tracker II has Three Operating Modes
1
ALL-METALS
a. All metals are detected
b. Single tone response, regardless of metal type
c. Maximum depth detection capability
Operating Controls
DISCRIMINATION knob does not apply
APPLICATIONS
Relic Hunting, Cache Hunting and general applications like
property marker locating
2
TONE
a. Ferrous metals are automatically eliminated from detection.
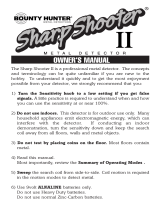
b. Two-tone audio response classifies metals as illustrated:
c. Adjust the DISCRIMINATION Control when encountering low-tone
objects. If the Disc control can be adjusted to induce a broken (or
scratchy) tone, the buried item is probably trash. A broken tone
can usually be achieved between the 12:00 and 2:00 positions.
APPLICATIONS
Coin Shooting
Jewelry Hunting
3
DISC: Full Discrimination
a. Ferrous metals are automatically
eliminated from detection.
b.Two-tone audio response classifies
metals as illustrated above under
the Tone mode.
c. Adjust the DISCRIMINATION
control knob to completely
eliminate unwanted items from
detection. Metals are eliminated
from detection as illustrated:
TONE MODE AUDIO RESPONSES
NO
RESPONSE
Iron & Steel
LOW
TONE
Gold & Nickel
BROKEN
TONE
Old & New Pull Tabs
HIGH
TONE
Copper, Silver & Brass

8
GROUND BALANCING
You can effectively detect in most soil conditions with the GROUND control in
the NORMAL position. As you sweep the coil from side-to-side, the detector is
constantly scanning the ground and self-adjusting to changing soil conditions.
Soils vary in their magnetic, conductive and alkaline properties. Soils vary by
region of the country, and can even vary within small areas; soil at the top of a
hill can be different from the soil in a nearby depression.
Automatic ground balancing requires a level, consistent coil sweep. Do not lift
the coil at the ends of your sweeps. Maintain a consistent coil speed as you
move the coil from side to side.
For increased detection efficiency in extreme soil conditions, you may want to
manually adjust the ground balance. If your detector emits excessive non-
repeatable signals, you may be detecting over magnetic, highly conductive or
alkaline soils. Most types of sand can be balanced with the GROUND control in
the 9:00 or 10:00 position. Clay and red-clay soil common to the Southeastern
U.S. can usually be balanced in the 11:00 to 4:00 positions.
GROUND BALANCE ADJUSTMENT
Move the search coil rapidly straight up
and down over the ground in a Yo-Yo
fashion. Do not sweep the coil during
this ground balance adjustment
process. Do not touch the coil to the
ground. Move the coil up and down
between 1 inch and 1 foot above the
ground.
Move the GROUND control to the left-most position at which the detector DOES
NOT beep while moving the coil up and down in a Yo-Yo fashion.
To verify the ground balance at any time in any ground condition,
perform this
Yo-Yo test (move the coil up and down rapidly over the ground, without
touching the ground). If the detector remains quiet while doing the Yo-Yo test
(with the GROUND knob motionless, and a spot of ground which does not
contain metal), then your detector is ground balanced.
The detector may beep while turning the GROUND knob; this is normal.
Move the knob in small increments.

9
IN THE FIELD TECHNIQUES
TONE RESPONSE
With practice in the field, you will
learn to classify buried objects
according to the different tones and
the clarity and repeatability of the
tones.
If you experience confusing and non-
repeating tones, do the following:
1Turn the SENSITIVITY knob
to the 2:00 position
2Ground Balance the detector
as described on Page 8.
3Use the DISC mode.
4Turn the DISCRIMINATION
knob to High.
It is easiest to start in the DISC mode;
ferrous objects will be automatically
eliminated, and the DISCRIMINATION
knob can be used to eliminate other
types of trash items. While searching
an area of ground in DISC mode,
move the DISCRIMINATION knob to
different settings until you understand
the relationship between discrimination
levels and the types of metals
eliminated at each level.
Only dig up targets that induce
repeatable tones. Each time you pass
the search coil over a possible target,
you should hear the same tone. If the
tone does not repeat on each pass,
varies in tone, or varies in location,
then the target is USUALLY not of
value.
Inconsistent tones are evidence of high
oxidation (rusted metals) or irregularly
shaped objects. Note, however, that
multiple tones may be evidence of
multiple targets. If you cannot pinpoint
the location of a very strong signal, lift
the coil higher off the ground until a
weaker, but more precise signal, is
heard. For very weak signals, try
moving the coil in short, rapid sweeps,
close to the ground.
PINPOINTING
Accurate pinpointing takes practice
and is best accomplished by "X-ing"
the suspected target area.
1When a buried target is
identified by a repeatable
tone response, continue
sweeping the coil over the
target in a narrowing side-to-
side pattern.
2Take visual note of the place
on the ground where the "beep"
occurs.
3Stop the coil directly over this
spot on the ground.
4Turn your stance 90 degrees,
facing the target from a
different angle.
5Sweep the coil back and
forth, making visual
reference of the intersection
of these two sweep paths.
6If necessary, "X" the target at
different angles to "zero in"
on the exact location on the
ground at which the beep
occurs.
When pinpointing a target, try drawing an “X”,
as illustrated, over where the tone is induced.

GOLD TARGETS
Gold will induce a low tone. In the
DISC mode, gold will be eliminated at
various DISCRIMINATION knob
settings, depending upon the size of
the object. Smaller gold objects will
be eliminated at lower discrimination
settings. A man’s gold wedding band,
for example, will be eliminated in
approximately the 12:00
discrimination position. Gold flakes
and necklaces will be eliminated at
low discrimination settings. If hunting
for gold, you will need to dig all
targets, until you become familiar
with the slight differences (if any)
between gold targets, and common
trash objects. Since a gold ring is
shaped like older pull-tabs, the two
will induce similar tones. A gold ring
can induce a double-beep as the coil
passes over the two sides of a ring;
older pull-tabs can induce a "broken"
tone with the discrimination knob in
the 12:00 to 1:00 position.
SILVER TARGETS
Silver objects will induce a high tone.
Repeatable high-tone responses are
usually worth digging. Highly
oxidized metals will, unfortunately,
also induce high tones. If a high-tone
target is difficult to pinpoint, it could
be oxidized metal.
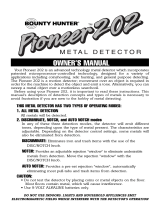
DISCRIMINATION CONTROL
In the DISC mode, as you rotate the
DISCRIMINATION knob clockwise,
more types of metals are eliminated
from detection. Discrimination is a
cumulative elimination system;
objects eliminated at a low setting
remain eliminated at high settings.
The illustration above shows the
approximate positions where different
types of metals are eliminated.
Objects come in many shapes, sizes,
and levels of purity, so these positions
can vary.
SENSITIVITY ADJUSTMENT
Use the SENSITIVITY knob to
eliminate Electromagnetic
Interference (EMI). EMI is both
naturally occurring and man-made.
Common sources of EMI are power
lines, both suspended and buried,
and broadcasting antennas. Operating
machinery can also produce EMI.
If your detector chatters or beeps
erratically with the SENSITIVITY knob
in the 100% clockwise position,
reduce the sensitivity until the chatter
stops (usually to the 1:00 to 3:00
position)
The SENSITIVITY knob can also be
used if you suspect the presence of
deeper targets underneath a
shallower target. Reduce the
sensitivity to eliminate the detection
of the deeper target, so as to properly
locate and identify the shallower
target.
GOLD TARGETS
Gold will induce a low tone. In the
DISC mode, gold will be eliminated at
various DISCRIMINATION knob
settings, depending upon the size of
the object. Smaller gold objects will
be eliminated at lower discrimination
settings. A man’s gold wedding band,
for example, will be eliminated in
approximately the 12:00
discrimination position. Gold flakes
and necklaces will be eliminated at
low discrimination settings. If hunting
for gold, you will need to dig all
targets, until you become familiar
with the slight differences (if any)
between gold targets, and common
trash objects. Since a gold ring is
shaped like older pull-tabs, the two
will induce similar tones. A gold ring
can induce a double-beep as the coil
passes over the two sides of a ring;
older pull-tabs can induce a "broken"
tone with the discrimination knob in
the 12:00 to 1:00 position.
SILVER TARGETS
Silver objects will induce a high tone.
Repeatable high-tone responses are
usually worth digging. Highly
oxidized metals will, unfortunately,
also induce high tones. If a high-tone
target is difficult to pinpoint, it could
be oxidized metal.
DISCRIMINATION CONTROL
In the DISC mode, as you rotate the
DISCRIMINATION knob clockwise,
more types of metals are eliminated
from detection. Discrimination is a
cumulative elimination system;
objects eliminated at a low setting
remain eliminated at high settings.
The illustration above shows the
approximate positions where different
types of metals are eliminated.
Objects come in many shapes, sizes,
and levels of purity, so these positions
can vary.
SENSITIVITY ADJUSTMENT
Use the SENSITIVITY knob to
eliminate Electromagnetic
Interference (EMI). EMI is both
naturally occurring and man-made.
Common sources of EMI are power
lines, both suspended and buried,
and broadcasting antennas. Operating
machinery can also produce EMI.
If your detector chatters or beeps
erratically with the SENSITIVITY knob
in the 100% clockwise position,
reduce the sensitivity until the chatter
stops (usually to the 1:00 to 3:00
position)
The SENSITIVITY knob can also be
used if you suspect the presence of
deeper targets underneath a
shallower target. Reduce the
sensitivity to eliminate the detection
of the deeper target, so as to properly
locate and identify the shallower
target.
10
IN THE FIELD TECHNIQUES APPROXIMATE
DISCRIMINATION
POSITIONS

IN THE FIELD TECHNIQUES
11
LOW BATTERY INDICATOR
The indicator light on the control panel will light up and stay on if the batteries need
replacing. When replacing batteries, replace both batteries at the same time. Use
ALKALINE batteries only. Non-alkaline batteries will cause poor detector operation
and lose power quickly.
TRASH ITEMS
Pull-Tabs: You will encounter a never-ending variety of pull-tabs. Most of the older
variety, those that detached completely from the can, will produce a
broken, scratchy tone with the discriminator adjusted to the
12:00 to 1:00 position in TONE mode, and can be completely
eliminated from detection in DISC mode. Many newer pull-tabs have a
magnetic signature similar to that of a nickel.
Cans: Older cans were made from tin, and can oxidize, inducing a high tone in
DISC mode. The best way to distinguish tin cans from valuable silver
coins, is with careful pinpointing. With practice, you can learn to
recognize a smaller target zone for a coin, and a larger zone for a tin can.
Foil: Foil can generally be eliminated in DISC mode. Small pieces of foil
usually induce a low tone.

12
COINSHOOTING
The most popular metal detecting application. When coinshooting, you want to
discriminate out pull-tabs, screw caps, and iron objects. Beware that highly
oxidized steel may also be detected. In the event of low tones, tune
Discrimination control to induce "scratchy" tones; these might be trash items.
Control Settings Required:
1) DISC Mode
2) DISCRIMINATION knob in 2:00 position
RELIC HUNTING
A relic is a historical object, sometimes of great value. Relics can be found in
abandoned homes, plowed fields, or even your own back yard. Research the
local library to learn of historical events or places in the area. You can then target
your search to a specific area and gain valuable insight into the local history.
Always obtain permission before entering private or government property.
Control Settings Required:
1) ALL-METALS Mode
2) SENSITIVITY at High
CACHE HUNTING
A cache, pronounced "cash" is a buried or hidden valuable stored inside a case,
strongbox, or bag. A cache can be hidden in the floor or walls of a house, or
buried nearby.
Control Settings Required:
1) ALL-METALS Mode
2) SENSITIVITY at High
JEWELRY HUNTING
Jewelry can be found wherever people congregate. Beaches, parks,
schoolyards, and fair grounds are all littered with lost jewelry. Gold necklaces
are very difficult to detect unless they are packed tightly together. Rings can
induce tones similar to pull-tabs.
Control Settings Required:
1) TONE Mode
2) DISCRIMINATION Control adjusted constantly to discern nature of
buried object.
UTILITY APPLICATIONS
Use your Tracker II to find property markers and lost items. Keep your detector
in the ALL-METALS mode for these tasks.
APPLICATIONS

13
TROUBLESHOOTING
TROUBLE SHOOTING GUIDE
SYMPTOM CAUSE SOLUTION
No power, no • Dead batteries • Replace batteries
sounds •
Batteries not • Securely snap
connected properly
batteries on to
connectors
Detector chatters • Electromagnetic • Stay away from
or Beeps Erratically Interference Power lines or
operating machinery
• Using Indoors • Use Outdoors Only
• Using Near Another • Keep 2 detectors at
Metal Detector least 20 feet apart
• Wrong Type of Batteries • Use 9-Volt ALKALINE
batteries only
(
do not
use heavy duty batteries)
• Sensitivity Set Too High • Reduce Sensitivity
for Environment
Detector Beeps at End • Improper Sweep • Sweep Coil Parallel to
of Sweeps Technique – Swinging Ground
(false signals)
Coil Like a Pendulum
Many False Signals in • Detector Not Ground • Ground Balance
the Field Balanced Correctly Detector per P.8
instruction
• Sensitivity Too High • Reduce Sensitivity
• Oxidized Targets • Only Dig Up
Repeatable Signals
• Increase
Discrimination Level
(turn control
clockwise)

14
CARE AND MAINTENANCE
Your Tracker II Metal Detector is an
example of superior design and
craftsmanship. The following
suggestions will help you care for
your metal detector so you can
enjoy it for years to come.
Handle the metal detector
carefully. Dropping it can damage
circuit boards and cases.
Use and store the metal detector in
normal temperature environ-
ments. Temperature extremes can
shorten the life of electronic
devices and distort or melt plastic
parts.
Wipe the metal detector with a
damp cloth occasionally to keep it
looking new. Do not use harsh
chemicals, cleaning solvents, or
strong detergents to clean the
metal detector.
The coil is waterproof and may be
submerged in either fresh or
saltwater. Be careful to prevent
water from entering the chassis.
After using the coil in saltwater,
rinse it with fresh water to prevent
corrosion of the metal parts.
Modifying or tampering with the
detector’s internal components
can cause a malfunction and will
invalidate your detector’s
warranty.

15
ACCESSORIES
MAXIMIZE YOUR METAL DETECTING EXPERIENCE WITH THESE
BOUNTY HUNTER ACCESSORIES
FINDS POUCH
With adjustable waistband
and Velcro closure
DIGGING TOOL
Narrow Spade to minimize
damage to environment
7-INCH COIL COVER
Protect coil bottom from
severe surface
HEADPHONES
Increase battery life and find
more deeply buried objects,
evidenced by faint signals
sometimes undetected with
the standard speaker
CARRY BAG
Custom-sized to carry your
Tracker II.
Padded, with space for
other accessories
www.detecting.com

TREASURE HUNTER’S CODE OF ETHICS:
1. Respect the rights and property of others.
2. Observe all laws, whether national, state or local.
3. Never destroy historical or archaeological treasures.
4. Leave the land and vegetation as it was. Fill in your holes.
5. All treasure hunters may be judged by the example you set.
Always obtain permission before searching any site. Be
extremely careful while probing, picking up, or discarding trash
items. And ALWAYS COVER YOUR HOLES!
First Texas Products, LP
1100 Pendale Road
El Paso, TX 79907
(915) 633-8354
REVISED 08/02 • 120959
This product is warranted against defects in work-
manship or materials under normal use for five years
from date of purchase to the original user. Liability in
all events is limited to the purchase price paid.
Liability under this Warranty is limited to replacing or
repairing, at our option, any Bounty Hunter Detector
returned, shipping cost prepaid, to First Texas
Products, LP. Damage due to neglect, accidental
damage or misuse of this product is not covered by
this warranty.
FIRST TEXAS PRODUCTS, LP
5-YEAR LIMITED WARRANTY
Copyright ©2002 by First Texas Products, L.P.
All rights reserved, including the right to reproduce this book, or parts thereof, in any form, except for the
inclusion of brief quotations in a review.
Published by First Texas Products, L.P.
Bounty Hunter® and Tracker® are registered trademarks of First Texas Products, L.P.
www.detecting.com
16
/