Page is loading ...

WARRANTY CONDITIONS
What the warrranty covers:
All defective material and manufacturing defects.
Length of warranty after initial purchase:
2 years on parts and labour.
What Convectair will do:
Pay the repair costs in an authorized repair centre, or at the company’s discretion, provide replacement.
Assume freight charges to ensure return to customer.
Service center:
To fi nd the service centre nearest you, contact Convectair by dialing 1-800-463-6478.
Purchase receipt:
For any repair or replacement covered by this warranty, you need proof of purchase. please keep your
original invoice.
Miscellaneous costs:
Cost of transport to service centre, pick-up and reinstallation of the defective item shall, in every case, be
at customer’s expense, and shall be his responsibility.
What the warranty DOES NOT COVER.
All damage resulting from faulty installation, misuse, negligence or abuse, accidents, acts of God, or any
other circumstance that is beyond Convectair’s control. This also applies to all repairs carried out without
Convectair’s supervision. in addition, Convectair may not be held responsible for any damage caused to
personal property or real estate caused directly or indirectly by our products, even when such damage is
due to a fault or defect in these appliances.
In keeping with our ongoing commitment to research and development, we reserve the right to change product specifi cations without notice.
PROGRAMMER MODULE
USING A PILOT WIRE
30, Carre Sicard, Sainte-Therese (Quebec), CANADA J7E 3X6
Telephone : (450) 433-5701 Fax: (450) 434-3166
Email: support@convectair.ca
www.convectair.com
IMPORTANT
More information on the Programmer’s required installation prior to use at:
www.convectair.com/install
Installation & Operating Instructions
Document to be read and kept by the user.

2. 7.
1 - OVERVIEW
Introduction: We thank you for choosing Convectair’s premium electric heating products and
we congratulate you on the purchase of this Programmer. To obtain the best results and the ul-
timate in performance and comfort, please take a moment to read the installation and operation
instructions detailed in this manual.
• This programmer can be used on heaters fi tted with a compatible receptacle.
- For a list of compatible heaters visit www.convectair.com/install
• The digital screen display allows you:
- to visualize the time, the day, the current heating status (comfort, economy or frost-pro-
tection), and the current program on an hour by hour basis;
- to set the time, the day, a program or confi rm a selection.
• Technical features:
- Tension: 240 V
- After a complete charge, the battery supply will last for a full 24 hours.
• Programmer settings:
- Comfort (room temperature as set on the heater)
- Economy (setback a desired amount of degrees from the Comfort settings, for short
absences or night time)
- Frost-protection (maintains a minimum of 7°C or 46°F for prolonged absences)
• The Programmer module can control up to 20 other Convectair heaters.
- While charging (20 minutes), Comfort is the only signal that can be sent
on the pilot wire.
In case the electric supply is cut for more than 24 hours, the programs are saved but time and day
are lost and should be set again. The screen displays a fl ashing 00:00. After charging for 20 minutes,
the heater will be operating according to Monday’s program at 00:00 AM (until the day and time are
reset).
5 - WARNINGS
Manual override:
It’s possible to override the heating status without touching the Programmer module. On the heater,
select another heating position:
- Comfort
- Economy
- Frost-protection
- Stop
When the Programmer module controls a number of heaters through the pilot wire, this procedure
enables the occupant to override an individual heater while the rest operates according to the current
program.
To return to the programmed settings, switch back to the Prog position .
- Should the back light not activate, leave the cassette programmer in the slot
to charge.
- When the cassette is not in the slot, the screen may switch off after a while.
Press on any button in order to re-activate. If light does not come back, insert
the cassette programmer into the slot.
IMPORTANT:
IMPORTANT:
- To plan your installation and connect heaters to this Programmer visit
www.convectair.com/install
- When the Programmer stays without power for a long period,
reset the time and day.
- The pilot wire must NOT be grounded.
- This Programmer module needs to be charged for 20 minutes, in the slot located on
the control panel of the heater, prior to its fi rst use. After a complete charge, the battery
supply will last for a full 24 hours.
- The Programmer module can be programmed when inserted into the heater or out of the
control panel slot, when fully charged.
- Prior to use, make sure you remove the protective fi lm that covers the display and the
Quick Reference Guide located on the Programmer module.

3.
6.
b) Individual or zone heating confi guration.
Zone heating confi guration:
One cassette programmer can operate several hea-
ters using the pilot wire. Connect the pilot wire of the
heater fi tted with the Programmer module (master) to
the pilot wire of the other heaters (slaves) as shown
on the picture.
Set all heaters to Prog mode. The ‘‘slaves’’ heaters
will operate according to the program on the ‘‘master’’
heater and constitute a comfort zone.
Comfort and Economy temperatures need to be
adjusted on each heater link with a pilot wire to the
‘‘master’’ heater.
Using 2 Programmer modules it is possible to have 2
separate comfort zones.
WARNING
- You must not install 2 Programmer modules
units in the same comfort zone.
- It is imperative to respect the connection pola-
rities of all heaters of one zone.
L1 L2 Programmer
GROUND
L1
L2
L2
L1
PILOT WIRE
(Purple)
Heater fitted
with a Programmer
Other heaters in
the comfort zone.
(20 maximum)
CONNECTOR
MAIN
PANNEL.
)
(Black)
(Red)
(Black)
(Red)
Master heater
Slave heater
Slave heater
Pilot wire
(Purple)
PILOT WIRE
OK
Prog
PROG
1 2 3 4 5 6 7
There are 4 pre-programmed groups of days:
• 1 - 2 - 3 - 4 - 5 - 6 - 7
• 1 - 2 - 3 - 4 - 5
• 6 - 7
• 1 - 2 - 4 - 5
Note: In these group of days, Monday = 1, and so on.
Copying a program on a group of days:
ou
ou
ou
- Using a small screwdriver, press on the clip
and lift the cover of the slot (on the right hand
side next to the control panel) and insert the
Programmer module.
- Select the Prog position on the thermostat.
2 - INSTALLATION & CONFIGURATION
Note: For optimal results the Program-
mer module should remain permanent-
ly in the slot of the control panels.
Control panel Slot designed
to receive the
Programmer
module.
a) Inserting the module into the heater:
Location
OK
Prog
PROG
6 7
OK
Prog
PROG
1 2 3 4 5
OK
Prog
PROG
1 2 4 5
Press Prog .
Select the day you want to copy the program from
using and and press OK to validate.
The program you want to copy is shown.
Press OK to validate.
Press for 3 seconds.
Select the group of days on which you want
to copy the program using and and
press OK for 3 seconds.
The program is copied and appears on the screen.
Press OK to validate.
Exit by pressing Prog .

4. 5.
- Day setting: select the day by pressing and
and press OK to validate.
1 = Monday 2 = Tuesday 3 = Wednesday
4 = Thursday 5 = Friday 6 = Saturday
7 = Sunday
HEURE
OK
Prog
10:40
PM
HEURE
OK
Prog
12:40AM
OK
Prog
T01
OK
Prog
0h 2 4 6 8 10 12 14 16 18 20 22 24
1 2 3 4 5 6 7
12:40
OK
Prog
1 2 3 4 5 6 7
PROG
OK
Prog
0h 2 4 6 8 10 12 14 16 18 20 22 24
PROG
0:h
1 2 3 4 5 6 7
OK
Prog
0h 2 4 6 8 10 12 14 16 18 20 22 24
PROG
0:h
1 2 3 4 5 6 7
OK
Prog
PROG
1 2 3 4 5 6 7
4 - OPERATION
c) Setting up frost-protection mode:
Simultaneously press on and OK for 3 seconds.
Select the number of days desired (from 1 to 99) by pressing
and and press OK to validate.
Simultaneously press on and OK for 3 seconds
to desactivate.
Press Prog .
Select the day you want to copy the program from
using and and press OK to validate.
The program you want to copy is shown.
Press OK to validate.
Select the day on which you want to copy the program
using and and press OK for 3 seconds.
The program is copied and appears on the screen.
Press OK to validate.
Select another day or exit by pressing Prog .
e) Copying a program from another day:
b) Customize a program:
Press Prog .
Select the day using and and press OK to validate.
Select the hour using et .
Press to choose between Comfort or Economy.
Press OK to validate your changes.
Select another day or exit by pressing Prog .
OK
Prog
1 2 3 4 5 6 7
PROG
0h 2 4 6 8 10 12 14 16 18 20 22 24
5h à 8h 17h à 23h
7h à 23h
{
{
{
0h 2 4 6 8 10 12 14 16 18 20 22 24
de 1 à 5
de 6 à 7
- The Programmer is now ready to be used using its default
setting (see picture).
HEURE
OK
Prog
00:00
a) Clock settings:
Press simultaneously on Prog and for 3 seconds.
Choose between a 12h or a 24h AM/PM display.
- Hour setting: adjust the hour by pressing and
and press OK to validate.
- Minutes setting: adjust minutes by pressing and
and press OK to validate.
d) Child lock setting:
Simultaneously press on and for 3 seconds.
A key appears on the screen.
To unlock, repat the same operation.
Individual heating confi guration:
Only the heater fi tted with the Programmer
module will follow the selected program.
Connect the pilot wire to an empty / unused
terminal.
L1 L2 Programmer
GROUND
L1
L2
L2
L1
PILOT WIRE
(Purple)
Heater with
Programmer
CONNECTOR
MAIN
PANEL
)
(Black)
(Red)
(Black)
(Red)
OK
Prog
24 H
OK
Prog
12 H
AM
PM

3.
6.
b) Individual or zone heating confi guration.
Zone heating confi guration:
One cassette programmer can operate several hea-
ters using the pilot wire. Connect the pilot wire of the
heater fi tted with the Programmer module (master) to
the pilot wire of the other heaters (slaves) as shown
on the picture.
Set all heaters to Prog mode. The ‘‘slaves’’ heaters
will operate according to the program on the ‘‘master’’
heater and constitute a comfort zone.
Comfort and Economy temperatures need to be
adjusted on each heater link with a pilot wire to the
‘‘master’’ heater.
Using 2 Programmer modules it is possible to have 2
separate comfort zones.
WARNING
- You must not install 2 Programmer modules
units in the same comfort zone.
- It is imperative to respect the connection pola-
rities of all heaters of one zone.
L1 L2 Programmer
GROUND
L1
L2
L2
L1
PILOT WIRE
(Purple)
Heater fitted
with a Programmer
Other heaters in
the comfort zone.
(20 maximum)
CONNECTOR
MAIN
PANNEL.
)
(Black)
(Red)
(Black)
(Red)
Master heater
Slave heater
Slave heater
Pilot wire
(Purple)
PILOT WIRE
OK
Prog
PROG
1 2 3 4 5 6 7
There are 4 pre-programmed groups of days:
• 1 - 2 - 3 - 4 - 5 - 6 - 7
• 1 - 2 - 3 - 4 - 5
• 6 - 7
• 1 - 2 - 4 - 5
Note: In these group of days, Monday = 1, and so on.
Copying a program on a group of days:
ou
ou
ou
- Using a small screwdriver, press on the clip
and lift the cover of the slot (on the right hand
side next to the control panel) and insert the
Programmer module.
- Select the Prog position on the thermostat.
2 - INSTALLATION & CONFIGURATION
Note: For optimal results the Program-
mer module should remain permanent-
ly in the slot of the control panels.
Control panel Slot designed
to receive the
Programmer
module.
a) Inserting the module into the heater:
Location
OK
Prog
PROG
6 7
OK
Prog
PROG
1 2 3 4 5
OK
Prog
PROG
1 2 4 5
Press Prog .
Select the day you want to copy the program from
using and and press OK to validate.
The program you want to copy is shown.
Press OK to validate.
Press for 3 seconds.
Select the group of days on which you want
to copy the program using and and
press OK for 3 seconds.
The program is copied and appears on the screen.
Press OK to validate.
Exit by pressing Prog .

2. 7.
1 - OVERVIEW
Introduction: We thank you for choosing Convectair’s premium electric heating products and
we congratulate you on the purchase of this Programmer. To obtain the best results and the ul-
timate in performance and comfort, please take a moment to read the installation and operation
instructions detailed in this manual.
• This programmer can be used on heaters fi tted with a compatible receptacle.
- For a list of compatible heaters visit www.convectair.com/install
• The digital screen display allows you:
- to visualize the time, the day, the current heating status (comfort, economy or frost-pro-
tection), and the current program on an hour by hour basis;
- to set the time, the day, a program or confi rm a selection.
• Technical features:
- Tension: 240 V
- After a complete charge, the battery supply will last for a full 24 hours.
• Programmer settings:
- Comfort (room temperature as set on the heater)
- Economy (setback a desired amount of degrees from the Comfort settings, for short
absences or night time)
- Frost-protection (maintains a minimum of 7°C or 46°F for prolonged absences)
• The Programmer module can control up to 20 other Convectair heaters.
- While charging (20 minutes), Comfort is the only signal that can be sent
on the pilot wire.
In case the electric supply is cut for more than 24 hours, the programs are saved but time and day
are lost and should be set again. The screen displays a fl ashing 00:00. After charging for 20 minutes,
the heater will be operating according to Monday’s program at 00:00 AM (until the day and time are
reset).
5 - WARNINGS
Manual override:
It’s possible to override the heating status without touching the Programmer module. On the heater,
select another heating position:
- Comfort
- Economy
- Frost-protection
- Stop
When the Programmer module controls a number of heaters through the pilot wire, this procedure
enables the occupant to override an individual heater while the rest operates according to the current
program.
To return to the programmed settings, switch back to the Prog position .
- Should the back light not activate, leave the cassette programmer in the slot
to charge.
- When the cassette is not in the slot, the screen may switch off after a while.
Press on any button in order to re-activate. If light does not come back, insert
the cassette programmer into the slot.
IMPORTANT:
IMPORTANT:
- To plan your installation and connect heaters to this Programmer visit
www.convectair.com/install
- When the Programmer stays without power for a long period,
reset the time and day.
- The pilot wire must NOT be grounded.
- This Programmer module needs to be charged for 20 minutes, in the slot located on
the control panel of the heater, prior to its fi rst use. After a complete charge, the battery
supply will last for a full 24 hours.
- The Programmer module can be programmed when inserted into the heater or out of the
control panel slot, when fully charged.
- Prior to use, make sure you remove the protective fi lm that covers the display and the
Quick Reference Guide located on the Programmer module.

WARRANTY CONDITIONS
What the warrranty covers:
All defective material and manufacturing defects.
Length of warranty after initial purchase:
2 years on parts and labour.
What Convectair will do:
Pay the repair costs in an authorized repair centre, or at the company’s discretion, provide replacement.
Assume freight charges to ensure return to customer.
Service center:
To fi nd the service centre nearest you, contact Convectair by dialing 1-800-463-6478.
Purchase receipt:
For any repair or replacement covered by this warranty, you need proof of purchase. please keep your
original invoice.
Miscellaneous costs:
Cost of transport to service centre, pick-up and reinstallation of the defective item shall, in every case, be
at customer’s expense, and shall be his responsibility.
What the warranty DOES NOT COVER.
All damage resulting from faulty installation, misuse, negligence or abuse, accidents, acts of God, or any
other circumstance that is beyond Convectair’s control. This also applies to all repairs carried out without
Convectair’s supervision. in addition, Convectair may not be held responsible for any damage caused to
personal property or real estate caused directly or indirectly by our products, even when such damage is
due to a fault or defect in these appliances.
In keeping with our ongoing commitment to research and development, we reserve the right to change product specifi cations without notice.
PROGRAMMER MODULE
USING A PILOT WIRE
30, Carre Sicard, Sainte-Therese (Quebec), CANADA J7E 3X6
Telephone : (450) 433-5701 Fax: (450) 434-3166
Email: support@convectair.ca
www.convectair.com
IMPORTANT
More information on the Programmer’s required installation prior to use at:
www.convectair.com/install
Installation & Operating Instructions
Document to be read and kept by the user.

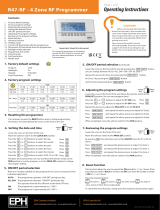
7392 ECP/RCP SYSTEM PROGRAMMER
INSTALLATION AND PROGRAMMING INSTRUCTIONS

0
7392 ECP/RCP SYSTEM PROGRAMMER
1) PRESENTATION.......................................................................................................................................1
A)OPERATING OPTIONS
QUICK START............................................................................................................................................2
A) PLANNING YOUR INSTALLATION
B) THE FIRST INSTALLATION
C) SET THE PROGRAM
D) SET THE HOME CODE
E) SET THE RECEIVERS ADDRESS
F) TEST TIME
3) INSTALLATION AND CONNECTIONS......................................................................................................5
A) INSTALLATION
B) CONNECTING HEATERS TO A PROGRAMMER MODULE
C) BASIC PRINCIPLES
4) OPERATION.............................................................................................................................................7
A) SETTING OF THE CLOCK
B) ASSIGNING PROGRAMS
5) OTHER FEATURES..................................................................................................................................8
A) FROST PROTECTION MODE
B) MANUAL BYPASS
C) IN CASE OF A POWER FAILURE
6) LOCKING THE PROGRAMMER MODULE...............................................................................................9
7) PROGRAMMING EXAMPLE.....................................................................................................................9
A) SETTING THE TIME AND DAY
B) PROGRAMMING EXAMPLE WITH PRE-SELECTED PROGRAMS
C) CHOOSE A CUSTOMIZED PROGRAM
D) INDIVIDUAL PROGRAMMING
E) EXAMPLE OF A ZONE CONFIGURATION
F) HOME CODE PROGRAMMING
G) ASSIGNING A ZONE
H) EXAMPLE OF A CONFIGURED ZONE
8) TESTING THE SYSTEM.........................................................................................................................12
9) TROUBLESHOOTING ............................................................................................................................12
10) ERROR CODES....................................................................................................................................12
11) WARRANTY..........................................................................................................................................13
12) REPAIR CENTERS...............................................................................................................................13
13) FAQ’S....................................................................................................................................................13

1
WARNING: Installation of a multi-heater CONVECTAIR programming system involves some
specific wiring requirements. CONVECTAIR recommends that this installation be performed and
checked by a licensed electrical contractor.
7392 ECP(Transmitter)/RCP (Receiver)
INSTALLATION AND OPERATING INSTRUCTIONS
1) PRESENTATION
The 7392 ECP CASSETTE is a management tool for your CONVECTAIR heating system. It allows
you to maximise your energy saving while ensuring ideal comfort, by scheduling periods of heating
comfort or energy saving setback.
The liquid crystal screen allows:
Cto display the time, the day of the week, the program for the day and the present heating
mode (comfort, economy or frost protection).
Cto set time, day and programming.
The 7392 ECP CASSETTE is designed to be inserted in the control panel of CONVECTAIR heaters
model number; ALTO, MEZZO, SOLO, TENOR and OPERA (7384, 7383, 7382, 7715 and 7720).
A) Operating options :
The PROGRAMMER MODULE offers a choice between :
C7 pre-selected programs or a customized program for every day of the week.
All programs offer 2 heating modes :
CComfort : ideal temperature for the room
CEconomy : setback of 2 to 7oC (3.6o F to 12.6o F) from comfort level; -4oC (-7oF) for
heaters with non adjustable setback like Jazz, Calypso and Samba.
It is also possible to bypass the current program by selecting the :
CFrost protection mode : maintains a temperature of approximately 8o C (45oF) , during
long periods of absence for example.

2
QUICK START
A)Planning the installation :
Place all the transmitter CASSETTES in their respective compartments, let them charge up.
(Aprox. 15 min).
Meanwhile, plan your installation:
One, two or tree zones?
Each zone corresponds to a group of units that will follow the same timetable.
Define the group that will share the same timetable.
Where do I place the transmitter CASSETTES?
Once the transmitter CASSETTES have been charged they can be placed in any unit that
contains a CASSETTE compartment.
One of the transmitters will be zone 1, another shall be zone 2 and so on. Up to, and not more
than 3 zones per home.
Which program for each weekday?
The timetable for each day of the week, indicates, hour by hour (0-24h), if we would prefer comfort
setting or economy setting. Seven pre-selected programs reside in the CASSETTE. Use them
or create your own for each day.
Choose the day that represents day 1 and the program to run (P1 to P7) or P=. Repeat this for
day 1 to day 7.
What shall my Home Code be?
For the Home code you require a four digit number. Chose a four digit number like your street
address or the four last digits of your telephone number. Write them down!
B) The first installation (for each transmitter CASSETTE)
SET TIME AND DATE
1. Press and hold “MODE” for 2 seconds
The hours will flash...
Use the + or - keys to set the hour (0-23 h)
Then “OK” to accept
2. The minutes will now flash...
Use + or - to set the minutes (1-59)
“OK” to accept
3. Now the day will flash...
Use + or - to set the day (1 to 7)
Confirm with “OK”

3
QUICK START
C) Set the program :
1. Press and hold “MODE” for 2 seconds then press once more briefly.
Day “1" is selected along with “P1", both flashing
2. To use a preset program use + or - to select the program of your choice. (P1 to P7)
Press “OK” to accept, then it will go to day “2" that will display “P1" and flashing.
Repeat steps 1 and 2 until day ”7"
2.1 For a custom (user defined) program, when your day and “P1" are flashing use + or -
until you see “P=”
Press “MODE”
Now for each hour (1 - 23) use + for Comfort setting and - for Economy setting.
Confirm with “OK” and proceed to the following day.
Repeat this step until day “7"
D) Set the HOME CODE :
1. Press “MODE” at least 4 seconds (until the “:” disappear)
Press + or - to select the first digit of your 4 digit Home code.
Press “OK” to confirm, proceed to the second digit.
Repeat this step for all digits.
E) Set receivers address :
1. Press briefly on “MODE”. The transmitter CASSETTE will automatically select Zone “1"
Press “OK” , if you have more than one zone select zone”2" or zone “3" then “OK”.
“EMET” will appear on the screen along with the zone chosen (1 or 2 or 3)
2. Place the transmitter CASSETTE in the receptacle of the unit, assure that the mode
selector is on programmer mode (clock face Icon)
3. Place all of the receiver CASSETTES in their appropriate units (Fig.1A), notice the LED
comes on and stays on once the receivers are installed. Place your Convectair units
mode selector on (Clock mode Icon).
4. On each receiver CASSETTE press and hold the addressing button for 10 seconds until
the LED starts to flash, then press it again briefly until it stops flashing. This will confirm
that the addressing was successful.
5. Once you are finished with all the CASSETTES in that zone, go to the Programmer
CASSETTE and push “OK” to confirm.The programmer will show the Time & date.
Repeat Step E for each additional zone transmitter.
F) Test time :
• From the Programmer CASSETTE push on “-/Hgel” for about 4 seconds, then “OK”. The
screen will indicate ”HG:01"
• During this time verify that all Convectair units are in -/Hgel (frost protection mode). The mode
selection light should have switched to -/Hgel Mode. This may take up to 30 seconds.
• Return to the Programmer CASSETTE and press on the /Hgel (frost protection mode). The
screen will now indicate the time and day.
• Once again verify that all Convectair units have switched back to their previous mode.

4
FIG. 2A Installation Courant porteur. / Carrier current installation.
FIG. 2B Installation avec appareils de salle de bain. / Installation including bathroom heaters.

5
CONVECTAIR recommends that all electric heaters be installed in accordance with applicable
local and national codes and by a qualified electrical contractor.
WARNING:
# Do not use the ground wire as a communication wire. Do not ground this white
communication wire. (Canadian Electrical Code 10-200, U.S National Electrical Code 1999
artical 250)
3) INSTALLATION AND CONNECTIONS
A) Installation :
The 7392 ECP CASSETTE can only be installed in the control panel of a CONVECTAIR; ALTO, MEZZO,
SOLO, TENOR or OPERA ( 7384, 7383, 7382, 7715 and 7720).
CTo install the MODULE, use the point of a screwdriver to press down on the clip (Fig. 1A), then
remove the cover. Insert the CASSETTE in its compartment. Allow 15 minutes for the 7392 ECP
CASSETTE to be fully charged.
COPERA model : please consult installation manual for the OPERA 7720
COn the thermostat control panel, turn the mode selector to program setting ( )(Fig. 1B) to allow
the heater to receive the CASSETTE’s signal.
B) Connections :
A Convectair equipped with one 7392 ECP CASSETTE can control up to 20 CONVECTAIR heaters
(equipped with a 7392 RCP CASSETTE) for a maximum wire length of 90 to 100 feet. (33 meters)
C) Basic principle :
The Programmer system requires the installation of at least one CASSETTE 7392 ECP transmitter and at
least one or more 7392 RCP CASSETTE on each unit to be controlled.
It is important to respect the phases from one circuit to the next. (Make sure that the circuit has 0 volts
between all red wires (white in U.S.) and 0 volts between all black wires located on the main panel.
It is also possible to control bathroom units that are compatible with a system programmer but have no
compartment to accept a CASSETTE. This is done by the use of a pilot wire connecting the bathroom unit to
a nearby unit that is controlled by a 7392 RCP CASSETTE.
To do this, first we must connect the compatible bathroom unit to a controlled unit, by means of a pilot wire.
Depending on the installation this may require specific wiring, such as:
NMD 12/3 (The white wire shall be marked and connected to the purple wire of each Convectair unit; the
red and black wires will be reserved for electrical power).
NMD 14/2 and FAS 105 18/2 (Only one wire will be used and connected to the purple wires of each
Convectair unit; the rest shall not be used).

6
WARNING:
- You must not install 2 PROGRAMMER MODULE in the same zone
- It is imperative to respect the connection polarities of all convectors of one zone.
- The communication wire must not be grounded.
The 7392 ECP CASSETTE can control up to 20 Convectair units per Zone, it is essential that the phases and
loads be respected, for instance 3750 W per 20 A circuit.
# IMPORTANT: If using a pilot wire : communication wires carry 120V. Since a zone may have several
circuits, switch the circuit breaker to the “OFF” position in the service panel for all circuits in the zone
before accessing the junction box of any heater.

7
Note: Two Instruction labels (English and French) are provided with the
PROGRAMMER MODULE. Stick the desired version directly on the
PROGRAMMER MODULE.
4) OPERATION:
NOTE:
- The PROGRAMMER MODULE is equipped with a capacitor that
allows programmed information to remain stored up to 1 hour in case of
a power failure. There are no batteries to replace.
- The PROGRAMMER MODULE can be programmed directly on the
CONVECTAIR heater (under tension) or out of its socket after being
completely charged.
- During the charging period (approximately 15 minutes), the signal through the communication wire is
comfort. No other signal can be transmitted until the PROGRAMMER MODULE is fully charged.
A) Setting the clock :
Make sure the PROGRAMMER MODULE is fully charged (the screen will display a blinking “00:00")
- Hold “ mode” key for 2 seconds
- Set the hour with”+” or ”-” key and confirm with “OK”
- Set the minutes with ”+” or ”-” key and confirm with “OK”
- Set the day with ”+” or ”-” key and confirm with “OK”
(ex. Monday=1, Tuesday=2... Sunday=7)
B) Assigning programs :
7 pre-selected programs are detailed on the instruction label and memorized for life in the PROGRAMMER
MODULE. Temperature mode (confort or economy) is recorded in 1 hour increments.
NOTE: Time is shown using the 24 hour system :
0h 2h 4h 6h 8h 10h 12h 14h 16h 18h 19h 20h 22h 24h
0am 2am 4am 6am 8am 10am 12am 2pm 4pm 6pm 7pm 8pm 10pm 12pm
- Press the “mode” key and hold for two seconds, then press again.
- Using the “+” and ”-” keys, choose the desired program for each day (starting with day 1) using any of
the standard programs (P1 to P7), or a customized program (P=).
* If using a standard program; press “OK” to confirm your selection and to go to the next day.
* To build your customized program; - Press “mode” key again
- For each hour, choose comfort with the “+” key or, economy with the “-” key.
-After completing the 24 hour cycle,press “OK” to go to the next day.

8
WARNING: Heaters switching from economy to comfort mode may become very hot to the
touch. Please keep children away from heaters at all time. Once the room reaches the comfort
temperature, heaters will begin to cycle again at a more moderate level.
NOTE:
- It is possible to assign a different customized program for each day of the week.
- To return to the clock setting, you must complete the full 7 day programming cycle. Simply press “OK” if
no change is required.
5) OTHER FEATURES
A) Frost protection mode :
To go into frost protection mode, press the “-/Hgel” key for 4 seconds. With the “+” or “-” key, select the
number of days desired and confirm with “OK“ (from 01 to 99)
All CONVECTAIR in that PROGRAMMER MODULE’s zone will go into frost protection mode with no
possibility of bypassing.
Note : If you have more than one zone, “Zone 1" will initiate -/Hgel on all units, in all zones. The -
/Hgel can be dis-activated by any one of the other ECP programer from any other zone.
Countdown starts immediatly and the original program will resume at midnight when the selected number of
days is over.
To cancel the frost protection mode at any time, press the “-/Hgel” key again. The clock display will
reappear and normal programming will resume.
B) Manuel bypass :
It is also possible to bypass a program temporarily on any individual convection heater by turning the dial of
the mode selector on the unit itself (Fig. 1, B)
- comfort mode--------------------------------------------- mode selector on
- economy mode------------------------------------------- mode selector on
- frost protection mode----------------------------------- mode selector on
- Shut off ------------------------------------------------- mode selector on “OFF”
To cancel the bypass and to return to the original program, turn the dial of the mode selector of each unit
back to the program setting .
C) In case of power failure :
- In the event of a power failure exceeding 1 hour the PROGRAMMER MODULE may loose its charge.
WARNING: Depending on the type of construction and the location of water pipes in the house,
we recommend that you not use the frost protection mode during extended periods of below
freezing temperature.

9
Only a few seconds are necessary to reajust the time and day. The programs,
standard or customized, are protected at all times.
The screen will display a blinking “00:00". Simply readjust the time and day
of the week (See 4A above).
6) LOCKING THE PROGRAMMER MODULE
A special screw is provided with the PROGRAMMER MODULE which,
when installed properly, makes it impossible to extract the module from its socket. Take out the screw from
the module ( Fig 3A), replace the module in the socket and fasten
the screw through the protruding lug on the side of the unit
corresponding to the hole in the module, (Fig 3B).
7) PROGRAMMING EXAMPLE
A) Setting the time and day:
It is Friday, and it’s 6:18 pm (18:18 hours)
Press “mode” for 2 seconds
The hours are flashing,
Using the “+” or “-” key, set the hour display to 18
Confirm with “OK” and go to the minutes
The minutes are flashing,
Using the “+” or “-” key, set the minutes display to 18
Confirm with “OK” and go to the day
The day is flashing,
Using the “+” or “-” key, set the day display to 5 (Monday = 1, Tuesday = 2,
...Friday = 5)
Confirm with “OK”
The PROGRAMMER MODULE is now set for Friday at 6:18 pm (18:18)
Now, start the actual programming.
B) Programming example with pre-selected programs :
(using P1 for Monday to Wednesday and P2 for Thursday and Friday).
Press “mode” for 2 seconds; the time is displayed ; press once again quickly, to
get to day 1(Monday).The P1 program is now flashing;
Using the “+” or “-” key, choose the standard program desired for Monday.
Assign program P1 for Monday
Confirm with “OK” and go to the next day
For Tuesday (2) and Wednesday (3), choose the same program as for Monday (1)
Press “OK” to confirm P1for each day and go to Thursday (4)

10
P1 is now flashing
Using the “+” or “-” key, choose P2
Confirm with “OK”
Friday will be set the same as Thursday
Confirm with “OK” and go to Saturday to customize a program.
C) Choose a customized program (for the weekend).
Saturday (6) is automatically selected following the last entry.
Using the “+” or “-” key, go to P= (a)
Press “mode”
The first cursor of the program is flashing (b)
Assign either a comfort or economy setting for each hour of the day using the “+” or “-” key
After completing the 24 hour cycle, confirm with “OK” and go to Sunday
For Sunday, use the same procedure as above, confirm with “OK” and go back to the original screen.
The programming schedule is now complete for the entire week
D) Individual programming :
Neither pilot wire nor the 7392 RCP CASSETTE are necessary to control a single Convectair heating unit. A
single 7392 ECP programmer CASSETTE transmitter, can simply be installed in it’s compartment (see Fig.
1A)
E) Example of a programmable zone configuration :
The programmable zone will enable us to link a 7392 ECP CASSETTE
programmer to one or more RCP receiver CASSETTES. We can create 3
distinct programmable zones with 20 heater units each.
To protect your control system from outside and neighboring transmitters, the
Convectair 7392 ECP programmer transmitter is equipped with a four digit
Mother Code.
F) Home code programming :
You select the mother Code.
1. Press on “MODE” for 4 seconds
2. With the + or - keys select your digits (0 - 9)
3. Press “OK” to accept
4. Press “MODE” for next
When all 4 digits have been accepted, press “Mode” and go to the next screen.
(Assigning a zone)
G) Assigning a zone :
At the Transmitter 7392 ECP
Assigning will enable us to define the series of Convectair heater units (with
/