Page is loading ...

MADE IN USA
COPYRIGHT - HEATMOR
TM
INC.
Revised 11/11
MY DEALER IS:
105 Industrial Park Ct. NE,
P.O. Box 787
Warroad, MN 56763
Manufactured By:
OperatiOns and
Maintenance Manual
TM

OUTDOOR WOOD FURNACE BEST BURN PRACTICES
Read and follow all operating instructions supplied by the manufacturer.
FUEL USED: Only those listed fuels recommended by the manufacturer of your
unit. Never use the following: trash, plastics, gasoline, rubber, naphtha, household
garbage, material treated with petroleum products (particle board, railroad ties and
pressure treated wood), leaves, paper products, and cardboard.
LOADING FUEL: For a more efcient burn, pay careful attention to loading times
and amounts. Follow the manufacturer’s written instructions for recommended
loading times and amounts.
STARTERS: Do not use lighter uids, gasoline, or chemicals.
LOCATION: It is recommended that the unit be located with due consideration to
the prevailing wind direction.
Furnace should be located no less than 100 feet from any residence not served
by the furnace.
If located within 100 feet to 300 feet to any residence not served by the furnace,
it is recommended that the stack be at least 2 feet higher than the peak of that
residence.
Residence
served by furnace
Chimney height
should be 2 feet above roof line.
Minimum of 100 feet
Residence not
served by furnace
1.
2.
3.
4.
5.
•
•
Always remember to comply with all applicable state and local codes.
6.
Outdoor Furnace Manufacturers Caucus
Wiring Diagram
Model 200 SSRII
LIGHT
COMBUSTION BLOWER
LIMIT
HIGH
OUTLET
JUNCTION BOX
FAN SWITCH
R3CCOMR30R2R1 L NC2C1T2T1
TSWB
JUNCTION BOX
Door Switch
THERMOCOUPLE
Low Water Probe
200 SSR II Wiring Diagram

Outdoor Furnaces
TM
THE
SAVE THESE INSTRUCTIONS

ii
When these safety symbols appear on the following pages, they will
alert you to the possibility of serious injury if you do not comply with the
corresponding instructions. The hazard may originate from something
mechanical or electrical shock. Please read the instructions carefully.
When you see this safety symbol on the following pages, it will alert you
to the possibility of damage to your HEATMOR
TM
Stainless Steel Outdoor
Furnace if you do not comply with the corresponding instructions. Please
read the instructions carefully.
The HEATMOR
TM
Stainless Steel Outdoor Furnace is certied to offer safe
service provided it is installed, operated and maintained in accordance with
the instructions contained in this manual.
Proper personal protective equipment, (PPE), MUST BE WORN AT ALL
TIMES when servicing and maintaining any of the HEATMOR
TM
Stainless
Steel Outdoor Furnace product line.

iii
TABLE OF CONTENTS Page #
DEAR HEATMOR™ OWNER 1
NOTICE TO THE READER 2
EPA PHASE 2 HANGTAG MODEL 200 SSRII 3
UL COMPLIANCE 4
1 FURNACE PHOTO 5
RESIDENTIAL FURNACE SPECIFICATIONS 6
2 FRONT CUT AWAY VIEW OF MODEL 200 SSRII 7
FURNACE PARTS LIST 8
3 REAR CUT AWAY VIEW OF MODEL 200 SSRII 9
FURNACE PARTS LIST 10
4 MINIMUM CLEARANCE SEPARATION SPECIFICATIONS 11
5 WARNINGS AND PRECAUTIONS 12
A Installation 12
B Electrical 13
C Other 13
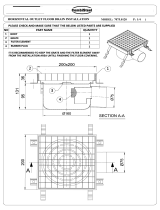
6 CONCRETE PAD SPECIFICATIONS 14
A Model 200 SSRII Pad Specifications 14
7 INSTALLATION OF THE HEATMOR™ FURNACE 15
A Equipment Required 15
B Placing the HEATMOR™ on the Concrete Pad 15
C Caulking Around the Firebox Base 15
D Caulking Around the Outside Perimeter of HEATMOR™ 15
E Filling the HEATMOR™ Outdoor Furnace Initially with Water 16
F Maintaining Water in the Bladder and in the HEATMOR™ 17
G Initial Installation of Sand 18
i. Types of sand to use 18
ii. Installation 18
H Heatmor Recommended Installation Instructions 19-21
8 SAFE OPERATING GUIDELINES 22
A Operation 22
B Lighting Your HEATMOR™ for the First Time 24
C Dew Point 25
D Loading Wood into the HEATMOR™ 26
E What can I burn? 27
i. Wood 27
F How does a fire burn out? 27
G Types of Wood 28
H Wood as a Fuel 28
I Stages of Combustion 28
J Efficiency Measurements and Types of Fires 29
K Types of Fires 29
L Handling and Storage of Wood 30

iv
9 WATER 31
A Qualities of Water to Use 31
B Water Level Maintenance 31
C Removal of water and replacement of water 31
D Water Additives 32
E Water Treatment Additives and Safety Specifications 33
F Adding Freeze Protection Products 34-35
10 BLADDER ASSEMBLY 36
A Bladder 36
B Bladder Gate Valve and Bladder Hose 37
C Water Level Gauge 38
11 WATER JACKET 39
A Water Jacket 39
B Supply Line and Return Line Connectors 39
C Relief Vent Pipe and Weighted Pop off Ball 39
12 FIREBOX AND OTHER COMPONENTS 40
A Firebox 40
B Firebox Door 41-42
C Firebox Door Hoses and Elbows 43
D Firebox Door Handle 44
E Firebox Door Hinge 45
F Firebox Door Latch 45
G Firebox Door Holder 45
H Firebox Door Gasket 45
I Firebox Door Frame 46
J Firebox / Base Connector Clamps 47
K Firebrick 47
L Standard Grates 47
M Sand 48
i. Types of sand to use 48
ii. Installation 48
13 AIR SUPPLY 49
A Combustion Air Blower and Flipper Assembly 49
i. Operation of the Combustion Air Blower and Flipper Assembly 49
ii. Steps to Maintain your Blower / Flipper Assembly 49
B Air Box(s) 50
D Automatic Fan Switch (A.F.S.) 51
14 CHIMNEY AND TOP FLUE
52
A Chimney 52
B Chimney Extension(s) 52
C Flue 53
D Top Flue Cover 53
E Flue Scraper 53

v
15 ASHES 54
A Ash Management and Ash Removal 54
B Ash Pan 55
C Ash Auger 55
D Ash Auger Tube 56
E Ash Auger Tube Cover Plate 56
16 ELECTRICAL
57
A Electrical Supply 57
B Electrical Supply Junction Box 57
C Double Electrical Outlets at rear 58
D Electronic Controller 58
E Temperature Probe 59
F Water Temperature Range Control 59
G High Water Temperature Safety Shutoff Control 60
H Front Light and Fan Power Switch 61
I In The Event of a Power Failure 61
17 EXTERIOR CLADDING AND INSULATION 62
A Outer Door of HEATMOR™ 62
B Roof of the HEATMOR™ 62
C Sides of the HEATMOR™ 63
D Insulation 63
18 AIR LEAKS 64
A Checking For Air Leaks 64
B Why do we not want any air leaks? 64
19 WATER LEAKS 65
20 DOMESTIC COIL
66
21 SEASON START UP & SHUT DOWN CHECKLISTS 67-69
22 FREQUENTLY ASKED QUESTIONS
70-71
23 TROUBLESHOOTING AND SOLUTIONS
72-84
HEATMOR™ STAINLESS STEEL LIMITED WARRANTY
85
HEATMOR™ FOR LIFE
86
NEW FURNACE DELIVERY CHECK SHEET
87
WIRING DIAGRAMS 88

1
Dear HEATMOR
™
Owner,
On behalf of myself and the employees of HEATMOR™, I would like to take this opportunity to personally
thank you for the purchase of our HEATMOR™ Stainless Steel Outdoor Furnace. You can be assured that
your HEATMOR™ was constructed with great emphasis on quality and workmanship. It is our commitment to
provide you with the finest outdoor furnace in the industry. We wish you many years of trouble-free use and we
sincerely hope you enjoy the comforts of burning wood.
This manual contains the manufacturer’s recommendations for operation and maintenance of the HEATMOR
™
Stainless Steel Outdoor Furnace. Also included are some regular maintenance tips and FAQ’s (frequently
asked questions). Please observe and follow all safety instructions as directed in this manual. SAVE THESE
INSTRUCTIONS FOR FUTURE REFERENCE.
Finally, please fill out your registration and warranty forms, if you haven’t done so already. If you have any
further questions on the operation or maintenance of your HEATMOR™ Outdoor Furnace, please contact your
local dealer.
Sincerely,
Gerry Reed,
President

2
NOTICE TO THE READER
HEATMOR™ Inc. warrants and guarantees ALL HEATMOR™ Stainless Steel Outdoor Furnace Models.
HEATMOR™ Inc. does not warrant or guarantee any of the supporting products described within this
Operations and Maintenance Manual.
The contents, descriptions, directions, diagrams, and recommendations within this material are for the sole
purpose of suggested operation and maintenance methods.
Furthermore, HEATMOR™ Inc. shall not be liable for any special, consequential, or exemplary damages,
resulting, in whole or part, from the readers’ neglectful use, based upon the material within this Operations and
Maintenance Manual. Adhere to and follow all maintenance procedures set forth in this manual.
Person(s) operating an OWHH is/are responsible for operation in a manner that does not create a public or
private nuisance condition. Meeting the distance and stack height recommendations from the manufacturer
and requirements in applicable state and local regulations may not always be adequate to prevent nuisance
conditions in some areas due to terrain or other factors.
The methods of operation described within this Operations and Maintenance Manual have proven to be
effective for HEATMOR™ Inc. for the sole purpose of the operation of a HEATMOR™ Stainless Steel Outdoor
Furnace.
All formulas and gures listed within this Operations and Maintenance Manual are approximated and should be
read as such.
For additional copies or information, contact
HEATMOR™ Inc.
105 Industrial Park Court NE,
P.O. Box 787,
Warroad, MN 56763 USA
Phone: (218) 386-2769
Fax: (218) 386-2947
Website: www.heatmor.com
E-mail: woodheat@heatmor.com
Copyright © 2011 - HEATMOR™ INC.
All rights reserved. No part of this Operations and Maintenance Manual may be reproduced or used in any
form or by any means - graphic, electronic or mechanical, including photocopying, recording, taping, or
information storage and retrieval systems - without the written permission of HEATMOR™ Inc.
MODEL 200 SSRII
Printed - 2011

3
EPA PHASE 2 HANGTAG MODEL 200 SSRII
EPA has determined, based on testing by an accredited independent laboratory, that this
model qualifies at the Phase 2 emissions level for U.S. EPA’s Voluntary Program.
Heatmor
200SSR11
66,842 BTU/HR
87.1% (using higher heating value)
99.9% (using lower heating value)
3.7 GRAMS/HR (average)
11.9 GRAMS/HR (maximum test run)
0.16 LBS/MILLION BTU INPUT
0.18 LBS/MILLION BTU OUTPUT
0.07 GRAMS/HR/10,000 BTU OUTPUT
MANUFACTURER:
MODEL NUMBER:
8-HOUR OUTPUT RATING:
AVERAGE EFFICIENCY:
PARTICLE EMISSIONS:
0.18
THIS MODEL
Phase 2 Qualified models are cleaner and pollute less than those
models that have not met this emission level. Exposure to smoke has
been associated with respiratory illness and other health problems.
Models that have lower smoke emissions may reduce your risk.
0

4
Certificate Number
20090904- MH46521
Page 1 of 1
Report Reference
MH46521, 2008 August 22
Issue Date
2009 September 04
Issued to:
HEATMOR INC
105 INDUSTRIAL PARK CT NE
WARROAD, MN 56763 USA
Solid-fuel-fired Water Heaters
This is to certify that
representative samples of
Model Descriptions: Wood-fired water heaters, Models 100CSS, 200CSS,
400CSS, 400DCSS, 200SSR, 200SSRII, and 400SSR. These assemblies are
provided with water tanks, which are vented and provide for atmospheric
pressure in the water chamber.
Have been investigated by Underwriters Laboratories Inc.® in accordance
with the Standard(s) indicated on this Certificate.
Standard(s) for Safety:
The basic standards used to investigate products in this category are ANSI/UL
732, "Oil-Fired Storage Tank Water Heaters," ANSI/UL 391, "Solid-Fuel and
Combination-Fuel Central and Supplementary Furnaces," UL Subject 2523
,
"Outline of Investigation for Solid Fuel-Fired Water Heaters and Boilers."
CAN/CSA B366.1, "Solid-Fuel-Fired Central Heating Appliances," ULC-S627,
"Standard for Space Heaters for Use with Solid Fuels," and CSA B140.12, "Oil-
Burning Equipment: Service Water Heaters for Domestic Hot Water, Space
Heating, and Swimming Pools."
Additional Information:
None
Only those products bearing the UL Listing Mark for the US and Canada should be
considered as being covered by UL's Listing and Follow-Up Service meeting the
appropriate requirements for US and Canada.
The UL Listing Mark for the US and Canada generally includes: the UL in a circle
symbol with “C” and “US” identifiers:
the word “LISTED”; a control number
(may be alphanumeric) assigned by UL; and the product category name (product
identifier) as indicated in the appropriate UL Directory.
Look for the UL Listing Mark on the product
Issued by:
Jim Larin
Reviewed by:
James Nowak
Jim Larin, Customer Service Professional
James Nowak, Staff Engineer
Underwriters Laboratories Inc. Underwriters Laboratories Inc.
Any information and documentation involving UL Mark services are provided on behalf of Underwriters Laboratories Inc. (UL) or any authorized
licensee of UL
For questions in The United States of America you may call 1-877-UL-HELPS.

5
HEATMOR
™
STAINLESS STEEL RESPONSE OUTDOOR FURNACE MODEL
CHAPTER 1
Model 200 SSRII

6
RESIDENTIAL FURNACE SPECIFICATIONS
Specications
Overall Width (Inches)
Base Width (Inches) (Footprint)
Overall Height (Inches)
(With chimney stub)
Overall Length (Inches)
Base Length (Inches) (Footprint)
Total Weight (lbs., without water)
Water Capacity (U.S. gallons)
Forced Draft (C.F.M.)
Chimney Size (Inches)
Maximum Wood Length (Inches)
Insulated Heating Area (Sq. Ft.)*
1 Loading/day
2 Loading/day
Firebox Width (Inches)
Firebox Length (Inches)
Firebox Height (Inches)
Volume of Firebox (Cu. Ft.)
Firebox Door Size (Inches) (W x H)
Flue Transfer Area (Sq. Ft.)
BTU’s (maximum)**
Water Jacket Steel
Gauge
Firebox Steel
Gauge
Base Steel
Gauge
Base of Unit to
Bottom of Loading Door (Inches)
Warranty - Workmanship
Warranty - Corrosion
Approvals Test Standards
Hook-ups
Total Heat Extraction Area (Sq. Ft.)
Type of Fuel
Electrical Supply
* This is an estimate only. Actual loadings per day may vary depending on structures heated and type of wood used.
** This value should only be used as an indication of the furnace’s heat recovery ability. Sustained outputs at this rate will increase the
loadings per day. Some types of wood may prevent the furnace from reaching this maximum output.
Model 200 SSRII
50
46.5
82.5
95
83.75
2175
377
150
8
24
2500
5000
24
24
42
14
20 x 18
56
200,000
409 Stainless
10
409 Stainless
10
409 Stainless
14
24
Limited Lifetime
Limited Lifetime
UL Subject
2523
Back
136.5
Wood
115 V, 60HZ, 1
Phase

7
CHAPTER 2
FRONT CUT-AWAY VIEW OF HEATMOR™
200 SSRII OUTDOOR FURNACE
(For parts not shown on the cut-away view, please refer to the appropriate chapter for further details.)
24
41
36
49
20
21
1
2
3
4
5
6
9
10
11
12
15
18
19
25
27
28
34
50

8
FURNACE PARTS LIST
Firebox
1) Firebox
2) Firebox door
3) Firebox door hoses and elbows
4) Firebox door handle
5) Firebox door hinge
6) Firebox door latch
7) Firebox door handle holder (not shown)
8) Firebox door gasket (not shown)
9) Firebox door frame
10) Firebox / base connector clamps
11) Firebrick
12) Standard grates
13) Sand
14) Flue Bafe
Water jacket
15) Water jacket (surrounds rebox)
16) Supply line threaded connector
17) Return line threaded connector
18) Relief vent pipe
19) Weighted pop off valve
Air supply
20) Combustion air blower
21) Flipper assembly
22) Air box
23) Cut front grate (not shown)
24) Automatic Fan Switch (A.F.S.)
Chimney and top flue
25) Chimney
26) Chimney extension(s) (not shown)
27) Two pass ue
28) Flue cover plates
29) Flue scraper (not shown)
50) Flue Ash Catcher
Ashes
30) Ash pan (under grates #12)
31) Ash auger (not shown)
32) Ash auger tube
33) Ash auger tube cover plate
Bladder assembly
34) Bladder
35) Bladder gate valve and hose
Electrical
36) Electronic Controller
37) Electrical supply junction box
38) Electrical plug outlets
39) Water temperature high-limit
controller (aquastat)
40) Low voltage junction box
41) Front light and combustion air
blower control switch
42) Temperature Probe
43) Low Water Switch
Housing - (not shown)
44) Outer front door
45) Outer rear door
46) Roof
47) Sides
48) Insulation
Lift hook
49) Lift ring
- FRONT CUT-AWAY OF 200 SSRII

9
REAR CUT-AWAY VIEW OF HEATMOR™
200 SSRII OUTDOOR FURNACE
(For parts not shown on the cut-away view, please refer to the appropriate chapter for further details.)
15
33
37
34
49
27
27
25
18
22
14
28
43
17
16
39
42
35
19
32
CHAPTER 3
38
1
40

10
FURNACE PARTS LIST - 200 SSRII
Firebox
1) Firebox
2) Firebox door
3) Firebox door hoses and elbows
4) Firebox door handle
5) Firebox door hinge
6) Firebox door latch
7) Firebox door handle holder (not shown)
8) Firebox door gasket (not shown)
9) Firebox door frame
10) Firebox / base connector clamps
11) Firebrick
12) Standard grates
13) Sand
14) Flue Bafe
Water jacket
15) Water jacket (surrounds rebox)
16) Supply line threaded connector
17) Return line threaded connector
18) Relief vent pipe
19) Weighted pop off valve
Air supply
20) Combustion air blower
21) Flipper assembly
22) Air box
23) Cut front grate (not shown)
24) Automatic Fan Switch (A.F.S.)
Chimney and top flue
25) Chimney
26) Chimney extension(s) (not shown)
27) Two pass ue
28) Flue cover plates
29) Flue Ash Catcher
Ashes
30) Ash pan (under grates #12)
31) Ash auger (not shown)
32) Ash auger tube
33) Ash auger tube cover plate
Bladder assembly
34) Bladder
35) Bladder gate valve and hose
Electrical
36) Electronic Controller
37) Electrical supply junction box
38) Electrical plug outlets
39) Water temperature high-limit
controller (aquastat)
40) Low voltage junction box
41) Front light and combustion air
blower control switch
42) Temperature Probe
43) Low Water Switch
Housing - (not shown)
44) Outer front door
45) Outer rear door
46) Roof
47) Sides
48) Insulation
Lift hook
49) Lift ring

11
MINIMUM CLEARANCE SEPARATION SPECIFICATIONS
The HEATMOR™ furnace, is certied to be installed outside, away from other buildings. Please observe the
following “Clearance to Combustibles” guidelines. If you have any further questions, which are not addressed
in this Operators Manual, please contact your local dealer for further information.
♦ To HEATMOR™ Stainless Steel Outdoor Furnace Back. 96 Inches
♦ To HEATMOR™ Stainless Steel Outdoor Furnace Top. 18 Inches
♦ To HEATMOR™ Stainless Steel Outdoor Furnace Front. 48 Inches
♦ To HEATMOR™ Stainless Steel Outdoor Furnace Chimney. 18 Inches
♦ To HEATMOR™ Stainless Steel Outdoor Furnace Sides. 6 Inches
♦ Do not store combustible liquids or materials near the furnace.
♦ It is not recommended to install the furnace in any form of building.
Before installing your HEATMOR™ Stainless Steel Outdoor Furnace, if in the United States, always check
any and all applicable state and local regulations and inform your insurance agent.
Before installing your HEATMOR™ Stainless Steel Outdoor Furnace, if in Canada, always check any and all
applicable Provincial and Municipal regulations and inform your insurance agent.
HEATMOR™ Inc. strongly recommends not installing a HEATMOR™ Stainless Steel Outdoor Furnace within
50 feet of any ammable structure.
A HEATMOR™ Stainless Steel Outdoor Furnace should be located with consideration to your neighbor’s
property and in accordance with local ordinances. Refer to the “Best Burn Practices” for further operating
considerations.
HEATMOR™ Outdoor Furnace, is not designed or certied to be located in densely populated areas.
CHAPTER 4

12
WARNINGS AND PRECAUTIONS
Please read the following list of cautions, warnings and dangers before installing and operating
your HEATMOR™ STAINLESS STEEL OUTDOOR FURNACE. If you have any questions or concerns
regarding any of the following cautions, warnings, dangers or instructions in this Operations and
Maintenance manual, please contact your local dealer.
Familiarize yourself with the “Best Burn Practices” located on the inside front cover.
Installation
If you are installing parts of this heating system on a “do-it-yourself” basis, it is highly recommended
that you purchase a total system installation manual recommended by your dealer.
1) The HEATMOR™ furnace is designed for outside installations, away from other buildings.
2) Please observe the following “ Clearance to Combustibles “ guidelines.
To unit back = 96 inches To unit sides = 6 inches
To unit front = 48 inches To chimney = 18 inches
To unit top = 18 inches
3) Before installing the furnace, always check any and all applicable state, provincial, and local
regulations.
4) HEATMOR™ Inc. strongly recommends not installing a HEATMOR™ Stainless Steel Outdoor
Furnace within 50 feet of any ammable structure.
5) A HEATMOR™ Stainless Steel Outdoor Furnace should be located with consideration
to your neighbor’s property and in accordance with local ordinances. The HEATMOR™ Outdoor
Furnace is not designed to be located in densely populated areas.
6) HEATMOR™ suggests the use of brass ttings when installing the unit.
7) Before installing the HEATMOR™ furnace, contact and inform your insurance agent.
8) The HEATMOR™ Outdoor Furnace is to be installed on a concrete base only. Any attempt to place
the furnace on any other surface may void the warranty.
9) Do not connect the HEATMOR™ furnace to the chimney of any existing heating system.
10) This unit was not designed, nor is it recommended, for use as a stand-alone heating system. A back
up source of heat must be in place to prevent the outdoor furnace from freezing and to provide
supplementary heat for the heated buildings.
11) Do not pressurize the HEATMOR™ Outdoor Furnace. This unit is designed to operate under
atmospheric pressure only.
12) Place the in-line ll/drain assembly in a location where the drained contents of the HEATMOR™ will
not cause damage to the surrounding areas or it’s contents.
CHAPTER 5

13
Electrical
1) Do not connect the electrical components of the HEATMOR™ Outdoor Furnace to any other
electrical appliance.
2) This HEATMOR™ Outdoor Furnace operates on 115-volt power only. Do not connect the furnace to a 220-
volt electrical supply.
3) HEATMOR™ INC. recommends a licensed professional electrician make all the necessary
electrical connections involved with the installation of the furnace.
4) Always disconnect the HEATMOR™ Outdoor Furnace from the main electrical supply before
servicing any of the electrical components of the HEATMOR™ Outdoor Furnace.
5) Always disconnect any existing electrical connections to any in-house heating system, before
installing the outdoor furnace to any existing indoor heating system or appliances.
6) The red wire from the high-limit aquastat on the back of the HEATMOR™ should be wired to the
indoor temperature control to override the thermostat. This will dissipate excess heat in the event of a
possible malfunction with the HEATMOR™. (The red wire is capped off in the electrical junction
box when the HEATMOR™ is new.)
Other
1) The unit may be connected to an existing indoor boiler system by installing a water-to-water heat
exchanger.
1) HEATMOR™ INC. recommends that you contact a licensed professional plumber to make
all necessary plumbing installations between the HEATMOR™ furnace and the existing heating
system of your building(s).
2) Do not operate the HEATMOR™ furnace until all electrical and water line connections have
been properly installed and tested.
3) Do not allow any re in the rebox until the HEATMOR™ has the correct amount of water and
sand installed.
/