MARUTI SUZUKI ZEN-VX Owner's manual
- Category
- Cars
- Type
- Owner's manual
This manual is also suitable for

1
843-63B-72F-D
8 PAGES MARUTI 800, ESTEEM, ZEN (CARBURETTOR)
1
2
3
4
5
6
7
8
9
10
11
12
13
14
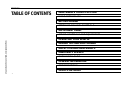
TABLE OF CONTENTS
MAINTENANCE SERVICE RECORD
WARRANTY POLICY
BEFORE DRIVING
STEERING COLUMN CONTROLS
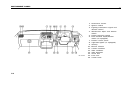
INSTRUMENT PANEL
OTHER CONTROLS AND EQUIPMENT
OPERATING YOUR VEHICLE
DRIVING TIPS AND SAFE DRIVING
INSPECTION AND MAINTENANCE
EMERGENCY SERVICE
BODY WORK CARE
GENERAL INFORMATION
SPECIFICATIONS
SERVICE NETWORK

2
8 PAGES MARUTI 800, ESTEEM, ZEN (CARBURETTOR)
843-63B-72F-D

3
8 PAGES MARUTI 800, ESTEEM, ZEN (CARBURETTOR)
843-63B-72F-D
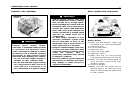
FOREWORD
MARUTI UDYOG LIMITED believes in
conservation and protection of Earth’s
natural resources.
To that end, we encourage every vehicle
owner to recycle, trade in, or properly
dispose of, as appropriate, used motor oil,
coolant, and other fluids; batteries; and
tyres.
MARUTI UDYOG LIMITED
All information in this manual is
based on the latest product
information available at the time of
publication. Due to improvements or
other changes, there may be
discrepancies between information in
this manual and your vehicle. Maruti
reserves the right to make changes
at any time without notice.
This vehicle may not comply with
standards or regulations of other
countries. Before attempting to
register this vehicle in any other
country, check all applicable
regulations and make any necessary
modifications.
IMPORTANT
w w
w w
w WARNING
w w
w w
w CAUTION
0-1
This manual is an essential part of your
vehicle and should be kept with the vehicle
at all times. Please read this manual
carefully and review it from time to time. It
contains important information on safety,
operation, and maintenance. It is especially
important that this manual remain with the
vehicle at the time of resale. The next
owner will need this information also.
You are invited to avail the three free
inspection services as described in this
manual. Three free inspection coupons are
attached to this manual. Please show this
manual to your dealer when you take your
vehicle for any Service.
To prolong the life of your vehicle and
reduce maintenance costs, the periodic
maintenance must be carried out according
to the "PERIODIC MAINTENANCE
SCHEDULE" described in “INSPECTION
AND MAINTENANCE” section of this
manual. Periodic maintenance is essential
for preventing trouble and accidents to
ensure your satisfaction and safety.
Daily Inspection and Care as per "DAILY
INSPECTION CHECKLIST" described in the
"INSPECTION AND MAINTENANCE"
section of this Manual is essential for
prolonging the operating life of the vehicle
and for safe driving.
WARNING/CAUTION/NOTE
Please read this manual and follow its
instructions carefully. To emphasise special
information, the words WARNING,
CAUTION, and NOTE have special
meanings. Information following these signal
words should be carefully reviewed.
The personal safety of the driver,
passengers, or bystanders may be
involved. Disregarding this information
could result in their injury or death.
These instructions point out special
service procedures or precautions that
must be followed to avoid damaging
the vehicle.
NOTE:
This provides special information to make
maintenance easier or important instructions
clearer.

4
843-63B-72F-D
8 PAGES MARUTI 800, ESTEEM, ZEN (CARBURETTOR)
0-2
w w
w w
w WARNING
w w
w w
w WARNING
MODIFICATION WARNING
Do not modify this vehicle.
Modification could adversely affect
safety, handling, performance, or
durability and may contravene
regulations. In addition, damage or
performance problems resulting from
modification may not be covered
under warranty.
Your vehicle has monocoque body
construction which provides for
certain crumple zones in the body
which absorbs larger part of impact
energy in the event of a front collision
and protects the occupants from
impact. Do not use any fitments such
as crash guards. These fitments will
increase the risk to the occupants
because of the shock directly getting
transmitted to the occupants.
Copying, quoting or reproduction of any part
of this manual is not permitted without
explicit approval by MARUTI UDYOG
LIMITED.
INFORMATION ON EMISSION
w w
w w
w CAUTION
Maruti recommends that maintenance
on your vehicle be performed by
Maruti Authorised Dealer/Service
Station.
If you take your vehicle for Service or
Pollution check-up at workshop other
than Maruti Authorised Dealer/Service
Station, please make sure that the
"Second air hose" (connecting second
air valve and air cleaner in models
Maruti 800, Zen and Esteem for
National Capital Region) and "H.I.C
hose" (in models Maruti 800, Zen and
Esteem) is plugged before adjustment
of CO-HC values (pollution level).
Adjustment of CO-HC values without
plugging these hoses can result in
wrong air-fuel mixture setting of car-
burettor and may consequently cause
high fuel consumption and permanent
damage to the catalytic converter and
other vehicle components. Catalytic
converter and/or other components
damage resulting from the wrong ad-
justment of air fuel mixtue are not the
responsibility of MARUTI and may not
be covered under warranty.

5
8 PAGES MARUTI 800, ESTEEM, ZEN (CARBURETTOR)
843-63B-72F-D
1
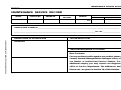
MAINTENANCE SERVICE RECORD
MAINTENANCE SERVICE RECORD
MODEL CHASSIS NO. ENGINE NO. MILEAGE BATTERY
MAKE SR. NO/BATCH CODE
DATE OF
DELIVERY
km.
OWNER'S NAME & ADDRESS ______________________________________________________________________________
______________________________________________________________________________TEL. NO. ________________
ADDRESS/STAMP OF SELLING DEALER SELLING DEALER CODE
SHOWROOM
IMPORTANT INFORMATION TO CUSTOMER
WORKSHOP
Dear Customer
For any assistance with regard to our product, please
contact General Manager/Works Manager at any of
our Dealer or Authorised Service Station. For
additional enquiry you may contact our Regional
office or Service Department. The Addresses and
Phone nos. are given in Section 14 of this Booklet.
1-1

6
843-63B-72F-D
8 PAGES MARUTI 800, ESTEEM, ZEN (CARBURETTOR)
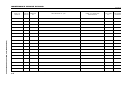
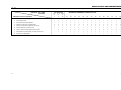
MAINTENANCE SERVICE RECORD
DATE OF
KIND OF
MILEAGE DESCRIPTION OF JOB NAME OF SERVICING JOB CARD MECHANIC’S
SERVICE
SERVICE
km DEALER/MASS NO. SIGNATURE
F....free Service P....Paid Service W....Warranty. A....Accident
1-2

7
8 PAGES MARUTI 800, ESTEEM, ZEN (CARBURETTOR)
843-63B-72F-D
2
WARRANTY POLICY
WARRANTY POLICY (4) Limitation:
This warranty shall not apply to:
(a) normal maintenance service required other than the three free
services, including without limitation, oil and fluid changes,
headlight aiming, fastener retightening, wheel balancing, wheel
alignment and tyre rotation, cleaning of injectors, adjustments
of carburettor, ignition timing, clutch and valve clearance.
(b) the replacement of normal wear parts including without
limitation, bulbs, battery, tyres and tubes, spark plugs, brake
linings, belts, hoses, filters, wiper blades and brushes.
(c) any vehicle which has been used for competition or racing.
(d) any repairs or replacement required as a result of accidents
or collision.
(e) any defects caused by misuse, negligence, abnormal use or
insufficient care.
(f) any vehicle which has been modified or altered, including
without limitation, the installation of performance accessories.
(g) any vehicle on which parts or accessories not approved by
Maruti have been used.
(h) any vehicle which has not been operated in accordance with
the operating instructions in the Maruti Owner’s Manual.
(i) any vehicle which has not received, during the warranty term,
the service inspections prescribed in the Maruti Owner’s
Manual.
(j) any vehicle which has been assembled, disassembled,
adjusted or repaired by other than an Maruti authorised
dealer/service station.
Maruti Udyog Limited (hereinafter called “Maruti”), warrants that each
new Maruti vehicle distributed in India by Maruti and sold by an
authorised Maruti dealer will be free, under normal use and service,
from any defects in material and workmanship at the time of
manufacture SUBJECT TO THE FOLLOWING TERMS AND
CONDITIONS:
(1) Qualification:
To qualify for this warranty:
(a) The Maruti vehicle must be delivered by Maruti authorised
dealer and set-up, serviced by Maruti authorised dealer/
service station.
(b) The warranty registration card in respect of each vehicle
must be completed by the dealer at the time of delivery of
the vehicle and dealer should retain the same.
(2) Term:
The term of the warranty shall be twelve (12) months from
the date of delivery to the first owner, for unlimited mileage.
(3) Maruti’s Warranty Obligation:
If any defect(s) should be found in a Maruti vehicle within the
term stipulated above, Maruti’s only obligation is to repair or
replace at its sole discretion any part shown to be defective,
with a new part or the equivalent at no cost to the owner for
parts or labour, when Maruti acknowledges that such a defect
is attributable to faulty material or workmanship at the time of
manufacture. The owner is responsible for any repair or
replacements which are not covered by this warranty.
2-1

8
8 PAGES MARUTI 800, ESTEEM, ZEN (CARBURETTOR)
843-63B-72F-D
WARRANTY POLICY
2-2
(k) any vehicle which has been used for purposes other than
what it was designed for.
(l) any damage or deterioration caused by industrial pollution
and bird droppings.
(m) insignificant defects which do not affect the function of the
vehicle including without limitation, sound, vibration and fluid
seep.
(n) any natural wear and tear including without limitation, aging
etc.
For Maruti Air-Conditioned Vehicles
(o) V-belts, hoses and gas leaks.
(5) Extent of Warranty:
This warranty is the entire written warranty given by Maruti for
Maruti vehicles and no dealer or its or his agent or employee
is authorised to extend or enlarge this warranty and no dealer
or its or his agent or employee is authorised to make any oral
warranty on Maruti’s behalf.
Maruti reserves the right to add any improvements or change
the design of any model at any time with no obligation to make
the same changes on units previously sold.
(6) Warranty Service:
To obtain warranty service, the complete vehicle must be
presented at the owner’s expenses to any authorised Maruti
dealer.
(7) Owner’s Warranty Responsibilities:
It is responsibility of each owner to:
(a) make certain that the warranty registration/PDI card was
completed at the time of delivery of the vehicle;
(b) have performed, at his own expenses, by an Maruti
authorised dealer/service station all the service inspections
specified in the Maruti “Owner’s Manual and Service Booklet”
and maintain adequate proof that such service inspections
have been performed.
(c) make certain that the Maruti authorised dealer/service station
performing the service inspection has certified the work on
the “Maintenance Service Record” page in the “Owner’s
Manual and Service Booklet” and
(d) present the Maruti “Owner’s Manual and Service Booklet” to
the authorised Maruti dealer whenever requesting service
inspections or warranty service.
If the “Owner’s Manual and Service Booklet” should be lost or
destroyed the owner should consult the authorised Maruti dealer
from whom the vehicle was purchased for instructions concerning
replacement of the “Owner’s Manual and Service Booklet”.
(8) Disclaimer of Consequential Damage:
Maruti assumes no responsibility for loss of vehicle, loss of time,,
inconvenience or any other indirect incidental or consequential
damage resulting from the vehicle not being available to the
owner because of any defect covered by this warranty.
(9) Change of Owner
Even if ownership of the vehicle changes, the remaining warranty
period is effective for the new owner.

9
72F-74E
3
BEFORE DRIVING
BEFORE DRIVING
Fuel Recommendation.......................................................................................3-1
Keys......................................................................................................................3-2
Door Locks..........................................................................................................3-3
Windows...............................................................................................................3-5
Mirrors...................................................................................................................3-7
Front Seat Adjustment......................................................................................3-8
Adjustable Head Restraints (if equipped).....................................................3-9
Seat Belts............................................................................................................3-9

10
72F-74E
3-1
BEFORE DRIVING
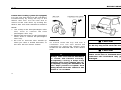
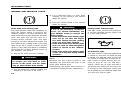
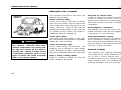
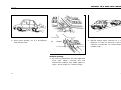
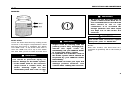
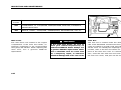
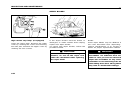
FUEL RECOMMENDATION
If your vehicle is not fitted with a restrictor
in the fuel filler pipe then you may use
leaded or unleaded petrol with an octane
number (RON) of 85 or higher. Note, it is
preferable to use unleaded petrol.
If your vehicle is fitted with a restrictor in
the fuel filler pipe (which indicates that your
vehicle is equipped with catalytic converter)
then you must use unleaded petrol with
an octane number (RON) of 87 or higher.
These vehicles are also identified by a label
attached on rear quarter glass and near the
fuel filler pipe that states: “UNLEADED
FUEL ONLY” and “ONLY UNLEADED
PETROL”.
Petrol/Methanol Blends
Blends of unleaded petrol and methanol
(wood alcohol) are also commercially
available in some areas. DO NOT USE
fuels containing more than 5% methanol
under any circumstances. Fuel system
damage or vehicle performance problems
resulting from the use of such fuels are not
the responsibility of MARUTI and may not
be covered under Warranty.
Fuels containing 5% or less methanol may
be suitable for use in your vehicle if they
contain cosolvents and corrosion inhibitors.
NOTE:
If you are not satisfied with the driveability
or fuel economy of your vehicle when you
are using a petrol/alcohol blend, you should
switch back to unleaded petrol containing no
alcohol.
Be careful not to spill fuel containing
alcohol while refuelling. Fuels
containing alcohol can cause paint
damage, which is not covered under
Warranty.
Use of leaded fuel in vehicle equipped
with catalytic converter is prohibited,
because lead deactivates the pollutant
reducing components of catalytic
converter and may result in permanent
damage to catalytic converter.
Petrol/Ethanol Blends
Blends of unleaded petrol and ethanol (grain
alcohol), also known as gasohol, are
commercially available in some areas.
Blends of this type may be used in your
vehicle if they are no more than 10%
ethanol. Make sure this petrol-ethanol blend
has octane ratings no lower than those
recommended for petrol.
ww
ww
w CAUTION
ww
ww
w CAUTION
72F-03-001E

11
72F-74E
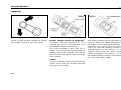
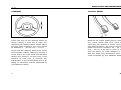
Your vehicle comes with a pair of identical
keys. Keep the spare key in a safe place.
One key can open all of the locks on the
vehicle.
The key identification number is stamped on
a metal tag provided with the keys. Keep
the tag in a safe place. If you lose your
keys, you will need this number to have
new keys made. Write the number down
and keep it in a safe accessible place away
from the vehicle.
KEYS
BEFORE DRIVING
• Do not use locally made key.
• Should you require a duplicate key,
place your order with a MARUTI
dealer only.
Note:
Keep the spare key very carefully. When it
is lost, consult your dealer by quoting key
number.
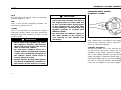
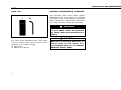
The fuel tank has an air space to
allow for fuel expansion in hot
weather. If you continue to add fuel
after the filler nozzle has automatically
shut off or an initial blowback occurs,
the air chamber will become full.
Exposure to heat when fully fuelled in
this manner will result in leakage due
to fuel expansion. To prevent such
fuel leakage, stop filling after the filler
nozzle has automatically shut off, or
when using an alternative non
automatic system, initial vent
blowback occurs.
3-2
ww
ww
w CAUTION
ww
ww
w WARNING
70F-01-003

12
72F-74E
BEFORE DRIVING
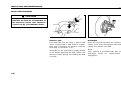
DOOR LOCKS
To lock a front door from outside the
vehicle:
a) Insert the key fully and turn the top of
the key toward the front of the vehicle,
or
b) Push in the lock lever and hold the door
handle up as you close the door.
To unlock a front door from outside the
vehicle, insert the key fully and turn the top
of the key toward the rear of the vehicle.
To lock a rear door from outside the vehicle,
push in the lock lever and close the door.
If the red mark is visible on the rear side
of the door lock lever, the door is unlocked.
To lock a door from inside the vehicle, push
in the lock lever. Pull out the lock lever to
unlock the door.
Always lock all doors when driving.
Locking the door prevents occupants
from being thrown from the vehicle in
the event of an accident. It also helps
prevent unintentional opening of the
doors.
ww
ww
w WARNING
3-3
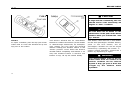
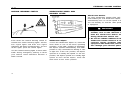
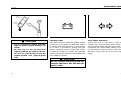
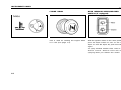
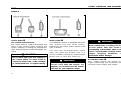
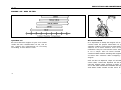
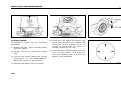
Child-Proof Locks (if equipped)
As illustrated, a child-proof lock is provided
for both rear doors. When the lock lever is
down, position 1, the child proof lock is
activated, and when up, in position 2 the
child-proof lock is deactivated, when the
child-proof lock is activated, the rear door
cannot be opened from the inside even if
the inside door lock is unlocked but can be
opened from the outside.
Be sure to place the child-proof lock
in the locked position whenever
children are seated in the rear.
ww
ww
w WARNING
72F-03-002E 70F-01-006E 70F-01-007

13
72F-74E BEFORE DRIVING
3-4
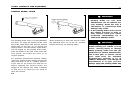
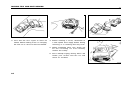
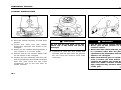
Do not use the key to lift up the lid,
or the key may break off in the lock.
While closing the hatchback PUSH
ONLY on the area as indicated above,
otherwise the hatchback may get
damaged.
ww
ww
w CAUTION
ww
ww
w CAUTION
Hatchback
To unlock insert the key and turn it
clockwise. You can also unlock the
hatchback by pulling the release lever
located on the outboard side of the driver’s
seat.
Always make sure that the hatchback
is closed and latched securely.
Completely closing it helps keep
exhaust gases from entering the car.
Completely closing the hatchback lid
also helps prevent occupants from
being thrown from the vehicle in the
event of an accident.
ww
ww
w WARNING
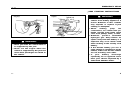
Central door locking system (if equipped)
You can lock and unlock all the side doors
simultaneously by using the key in the
driver’s door lock. You can also lock or
unlock all the side doors by moving the
driver’s door lock lever rearward or forward.
NOTE:
•Use of key in the front passenger’s door
lock, locks or unlocks the front
passenger's door only.
•Moving the lock lever on the passenger’s
doors, locks or unlocks the passenger’s
door only.
•Be sure to hold the door handle up
when you close a locked front door, or
the door will not remain locked.
72F-03-003E 72F-03-004E

14
72F-74E
BEFORE DRIVING
3-5
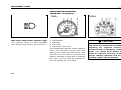
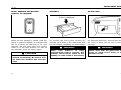
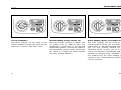
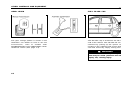
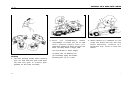
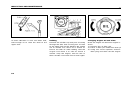
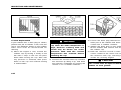
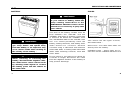
WINDOWS
Raise or lower the door windows by turning
the handle located on the door panel. Electric window controls (if equipped)
The driver’s door has switches 2 & 3 to
operate the driver’s window and front
passenger’s window respectively.
The front passenger’s door only has a
switch 4 to operate the front passenger’s
window. The electric windows can only be
operated when the ignition switch is in the
“ON” position.
TYPE-1
To close a window, push the top part of the
switch and to open the window push the
rear part of the switch.
The driver’s window has an “auto-down” and
“auto-up” feature for added convenience (at
toll booths or drive-through restaurants, for
example). This means you can open or
close the window without holding the
window switch in the “Down” or “Up”
position. Press down the driver’s window
switch completely and release it. To stop
the window before it reaches the bottom or
top, push the switch briefly.
70F-01-010 72F-03-009E 72F-03-010E

15
72F-74E BEFORE DRIVING
3-6
Since the electric windows consumes
a large amount of electricity, the same
should not be used excessively with
engine in “OFF” condition.
Be sure there are no hands or other
obstructions in the path of the driver’s
window when you activate the “auto-
up” feature.
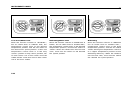
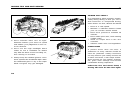
The driver’s door also has a lock button 1
for the front passenger’s window. When you
push in the lock button, the front
passenger’s window can not be raised or
lowered by operating the switch 4. To
restore normal operation, release the lock
button by depressing it again.
You should always push in the lock
button when there are children in the
vehicle. Children can be seriously
injured if they get part of their body
caught by the window during
operation.
ww
ww
w WARNING
ww
ww
w WARNING
ww
ww
w CAUTION
TYPE-2
To open a window, push the top part of the
switch and to close the window lift up the
top part of the switch.
The driver’s window has an “auto-down”
feature for added convenience (at toll booths
or drive-through restaurants, for example).
This means you can open the window
without holding the window switch in the
“Down” position. Press down the driver’s
window switch completely and release it. To
stop the window before it reaches the
bottom or top, lift up the switch briefly.
72F-03-011E 72F-03-012E

16
72F-74E
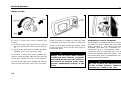
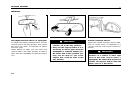
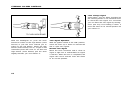
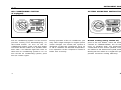
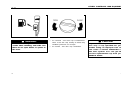
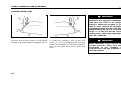
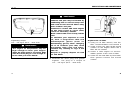
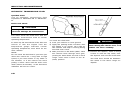
Outside Rearview Mirrors
Adjust the outside rearview mirrors (with the
help of control lever, if equipped) so you
can just see the side of your vehicle in the
mirrors.
Be careful when judging the size or
distance of a vehicle or other object
seen in the side convex mirror (if
equipped). Be aware that objects look
smaller and appear farther away than
when seen in a flat mirror.
ww
ww
w WARNING
3-7
BEFORE DRIVING
72F-03-006E
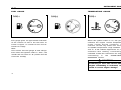
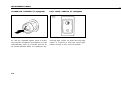
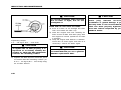
• Always adjust the mirror with the
selector set to the day position.
• Only use the night position if it is
necessary to reduce glare from the
headlights of vehicles behind you.
Be aware that in this position you
may not be able to see some
objects that could be seen in the
day position.
ww
ww
w WARNING
MIRRORS
Day-Night Rearview Mirror (if equipped)
To adjust the interior rearview mirror, set the
selector tab to the day position, then move
the mirror up, down, or sideways to obtain
the best view.
When driving at night, you can move the
selector tab to the night position to reduce
glare from the headlights of vehicles behind
you.
70F-01-012E 70F-01-013

17
72F-74E
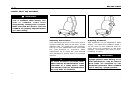
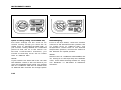
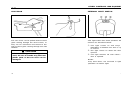
Adjusting Seatbacks
The seatbacks can be adjusted to different
angles. To adjust the seatback angle, pull
up the lever on the outboard side of the
seat, move the seatback to the desired
position, and release the lever to lock the
seatback in place.
Seatbacks should always be in an
upright position when driving, or seat
belt effectiveness may be reduced.
Seat belts are designed to offer
maximum protection when seatbacks
are in the fully upright position.
ww
ww
w WARNING
3-8
BEFORE DRIVING
70F-01-016
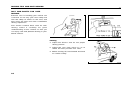
Adjusting Seat Position
The adjustment lever for each front seat is
located under the front of the seat, on the
inboard side. To adjust the seat position,
pull up on the adjustment lever and slide
the seat forward or rearward. After
adjustment, try to move the seat forward
and rearward to ensure that it is securely
latched.
To avoid excessive seat belt slack,
which reduces the effectiveness of the
seat belts as a safety device, make
sure that the seats are adjusted before
the seat belts are fastened.
ww
ww
w WARNING
FRONT SEAT ADJUSTMENT
Never attempt to adjust the driver’s
seat or seatback while driving. The
seat or seatback could move
unexpectedly, causing loss of control.
Make sure that the driver’s seat and
seatback are properly adjusted before
you start driving.
ww
ww
w WARNING
70F-01-015

18
72F-74E
BEFORE DRIVING
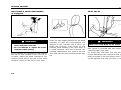
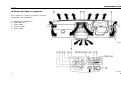
Wear Your Seat Belts at All Times.
The vehicle is provided with two automatic
retracting type seat belts.
To fasten the seat belt, pull the buckle
tongue attached to the seat belt across your
body and slide it into the buckle catch slot
on the opposite side until you hear a “click”.
SEAT BELTS
ww
ww
w WARNING
3-9
70F-01-021
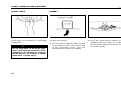
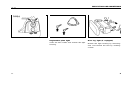
ADJUSTABLE HEAD RESTRAINTS
(if equipped)
ww
ww
w WARNING
• Never drive the vehicle with the
head restraints removed.
• Do not attempt to adjust the head
restraint while driving.
Head restraints are designed to help reduce
the risk of neck injuries in the case of an
accident. Adjust the head restraint to the
position which places the top of the head
restraint closest to the top or your ears.
There are two height positions for the head
restraints. To raise the head restraint, pull
upward on the restraint until it clicks. To
lower the restraint, push down on the
restraint while holding in the lock lever. If
a head restraint must be removed (for
cleaning, replacement, etc.), push in the lock
lever and pull the head restraint all the way
out.
70F-01-019 70F-01-020

19
72F-74E BEFORE DRIVING
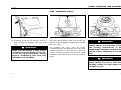
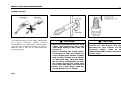
To Adjust the Belt
• Automatic retracting type
Pull the shoulder portion of the belt
upwards through the tongue plate.
The length of the diagonal shoulder strap
adjusts itself to allow freedom of movement.
The seat belt has an emergency locking
retractor (ELR), which is designed to lock
the seat belt only during a sudden stop or
impact.
No modifications or additions of any
sort should be made to the seat belt
or its operating mechanism.
ww
ww
w WARNING
3-10
70F-01-024E
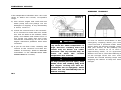
To reduce the risk of sliding under the belt
during a collision, position the lap portion of
the belt across your lap as low on your hips
as possible and adjust the belt to a snug
fit using the proper method described below.
Make sure that the belt is not twisted.
70F-01-022E 70F-01-023E
To unfasten the belt, press the release
button on the buckle catch.

20
72F-74E
BEFORE DRIVING
as tightly as is comfortable to
provide the protection for which
they have been designed. A slack
belt will provide less protection than
one which is snug.
• Make sure that each seat belt buckle
is inserted into the proper buckle
catch.
• Do not wear your seat belt over
hard or breakable objects in your
pockets or on your clothing. If an
accident occurs, objects such as
glasses, pens, etc. under the seat
belt can cause injury.
• Never use the same seat belt on
more than one occupant and never
attach a seat belt over an infant or
child being held on an occupant’s
lap. Such seat belt use could cause
serious injury in the event of an
accident.
• Pregnant women should use seat
belts, although specific recommen-
dations about restraint use should
be made by the woman’s medical
advisor.
• Periodically inspect seat belt
assemblies for excessive wear and
damage. Seat belts should be
replaced if webbing becomes frayed,
contaminated, or damaged in any
way. It is essential to replace the
entire seat belt assembly after it has
been stressed in an impact, even if
damage to the assembly is not
obvious.
• Infants and small children should
never be transported unless they
are properly restrained. Restraint
systems for infants and small
children can be purchased locally
and should be used. Make sure that
the system you purchase meets
applicable safety standards. Read
and follow all the directions
provided by the manufacturer.
• Avoid contamination of seat belt
webbing by polishes, oils,
chemicals, and particularly battery
acid. Cleaning may safely be carried
out using mild soap and water.
• For children, if the shoulder belt
irritates the neck or face, move the
child closer to the center of the
vehicle.
ww
ww
w WARNING
3-11
ww
ww
w WARNING
ˇˇ
ˇˇ
ˇ
ˇˇ
ˇˇ
ˇ
ˇˇ
ˇˇ
ˇ
Be sure to inspect all seat belt
assemblies after any collision. Any
seat belt assembly which was in use
during a collision (other than a very
minor one) should be replaced, even
if damage to the assembly is not
obvious. Any seat belt assembly
which was not in use during a
collision should be replaced if it does
not function properly or is damaged
in any way.
• Never allow persons to ride in the
cargo area of a vehicle. In the event
of an accident, there is a much
greater risk of injury for persons
who are not riding in a seat with
their seat belt securely fastened.
• Seat belts should always be
adjusted so the lap portion of the
belt is worn low across the pelvis,
not across the waist. Shoulder
straps should be worn on the
outside shoulder only, and never
under the arm. Seat belts should
never be worn with the straps
twisted and should be adjusted
ww
ww
w WARNING
ww
ww
w WARNING
ˇˇ
ˇˇ
ˇ
Page is loading ...
Page is loading ...
Page is loading ...
Page is loading ...
Page is loading ...
Page is loading ...
Page is loading ...
Page is loading ...
Page is loading ...
Page is loading ...
Page is loading ...
Page is loading ...
Page is loading ...
Page is loading ...
Page is loading ...
Page is loading ...
Page is loading ...
Page is loading ...
Page is loading ...
Page is loading ...
Page is loading ...
Page is loading ...
Page is loading ...
Page is loading ...
Page is loading ...
Page is loading ...
Page is loading ...
Page is loading ...
Page is loading ...
Page is loading ...
Page is loading ...
Page is loading ...
Page is loading ...
Page is loading ...
Page is loading ...
Page is loading ...
Page is loading ...
Page is loading ...
Page is loading ...
Page is loading ...
Page is loading ...
Page is loading ...
Page is loading ...
Page is loading ...
Page is loading ...
Page is loading ...
Page is loading ...
Page is loading ...
Page is loading ...
Page is loading ...
Page is loading ...
Page is loading ...
Page is loading ...
Page is loading ...
Page is loading ...
Page is loading ...
Page is loading ...
Page is loading ...
Page is loading ...
Page is loading ...
Page is loading ...
Page is loading ...
Page is loading ...
Page is loading ...
Page is loading ...
Page is loading ...
Page is loading ...
Page is loading ...
Page is loading ...
Page is loading ...
Page is loading ...
Page is loading ...
Page is loading ...
Page is loading ...
Page is loading ...
Page is loading ...
Page is loading ...
Page is loading ...
Page is loading ...
Page is loading ...
Page is loading ...
Page is loading ...
Page is loading ...
Page is loading ...
Page is loading ...
Page is loading ...
Page is loading ...
Page is loading ...
Page is loading ...
Page is loading ...
Page is loading ...
Page is loading ...
Page is loading ...
Page is loading ...
Page is loading ...
Page is loading ...
Page is loading ...
Page is loading ...
Page is loading ...
Page is loading ...
Page is loading ...
-
 1
1
-
 2
2
-
 3
3
-
 4
4
-
 5
5
-
 6
6
-
 7
7
-
 8
8
-
 9
9
-
 10
10
-
 11
11
-
 12
12
-
 13
13
-
 14
14
-
 15
15
-
 16
16
-
 17
17
-
 18
18
-
 19
19
-
 20
20
-
 21
21
-
 22
22
-
 23
23
-
 24
24
-
 25
25
-
 26
26
-
 27
27
-
 28
28
-
 29
29
-
 30
30
-
 31
31
-
 32
32
-
 33
33
-
 34
34
-
 35
35
-
 36
36
-
 37
37
-
 38
38
-
 39
39
-
 40
40
-
 41
41
-
 42
42
-
 43
43
-
 44
44
-
 45
45
-
 46
46
-
 47
47
-
 48
48
-
 49
49
-
 50
50
-
 51
51
-
 52
52
-
 53
53
-
 54
54
-
 55
55
-
 56
56
-
 57
57
-
 58
58
-
 59
59
-
 60
60
-
 61
61
-
 62
62
-
 63
63
-
 64
64
-
 65
65
-
 66
66
-
 67
67
-
 68
68
-
 69
69
-
 70
70
-
 71
71
-
 72
72
-
 73
73
-
 74
74
-
 75
75
-
 76
76
-
 77
77
-
 78
78
-
 79
79
-
 80
80
-
 81
81
-
 82
82
-
 83
83
-
 84
84
-
 85
85
-
 86
86
-
 87
87
-
 88
88
-
 89
89
-
 90
90
-
 91
91
-
 92
92
-
 93
93
-
 94
94
-
 95
95
-
 96
96
-
 97
97
-
 98
98
-
 99
99
-
 100
100
-
 101
101
-
 102
102
-
 103
103
-
 104
104
-
 105
105
-
 106
106
-
 107
107
-
 108
108
-
 109
109
-
 110
110
-
 111
111
-
 112
112
-
 113
113
-
 114
114
-
 115
115
-
 116
116
-
 117
117
-
 118
118
-
 119
119
-
 120
120
-
 121
121


MARUTI SUZUKI ZEN-VX Owner's manual
- Category
- Cars
- Type
- Owner's manual
- This manual is also suitable for
Ask a question and I''ll find the answer in the document
Finding information in a document is now easier with AI
Related papers


Other documents
-
Suzuki Baleno Owner's manual
-
Suzuki Wagon R Owner's manual
-
-
-
-
-
-
-
Simoniz 041-2263-4 Operating instructions
-