Page is loading ...

AcePro-CE89-1
4x1 HDMI QuadView Switcher
Quick Installation Guide
www.avlab.com.tw
Made in Taiwan
AP4-0099B

TABLE OF CONTENTS
INTRODUCTION ......................................................................................................... 1
FEATURES ................................................................................................................. 1
PACKAGE CONTENTS ............................................................................................... 1
SPECIFICATIONS ....................................................................................................... 2
PANEL DESCRIPTIONS .............................................................................................. 3
CONNECTION DIAGRAM ............................................................................................ 4
HARDWARE INSTALLATION ....................................................................................... 4
OPERATION APPROACH ............................................................................................ 5
WARRANTY ............................................................................................................... 9

-1-
INTRODUCTION
The AcePro-CE89-1 4x1 HDMI QuadView Switcher provides the most flexible and cost
effective solution in the market to route high definition video source from any of the
four HDMI sources to the remote display at the same time. Besides, this device
supports a variety of video layout (5 default modes) and seamless switching on one
view mode. This solution is well suited for use in digital signage, conference room
presentation systems or other similar settings or applications.
With up to FHD output resolution, users can display the resulted mixed video with
improved presentation quality. In the meantime, the unit can be controlled thru the IR
remote, software and push button control to provide the most flexible control way to
fit into any applications.
FEATURES
4 x HDMI inputs and 1 x HDMI output
Input resolution supports 480i/480p/576i/576p/720p/1080i/1080p
Output resolution supports 720p@60 & 1080p@60
Supports HDCP 1.4
Supports 5 Display Modes: One View Mode, Dual View Mode(left & right), Quad
View Mode, Quad View Cycled Mode, Quad View H mode
Supports seamless switching on one view mode
Supports audio extraction via stereo audio from selected HDMI input
Supports audio switch function
Supports cascading
Firmware upgradable for support of new features and technology enhancements.
Perfect as a video converter and a video switcher
Software control through micro-USB
Supports IR remote, software and push button control.
PACKAGE CONTENTS
1x 4x1 HDMI QuadView Switcher (AcePro-CE89-1)
1x DC 5V 2A
1x Installation software CD
1x User Manual
1x IR Remote control (15 keys)

-2-
SPECIFICATIONS
Model Name
AcePro-CE89-1
Technical
Role of usage
Multi-viewer/ video processor
HDCP compliance
HDCP 1.4
Video bandwidth
HDMI [6.75Gbps]
Output Video Support
720p60/ 1080p60
Input Video Support
480i/480p/576i/576p/720p/1080i/1080p
Video Format Support
DVI/HDMI
Audio support
Bypass
Control
IR remote, software and push button control
Embedded video mixer
Yes
Input TMDS signal
1.2 Volts [peak to peak]
ESD protection
Human body model ± 15kV [air-gap discharge] &
± 8kV [contact discharge]
Input
4x DVI/HDMI + 1x micro-USB
Output
1x HDMI + 1x 3.5mm phone jack
HDMI connector
Type A [19-pin female]
USB connector
Micro-USB
Role of usage
Multi-viewer/ video processor
HDCP compliance
HDCP 1.4
Mechanical
Housing
Metal enclosure
Dimensions
152 x 92 x 23mm [6" x 3.6" x 0.9"]
Weight
390g [13.7 oz]
Fixedness
Wall-mounting case
Power supply
5V 2A DC
Power consumption
5 Watt [max]
Operation temperature
0~40°C [32~104°F]
Storage temperature
-20~60°C [-4~140°F]
Relative humidity
20~90% RH [no condensation]

-3-
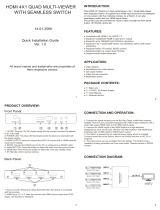
PANEL DESCRIPTIONS
1. Stereo output (3.5mm)
2. IR SENSOR: IR sensor for receiving the IR commands from IR remote
3. Dip Switch: [ON] Normal mode; [OFF] Firmware Update mode
4. Micro-USB: for software control or firmware update
5. Source Status LED: Input source detection LED (from the left to the right is
input 4, input 3, input 2, input 1)
6. One View mode: Switch source in one view (full screen) mode
7. Audio Switch: Switch stereo audio out from source 1-4 or mute
8. Quad View Cycled Mode: Switch source in quad view cycled mode
9. Default layout Modes: Switch 3 default layout modes (Dual View Mode(left & right),
Quad View Mode, Quad View H mode)
10. 1080p/ 720p: Switch output resolution in 1080p/ 720p
11.
SOURCE 1-4: HDMI inputs (from the left to the right is input 1, input 2, input 3,
input 4)
12. HDMI OUT: HDMI output
13. +5V DC: 5V DC power jack

-4-
CONNECTION DIAGRAM
HARDWARE INSTALLATION
AcePro-CE89-1 as master
1. Connect all sources to DVI/HDMI Inputs on the AcePro-CE89-1.
2. Connect all displays to DVI/HDMI Outputs on the AcePro-CE89-1.
3. Connect the +5V 2A DC power supply to the AcePro-CE89-1.

-5-
OPERATION APPROACH
Method A: IR Remote Control
Method B: Software Control through Micro-USB port
1.
System Requirement
(1) OS Information: MS Win XP/7/8/10
(2) Baud rates: 115200
(3) Software size: 3KB
(4) Minimum RAM requirement: 256 MB
2.
Control Interface
Before clicking on the icon of the software, make sure you have secured the connection
between your computer COM port and the AcePro-CE89-1.
When clicking on the software control program, the following window will pop-up (under
Microsoft Windows 7, please run as administrator.)
After you clicking the OK button, it will enter directly to the control interface (Please click
DISCONNECTED button to connect the software),
Button
Function
Button
Function
POWER
Power ON/OFF the
device
Dual view mode (left & right) 1
F1
Reserved
Quad view H mode
F2
Reserved
Dual view mode (left & right) 2
IN 1
Input 1 in one view
mode
INFO
Display layout/audio
information of device
IN 2
Input 2 in one view
mode
MUTE
audio
IN 3
Input 3 in one view
mode
Switch stereo audio from
source 1-4
IN 4
Input 4 in one view
mode
Switch source in quad-view
mode
Quad-view mode

-6-
1
Info
2
Refresh
3
COM Port Selection & Connection Status
4
Factory Reset
5
Video Switch Full Screen (One View Mode)
6
Video Switch Quad View Mode
7
Video Switch Dual View Mode
8
Audio Switch
9
Input Information
10
Output Resolution
11
System Update
(1) Info
Read the software version
1
5
6
7
8
9
11
4
3
2

-7-
(2) Refresh
This button can get all information of the device and update this software state.
(3) COM Port Selection & Connection Status
Please ensure you have secured the connection between your computer COM port and the
device. Select correct COM port and click the connection/disconnect button to connect
software.
(4) Factory Reset
The process of default reset will take about 10~15 seconds.
(5) Video Switch Full Screen (One View Mode)
Select input source in one view mode (full screen).
(6) Video Switch Quad View Mode
We provides 3 default quad view mode for user to select different layout modes.
(7) Video Switch Dual View Mode
It has 2 dual view layout modes for user to select.

-8-
(8) Audio Switch
To set up the audio source of the output (stereo and HDMI).
(9) Input Information
Show the input source resolution. You also can click button to refresh input
resolution information.
(10) Output Resolution
We provide 2 most common output resolution (1080p & 720p) for user select.
(11) System Update
Before you start to update, please make sure you have secured the connection between
your computer COM port and the device.
Please move the dip switch on F/W mode, and then power cycle the device.
Click button to do firmware update.
The firmware update window shows up as below.
Click button to load firmware file.
Click button to start firmware update process.
After updating, please move the dip switch on normal mode and power cycle
the device.

-9-
WARRANTY
The AceProAV warrants the AcePro-CE89-14x1 HDMI QuadView Switcher free
from defects in the material and workmanship for 1 year from the date of purchase
from the AceProAV or an authorized dealer. Should this product fail to be in good
working order within 1 year warranty period, The AceProAV, at its option, repair or
replace the unit, provided that the unit has not been subjected to accident, disaster,
abuse or any unauthorized modifications including static discharge and power surge.
This warranty is offered by the AceProAV for its BUYER with direct transaction only.
This warranty is void if the warranty seal on the metal housing is broken.
Unit that fails under conditions other than those covered will be repaired at the
current price of parts and labor in effect at the time of repair. Such repairs are
warranted for 90 days from the day of reshipment to the BUYER. If the unit is delivered
by mail, customers agree to insure the unit or assume the risk of loss or damage in
transit. Under no circumstances will a unit be accepted without a return authorization
number.
The warranty is in lieu of all other warranties expressed or implied, including
without limitations, any other implied warranty or fitness or merchantability for any
particular purpose, all of which are expressly disclaimed.
Proof of sale may be required in order to claim warranty. Customers outside
Taiwan are responsible for shipping charges to and from the AceProAV. Cables and
power adapters are limited to a 30 day warranty and must be free from any markings,
scratches, and neatly coiled.
The content of this manual has been carefully checked and is believed to be
accurate. However, The AceProAV assumes no responsibility for any inaccuracies that
may be contained in this manual. The AceProAV will NOT be liable for direct, indirect,
incidental, special, or consequential damages resulting from any defect or omission in
this manual, even if advised of the possibility of such damages. Also, the technical
information contained herein regarding the AcePro-CE89-1 features and
specifications is subject to change without further notice.

Apr, 2020 Ver.B
Copyright © by AceProAV, LLC. All rights reserved.
/