Page is loading ...

•
••
U)orld~s
",OSt
pop,,'ar
35mm
e"",er"

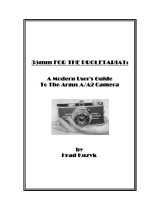
SHUTTER
of
gour
RANGEFINDER
WINDOW
SHUTTER
RElEASE
.....
;;;:::::::~
.n
SHUTTER
SPEED
DIAL
:
'f=
=:::::::::::;=~
LENS
BULB
AND
INSTANTANEOUS
SmlNG
Because Argus products are constantly being imJlroved, minor changes in
the
appearance
of
the
product
may
not
be includeil in this instruction book.

lie",
Argus
C-3
The Argus
C3
is the world'8 first choice
of
aU
35mm camera8.
Its
wonderful combination
of
advanced de8ign feature8
will provide you with a lifetime
of
picture-making plea8ure.
Thi8 little booklet will help you
to
become more familiar
with
the
C3 more quickly,
and
bring you fullest enjoyment
from its
U8e.
If
you plan
to
take
a
trip,
expose a practice roll
or
two
of
rum
80
tbat
you
may
beCome familiar with
the
operation
of
your new camera.
CONTENTS
Load
in
g.
. . . . . . . . . . .
..
4·6
How
to
hold
yo
ur
C3. . 7
COLOR
-
MAT
IC
se
ttin
gs . . . . . . . . . .
..
8-9
T he next pic
tur
e . . . . . . 10
S
hu
tte
r
sett
in
gs. . . . . . . 11
Le
ns
sett
ings . . . . . . . . . 12
Foc
us
in
g.
. . . . . . . . . . . . 13
De
pth
of Fie
ld
. . .
..
.
..
14
Unl
oadi
n
g.
. . . .
..
. . . . . 15
Fl
as
h Pi
ct
ur
es.
. . . . . . . 16
Flash
Tab
le . . . . . . . . . . . 17
In
terc
han
geab
le lenses. 18-19
Rem
oving
th
e lens. . . . . 20
Th
e Ar
gus
300
Proj
ec
tor . . . . . . . . . . . 21
Additi
ona
l f
ac
t
s.
. . . . . . 22
Specifi
ca
ti
on
s.
. . . . . . . . 23
Guara
nt
ee.
..
. .
..
....
• 24
Argus
Cameras
Ann
Arbor,
Michigan

your
Argus
C-3
Your
Argus
C3 takes
35mm
film
cartridges;
20
or
36
pictures
per load; color or black-and-white.
/
Op
en
th
e
ca
mera hy
de
pr
essing
th
e
catc
h
at
th
e e
nd
of
th
e
ca
me
ra.

Pullout
Rewind
Knob
on
tbe
bottom
of
the
camera,
and
insert
the
35mm
cartridge.
Tben
pusb
in Rewind
Knob
(it
may
be
n_ary
to
tum
it
slightly).
Thr
ea
d e
nd
of film
co
m-
pletely
th
ro
ugh
th
e slot on
th
e
Tak
e
-up
S
pi
n
dl
e.
Turn
Wind
Kn
o b a p p r
ox
i.
ma
tel
y
on
e-
ha
lf
tu
rn
until
film folds un
der
it
se
lf
a
nd
is sec
ur
e on sha
ft
.
Give Winding
Knob
a couple
of
turns
to
make
sure
film is secure
on
Take.up
Spindle.
Make
sure
sprockets engage boles
in
film.
If
sprockets
stop
turning,
reo
lease
Film
Catch.
(See
lUustra.
tion5.)Closecameraback,making
I!ure
the
back
cover lock slides
over
the
case
catch
and
securely
engages it. 5

Tum
Winding
Knob
as
far
as
it
will go
without
forcing.
Hold
down
FiJ~
Catch,
and
tum
Winding
Knob
about
a
quarter
of
a
turn.
Release
Film
Catch
and
wind as
far
as
knob
will
tum.
Repeat
this
opera-
tion
again in
order
to
take
up
proper
amount
of
film leader.
6
After· a
dv
ancing
th
e film as
e
xplain
ed
in
St
ep 5,
se
t
Co
unt
er
Dial
hy
turnin
g
it
co
unt
e
r-clo
ckwi
se
(
to
th
e left)
until
" 0 " is
opp
os
it
e
ind
ex
line.
Th
e
Count
er
Dial
indi-
ca
tes
th
e
numh
er
of
pi
ct
ur
es
taken.
Th
e c
am
e
ra
is now
re
ad
y for
th
e first
pi
c
tur
e.
The
Bulb
and
Instantane.
ous
Setting
must
he llet
at
"I"
when
using
shutter
speeds
on
the
Speed
Dial.

How
to
You
ma
y
hold
you
r C3
either
vertically
or
hori-
zontally.
To
"sec"
yo
ur
pi
c
tur
e,
look
through
the
Viewing
Window
-
it'
s
th
e
left
one.
Then
compose
the
sub
ject
ju
st
as
you
want
it.
Be s
ur
e
to
hold
th
e
camera
steady
at
the
mom
e
nt
the
picture
is
taken
,
and
s
qu
eeze
the
S
hutt
er
Rel
ease
smoo
thl
y- us
ing
th
e
trigg
er
s
qu
eeze ac
ti
on
.
Care
s
hould
be taken
th
at
the
finger does
not
interfere
with
the
up-s
trok
e
of
the
Cocking
Lever
when
th
e
Shutter
is release
d.
7

It's
a8
ea8Y
•
as
1-2-3
mith
COLOR-MATle
8etting8

There
are
only
three
quick
settings
needed
to
take
fine
pictures
with
your
Argus
C3.
LENS
OPENING
OR F -STOP
DISTANCE
SETTING
:
SHUTTER
SPEED
/
Your Argus C3 has
"COLOR-MATIC
set-
tings"
for
your
convenience in making quick
adjustments
for
all
average
scenes
in
brigbt
sunlight_
Each
of
these
three seuings is s
hown
in
co
l
ored
markings
on
the
camera
.
SET
ALL
THREE
DIALS
ON
YELLOW
(as shown at left) when using
Kodachrome color film.
SET
ALL
THREE
DIALS
ON
RED
when using Ektachrome or Ansco-
chrome color film and when using
Plus
X or Supreme black-and-
white film.
For
handy
reference
COLOR-MATIC
set-
tings are listed inside
the
cover
of
your
C3
carrying case.
Cock
shutter
by
push
i
ng
down
Shutter
Cocking
Lever
as
indicated
by
the
dotted
lines
in
the
illustration.
You
are
now
ready
to
take
your
picture.
9

10
After each
picture
is
taken,
make
it
a practice
to
wind
the
film immediately so
the
camera will be
ready
for
the
next
picture. Hold down
the
Film
Catch,
and
turn
Winding
Knob
about
a
quarter
of
a
turn.
Release
Film
Catch
and
continue
to
wind as
far as
Knob
will
turn
without
forcing.
Once
you've
wound
the
film,
the
Count~r
Dial
tells you
the
number
of
the
picture you
have
taken.
Be
sure
to
cock the Shutter
before
taking
the
next
picture.

The
Shutter
Speed
Dial
controls
the
length
of
time
the
Shutter
will
be
open
to
light.
To
adjust
the
Shutter,
turn
Shutter
Speed
Dial
counter-clockwise
(to
the
left)
until
desired
shutter
speed is opposite index
mal
·k.
The
extl·a tension when
setting
Speed
Dial
at
10 is a normal condition.
The
Bulb
and
Instantaneou
s
Setting
must
be
at
"I"
when
using s
hutter
speeds
on
the
Speed
Dial.
For
exposure longer
than
1/ 10 second,
turn
knurled
base
of
Shuttel· Release
clockwise U
turn
until
"B"
is opposite
white
dot.
When
set
at
"B",
pressure
on
the
Shutter
Release
opens
the
Shuttel·,
and
it
remains open
until
pressure is released.
When
thus
set,
the
camera
must
be
on
a
tripod
or
other
stea\ly
support.
u

Smallest opening is
pro-
vided
at
f:16.
Turnint
dial
clockwise
to
next
-
atop
number
0rens
lens
for twice as
muc
exposure
as
at
each
l.revious
setting
(exce'ht f: .5, which
adds
only
aU
~ain
as m.
uch
as
at
f:4). urBing dial
in
opposite
direction
cuts
exposure
in
balf
at
each
f-stop.
Settings
in
this
chart
are
for
average
subj_cts
at
.hutter
speed
shown.
Open
lens
one half
.top
more for
very darkly colored .ubjectl;
clOie
I
....
on.
half .top for very light
svbi.ct ••
12
The lens setting determines the size
of
the opening through
which
the light passes when the
shutter
is
open
. Adiustments
are
made
by
tuming the Aperture Dial to bring the correct f-stop
number opposite the I
ndex
mark. (in-between settings can also
be
used
I.
L~
~~
or
I-stop
OUTDOOR
EXPOSURE
GUIDE
SHUTTER
BRIGHT
HAZ
Y
CL
OUDY
CL
OU
DY
(F
O R
AV
E
RAG
E SUBJECTS) S
PEED
SU
N S
UN
BRIGHT DULL
Ekt
a
ch
rame Dayli
ght
100
f:8 f:5.6 f
:4
f:4,
shutter
Ans
cachrome D
ay
light
sp
ee
d
of
50
Ek
t
achrome
Type F* betw een between I f:3.
5,
sh
utter
Ans
cachrome Flash Type *
100
f:3.5
5
.6
& 8 4 &
5.
6 sp
ee
d
of
50
(*with
85C
·type filte
r)
Kod
ac
hrome Da y
li
ght
(or
indao
r ty
pe
with
SO
bet
wee
n
bet
wee
n f:3.5 f:3.5, shutt
er
carrection filt e
r)
5.
6 & 8 4 &
5.6
sp
ee
d
af
25
Sup
er
100
f:
16
f:
11
f:8 f:5.6
An
scochrame D
ay
light
Ko
dak
Tri·X
300
f:16 f:
11
f:8 f:5.6
Ans
co Ultra Sp
ee
d Pa n
Kodak
Plus·X
100
f:
16
f: 1 1 f:8 f:5.6
Ansco
Supreme
100
f:
11
f
:8
f:5.6 f:4
Kodak
Panatom
ic
·X
SO
f:
11
f:8 f:5.6 f:4

The
Argus C3 is e
quipp
ed with a
built-in
rangcfinder
which is
COli
pled to
th
e Lens.
To
fo
cus
th
e c
am
e
ra
, look
through
the
right-hand
eyep
iece on
the
back
of
th
e
camera
and
turn
the
knurl
ed
Rangefind
er
Dial
with yo
ur
fin
ger
until
you
see
only
on
e clear
ima
ge. (see illus
tration
at
right)
Th
e
bottom
half
of
th
e
"s
plit
image
" is yellow
to
help
you
see
the
line al
ong
which
you
r s
ubject
will
be
divid
ed when
th
e
camera
is
not
in
focus.
Note:
It
is
also possible to
"g
uess focus"
by
estimating the distance
and
setting this figure
on
the
knurled Ronge-
finder Dial
opposite
the
index
mark.
Subject
out
of
focus
13
Subject
correctly focused

14
Fo
r
eve
ry differe
nt
lens a
nd
focus
settin
g t
her
e
is a range of dist ance
within
which y
our
pic
tur
es
a
pp
ea
r
in
sha
rp
Cocus.
Th
e "de
pth
of
fi
eld" t able
ind
ic
at
es
th
at range
Fo
r exa
mp
le ' Wi
th
yo
ur
C3
f
oc
used on
15
fe
et
, a
nd
the
Lens set at
f:
8,
a
ll
s
ub
j
ec
ts be
tw
een 8'
8"
a
nd
56' 7"
wi
ll
a
pp
ear sha
rp
.
By refe
rrin
g to
th
e t able,
Yo
::l
ca
n rea
di
ly dete
rmin
e
th
e de
pth
of
fi
e
ld
for
an
y lens a
nd
f
oc
us
se
ttin«
o ·
DlSTANCf
f:3'.S f:4 f:S.6 f:8
f:
11
f:16
FOCUSED SHARPLY SHARPLY SHARPLY SHARPLY SHARPLY SHARPLY
FOCUSfD FOCUSfD
FOCUSfD
FOCUSED FOCUSED FOCUSED
ON
II FROM
ii
TO
FROM FROM
TO
TO
FROM
TO
FROM
TO
FROM
TO
3'
2'
10
" 3'2"
2'10
-
3'3
"
2'9
-
3'4
-
2'8
"
3'6
-
2'6
"
3'9
-2'4" 4'2"
3.5'
3'3
" 3'9-
3'3
-I
3'10
" 3'2-
3'11
-
3'
4'2" 2'
10
-
4'6
"
2'8
-5'3"
4'
3'8
-4'4"
3'8
" !
4'5
-
3'6
-
4'7
-3'4" 4'
11
-
3'2
" 5'5- 2'
11
-6'5-
5' I 4'6- 5'7"
4'6
"
5'8
-4'3"
6'
4'
6'7" 3'9"
7'5
-3'5"
9'7
"
6'
5'4
" , 6'
10
"
5'3
-7'
5'
7'6"
4'8
-8'5" 4'3-
10'
3'10
"
14'3
"
8'
6'10"
1
9'8
" 6'8-
9'11
" 6'3"
11'
5'9" 13' 1-
5'2
-
17
'2" 4'6-
35'10
-
10'
8'3
" 1
12'9
"
8'
13'3
"
7'5
-
15
'2-
6'9
-
19'6
-6'
30
'4" 5' 1-
ao
15'
11
'4"
22'1
"
11
'
23'9
-
9'11
-
30'11
-
8'8"
56'7
-7'5"
ao
6'1 -
ao
25
'
16'3
" 54'2"
15'6
-
65
' 13'5-
180'2
-
11
'2-
ao
9'3
-
ao
7'3
-
ao
50
'
24'
ao
22'4
-
ao
18'4
-
ao
14'5-
ao
11
'S-
ao
8'5
"
ao
100'
11
31
'8
" I
ao
I
28'9
-
ao
22'S
-
ao
16'10
-
ao
12'10
-
ao
9''2"
ao
ao
H
46'2
"
ao
40'4
"
ao
28'10
"
ao
20
'2-
ao
14'8"
ao
10'1
-
ao
Abov.
tabl.
based
on circl.
of
confusion .
002
"
11/500
-)
~all.ngth-SOmm
11.9685")
I

When
Winding
Knob
stops
turning
before
the
Counter
Dial
reaches
the
next
consecutive
number,
you
have
taken
all
the
pictures
on
th
e roll. Before
removing
fihn, first
rewind
the
film
with
Rewind
Knob
on
bottom
of
camera.
Continue
to
rewind
film
into
cartridge
until
Counter
Dial
s
tops
turning.
One
or
two
extra
full
turns
will
insure
complete
film
return
into
the
cartridge.
Then
open
back
of
camera,
as
in
loading,
and
remove
film
cartridge.
Notf!:
Color
films
should
be
processed
as
soon
as
possible
after
exposure.
Take
all
types
of
film
to
your
Argus
Dealer
for
developing
and
printing.

16
Unscrew
the
bottom
cap
of
the
flash
gun
and
in
se
rt
two
size
C
photofla
sh
bat-
teries.
Be
sure
the
batteries
are
fresh.
To
attach
flash
gun
to
your
C3,
simply
plug
it
into
the
side
of
the
camera.
Cau-
tion:
Do
not
have
a flash
bulb
in
the
gun
when
at-
taching
it
to
the
camera.
After
attaching
flash glln
to
your
C3,
in
se
rt
a flash
bulb,
pushing
it
in
as
far
as
it
will go.
Pressing
red
buttonattopofgunejects
bu
lbs
automatically.
It'
s
just
as
easy
to
take
flash
pictures
-
indoors,
at
night
,
or
undel
'
any
poor
light-
ing
conditions-as
it
is
to
tak
e
outdoor
pictures
in
bright
s
unlight.
On
the
opposite
page
you
wiII
find
complete
in
s
tructions
for
flash
exposure
settings.

"'a.6
Bxpo.ure
Guide
lor
Guid
e
number
s
are
given
in
the
table
below
for
comb
ination
s
of
popular
films
an
d fla s
hbulb
s.
By
di
v
iding
th
e a
ppropriate
guide
number
by
th
e
number
of
feet between yo
ur
cam
era
and
the
pic.
tu
re
s
ubje
ct,
you
obtain
the
correct
l
ens
opening.
EXAMPLE:
For
Ektachrom
e Type F
and
Sylvania
Bant
am 8 flas
hhulb
s,
th
e g
uid
e
numb
er
is 80.
With
a s
ubj
ect
at
10
feet,
divide
80
by
10
,
which
e
quals
8. Set
th
e
len
s
opening
at
f:8.
,
alld
Your C3 is
automatically
sync
hroniz
ed
for
Sylvania
bayonet.base
bulb
s
and
for
electronic
flash
with
"X"
delay.
Use
a s
hutter
speed
of
1/25
sec
ond
(
marked
in
green
on
the
s
hutter
speed
dial)
w
ith
AL
L
flas
hbulb
s.
With
elec
troni
c flash
unit
s,
any
s
hutt
er speed
be
tween
1/25
and
1/300
ma
y
be
used.
FILM
~
flASHBULB
~
• 82B-type filter required.
..
B 1 C-type filter required.
M2-type
flashbulbs
require a
special refledar. Guide
numbers
are supplied by
film
and bulb
manufadurers.
GUIDE
NUMBERS
FOR
ELECTRONIC
RASH
UNITS
ARE
FURNISHED
BY
THE
UNIT'S
MANUFACTURER.
Flashbulbs
occasionally
shatler. and
to
ovoid
passible
danger. a pro-
tective
shield
may be
used
over
the
face of
the
refledar.
NEVER
USE
FLASH
IN
AN
EXPLOSIVE
ATMOSPHERE

18
The
C3 Telephoto Lens is a
truly
candid lens.
It
cuts
distance in
half
so
that
you can
take
close-ups from
far away when your subjects are
natural
and
relaxed.
You'll find
it
ideal, too, for true-perspective
portraits,
wild-life close-ups.
The
Telephoto Lens is a color-corrected, four
element 100mm f:4.5 lens,
and
is easily installed.
It
couples automatically
to
rangefinder
and
has
smooth
helical focusing, a built-in sunshade
and
filter holder,
and
many
other
precision features.

These
three
pictures
were
made
with
the
C3
camera
at
the same
distance
fram
the subject
The
C3
Wide
Angle
Lens
gives
you
broader
and
taller
pictures-the
area
photographed
is
actually
87%
greater.
It's
ideal for
group
shots
and
sports
scenes,
indoors
or
out,
and
wherever
there
is
no
room
to
step
back
from
your
subject.
Features
include
a color-corrected
35mm
f:4.5 lens;
automatic
rangefinder coupling; click
stop
lens settings;
depth
of
field scale;
handy
slip-on viewfinder;
sunshade
and
filter
holder;
and
a
host
of
others.
19

20
Removing
tI,e
Lens
Th
e C
int
ar f :3
.5
Lens is re
movabl
e to pe
rmit
use of
th
e
C3
W
id
e Angle a
nd
Tele
photo
Lenses.
I
UNSCREW
CAP
FRO
M
THE
IDLER
GEAR
which co
upl
es
th
e
ran
gefi
nd
er
di
al to
th
e fo cus
in
g
lens mo
unt.
(
If
yo
ur
C3
is an
old
er
mod
el,
it
may
be necessary to
turn
th
e
ran
gefinder
dial
to 3 feet
to
un
screw
th
e large size cap.)
2
REMOVE
THE
IDLER
GE
AR
by
lif
t
ing
it
straig
ht
up.
3 GRAS
PI
NG
THE
LE
NS C
OLLAR
, UNSC
REW
T
HE
LENS
(co
un
tercloc
kwi
se)
FROM
THE
CAMERA F
RO
NT
PL
A
TE.
If
the
lens
ha
s
not
been removed for a
lon
g pe
riod
of
tim
e,
it
may
take a little e
xtra
effort to
un
sc
rew
it
.
Do
not
loosen or re
mo
ve
any
of
th
e asse
mbl
y scr
ews
in
th
e
lens
mo
u
nt.
Avo
id
any poss
ibl
e damage to s
hutter
after lens is
re
mo
ved.
To
avo
id
injur
y to
th
e
ran
gefinde
r,
never
turn
th
e
ra
ngefin
der
dial
into
th
e
ar
ea designated by
th
e
wo
rd
s RANGE FIN
DER
engraved
on
the dial.
R e
pl
aci
ng
tI
,e
Le
ns
I SC
REW
THE
CI
NT
AR
LE
NS IN
TO
THE
CAM.
ER
A,
turnin
g to
th
e
ri
g
ht
(clockwis
e)
past
th
e
resistance p
oi
nt
until
th
e lens is SEA
TED
FIR
ML Y. C
HE
CK that
th
e lens is seated firmly
by rota
tin
g the
fo
cusing mo
unt
a
nd
making ce
r·
tain
th
at
th
e
fo
cusing
mount
is
mo
ving
in
a
nd
out.
Be
ce
rt
a
in
th
e lens is
not
un
screwing
fr
om
th
e came
ra
bod
y.
2 TURN
THE
LE
NS
COLLAR
until
the
first ge
ar
tooth
on
the
left s
id
e of
the
row
of t
eet
h is
in
a
po
sition to engage the
idl
er gear.
3 S
ET
THE
R
ANG
EFI
NDER
DIAL
AT IN
FI
N
IT
Y,
THE
N
DROP
IN
THE
ID
L
ER
GEAR. Move
th
e
rangefinder dial
ba
ck a
nd
forth
a
nd
make c
ert
a
in
th
at
it
s
top
s exac
tly
at
infinit
y.
Thi
s is esse
nti
al
for
prop
er focus
in
g.
If
the dial does
not
s
top
at
infinit
y,
lift
th
e
idl
er gear
up
slig
htl
y
and
mo
ve
the rangefinder
di
al to
th
e
prop
er
po
s
ition
, tak·
in
g c
ar
e
not
to
mov
e
th
e lens
mount
.
4 SC
REW
ON
THE
IDLER
G
EAR
CAP.
(If
y
our
C3
is an
old
er
mod
el,
mo
ve the rangefinder
dial
to
th
e 3·fo
ot
ma
rk
to do
thi
s.)
/